Introduction
When it comes to managing your business finances, QuickBooks is a trusted and efficient solution. In addition to its robust accounting features, QuickBooks also allows you to easily create and send invoices to your clients. One of the most convenient ways to send invoices is through email, saving you time and hassle.
In this article, we will guide you through the step-by-step process of emailing invoices directly from QuickBooks. Whether you are a small business owner or a freelancer, this feature will streamline your invoicing process and help you maintain a professional image.
Sending invoices via email has numerous benefits. It not only saves paper and postage costs but also ensures that your clients receive the invoices in a timely manner. With QuickBooks, you can customize the email message, attach supporting documents, and track the delivery status of each invoice.
Now, let’s dive into the details of how to email invoices from QuickBooks, so you can start streamlining your invoicing process and improve your cash flow.
Step 1: Set up your email preferences in QuickBooks
Before you can start emailing invoices from QuickBooks, you need to set up your email preferences within the software. This step is crucial to ensure that your invoices are delivered smoothly and that the email message appears professional.
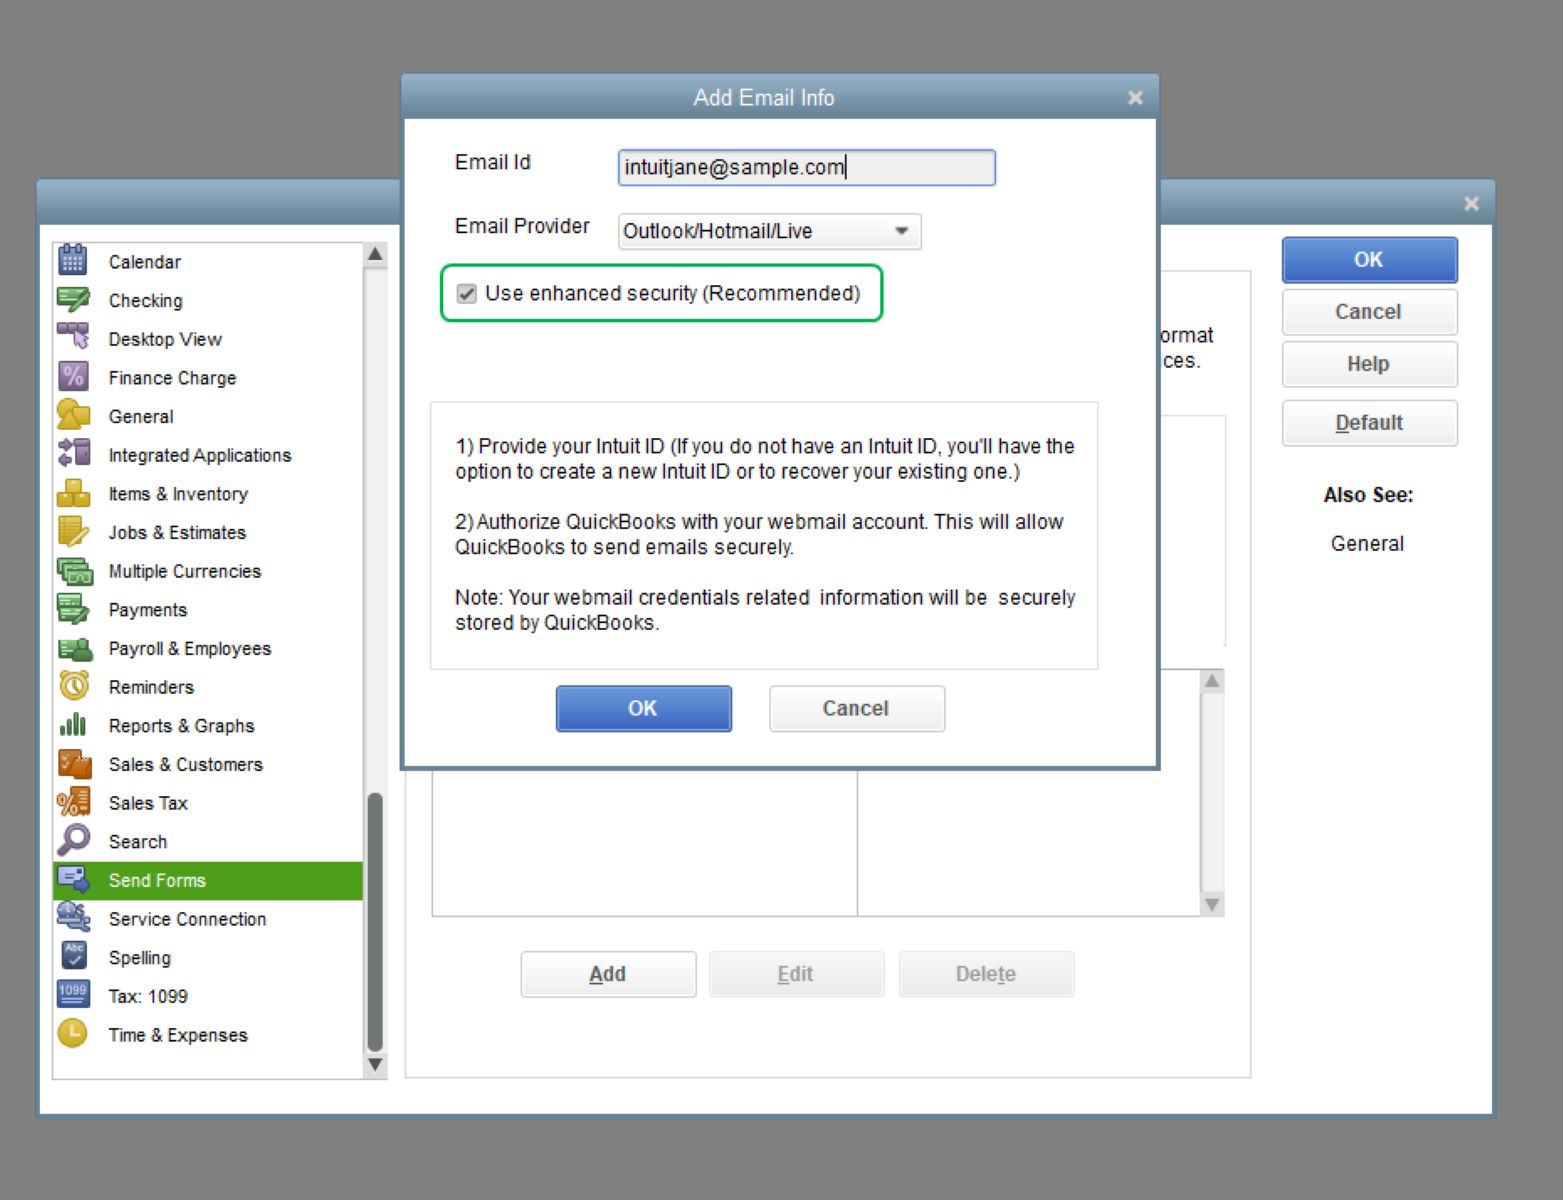
To begin, open QuickBooks and navigate to the “Edit” menu. From there, select “Preferences” and choose “Send Forms” from the left-hand menu. This will open the email settings window.
First, you’ll need to enter your email address in the designated field. Make sure to use an email address that you actively monitor, as this is where you’ll receive any replies or notifications related to the invoices you send.
Next, select your email provider from the dropdown menu. QuickBooks supports a wide range of providers, including Gmail, Outlook, Yahoo, and more. If your provider is not listed, you can select “Other SMTP” and input the required server and port information manually.
Once you’ve selected your email provider, QuickBooks will attempt to automatically fill in the SMTP settings. If this is successful, you can proceed to the next step. If not, you may need to consult with your email provider to obtain the correct SMTP settings to enter manually.
After entering the SMTP settings, you have the option to enable SSL/TLS encryption for added security. This is recommended, especially if your email provider supports it.
Finally, you can customize the default email message that will be sent with each invoice. QuickBooks provides a default template, but you can modify it according to your preferences. Make sure to include any important details or instructions for your clients.
Once you’ve made all the necessary adjustments, click “OK” to save your email preferences. You’re now ready to create and send invoices via email directly from QuickBooks.
Step 2: Create an invoice in QuickBooks
Now that you’ve set up your email preferences in QuickBooks, it’s time to create your invoice. QuickBooks offers a user-friendly interface that allows you to quickly and accurately generate professional invoices.
To start, open QuickBooks and navigate to the “Customers” menu. From there, select “Create Invoices” to open a new invoice window.
In the invoice window, you’ll need to input the relevant information for your invoice. This includes the customer’s name, billing address, and contact details. If you’ve already added the customer to your QuickBooks database, you can simply select their name from the drop-down menu.
Next, specify the invoice date and due date to ensure timely payment. Additionally, you can assign a unique invoice number for easy reference and tracking.
Once you’ve filled in the customer and invoice details, it’s time to add the products or services you’re invoicing for. QuickBooks allows you to enter each item individually, including the description, quantity, rate, and any applicable tax or discount.
If you frequently invoice the same products or services, you can create item templates in QuickBooks for faster and more consistent invoicing. This is especially useful if you have a large inventory or offer a variety of services.
After you’ve added all the invoice items, QuickBooks will automatically calculate the subtotal, tax, discount, and total amount due. Double-check these figures to ensure accuracy before proceeding.
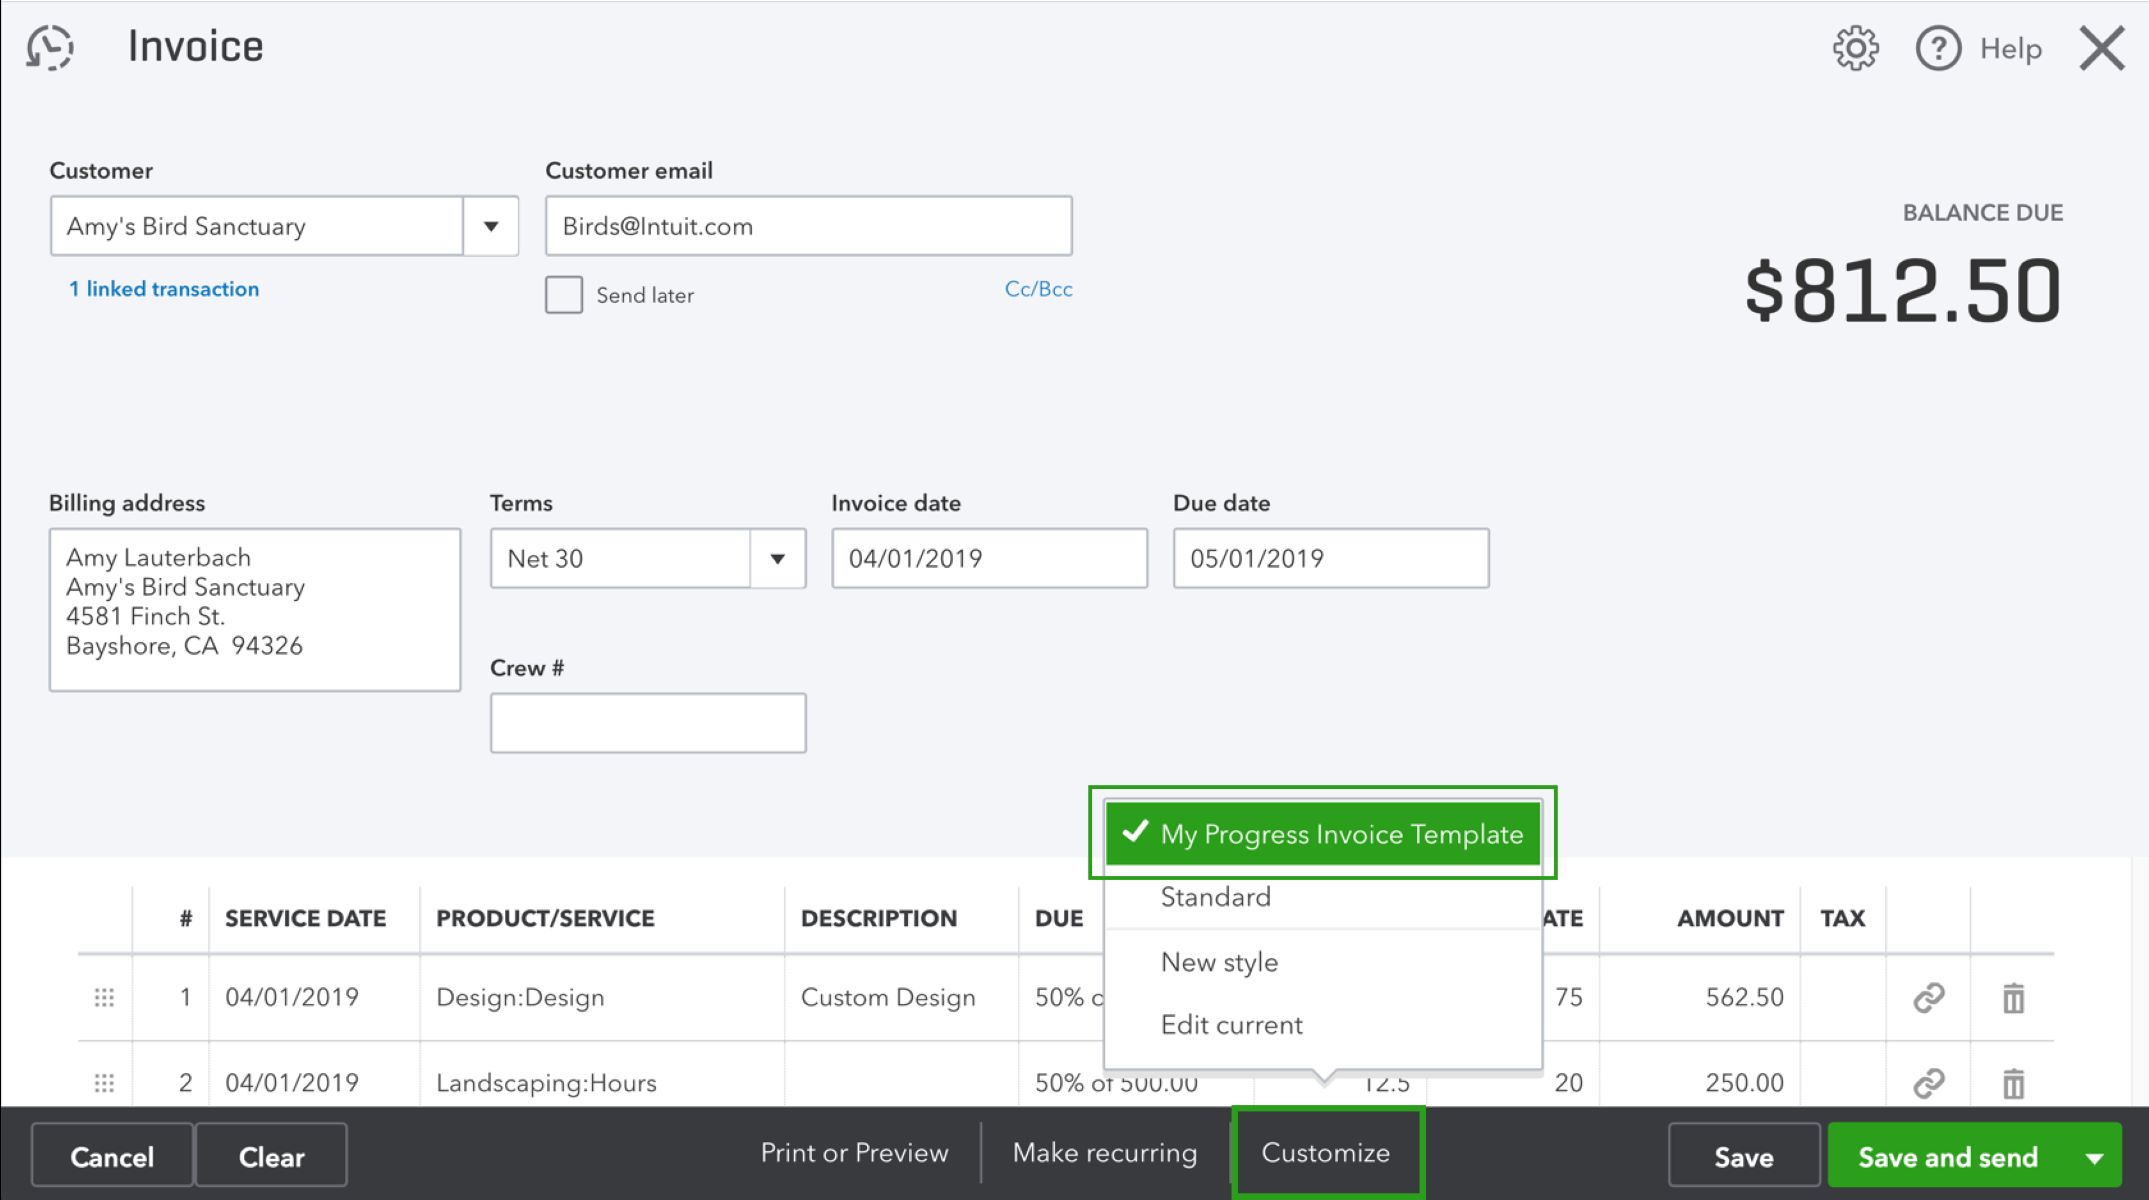
In addition to the standard invoice details, QuickBooks also offers customization options. You can apply a brand logo or choose from various templates to reflect your business’s visual identity. This enhances professionalism and brand consistency when sending invoices to your clients.
Once you’re satisfied with the invoice details and customization, click “Save and Close” to save the invoice in the system. The invoice is now ready to be emailed to your client.
Step 3: Email the invoice from QuickBooks
Now that you’ve created your invoice in QuickBooks, you can easily send it to your client via email. QuickBooks streamlines the process by allowing you to send the invoice directly from the software.
To email the invoice, open the invoice you want to send and click on the “Email” button located at the top of the invoice window. This will open the email composition window within QuickBooks.
QuickBooks automatically fills in the recipient’s email address based on the customer information you entered earlier. You also have the option to add additional email addresses or CC recipients if needed.
Next, you can review the email subject line, which should include relevant information such as the invoice number and customer name. The subject line can be customized if desired, but QuickBooks provides a default template as well.
Beneath the subject line, you’ll find a prepopulated email message. QuickBooks includes the invoice details and any customizations you made to the invoice email template. You can customize this message further to include any additional information or instructions for your client.
If you have any supporting documents to include with the invoice, such as receipts or project details, you can attach them to the email by clicking on the “Attach File” button.
Once you’ve reviewed and customized the email message, click “Send”. QuickBooks will use your configured email settings to send the invoice directly to your client’s email inbox.
It’s important to note that QuickBooks also provides an option to save a copy of the sent email for your records. This can be helpful in case you need to refer back to it or track the communication history with your client.
With just a few clicks, you have successfully emailed the invoice to your client, saving time and ensuring the timely delivery of your invoice.
Step 4: Customize the invoice email message
When sending invoices from QuickBooks, you have the option to personalize the email message that accompanies the invoice. Customizing the email message allows you to add a personal touch, provide additional information, and strengthen your professional relationship with your clients.
To customize the invoice email message in QuickBooks, follow these simple steps:
- Open QuickBooks and navigate to the “Edit” menu. From there, select “Preferences” and choose “Send Forms” from the left-hand menu. This will open the email settings window.
- Within the email settings window, click on the “Company Preferences” tab. Here, you’ll find the option to customize the default message that appears in the email body of your invoices.
- Edit the default message to reflect your branding, add a personalized greeting, or include any specific instructions for your clients. You can also use formatting options to enhance the readability and visual appeal of the email message.
- Make sure to include important information, such as payment terms, due dates, and contact details in case your clients have any questions or concerns regarding the invoice.
- Additionally, you can create multiple email templates in QuickBooks and choose the applicable template for each individual invoice. This allows you to tailor the message based on the type of service, client preferences, or any other specific requirements.
- Once you’ve made the desired changes to the email message, click “OK” to save your preferences.
By customizing the invoice email message, you can establish a professional and consistent communication approach with your clients. Tailoring the message to their needs and providing clear instructions can also help improve the payment process and reduce any potential confusion or delays.
Remember to review the email message before sending each invoice to ensure it accurately reflects the specific details of that invoice. This will help strengthen your brand image, build trust with your clients, and set clear expectations regarding payment and any other relevant information.
Step 5: Verify that the email was sent successfully
After sending an invoice via email from QuickBooks, it’s essential to verify that the email was successfully delivered to your client. This step ensures that your clients receive the invoices in a timely manner, allowing for prompt payment and reducing any potential misunderstandings.
To verify that the email was sent successfully, follow these steps:
- Check your Outbox or Sent folder in your email client or provider. Look for the email containing the invoice you sent from QuickBooks.
- Verify that the email was sent to the correct recipient’s email address. Double-check for any typos or errors in the email address.
- If your email provider offers read receipts or delivery notifications, check if you have received any confirmation of delivery or read receipts for the sent email.
- Reach out to your client directly and inquire if they have received the email. This can be done through a simple follow-up message or a phone call to ensure they have received the invoice.
- In QuickBooks, navigate to the customer’s profile for whom you sent the invoice. In the customer’s transaction history, look for the invoice and check if it shows a “sent” status or any relevant delivery information.
By following these steps, you can easily verify the successful delivery of the invoice and promptly address any issues that may arise in the delivery process.
In case the email was not delivered successfully or your client did not receive it, there are a few troubleshooting steps you can take:
- Check your email settings in QuickBooks to ensure they are correctly configured. Make sure the SMTP settings, email address, and preferences are accurate.
- Verify that the recipient’s email address is entered correctly. Double-check for any typos or errors.
- If there are any attachments with the email, ensure they are not too large for your email provider’s size limits.
- Consider reaching out to your email provider’s support team for assistance if you encounter any issues or error messages.
By verifying the successful delivery of your invoices, you can maintain clear communication with your clients and ensure a smooth payment process. Promptly addressing any delivery issues will help you maintain a professional reputation and strengthen your client relationships.
Conclusion
Invoicing is a crucial part of running a successful business, and QuickBooks provides a convenient solution for creating, customizing, and sending invoices to your clients. With the ability to email invoices directly from QuickBooks, you can streamline your invoicing process, save time, and ensure timely payments.
In this article, we have walked you through the step-by-step process of emailing invoices from QuickBooks. We started by setting up your email preferences within QuickBooks, ensuring that your email delivery is seamless and professional. We then moved on to creating invoices in QuickBooks, allowing you to input all the necessary details for accurate billing.
Next, we discussed how to effortlessly email invoices from QuickBooks, taking advantage of the software’s integrated email functionality. We highlighted the importance of customizing the email message to add a personal touch and provide additional instructions or information to your clients.
Finally, we emphasized the significance of verifying that the invoices were sent successfully. This step ensures that your clients receive the invoices and can make timely payments. We provided troubleshooting tips in case any delivery issues arise.
By following these steps, you can streamline your invoicing process, improve cash flow, and maintain strong relationships with your clients. QuickBooks simplifies the entire invoicing workflow, allowing you to focus more on growing your business.
Remember, effective communication and professionalism are key when sending invoices to your clients. Customize your email messages, provide clear instructions, and promptly address any issues that may arise.
Now that you have a clear understanding of how to email invoices from QuickBooks, you can take advantage of this feature and enjoy the benefits of a more efficient and organized invoicing process.