Introduction
Welcome to QuickBooks Online, where managing your sales forms is made simple and efficient. With QuickBooks Online, you have the flexibility to customize your sales forms as per your business needs. One key customization option is the ability to display the Product/Service column on sales forms. By showing this column, you can easily track and itemize the products or services being sold, providing a clear breakdown for your customers and improving your business’s record-keeping capabilities.
In this article, we will explore different methods to navigate within QuickBooks Online to show the Product/Service column on your sales forms. Whether you prefer to access it from the Sales Tab, the Gear Icon, the Custom Form Styles, or the Products and Services List, we’ve got you covered. By following these step-by-step instructions, you’ll be able to effortlessly configure your sales forms to include this important column.
Let’s jump right into the various methods and explore how to show the Product/Service column on your sales forms in QuickBooks Online.
Method 1: From the Sales Tab
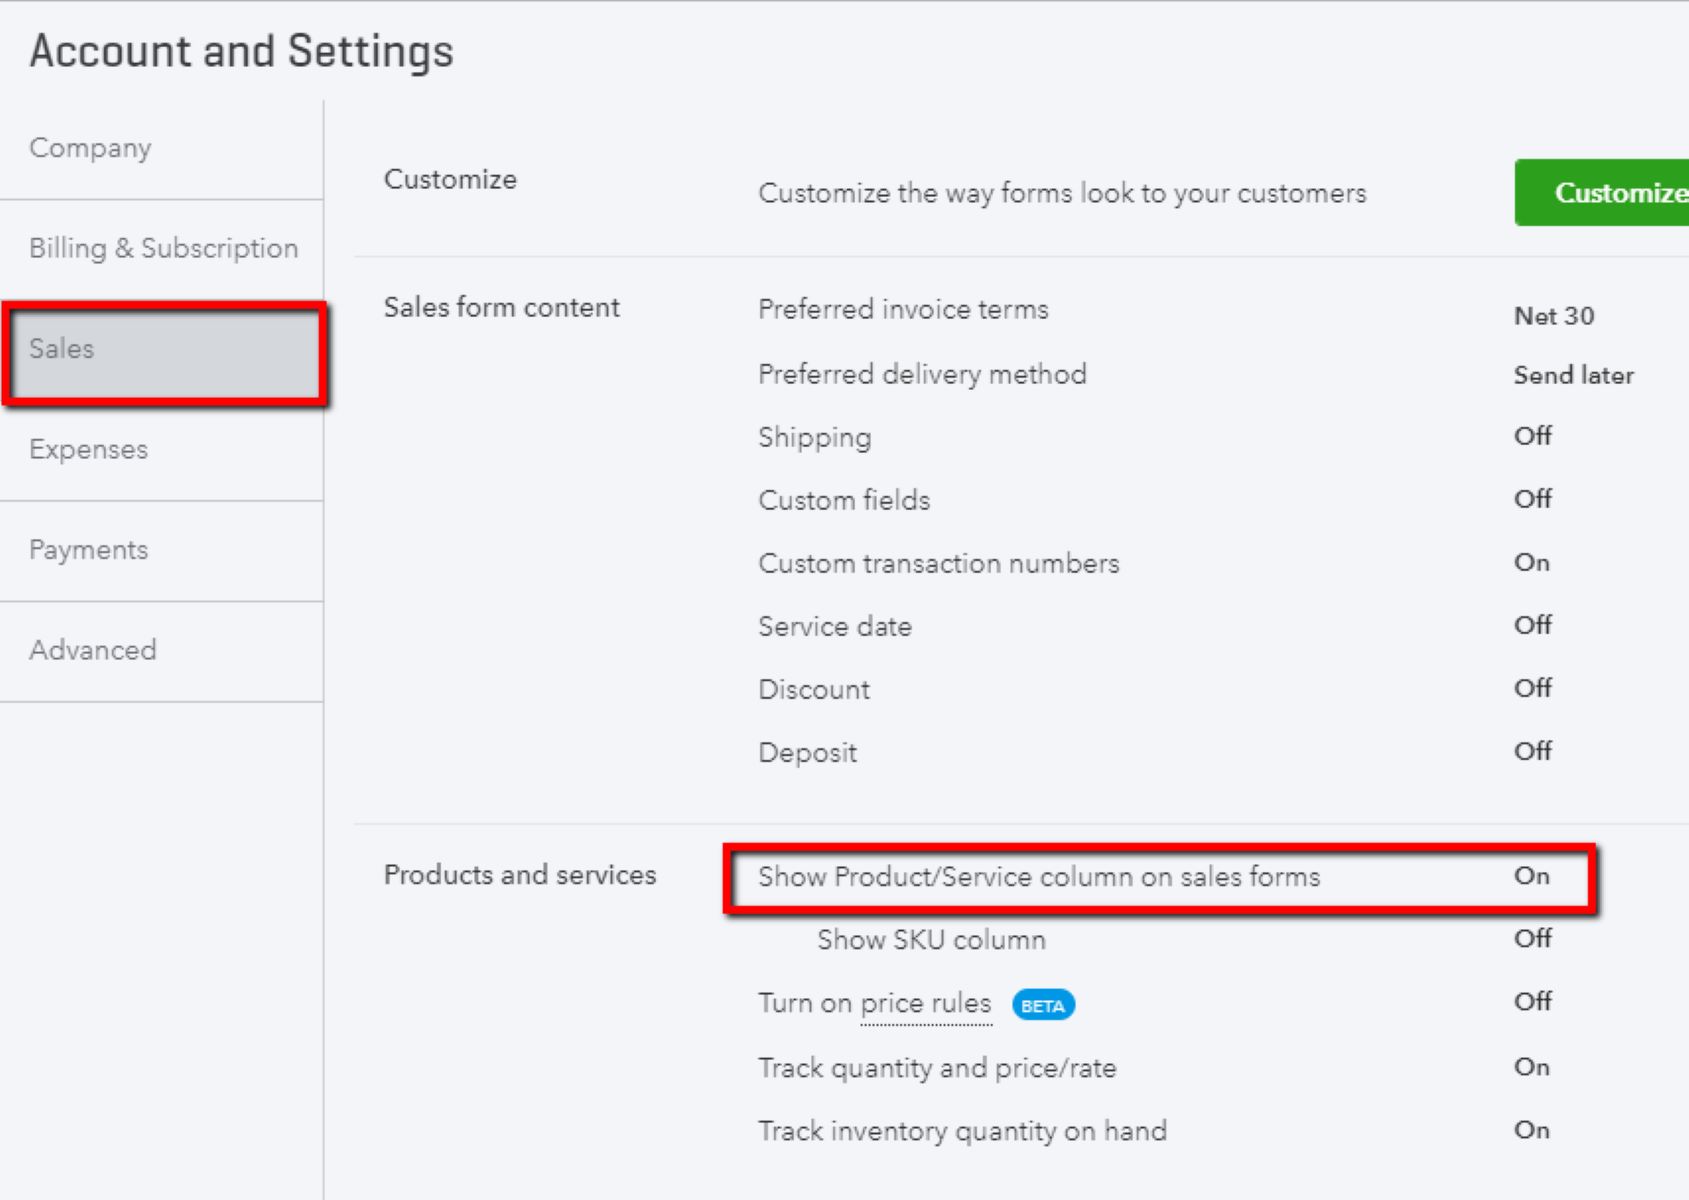
The Sales Tab in QuickBooks Online is a central hub for managing your sales transactions. Here’s how you can access the Product/Service column setting from this tab:
- From the QuickBooks Online Dashboard, click on the “Sales” tab located on the left-hand side of the screen.
- In the Sales tab, navigate to the “All Sales” tab and click on it to open.
- Look for the “Customize” button located at the top-right corner of the page and click on it.
- A dropdown menu will appear. Select “Customize look and feel”.
- In the Customize look and feel window, click on the “Content” tab.
- Scroll down to the “Columns” section and locate the “Product/Service” option.
- Toggle the switch to enable the display of the Product/Service column on your sales forms.
- Once you have made the desired changes, click on the “Done” button to save your settings.
Now, when you create or view sales forms such as invoices or sales receipts, the Product/Service column will be visible, allowing you to easily specify the products or services being billed to your customers.
That’s how you can show the Product/Service column on your sales forms through the Sales Tab in QuickBooks Online.
Method 2: From the Gear Icon
Another way to access the setting to show the Product/Service column on your sales forms is through the Gear Icon in QuickBooks Online. Here’s how you can do it:
- From the QuickBooks Online Dashboard, locate and click on the Gear Icon, typically found in the top-right corner of the screen.
- From the dropdown menu, select “Customize look and feel”.
- In the Customize look and feel window, click on the “Content” tab.
- Scroll down to the “Columns” section and find the “Product/Service” option.
- Switch the toggle to enable the display of the Product/Service column on your sales forms.
- Remember to click on the “Done” button to save your settings.
Once you’ve completed these steps, the Product/Service column will be readily visible when you create or view your sales forms, providing you with a convenient way to detail the products or services being sold.
This method allows you to access the setting easily from the Gear Icon, providing a straightforward alternative to showing the Product/Service column on your sales forms in QuickBooks Online.
Method 3: From the Custom Form Styles
If you prefer to access the setting to show the Product/Service column on your sales forms through the Custom Form Styles in QuickBooks Online, follow these steps:
- Start by clicking on the Gear Icon located in the top-right corner of the QuickBooks Online Dashboard.
- From the dropdown menu, select “Custom Form Styles”.
- Select the form style that you want to customize.
- Click on the “Edit” button for that particular form style.
- In the customization window, look for the “Content” tab.
- Scroll down until you find the “Columns” section and locate the “Product/Service” option.
- Toggle the switch to enable the display of the Product/Service column on your sales forms.
- Once you’re satisfied with your changes, click on the “Done” button to save your settings.
By following these steps, you will ensure that the Product/Service column is visible on your sales forms when using the selected custom form style. This allows you to present a professional and organized appearance to your customers while entering detailed information about the products or services sold.
The Custom Form Styles option provides a convenient way to access the setting to show the Product/Service column and customize your sales forms in QuickBooks Online according to your desired style.
Method 4: From the Products and Services List
If you prefer a slightly different approach, you can access the setting to show the Product/Service column on your sales forms directly from the Products and Services List in QuickBooks Online. Here’s how:
- From the QuickBooks Online Dashboard, click on the “Sales” tab located on the left-hand side of the screen.
- Select “Products and Services” from the dropdown menu.
- Find and click on the specific product or service you want to edit.
- In the product or service details window, look for the “Sales information” section.
- From here, toggle the switch to enable the display of the Product/Service column on your sales forms specifically for that particular item.
- Ensure you click on the “Save” button to save your changes before exiting the window.
With this method, you have the flexibility to choose whether the Product/Service column is displayed on your sales forms for specific items. This allows you to have more control over how your sales forms are organized and presented to your customers.
By accessing the setting directly from the Products and Services List, you can customize the display of the Product/Service column for individual items, tailoring your sales forms to suit your unique business needs.
Conclusion
Configuring the display of the Product/Service column on your sales forms in QuickBooks Online is essential for accurate and detailed record-keeping. By following the methods outlined in this article, you can easily enable this feature and enhance the clarity of your sales forms.
Whether you prefer accessing the setting from the Sales Tab, the Gear Icon, the Custom Form Styles, or the Products and Services List, QuickBooks Online offers convenience and flexibility to meet your specific business requirements.
Remember to save your settings after making changes to ensure that the Product/Service column is visible on your sales forms. This will provide you with a clear breakdown of the products or services sold and improve the overall professionalism of your invoices, sales receipts, and other sales forms.
Take the time to explore each method and discover the one that suits your workflow and preferences best. You can always revisit these settings to make adjustments as needed.
By utilizing the options available in QuickBooks Online to show the Product/Service column on your sales forms, you will streamline your invoicing process, enhance customer transparency, and maintain accurate records of your sales transactions.
So, get started today and enjoy the benefits of displaying the Product/Service column on your sales forms in QuickBooks Online!