Introduction
Welcome to the world of Quickbooks 2016, an efficient and user-friendly accounting software that can revolutionize the way you manage your business finances. Whether you’re a small business owner, a freelancer, or a bookkeeper, Quickbooks 2016 provides you with the tools and functionalities you need to streamline your financial operations.
In this comprehensive guide, we will walk you through the process of using Quickbooks 2016 effectively. From setting up your company and navigating the software interface to managing customers, vendors, and bank accounts, we’ll cover all the essential features and tasks. Additionally, we’ll delve into more advanced topics like generating financial reports, managing payroll, and customizing Quickbooks to suit your specific business needs.
With Quickbooks 2016, you can easily automate repetitive tasks, track your income and expenses, and gain valuable insights into the financial health of your business. By harnessing the power of this software, you’ll be able to increase your productivity, save time, and make more informed financial decisions.
Throughout this guide, we’ll provide step-by-step instructions, tips, and best practices to help you make the most of Quickbooks 2016. Whether you’re a seasoned Quickbooks user or a beginner, we’re confident that this guide will empower you to take full advantage of the software’s capabilities.
So, let’s dive in and unleash the power of Quickbooks 2016 to simplify your accounting tasks and take your business to new heights of success!
Getting Started with Quickbooks 2016
Before you begin using Quickbooks 2016, it’s important to familiarize yourself with the basics. In this section, we’ll guide you through the initial setup process and help you get up and running in no time.
The first step is to install Quickbooks 2016 on your computer. You can either download it from the official Quickbooks website or install it from a CD-ROM. Once the installation is complete, you’ll need to follow the prompts to set up your company file. This involves entering your business information, such as company name, address, and industry.
After setting up your company file, you’ll be greeted with the Quickbooks home screen. Here, you’ll find a variety of tasks and options to manage your financial data. Take some time to explore the different sections of the interface, including the main menu, toolbar, and navigation pane, to familiarize yourself with the layout.
One of the key features of Quickbooks 2016 is its ability to connect with bank and credit card accounts. This allows you to automatically import transactions and reconcile your accounts with ease. To set up bank feeds, navigate to the Banking menu and select “Set Up Bank Feeds.” Follow the instructions to link your accounts and configure the necessary settings.
Another important step is to set up your chart of accounts. This is where you categorize your income, expenses, assets, and liabilities. Quickbooks provides a default list of accounts, but you can customize it to fit your specific needs. To access the chart of accounts, go to the Lists menu and select “Chart of Accounts.”
Lastly, it’s crucial to create backups of your Quickbooks data to protect against data loss. Regularly backing up your files ensures that you can easily restore your data in case of computer crashes or other unforeseen events. Quickbooks offers a built-in backup feature, enabling you to schedule automatic backups or create manual backups whenever needed.
Now that you have a solid understanding of the initial setup process, you’re ready to dive deeper into the functionality and features of Quickbooks 2016. In the following sections, we’ll explore various aspects of the software and guide you through hands-on tasks to help you master its capabilities and maximize your efficiency.
Setting Up Your Company
Setting up your company in Quickbooks 2016 is a crucial step to ensure accurate financial tracking and reporting. In this section, we’ll walk you through the process of customizing your company settings and configuring important details to align with your business requirements.
To get started, navigate to the “Company” menu and select “Company Information.” Here, you can enter essential details such as your company name, address, phone number, and email address. Take the time to review and update this information as needed to reflect your current business identity.
Next, you’ll want to set your fiscal year and reporting period. This helps Quickbooks organize your financial data and generate accurate reports. To do this, go to the “Company” menu and select “Set Up Your Fiscal Year.” Follow the prompts to input the start date of your fiscal year and choose the reporting period that aligns with your business practices.
One of the key elements in Quickbooks is your chart of accounts. This is where you track your income, expenses, assets, and liabilities. By default, Quickbooks provides a pre-set chart of accounts, but you have the option to customize it to fit your unique needs. To access the chart of accounts, go to the “Lists” menu and select “Chart of Accounts.” Here, you can edit existing accounts, add new ones, or categorize them to match your business structure.
Additionally, you may want to set up classes or locations to further organize your financial data. This is particularly useful if you operate multiple segments or branches within your business. To set up classes or locations, go to the “Lists” menu and select “Class List” or “Location List.” From here, you can create and manage your classes or locations as needed.
Furthermore, Quickbooks 2016 allows you to customize your invoices and sales forms to reflect your branding. You can add your company logo, select a preferred template, and modify the design elements to create a professional and cohesive look. To customize your sales forms, go to the “Lists” menu and select “Templates.” Choose the form you want to modify and click the “Edit” button.
Lastly, consider setting up user access and permissions. If you have multiple employees or team members who need access to your Quickbooks data, you can create user accounts with specific roles and restrictions. This ensures that each user has appropriate access levels and maintains data integrity. To set up user access, go to the “Company” menu and select “Set Up Users and Passwords.” Follow the prompts to add new users, assign roles, and set passwords.
By following these steps to set up your company in Quickbooks 2016, you’ll have a solid foundation to efficiently manage your financial data and streamline your day-to-day operations.
Navigating Quickbooks Interface
When using Quickbooks 2016, it’s essential to familiarize yourself with the software’s interface to navigate efficiently and access all the features and tools. In this section, we’ll guide you through the different elements of the Quickbooks interface, helping you become a pro at finding your way around the software.
The Quickbooks interface consists of various components that make it easy to access the different features and functionalities. At the top of the screen, you’ll find the menu bar, which contains the primary menus such as File, Edit, View, Lists, and so on. These menus house the majority of Quickbooks’ features, allowing you to manage your financial tasks effectively.
Beneath the menu bar, you’ll see the toolbar, which provides quick access to commonly used tasks and functions. The toolbar contains icons for tasks such as creating invoices, recording payments, running reports, and more. By utilizing the toolbar, you can perform essential functions with just a single click, reducing the time spent navigating through various menus.
Located on the left side of the screen, the navigation pane allows you to access different sections of Quickbooks. It provides shortcuts to essential modules like Customers, Vendors, Employees, Banking, and Reports. By clicking on these shortcuts, you can quickly navigate to specific areas of Quickbooks to manage various aspects of your business finances.
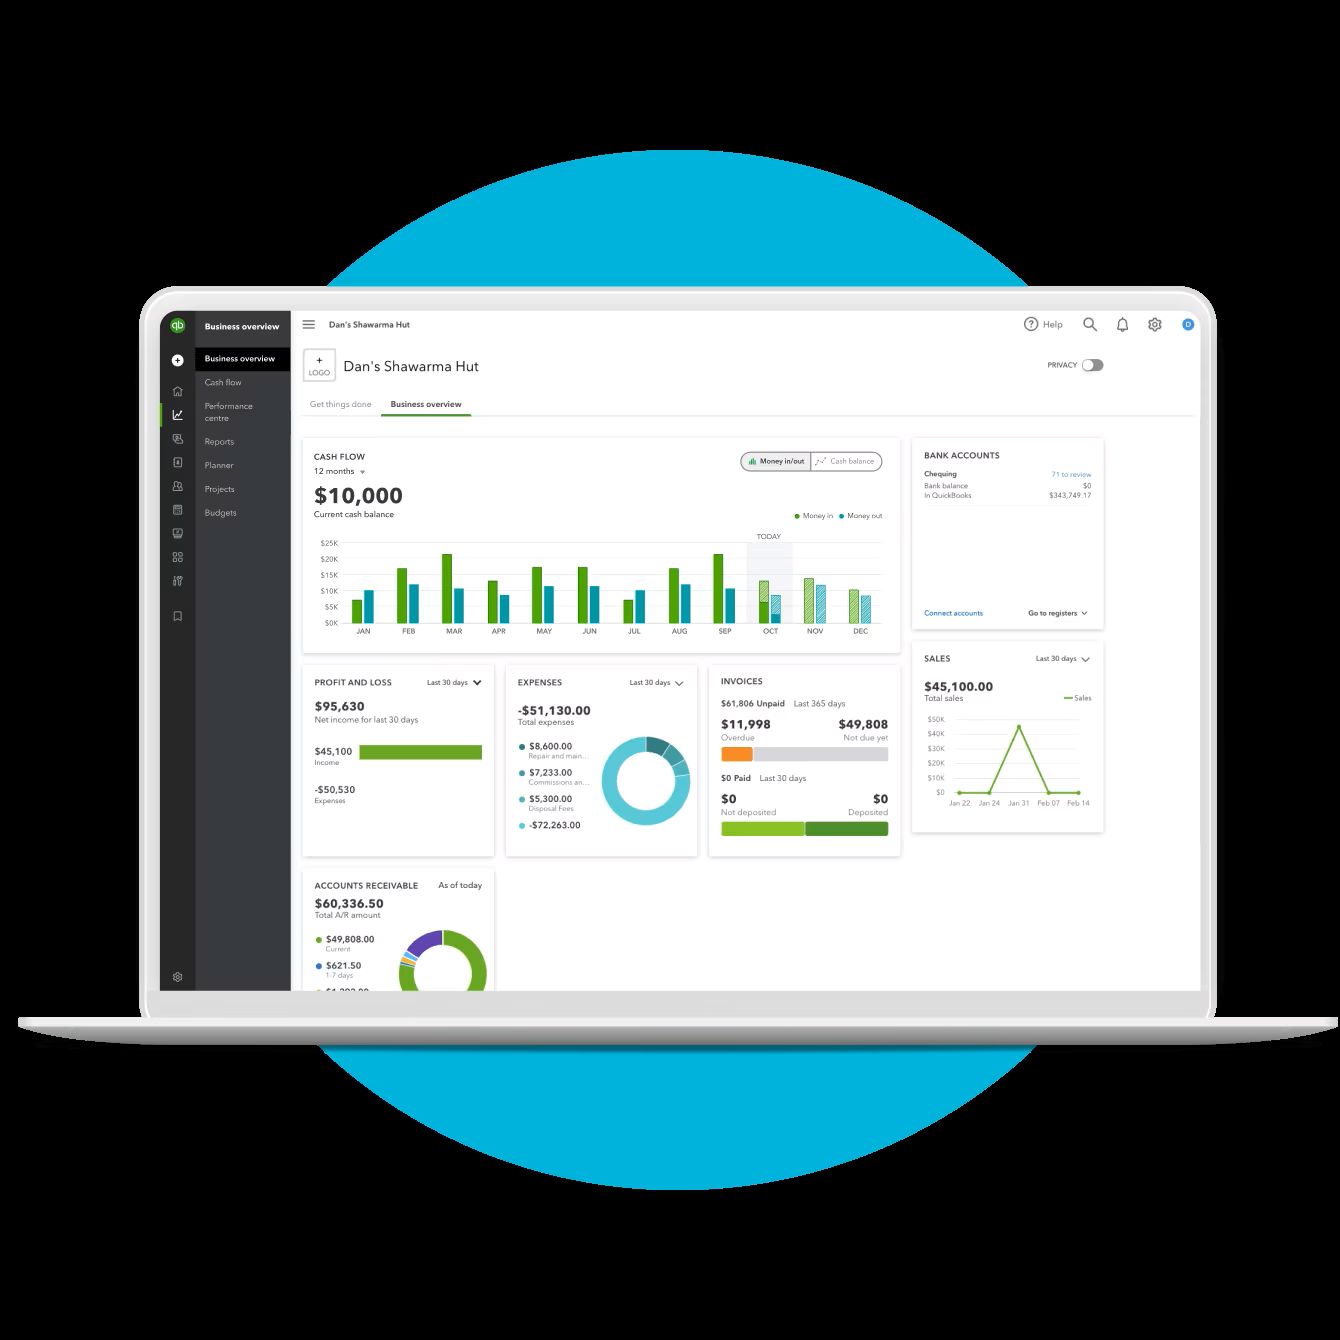
One notable feature of Quickbooks 2016 is the Home screen. It serves as a hub for important tasks and activities, displaying a customized snapshot of your company’s financial status. From this screen, you can view account balances, recent transactions, and access frequently used features. The Home screen also provides shortcuts to create invoices, record expenses, track sales, and more.
Additionally, Quickbooks 2016 offers a robust search feature to help you locate specific transactions, records, or reports quickly. The search bar is typically located at the top-right corner of the screen. You can search using keywords, transaction numbers, or other criteria, enabling you to find the information you need without scrolling through long lists or menus.
Finally, you can further customize the Quickbooks interface to suit your preferences. For example, you can rearrange the icons on the toolbar, hide or show specific sections in the navigation pane, and customize the columns displayed in the different lists and reports. By tailoring the interface to your liking, you can enhance your overall user experience and optimize your workflow.
By becoming familiar with the various components of the Quickbooks interface, you’ll be able to navigate the software with ease and efficiency. This will help you save time, access critical information quickly, and accomplish your financial tasks with confidence.
Managing Customers and Sales
In Quickbooks 2016, efficiently managing your customers and sales is vital to the success of your business. This section will guide you through the process of setting up customer profiles, creating invoices, and tracking sales to ensure seamless management of your customer relationships and revenue.
One of the first steps in managing customers is to create customer profiles in Quickbooks. To do this, navigate to the Customers menu and select Customer Center. From here, you can add new customers by clicking on the “New Customer & Job” button. Enter the relevant customer information, such as name, contact details, and payment terms. You can also assign a customer type or category to better track and segment your customers.
Once your customer profiles are set up, you can easily create invoices to bill your customers for products or services. To create an invoice, go to the Customers menu and select Create Invoices. Choose the appropriate customer, select the billing address, and add the products or services being provided. Quickbooks 2016 allows you to customize the invoice appearance and layout to match your branding or business preferences.
Tracking your sales is essential for monitoring your revenue and understanding the financial health of your business. Quickbooks provides various tools to help you stay on top of your sales activities. For instance, the Sales Center allows you to view a snapshot of your sales, including open invoices, overdue payments, and sales orders. It also provides quick access to essential sales-related tasks.
In addition to creating invoices, Quickbooks 2016 enables you to manage estimates and sales orders. Estimates allow you to provide customers with detailed proposals or quotes for potential work. Sales orders, on the other hand, are used when customers place orders that are not immediately invoiced. By utilizing these features, you can streamline your sales processes and ensure accurate record-keeping.
Tracking customer payments is crucial to maintaining your financial records and cash flow. Quickbooks allows you to record payments received from customers and easily apply them to outstanding invoices. You can also schedule recurring payments for customers with regular billing cycles. The software will automatically generate and send invoices to your customers at the specified intervals.
To improve customer relationships and ensure timely follow-ups, Quickbooks 2016 provides a built-in customer relationship management (CRM) feature. You can set reminders to reach out to specific customers, track interactions, and add notes about important conversations or events. This helps you stay organized and provides a holistic view of your customer interactions.
By effectively managing your customers and sales in Quickbooks 2016, you can streamline your revenue generation processes, enhance customer satisfaction, and maintain a clear picture of your business financials.
Managing Vendors and Expenses
In Quickbooks 2016, managing vendors and expenses is crucial for maintaining accurate financial records and effectively tracking your business expenses. This section will guide you through the process of setting up vendor profiles, recording expenses, and staying on top of your payables.
The first step is to set up vendor profiles in Quickbooks. To do this, navigate to the Vendors menu and select Vendor Center. From here, you can add new vendors by clicking on the “New Vendor” button. Enter the necessary vendor details, such as name, contact information, and payment terms. You can also assign a vendor type or category to better organize and analyze your vendor data.
Once your vendor profiles are set up, you can easily record expenses incurred for products or services received. To record an expense, go to the Vendors menu and select Enter Bills. Choose the appropriate vendor, select the expense date, and enter the details of the expense, such as the amount, description, and accounts to be debited. Quickbooks 2016 allows you to attach receipts or supporting documents to maintain a complete record of your expenses.
To ensure accurate bookkeeping, it’s important to categorize your expenses correctly. Quickbooks provides a pre-defined chart of accounts for common expense categories, such as utilities, office supplies, and travel expenses. However, you can customize these categories to suit your business needs. By accurately categorizing your expenses, you’ll have a clear understanding of your expenditure and can easily generate expense reports for analysis.
Managing payables is an essential aspect of vendor management. Quickbooks allows you to easily track and pay your bills through the Accounts Payable feature. When you enter bills, Quickbooks automatically records them as payables. When it’s time to pay your vendors, you can use the Pay Bills feature to select the bills you want to pay and choose your preferred payment method. The software also provides the option to print checks directly or utilize online payment methods.
To streamline your vendor interactions and ensure timely follow-ups, Quickbooks 2016 offers a CRM feature specifically designed for managing vendor relationships. You can set reminders to review contracts or agreements, track vendor communications, and add notes about important discussions. This helps you stay organized and maintain strong vendor relationships.
In addition to managing individual vendors, Quickbooks 2016 provides a handy feature called the Quickbooks Vendor Center that allows you to view a snapshot of your vendor-related activities and information. From the Vendor Center, you can access key vendor reports, view vendor balances, and quickly navigate to specific vendor profiles. This central hub simplifies the management of your vendors and related transactions.
By effectively managing vendors and expenses in Quickbooks 2016, you can streamline your financial operations, track your business expenses accurately, and maintain strong relationships with your vendors.
Managing Bank and Credit Card Accounts
In Quickbooks 2016, effectively managing your bank and credit card accounts is essential for maintaining accurate financial records and reconciling your transactions. This section will guide you through the process of setting up bank and credit card accounts, importing transactions, and reconciling your accounts with ease.
The first step is to set up your bank accounts in Quickbooks. To do this, navigate to the Banking menu and select Chart of Accounts. Click on the “New” button to add a new account. Choose the appropriate account type, such as checking, savings, or money market. Then, enter the necessary details, including the account name, account number, and initial balance. Repeat this process for each bank account you want to add.
Once your bank accounts are set up, you can easily import your banking transactions into Quickbooks. Most banks offer the option to download your transaction history in a compatible format, such as CSV or QBO. To import transactions, select the appropriate bank account from the Chart of Accounts, navigate to the Banking menu, and select “Import Bank Statement.” Follow the prompts to locate and import the downloaded file.
Importing your bank transactions allows Quickbooks to automatically match them with existing records or create new ones. This saves you time and reduces manual data entry. Quickbooks will categorize the transactions based on your chart of accounts, making it easier to track and analyze your income and expenses.
When reconciling your bank and credit card accounts, Quickbooks provides a user-friendly process to ensure your records match your bank statements. To reconcile an account, go to the Banking menu and select Reconcile. Choose the account you want to reconcile and enter the statement date and ending balance from your bank statement. Quickbooks will display a list of transactions, allowing you to mark them as cleared by comparing them to your bank statement.
As you reconcile your accounts, Quickbooks will automatically update your bank balances and identify any discrepancies. If you come across a transaction that requires further investigation, you have the option to make adjustments or add missing transactions directly within the reconciliation window.
Quickbooks 2016 also offers the ability to connect your bank and credit card accounts directly to the software using Bank Feeds. This allows you to automatically import transactions and save time on manual data entry. To set up Bank Feeds, navigate to the Banking menu and select “Set Up Bank Feeds.” Follow the prompts to link your accounts and configure the necessary settings.
By effectively managing your bank and credit card accounts in Quickbooks 2016, you can streamline your financial tracking, save time on manual data entry, and ensure that your records accurately reflect your financial transactions.
Creating Invoices and Sales Receipts
In Quickbooks 2016, creating professional invoices and sales receipts is crucial for billing your customers and recording your sales accurately. This section will guide you through the process of generating invoices and sales receipts, enabling you to streamline your billing process and maintain a clear record of your sales transactions.
To create an invoice in Quickbooks 2016, navigate to the Customers menu and select “Create Invoices.” Choose the customer you want to bill from the drop-down menu. Quickbooks will automatically populate the customer’s information, such as billing and shipping addresses, based on their profile. Next, you can select the products or services provided to the customer by either typing in the item details or selecting them from your item list.
When creating an invoice, you have the option to customize the appearance and layout to reflect your brand. Quickbooks provides pre-designed templates that you can choose from, or you can create a customized template to match your business’s unique style. You can add your logo, modify the colors, and rearrange the fields to create a professional-looking invoice.
Additionally, Quickbooks 2016 allows you to track the status of your invoices closely. You can assign due dates, set payment terms, and add notes or terms and conditions for your customers. This helps you manage your outstanding invoices, track payments, and send reminders to customers with unpaid invoices.
In some cases, you may not require detailed invoices and prefer to provide a sales receipt to your customers instead. Sales receipts are typically used for immediate payments or when goods or services are delivered at the time of the transaction. To create a sales receipt, navigate to the Customers menu and select “Enter Sales Receipts.” Choose the customer and enter the details of the transaction, such as payment method and items sold.
Both invoices and sales receipts automatically update your sales revenue and can be used to generate essential reports, such as sales by customer or product, to gain insights into your business performance. Properly tracking your sales transactions through invoices and sales receipts allows you to have a complete record of your revenue, making it easier to analyze your sales performance and identify trends or areas for improvement.
In Quickbooks 2016, you also have the option to email invoices or sales receipts directly to your customers. This not only saves time and money on postage but also provides a convenient and professional way to deliver your billing documents. Quickbooks enables you to customize the email templates to include personalized messages and attach additional documents or receipts if needed.
By effectively leveraging Quickbooks to create invoices and sales receipts, you can streamline your billing process, accurately track your sales transactions, and maintain professional communication with your customers.
Recording Payments and Deposits
In Quickbooks 2016, recording payments and deposits is crucial for accurately tracking your income and maintaining up-to-date financial records. This section will guide you through the process of recording customer payments and deposits, ensuring that your books reflect your actual cash flow.
When a customer pays an invoice or provides a payment for goods or services, it’s important to record that transaction in Quickbooks. To record customer payments, go to the Customers menu and select “Receive Payments.” Choose the customer that made the payment and select the corresponding invoice(s) for which payment is being made. Enter the payment amount, payment method, and any additional details as needed.
If a customer pays for an invoice in full, you can simply enter the payment amount in the “Amount Received” field. If a customer makes a partial payment or provides multiple payments towards an invoice, you can specify how much is being applied to each individual invoice. Quickbooks can also automatically calculate and apply any discounts or credits based on your predefined invoice settings.
When recording customer payments, Quickbooks provides various payment methods to choose from, such as cash, check, credit card, or electronic funds transfer (EFT). You can input the necessary details for each payment method to ensure accurate record-keeping.
In addition to customer payments, it’s important to record any deposits made into your bank accounts. Deposits can include revenue from sales, loan proceeds, or any other influx of funds. To record a deposit, go to the Banking menu and select “Make Deposits.” Choose the appropriate bank account for the deposit and enter the details of the deposit, including the source and amount of the funds.
When recording a deposit, Quickbooks allows you to link the deposit to specific customer payments, sales receipts, or invoices. This ensures that your bank records and your books align, enabling you to accurately track your income and reconcile your accounts.
Quickbooks 2016 provides a handy feature called Undeposited Funds. This feature allows you to temporarily hold customer payments or deposits until you’re ready to group them into a single deposit. This is particularly useful if you receive multiple payments or make multiple deposits throughout the day. Once you’re ready to record the deposit, you can select the payments or deposits from the Undeposited Funds account and create a single deposit entry.
Recording payments and deposits in Quickbooks 2016 not only helps you keep your financial records organized and accurate but also provides the foundation for generating reports and gaining insights into your business’s cash flow and profitability. By ensuring that all payments and deposits are properly recorded, you can maintain a clear picture of your financial transactions and make informed business decisions.
Reconciling Bank Accounts
In Quickbooks 2016, reconciling your bank accounts is a critical task to ensure the accuracy of your financial records and maintain a clear picture of your actual cash position. This section will guide you through the process of reconciling your bank accounts in Quickbooks, enabling you to match your records with your bank statements and identify any discrepancies.
The first step in reconciling your bank accounts is to gather your bank statements for the period you wish to reconcile. Ensure that you have the most recent statement available, as this will provide the most accurate information to compare with your Quickbooks records.
To start the reconciliation process, go to the Banking menu and select “Reconcile.” Choose the bank account you want to reconcile from the drop-down menu. Enter the statement date and ending balance as shown on your bank statement.
Quickbooks will display a list of transactions that have been recorded in your Quickbooks bank account register. Your goal is to compare these transactions with the transactions listed on your bank statement, ensuring that they match each other. To do this, tick off the transactions in Quickbooks that appear on your bank statement as cleared or reconciled.
As you reconcile your transactions, Quickbooks will automatically update your bank balance and calculate the difference between your Quickbooks records and your bank statement. This difference is known as the “Reconciliation Discrepancy.” If the discrepancy is zero, congratulations! Your bank account is fully reconciled. If there is a discrepancy, you will need to investigate and resolve it.
If you come across a transaction in Quickbooks that does not appear on your bank statement or vice versa, you will need to reconcile the discrepancy. This can occur due to timing differences, transactions recorded in the wrong account, or missing entries. Analyze the discrepancy and make any necessary adjustments or corrections in Quickbooks.
It’s important to note that reconciliation discrepancies are not uncommon, and they can often be resolved with careful review and investigation. Quickbooks allows you to make adjustments directly within the reconciliation window, helping you maintain accurate records while resolving any discrepancies.
Once all discrepancies have been addressed and resolved, and your Quickbooks balance matches your bank statement balance, you can complete the reconciliation process. Quickbooks will prompt you to review your reconciliation details before finalizing and saving the reconciliation.
Regularly reconciling your bank accounts in Quickbooks 2016 ensures that your financial records are accurate and reliable. It also helps you identify any potential errors or discrepancies early on, allowing you to take corrective actions promptly. By keeping your bank accounts reconciled, you can have confidence in the accuracy of your financial data and make informed business decisions.
Generating Financial Reports
In Quickbooks 2016, generating financial reports is a powerful tool that allows you to gain insights into the financial health of your business. This section will guide you through the process of generating financial reports in Quickbooks, enabling you to analyze your income, expenses, cash flow, and other key financial metrics.
Quickbooks 2016 provides a wide range of standard financial reports that cover various aspects of your business’s financial performance. To generate a report, go to the Reports menu and select the desired report category. You can choose from reports such as Profit and Loss, Balance Sheet, Cash Flow, Accounts Receivable Aging, and many others.
When selecting a report, consider the specific information you need and the time period you want to analyze. Quickbooks allows you to customize the report parameters, such as date range, categories, and filters, to focus on the precise data you require. You can also save customized reports for future use.
Once you’ve selected your report and customized the parameters, Quickbooks will generate the report and present it on your screen. You can view the report directly, print it, or export it to a PDF or Excel file for further analysis or sharing with others.
Quickbooks 2016 provides various insights through the generated financial reports. For example:
- The Profit and Loss statement provides a summary of your income, expenses, and net profit or loss for a specified period. It helps you understand the overall financial performance of your business.
- The Balance Sheet gives you a snapshot of your business’s financial position, showing your assets, liabilities, and equity at a specific point in time. It helps you assess your business’s solvency and financial stability.
- The Cash Flow report helps you track the inflow and outflow of cash in your business. It provides insights into your cash position, operating activities, investing activities, and financing activities.
- The Accounts Receivable Aging report helps you monitor outstanding customer invoices and identify past due payments. It enables you to manage your accounts receivable effectively and take appropriate steps for collections.
In addition to standard reports, Quickbooks 2016 allows you to create custom reports to fit your specific reporting needs. The Custom Reports feature provides flexibility in terms of report structure, filters, and columns. You can design reports that focus on specific segments of your business or analyze unique data points specific to your industry or requirements.
By utilizing the financial reporting capabilities of Quickbooks 2016, you can gain valuable insights into your business’s financial performance, identify trends, track key metrics, and make informed decisions to drive your business forward.
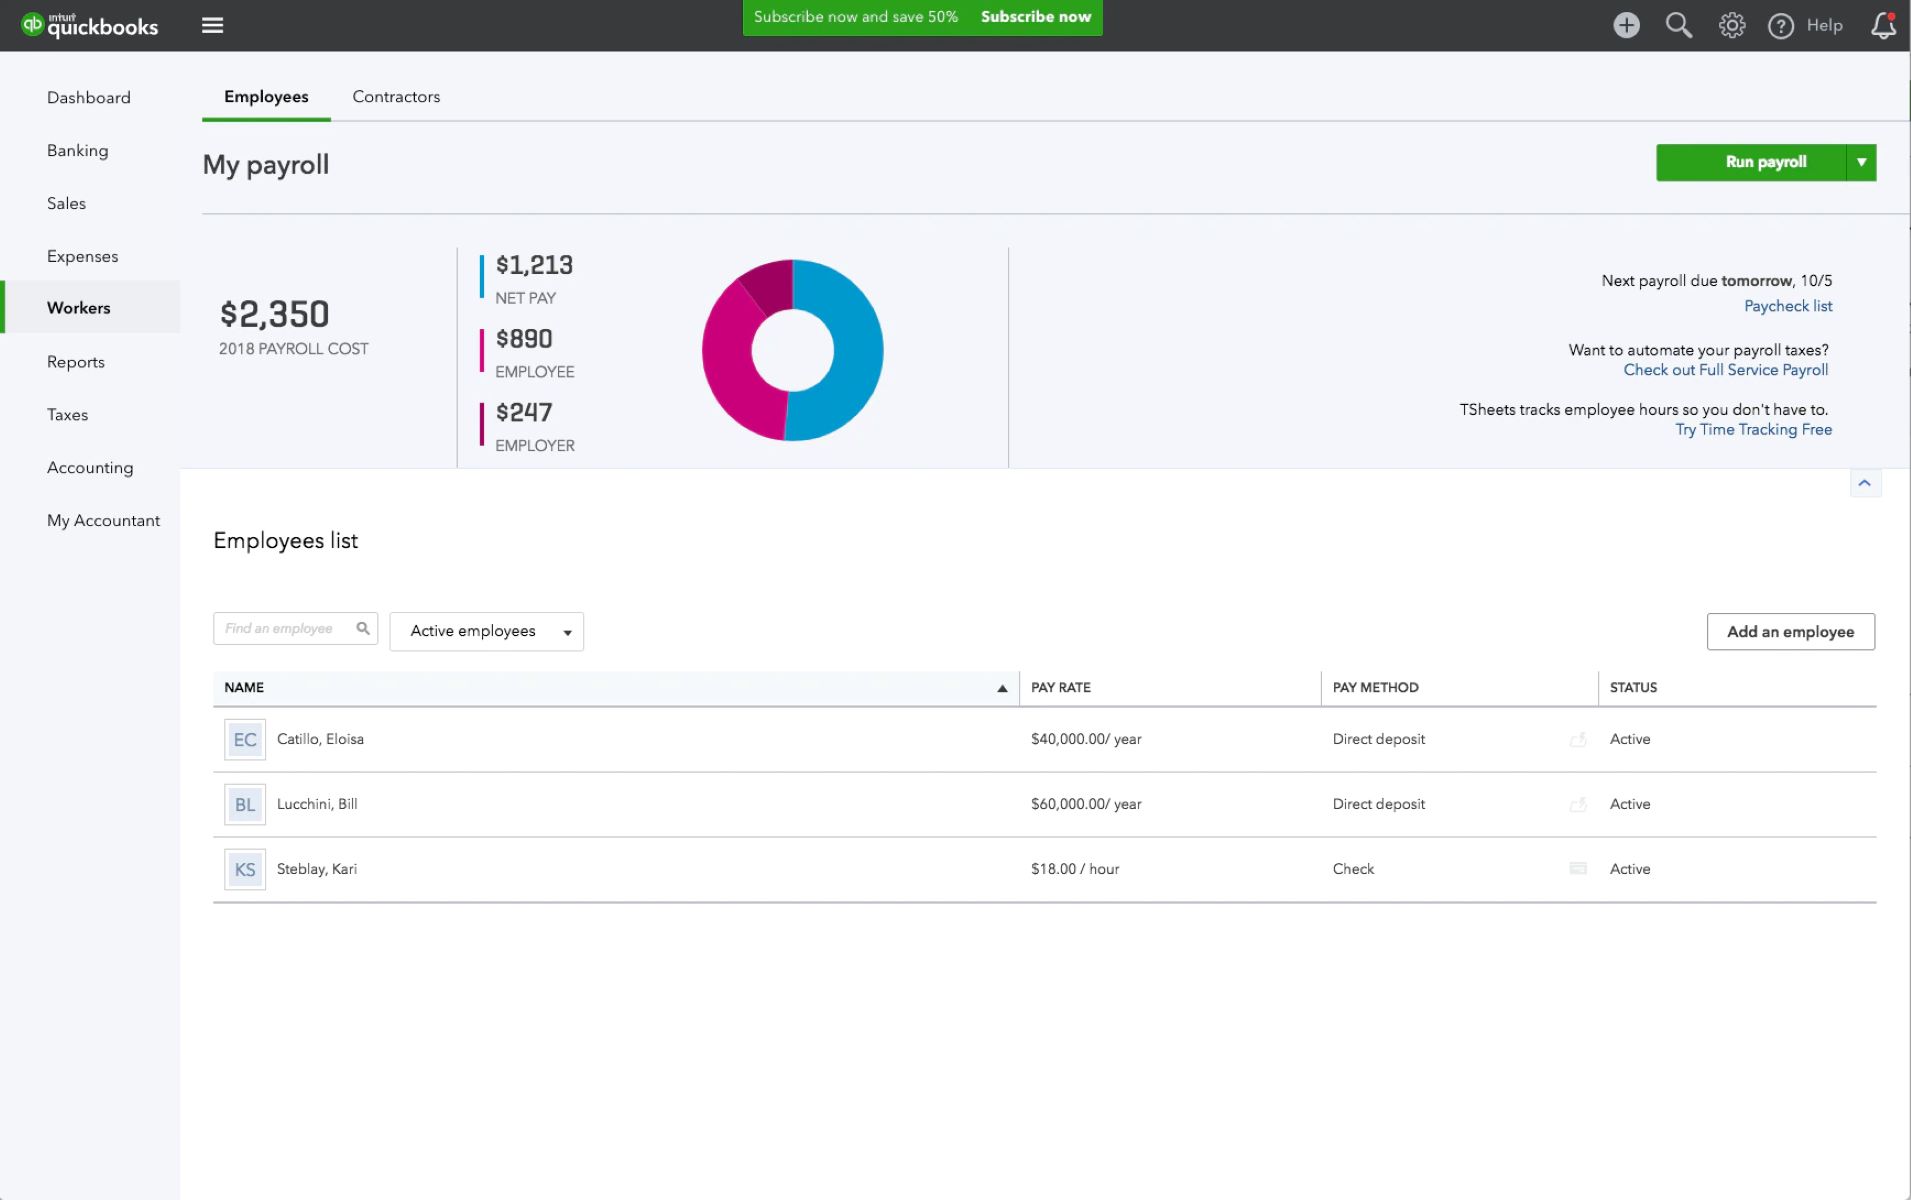
Managing Payroll
Managing payroll is a critical aspect of running a business, and Quickbooks 2016 provides powerful tools to simplify the management of employee wages, taxes, and benefits. This section will guide you through the process of managing payroll in Quickbooks, enabling you to ensure accurate and timely payment to your employees while staying compliant with payroll regulations.
Quickbooks 2016 offers two main options for managing payroll: Basic Payroll and Enhanced Payroll. Basic Payroll allows you to easily calculate employee wages, print paychecks, and track time. Enhanced Payroll provides additional features, such as creating payroll tax forms and e-filing tax payments and forms.
To set up payroll in Quickbooks, go to the Employees menu and select Payroll Setup. Follow the prompts to enter your company’s payroll information, including your federal Employer Identification Number (EIN), state tax ID, and payroll tax rates. Quickbooks 2016 will guide you through the process of defining employee details, compensation, deductions, benefits, and tax withholdings.
Once your payroll setup is complete, you can easily generate paychecks for your employees. Quickbooks allows you to input employee hours and earnings, including regular pay, overtime, bonuses, and commissions. The software automatically calculates taxes, deductions, and net pay based on the information you entered during the setup process.
Quickbooks 2016 also supports direct deposit, providing a convenient and secure method for paying your employees. With direct deposit, you can electronically transfer funds from your business bank account to your employees’ bank accounts, eliminating the need for physical checks or cash.
Managing payroll taxes is a critical aspect of payroll management, and Quickbooks 2016 simplifies this process. The software automatically calculates and withholds federal, state, and local payroll taxes based on the information you provided during setup. It also generates payroll tax forms, such as W-2s and 1099s, allowing you to easily meet your reporting requirements.
In addition to payroll processing, Quickbooks 2016 provides a variety of reports to help you analyze your payroll expenses, track employee hours, and maintain compliance. You can generate reports such as Payroll Summary, Payroll Details, and Payroll Tax Liability. These reports provide valuable insights into your labor costs, employee benefits, and tax liabilities.
Quickbooks 2016 also helps you stay compliant with tax laws and regulations by regularly updating payroll tax rates and forms. The software automatically downloads the latest tax tables, ensuring that your payroll calculations are accurate and in line with current regulations.
By effectively managing payroll in Quickbooks 2016, you can streamline your payroll processes, reduce errors, ensure timely and accurate payment to your employees, and maintain compliance with payroll regulations.
Customizing Quickbooks for Your Business
One of the great advantages of Quickbooks 2016 is its flexibility to be customized to fit the unique needs of your business. This section will guide you through the process of customizing Quickbooks for your business, enabling you to tailor the software to match your specific workflows, preferences, and reporting requirements.
One of the first steps in customizing Quickbooks is to set up your company preferences. Navigate to the Edit menu and select Preferences. Here, you can customize various settings that impact how Quickbooks functions for your business. For example, you can specify default bank accounts, invoice templates, report preferences, payroll settings, and much more.
Another aspect of customization is creating and modifying lists and forms within Quickbooks. Lists, such as the Chart of Accounts, Customer List, and Item List, can be customized to align with the specific needs of your business. For example, you can add or remove columns, rearrange the order of list elements, and create custom fields to capture unique information.
To customize forms, such as invoices, sales receipts, or purchase orders, navigate to the Lists menu and select Templates. Choose the form you want to modify and click the Edit button. From here, you can customize the layout, add or remove fields, change fonts and colors, and include your company logo to create a professional and branded appearance.
Quickbooks 2016 also provides the option to customize reports to extract specific insights and information relevant to your business. When generating a report, you can customize the report parameters, such as date range, filters, and columns. You can save these customizations for future use and create specific report groups that align with your reporting needs.
Another area of customization is user access and permissions. If you have multiple employees who need access to Quickbooks, you can set up user accounts and assign specific access levels for each user. This allows you to control what features and data each user can access, ensuring that sensitive information is only available to authorized individuals.
Furthermore, Quickbooks 2016 provides the option to integrate third-party applications and services to enhance its functionality and meet specific business needs. With the vast array of available integrations, you can seamlessly connect Quickbooks with other business tools such as payment processors, eCommerce platforms, CRM systems, and more.
By customizing Quickbooks for your business, you can streamline your workflows, improve efficiency, and gain access to the specific insights and information that matter most to your organization. With its robust customization options, Quickbooks 2016 can be tailored to optimize your accounting processes and provide a personalized experience that aligns with your business requirements.
Backing Up and Restoring Your Data
Backing up your data is crucial to safeguarding your valuable business information. Quickbooks 2016 provides built-in tools and options to help you create regular backups of your data and restore it in case of data loss or system failure. This section will guide you through the process of backing up and restoring your data in Quickbooks, ensuring the security and integrity of your financial information.
To back up your data in Quickbooks, navigate to the File menu and select “Create Backup.” Quickbooks will guide you through the process of creating a backup file, allowing you to save it to a specified location, such as an external hard drive, cloud storage, or a network drive. It’s recommended to create multiple backups and store them in different locations to ensure redundancy and protect against any potential data loss.
Quickbooks provides options to customize your backup preferences, such as choosing which company files to include, setting a backup schedule, and selecting the location for storing backups. It’s essential to ensure that your backup settings are regularly reviewed and updated to maintain an up-to-date copy of your data.
In addition to manual backups, Quickbooks 2016 also offers the option to schedule automatic backups. With this feature, you can set a recurring backup schedule, such as daily, weekly, or monthly, to ensure that your data is backed up regularly without having to remember to do it manually.
Restoring your Quickbooks data from a backup is a straightforward process. In the event of data loss or system failure, simply navigate to the File menu and select “Open or Restore Company.” Choose the option to “Restore a backup copy” and follow the prompts to locate and restore the desired backup file. Quickbooks will guide you through the steps to overwrite existing data or create a new company file.
It’s important to note that when restoring from a backup, it will replace your existing data with the restored data. Therefore, it’s crucial to carefully select the backup file and ensure that all necessary precautions are taken to avoid overwriting any important or recent data.
When creating regular backups, it’s essential to test the backup files regularly to ensure their integrity and viability. Quickbooks provides the option to verify the integrity of the backup file during the backup process. It’s recommended to periodically restore a backup file to a test environment to ensure that the data is restored accurately and that all necessary information is intact.
Backing up and restoring your Quickbooks data is a vital part of protecting your business information. By following the proper backup procedures and regularly maintaining backups, you can safeguard your data and seamlessly restore it in the event of any unforeseen circumstances.
Troubleshooting Common Issues
While Quickbooks 2016 is a reliable and user-friendly accounting software, it’s not uncommon to encounter some common issues or errors during usage. This section will guide you through troubleshooting some of the most common issues in Quickbooks, helping you resolve them and keep your financial operations running smoothly.
One common issue many users face is slow performance or freezing of Quickbooks. This can be caused by various factors, such as the size of your company file, insufficient system resources, or conflicts with other programs. To resolve this, make sure you’re using a computer that meets Quickbooks’ system requirements, close any unnecessary programs running in the background, and run the Verify and Rebuild utility in Quickbooks to fix any data integrity issues.
If you’re unable to open or access your company file in Quickbooks, it may be due to file corruption or damage. In such cases, you can try using the Quickbooks File Doctor tool to repair the file. This tool can help resolve common file issues that prevent you from opening or accessing your company data.
If you have trouble with balance sheet or financial statement discrepancies, you can use the Reconcile Discrepancy report in Quickbooks to identify any discrepancies between your bank statements and your Quickbooks records. This report can help you track down and resolve any inconsistencies, ensuring the accuracy of your financial statements.
Another common issue is improperly recorded or missing transactions. This can occur due to data entry errors or accidental deletion. To address this, you can run various reports in Quickbooks, such as the Transaction Detail report or the Audit Trail report, to locate missing or incorrectly recorded transactions. You can then make the necessary adjustments to ensure your records are accurate.
If you encounter issues during the payroll process, such as incorrect calculations or problems with tax forms, it’s recommended to review your payroll settings and ensure that they are configured correctly. You can also consider reaching out to the Quickbooks support team or consulting the Quickbooks payroll knowledge base for specific troubleshooting steps.
Additionally, if you experience connectivity issues or problems with bank feeds, you can try refreshing your online banking connection or updating your bank feeds settings in Quickbooks. Clearing the cache and temporary internet files may also help resolve certain connectivity issues.
When facing any issues or errors in Quickbooks, it’s advisable to check for available software updates and install them, as updates often include bug fixes and enhancements. Quickbooks regularly releases updates to address common issues and improve the overall functionality of the software.
If you’re unable to resolve the issue on your own, it’s recommended to reach out to Quickbooks support for assistance. The Quickbooks support team can provide further guidance and troubleshooting steps tailored to your specific situation.
By being aware of these common issues and familiarizing yourself with the available troubleshooting steps, you can effectively address any challenges that arise while using Quickbooks 2016 and keep your accounting processes running smoothly.
Conclusion
Congratulations! You have now gained a solid understanding of various aspects of Quickbooks 2016. This comprehensive guide has provided you with the necessary knowledge to navigate the software interface, set up your company, manage customers and sales, handle vendors and expenses, reconcile bank accounts, generate financial reports, manage payroll, customize Quickbooks to fit your business needs, and troubleshoot common issues.
By effectively utilizing Quickbooks 2016, you can streamline your accounting processes, save time, and make informed financial decisions. Whether you’re a small business owner, a freelancer, or a bookkeeper, Quickbooks 2016 provides you with the tools and functionalities to manage your business finances with ease.
Remember to take advantage of the customization options in Quickbooks, such as setting up user access and permissions, tailoring lists and forms, and creating custom reports, to align the software with your unique business requirements. This will enhance your user experience and provide you with the specific insights and information you need to drive your business forward.
In addition, always ensure that you regularly back up your data to protect against any potential loss or system failure. By regularly backing up your Quickbooks data and knowing how to restore it, you can maintain the security and integrity of your financial records.
If you encounter any issues or errors along the way, be sure to refer to the troubleshooting steps provided in this guide. Additionally, don’t hesitate to reach out to Quickbooks support for further assistance and guidance tailored to your specific situation.
With the knowledge and skills you have acquired, you are well-equipped to harness the power of Quickbooks 2016 to simplify your accounting tasks, gain valuable insights into your business finances, and ensure the financial success of your business.
Now it’s time to put your newfound expertise into action. Start exploring Quickbooks 2016, customize it to your needs, and experience the benefits of efficient financial management. Embrace the power of Quickbooks 2016 and take your business to new heights!