Introduction
Google Sheets is a powerful tool for creating and managing spreadsheets online. Whether you’re using it for personal or professional purposes, it’s important to keep track of any changes made to your data. Fortunately, Google Sheets provides a feature called “Edit History” that allows you to view and manage the revision history of your spreadsheet.
Edit History in Google Sheets enables you to see a detailed log of all the edits made in a spreadsheet, including who made the changes and when they were made. This feature is incredibly useful for collaboration purposes, as it allows multiple users to work on a sheet while maintaining a record of every modification.
In this article, we will explore the steps to enable and view the edit history in Google Sheets, as well as how to navigate, filter, and restore previous versions of your spreadsheet. We will also discuss how edit history can enhance collaboration within a team or among multiple users.
By the end of this article, you will have a comprehensive understanding of how to effectively use the edit history feature in Google Sheets, empowering you to track changes, revert to previous versions if necessary, and collaborate seamlessly with your teammates.
Enabling Edit History
Before you can start using the edit history feature in Google Sheets, you need to enable it for your spreadsheet. Here’s how you can do it:
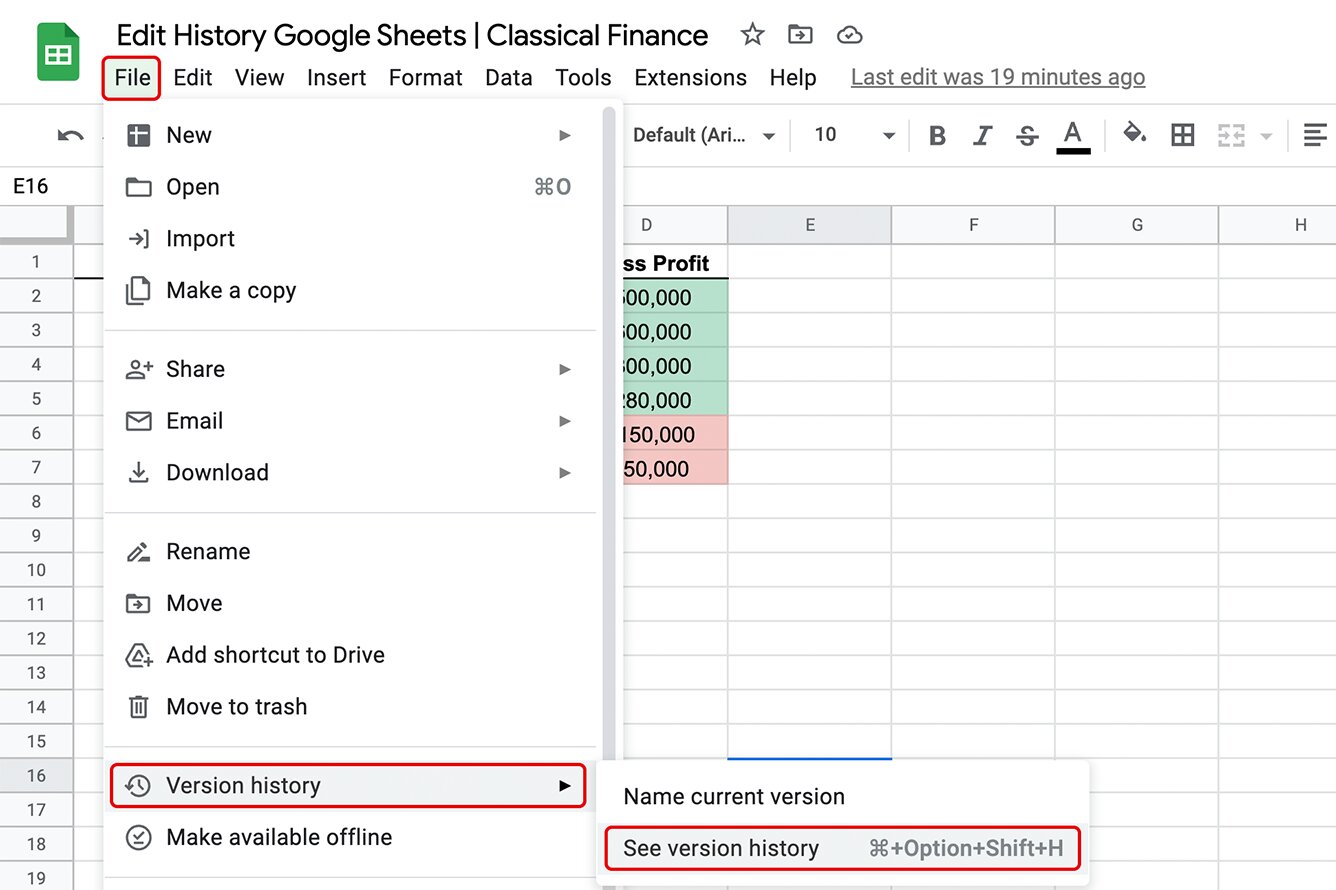
- Open your Google Sheets spreadsheet and click on “File” in the top left corner of the screen.
- From the dropdown menu, select “Version history”.
- In the expanded options, click on “See version history”.
- On the right side of the screen, a panel will appear displaying the edit history. Click on the clock icon at the top of the panel to enable edit history for the document. You should see a message confirming that edit history is now turned on.
Once you have enabled edit history for a spreadsheet, Google Sheets will automatically start tracking every change made to the document. This ensures that you have a comprehensive record of all the edits made and can easily refer back to previous versions if needed.
Additionally, it’s important to note that edit history is linked to your Google account. Therefore, only the users who have access to the spreadsheet and are signed in with their Google accounts will be able to view and manage the edit history.
With edit history enabled, you can now move on to the next section to learn how to view and understand the edit history in your Google Sheets spreadsheet.
Viewing Edit History
Once you have enabled edit history in your Google Sheets spreadsheet, you can easily view the edit history by following these steps:
- Open the spreadsheet for which you want to view the edit history.
- Click on “File” in the top left corner of the screen.
- Select “Version history” from the dropdown menu.
- Click on “See version history” in the expanded options.
Upon clicking “See version history,” a panel will appear on the right side of the screen, displaying the edit history of the spreadsheet. The panel will show a list of all the revisions made to the document, with the most recent changes appearing at the top.
Each entry in the edit history panel will include information such as the date and time of the edit, the person who made the change, and any comments associated with the revision. This details allow you to gain insight into the editing process and track the modifications made by different collaborators.
You can click on any of the entries in the edit history panel to see a preview of the spreadsheet as it appeared at that particular revision. This allows you to compare and analyze the changes made between different versions of the document.
Furthermore, if there is a specific revision that you want to restore, you can simply click on it in the edit history panel. This will restore that version of the spreadsheet, making it the current version and overwriting any subsequent changes that were made.
Now that you know how to view the edit history in your Google Sheets spreadsheet, let’s delve into the details of understanding the information displayed in the edit history panel and how to navigate through different revisions effectively.
Understanding Edit History Display
When viewing the edit history of your Google Sheets spreadsheet, it’s important to understand the information displayed in the edit history panel. Here are the key elements you need to know:
- Date and Time: Each revision in the edit history panel shows the date and time when the change was made. This helps you track the sequence of edits and the timeline of modifications.
- Editor: The editor column displays the name or email address of the person who made the edit. This allows you to see the contributions made by different collaborators and identify who made specific changes.
- Comments: If any comments were added to a revision, they will appear in the comments column. Comments provide additional context or explanations about specific changes and can be helpful for understanding the reasoning behind an edit.
In addition to these basic elements, the edit history panel also provides you with the ability to perform certain actions. For each revision, you have options to:
– Preview the revision: Clicking on a revision will show you a preview of the spreadsheet as it appeared at that specific point in time. This allows you to examine the changes made and compare them to the current version.
– Restore the revision: If you want to revert to a previous version of the spreadsheet, simply click on the revision you wish to restore. This will make that version the current version, effectively undoing any subsequent changes. It’s important to note that restoring a revision will overwrite any edits made after that revision, so use this feature with caution.
By understanding the information and functionality provided in the edit history panel, you can effectively navigate through different revisions and make informed decisions about restoring previous versions if required.
Now that you have a grasp on how the edit history display works, let’s move on to the next section where we will explore how to navigate through the edit history effectively and filter the revisions to focus on specific changes.
Navigating Through Edit History
When working with the edit history in Google Sheets, it’s important to know how to navigate through different revisions effectively. This allows you to explore the changes made to your spreadsheet and understand the evolution of the document over time. Here are some key tips for navigating through the edit history:
- Scrolling: If there are numerous revisions in the edit history panel, you can scroll through them to view older versions. The most recent changes will appear at the top, while older revisions will be towards the bottom.
- Previewing a revision: To see how the spreadsheet looked at a specific revision, simply click on the entry in the edit history panel. This will show you a preview of the spreadsheet at that particular point in time, allowing you to compare it with the current version.
- Comparing revisions: You can compare two different revisions of the spreadsheet by clicking on one revision and then holding down the “Shift” key and clicking on another. This will highlight both revisions and show a side-by-side comparison, making it easier to spot the changes made between the two versions.
- Using the slider: At the top of the edit history panel, you will find a slider that allows you to navigate through revisions. Dragging the slider left or right enables you to move between different versions and see how the spreadsheet evolved.
By utilizing these navigation methods, you can effectively explore the edit history of your Google Sheets spreadsheet and gain insights into the changes made over time. This can be particularly useful when collaborating with others or when tracking your own modifications to the document.
In the next section, we will discuss how you can filter the edit history to focus on specific changes or contributors, making it easier to analyze and understand the revisions made to your spreadsheet.
Filtering Edit History
Google Sheets provides the ability to filter the edit history, allowing you to focus on specific changes or contributors. This feature is particularly useful when you want to analyze specific revisions or track the modifications made by a certain person. Here’s how you can filter the edit history:
- Open the edit history panel by clicking on “File” and selecting “Version history” in your Google Sheets spreadsheet.
- Click on the “All changes” dropdown at the top of the edit history panel.
- Select from the available filtering options:
- Show changes: Choose between “All changes,” “Only show changes,” or “Only show historical values.” This allows you to filter the revisions based on the type of changes made to the spreadsheet.
- Show edits by: Select specific editors to display revisions made by those individuals. This is handy when you want to see the contributions of a particular collaborator.
- Date range: Specify a date range to narrow down the revisions made within that time period. This is useful for examining changes made during a specific timeframe.
By applying these filters, you can focus on the revisions that are most relevant to your analysis or investigation. This helps streamline your workflow and makes it easier to understand the specific changes made to your spreadsheet.
Additionally, you can combine multiple filters to further refine your view of the edit history. For example, you can choose to show only changes made by a particular editor within a specific date range.
Using the filtering options in the edit history panel allows you to customize your view of the revisions, making it easier to analyze and track specific changes. This feature enhances your ability to collaborate effectively and maintain a clear record of the modifications made to your Google Sheets spreadsheet.
In the next section, we will explore how you can use the edit history feature to restore a previous version of your spreadsheet if needed.
Restoring a Previous Version
One of the key benefits of the edit history feature in Google Sheets is the ability to restore a previous version of your spreadsheet. This comes in handy when you need to undo certain changes or revert to an earlier state of your document. Here’s how you can restore a previous version:
- Open your Google Sheets spreadsheet and click on “File” in the top left corner of the screen.
- From the dropdown menu, select “Version history” and then click on “See version history” in the expanded options.
- In the edit history panel, locate the revision that you want to restore.
- Click on the revision to preview the spreadsheet as it appeared at that point in time.
- Once you have confirmed that you want to restore that version, click on the “Restore this revision” button at the top of the edit history panel.
By restoring a previous version, you effectively make that revision the current version, overwriting any subsequent changes that were made to the spreadsheet. It’s important to note that this action cannot be undone, so make sure to double-check before proceeding.
Restoring a previous version is especially useful if you want to revert to a previous set of data or undo undesirable changes. Whether it’s a formatting error, accidental deletion, or any other unintended modification, the edit history feature in Google Sheets gives you the flexibility to rectify the situation by restoring an earlier version.
Remember to consider the impact on collaborators when restoring a previous version. If others have made edits since the revision you are restoring, their changes will be lost. Communication and coordination with your team members is crucial to ensure everyone is aware of the restoration.
With the ability to restore previous versions, you have more control over the changes made to your Google Sheets spreadsheet and can easily undo any undesired modifications, bringing your document back to a desired state.
In the next section, we will discuss how the edit history feature enhances collaboration in Google Sheets.
Collaborating Using Edit History
The edit history feature in Google Sheets plays a crucial role in enhancing collaboration among team members. By providing a transparent and organized record of all the changes made to a spreadsheet, it promotes effective teamwork and ensures that everyone is on the same page. Here’s how you can leverage edit history for collaboration:
1. Tracking Changes: The edit history allows you to see who made each change and when it was made. This enables you to track the contributions of different team members and identify the specific edits they made. It provides clear accountability and makes it easier to collaborate on a shared document.
2. Resolving Conflicts: In a collaborative environment, conflicts or disagreements about changes to a spreadsheet can arise. With the edit history, you can refer back to previous versions and pinpoint where the conflict originated. This facilitates discussions and enables you to resolve conflicts by reverting to an earlier version or finding a collaborative solution.
3. Version Control: The ability to restore previous versions ensures that you have a safety net even when mistakes happen. If an important piece of data is accidentally deleted or modified, you can easily restore a previous version to retrieve that information. This fosters a sense of security when collaborating and encourages experimentation and innovation.
4. Commenting and Collaboration: Within the edit history panel, you can add comments to revisions to provide context or explanation for specific changes. This allows collaborators to communicate their rationale behind edits or ask questions related to a particular revision. It promotes effective communication and helps team members understand the thought process behind modifications made in the spreadsheet.
5. Workflow Insights: By analyzing the edit history, you can gain valuable insights into the workflow and decision-making process of your team. You can identify patterns, trends, or recurring changes, allowing you to optimize your workflows, identify training opportunities, and improve efficiency and collaboration within the team.
Overall, the edit history feature in Google Sheets serves as a valuable collaboration tool, promoting transparency, accountability, and effective communication among team members. It empowers you to work together seamlessly, track changes, resolve conflicts, and maintain a comprehensive record of the evolution of your shared spreadsheet.
Now that you understand how edit history enhances collaboration, let’s conclude our discussion.
Conclusion
In conclusion, the edit history feature in Google Sheets is a powerful tool that allows you to track, manage, and collaborate on spreadsheet revisions. By enabling edit history, you can ensure transparency, accountability, and effective teamwork when working on shared spreadsheets. It provides a detailed log of all changes made, including the editor’s name, timestamp, and any associated comments.
With edit history, you can easily view and understand the revisions made to your spreadsheet. The ability to navigate through the edit history panel, compare versions, and filter revisions based on specific criteria enhances your analysis capabilities. You can analyze the changes made, resolve conflicts, and optimize your workflows based on workflow insights gained from the edit history.
Additionally, the edit history feature enables you to restore previous versions of your spreadsheet, giving you flexibility and control over modifications. This is particularly useful for undoing unintended changes or reverting to a desired state of data.
Furthermore, the collaboration benefits of edit history cannot be overstated. It facilitates effective teamwork, supports communication among collaborators, and provides a transparent record of modifications. Tracking changes, resolving conflicts, and leveraging comments and collaboration within the edit history panel are all essential for successful collaboration.
By utilizing the edit history feature in Google Sheets, you can work efficiently with your team, maintain data integrity, and make informed decisions based on a clear record of spreadsheet revisions.
So, make the most of the edit history feature in Google Sheets and take your collaboration and spreadsheet management to the next level.