Introduction
Windows 11 is the latest operating system released by Microsoft, offering a modern and intuitive user interface. One of the features that Windows 11 introduces is the option to set up a PIN for secure and quick access to your computer. However, there may be instances where you no longer want to use a PIN and prefer to rely solely on other login methods like a password or biometric authentication.
In this article, we will guide you through the process of removing the PIN from your Windows 11 device. Whether you have decided to switch to a different login method or you simply want to streamline your login process, we will provide you with step-by-step instructions to remove the PIN from your Windows 11 account.
Removing the PIN is a straightforward process that can be done within the Settings menu. We will walk you through each step to ensure a seamless experience. Before we dive into the steps, let’s explore some of the reasons why you might want to remove the PIN from your Windows 11 device.
By the end of this article, you will have the competence to remove the PIN from your Windows 11 account, allowing you to tailor your login experience to your preferences and needs.
Why Remove the PIN From Windows 11?
While setting up a PIN for your Windows 11 account can provide convenience and added security, there are certain situations where you may want to remove the PIN. Here are a few reasons why you might consider removing the PIN from your Windows 11 device:
- Preference for alternative login methods: Some users may prefer using a password or relying solely on biometric authentication, such as facial recognition or fingerprint scanning, for logging into their Windows 11 device. If you find these methods more convenient or secure, removing the PIN might be the right choice for you.
- Simplifying the login process: Having multiple login options can sometimes lead to confusion or delays in accessing your device. If you feel that the PIN login is unnecessary and you’d like to streamline the login process, removing the PIN can help expedite your access to your Windows 11 account.
- Changing security preferences: Your security preferences may evolve over time. If you previously set up a PIN but now want to change to a different login method or prefer relying solely on a password, removing the PIN allows you to align your security preferences with your current needs.
- Device compatibility: In some cases, certain devices may not fully support the use of a PIN. If you are using an older device or a device with incompatible hardware, removing the PIN can prevent any potential login issues or errors.
It’s important to note that removing the PIN from your Windows 11 device doesn’t mean compromising security. Windows 11 offers robust security measures, such as password-based logins and biometric authentication, that you can still utilize to ensure the safety of your account and data.
Now that we understand some of the reasons behind removing the PIN, let’s move on to the step-by-step process of removing the PIN from your Windows 11 account.
Step 1: Open Settings
The first step to remove the PIN from your Windows 11 account is to open the Settings menu. There are a couple of ways you can do this:
- Using the Start menu: Click on the Start icon in the bottom left corner of the taskbar. Then, click on the gear-shaped Settings icon to open the Settings menu.
- Using the keyboard shortcut: Press the Windows key + I on your keyboard. This will also open the Settings menu directly.
Once you have successfully opened the Settings menu, you’re ready to move on to the next step.
Pro Tip: If you prefer using keyboard shortcuts, you can press the Windows key + X on your keyboard to open the Power User menu. From there, select “Settings” to directly access the Settings menu.
By opening the Settings menu, you gain access to various customization options and system settings that allow you to personalize your Windows 11 experience. Now that you’re in the Settings menu, it’s time to proceed to the next step.
Step 2: Go to Accounts
After opening the Settings menu, it’s time to navigate to the “Accounts” section. Here’s how you can do it:
- In the Settings menu, you will see a list of categories on the left-hand side. Scroll down and click on the “Accounts” category.
- Alternatively, you can also directly search for “Accounts” in the search bar at the top of the Settings menu and select it from the search results.
Once you click on the “Accounts” category or select it from the search results, you will be taken to the “Accounts” section of the Settings menu.
Within the “Accounts” section, you can manage various aspects related to your Windows 11 account, such as your profile settings, email and app accounts, and sign-in options. Removing the PIN falls under the sign-in options category.
Now that you have successfully reached the “Accounts” section, it’s time to move on to the next step and select the “Sign-in options” menu.
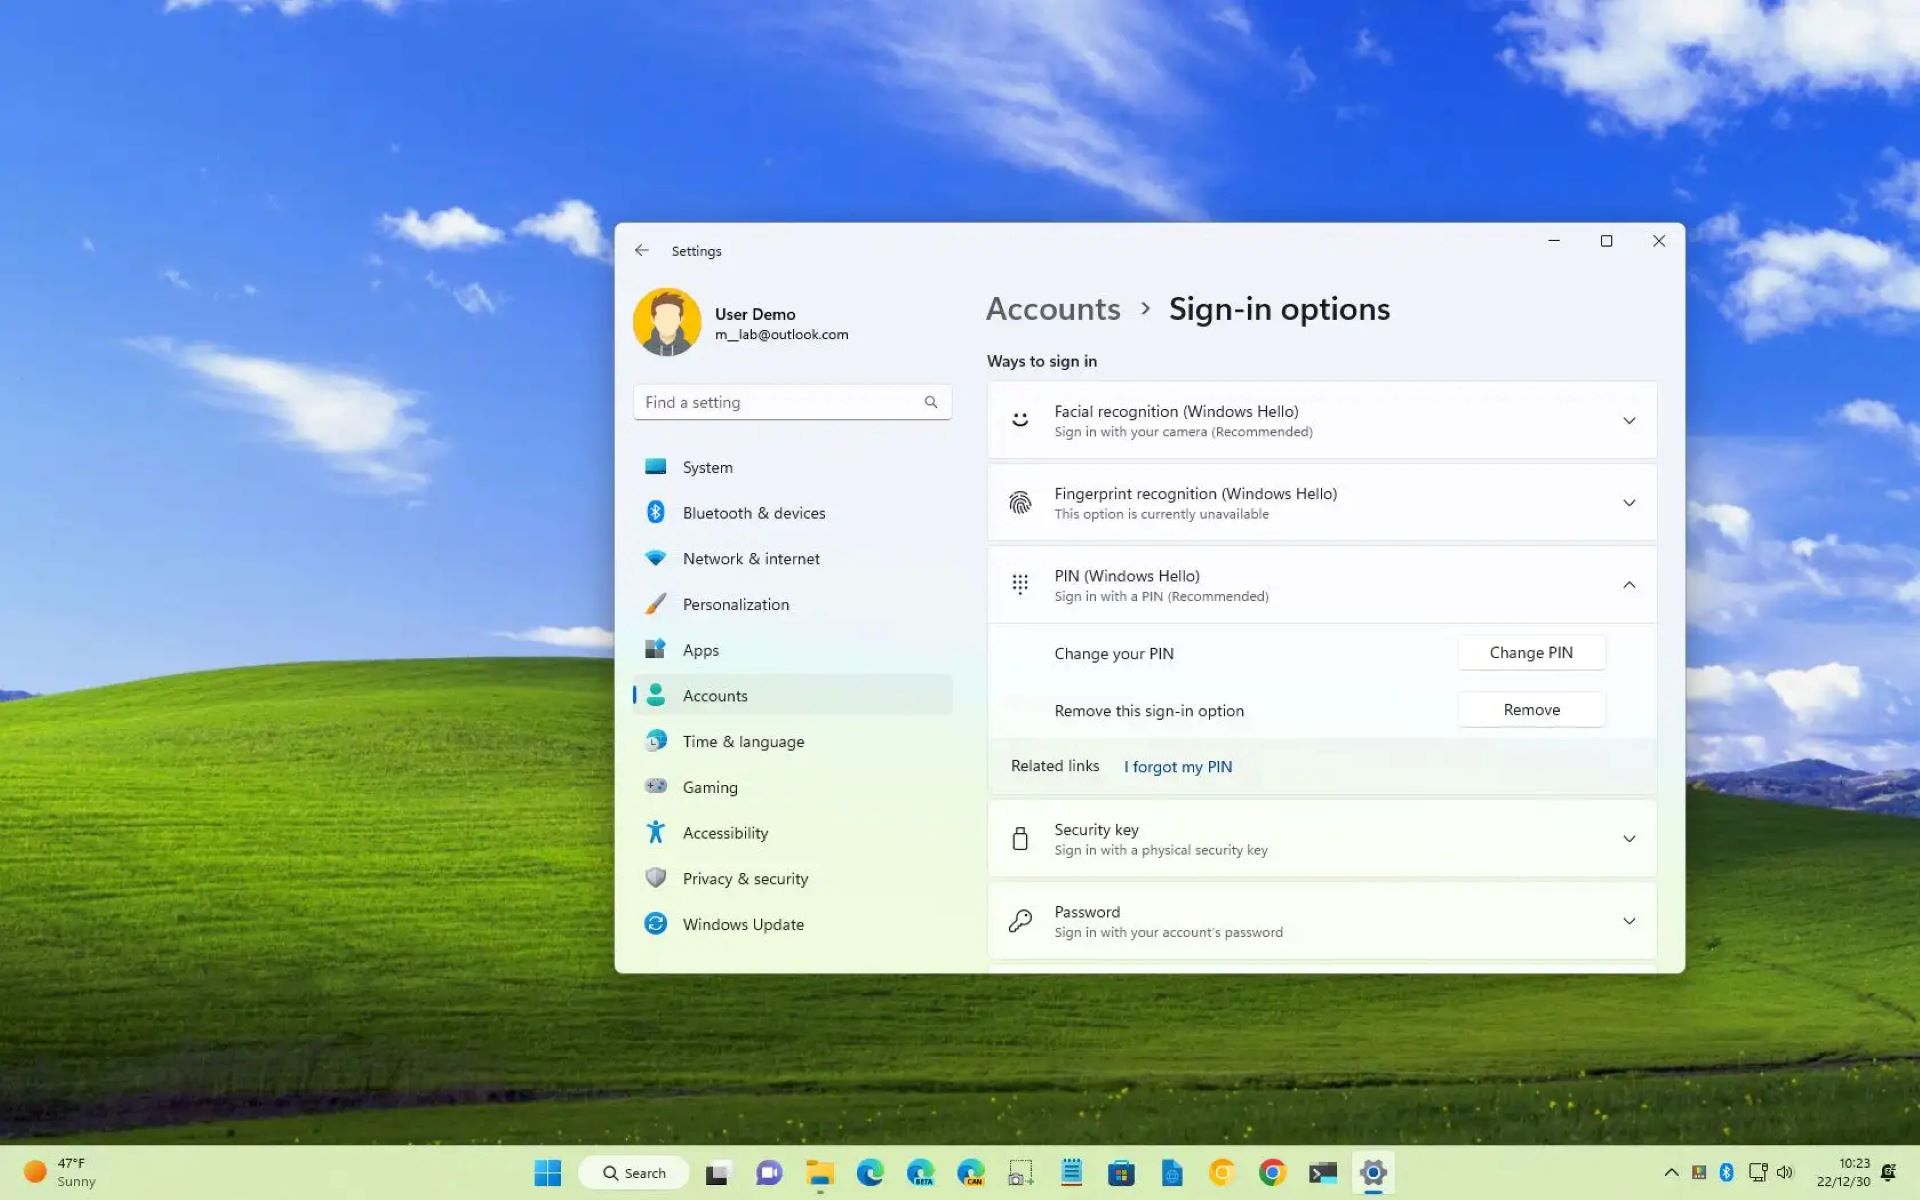
Step 3: Select Sign-in Options
Once you are in the “Accounts” section of the Settings menu, it’s time to select the “Sign-in options” menu. Here’s how to do it:
- In the left-hand pane of the “Accounts” section, you will see a list of options. Scroll down and click on “Sign-in options”.
- Alternatively, you can also use the search bar at the top of the Settings menu and type in “Sign-in options”. Select it from the search results.
By selecting the “Sign-in options” menu, you will be able to customize and manage various sign-in settings for your Windows 11 account, including the PIN authentication.
Windows 11 offers multiple sign-in options, such as a password, PIN, Windows Hello facial recognition, fingerprint, and more. In this step, we are focusing on removing the PIN, so let’s proceed to the next step and click on the “Remove” button.
Now that you have successfully accessed the “Sign-in options” menu, it’s time to move on to the next step to remove the PIN from your Windows 11 account.
Step 4: Click on Remove
With the “Sign-in options” menu open, it’s time to remove the PIN from your Windows 11 account. Follow these steps:
- In the “Sign-in options” menu, locate the section titled “PIN” or “Windows Hello PIN”.
- Under the “PIN” section, you will see a button labeled “Remove”.
- Click on the “Remove” button to initiate the process of removing the PIN from your Windows 11 account.
By clicking on the “Remove” button, you are confirming that you want to delete the currently set PIN from your account. This action will remove the PIN as one of the available sign-in options.
Please note that removing the PIN does not affect any other sign-in options you may have set up, such as a password or biometric authentication. Those options will remain intact and can still be used to access your Windows 11 account.
Now that you have successfully clicked on the “Remove” button, it’s time to proceed to the next step and confirm the removal of the PIN from your Windows 11 account.
Step 5: Confirm the Removal
After clicking on the “Remove” button, a confirmation prompt will appear to ensure that you want to proceed with removing the PIN from your Windows 11 account. Follow these steps to confirm the removal:
- In the confirmation prompt, you will see a message informing you that by removing the PIN, you won’t be able to use it for sign-in anymore.
- Read the message carefully to ensure that you understand the implications of removing the PIN.
- If you are certain that you want to proceed with the PIN removal, click on the “Remove” or “Confirm” button in the confirmation prompt.
By confirming the removal of the PIN, you are acknowledging that the PIN will no longer be associated with your Windows 11 account. This step is important to prevent accidental removal of the PIN.
Once you have confirmed the removal, the PIN will be deleted from your account, and you will need to rely on alternative sign-in methods, such as a password or biometric authentication, to access your Windows 11 account.
Now that you have successfully confirmed the removal, it’s time to proceed to the final step and restart your computer for the changes to take effect.
Step 6: Restart Your Computer
After removing the PIN from your Windows 11 account, it is important to restart your computer to ensure that the changes take effect. Follow these steps to restart your computer:
- Click on the Start icon in the bottom left corner of the taskbar.
- In the Start menu, click on the power icon.
- From the power options, select “Restart”.
Alternatively, you can use the keyboard shortcut by pressing the Windows key + X, and then selecting “Restart” from the Power User menu.
When you restart your computer, any pending changes, including the removal of the PIN, will be applied. After the computer restarts, you will need to use the alternative sign-in methods, such as password or biometric authentication, to access your Windows 11 account.
It is important to note that if you have any unsaved work or open applications, restarting your computer will close them. Make sure to save your work and close any open applications before proceeding with the restart.
Once your computer has successfully restarted, you can log in to your Windows 11 account using the chosen alternative sign-in method, without the need for a PIN.
Congratulations! You have successfully removed the PIN from your Windows 11 account and completed the process. You can now enjoy using your preferred sign-in method to access your Windows 11 device.
Conclusion
Removing the PIN from your Windows 11 account can be a straightforward process, providing you with the flexibility to choose alternative sign-in methods that suit your preferences. Whether you want to simplify the login process, change your security preferences, or prefer using other authentication methods, Windows 11 offers the flexibility to accommodate your needs.
In this article, we have guided you through the step-by-step process of removing the PIN from your Windows 11 account. We started by opening the Settings menu, navigating to the Accounts section, selecting the Sign-in options menu, clicking on Remove, confirming the removal, and finally restarting your computer to apply the changes.
Remember, removing the PIN does not compromise the security of your Windows 11 account. You can still utilize other sign-in options, such as passwords or biometric authentication, to ensure the safety of your device.
By following the steps outlined in this article, you have gained the competence to remove the PIN from your Windows 11 account and customize your login experience. Whether you decide to switch to a different sign-in method or rely solely on a password, the choice is now in your hands.
We hope this guide has been helpful and that you have successfully removed the PIN from your Windows 11 account. Enjoy a streamlined and personalized login process on your Windows 11 device!


![[Full Guide] How to Bypass Google Account Verification After Reset](https://robots.net/wp-content/uploads/2023/11/How-to-Bypass-Google-Account-Verification-After-Reset-300x180.png)