Introduction
Google Calendar is a popular online application that helps users stay organized and manage their schedules effectively. One of the features of Google Calendar is the inclusion of holidays from various countries and religions. While this can be helpful for some users, it may not be relevant or necessary for everyone. If you find the holidays cluttering your calendar or simply want to have a more personalized view, you have several options for removing or hiding them.
In this article, we will explore three methods for removing or hiding holidays from your Google Calendar. The first method involves manually unsubscribing from the Holidays calendar, the second method allows you to hide the calendar entirely, and the third method involves creating a new calendar and transferring events to it. Whether you prefer a clean calendar or have specific events you want to focus on, these methods will help you customize your Google Calendar to suit your needs.
It’s important to note that these methods apply to the web version of Google Calendar. While the steps may vary slightly depending on whether you’re using a desktop or mobile device, the general principles remain the same. Now, let’s dive into each method and learn how to remove holidays from your Google Calendar.
Method 1: Removing Holidays Manually
If you prefer a more hands-on approach to removing holidays from your Google Calendar, you can manually unsubscribe from the Holidays calendar. Here’s how to do it:
Step 1: Open Google Calendar
Start by opening Google Calendar in your preferred web browser. Log in to your Google account if you haven’t already.
Step 2: Locate the Holidays Calendar
Once you’re in Google Calendar, look for the “Other calendars” section on the left-hand side. Under this section, you should see a list of calendars that are currently subscribed to. Scroll down until you find the Holidays calendar.
Step 3: Unsubscribe from the Holidays Calendar
To remove the Holidays calendar from your view, simply uncheck the box next to it. This action will unsubscribe you from the calendar, and the holidays will no longer be displayed on your Google Calendar.
By manually unsubscribing from the Holidays calendar, you have the flexibility to remove it whenever you want. If you change your mind later and want the holidays back on your calendar, you can easily subscribe to the Holidays calendar again.
Now that you know how to remove holidays manually, let’s explore another method for hiding holidays completely from your view.
# Step 1: Open Google Calendar
To remove or hide holidays from your Google Calendar, start by opening Google Calendar in your web browser. You can do this by visiting https://calendar.google.com and signing in to your Google account if prompted.
If you’re using the Google Calendar app on your mobile device, open the app and make sure you’re signed in with the correct Google account associated with your calendar.
Once you’re logged in, you’ll be taken to the main Google Calendar interface. Here, you’ll have access to all the features and options for managing your calendar.
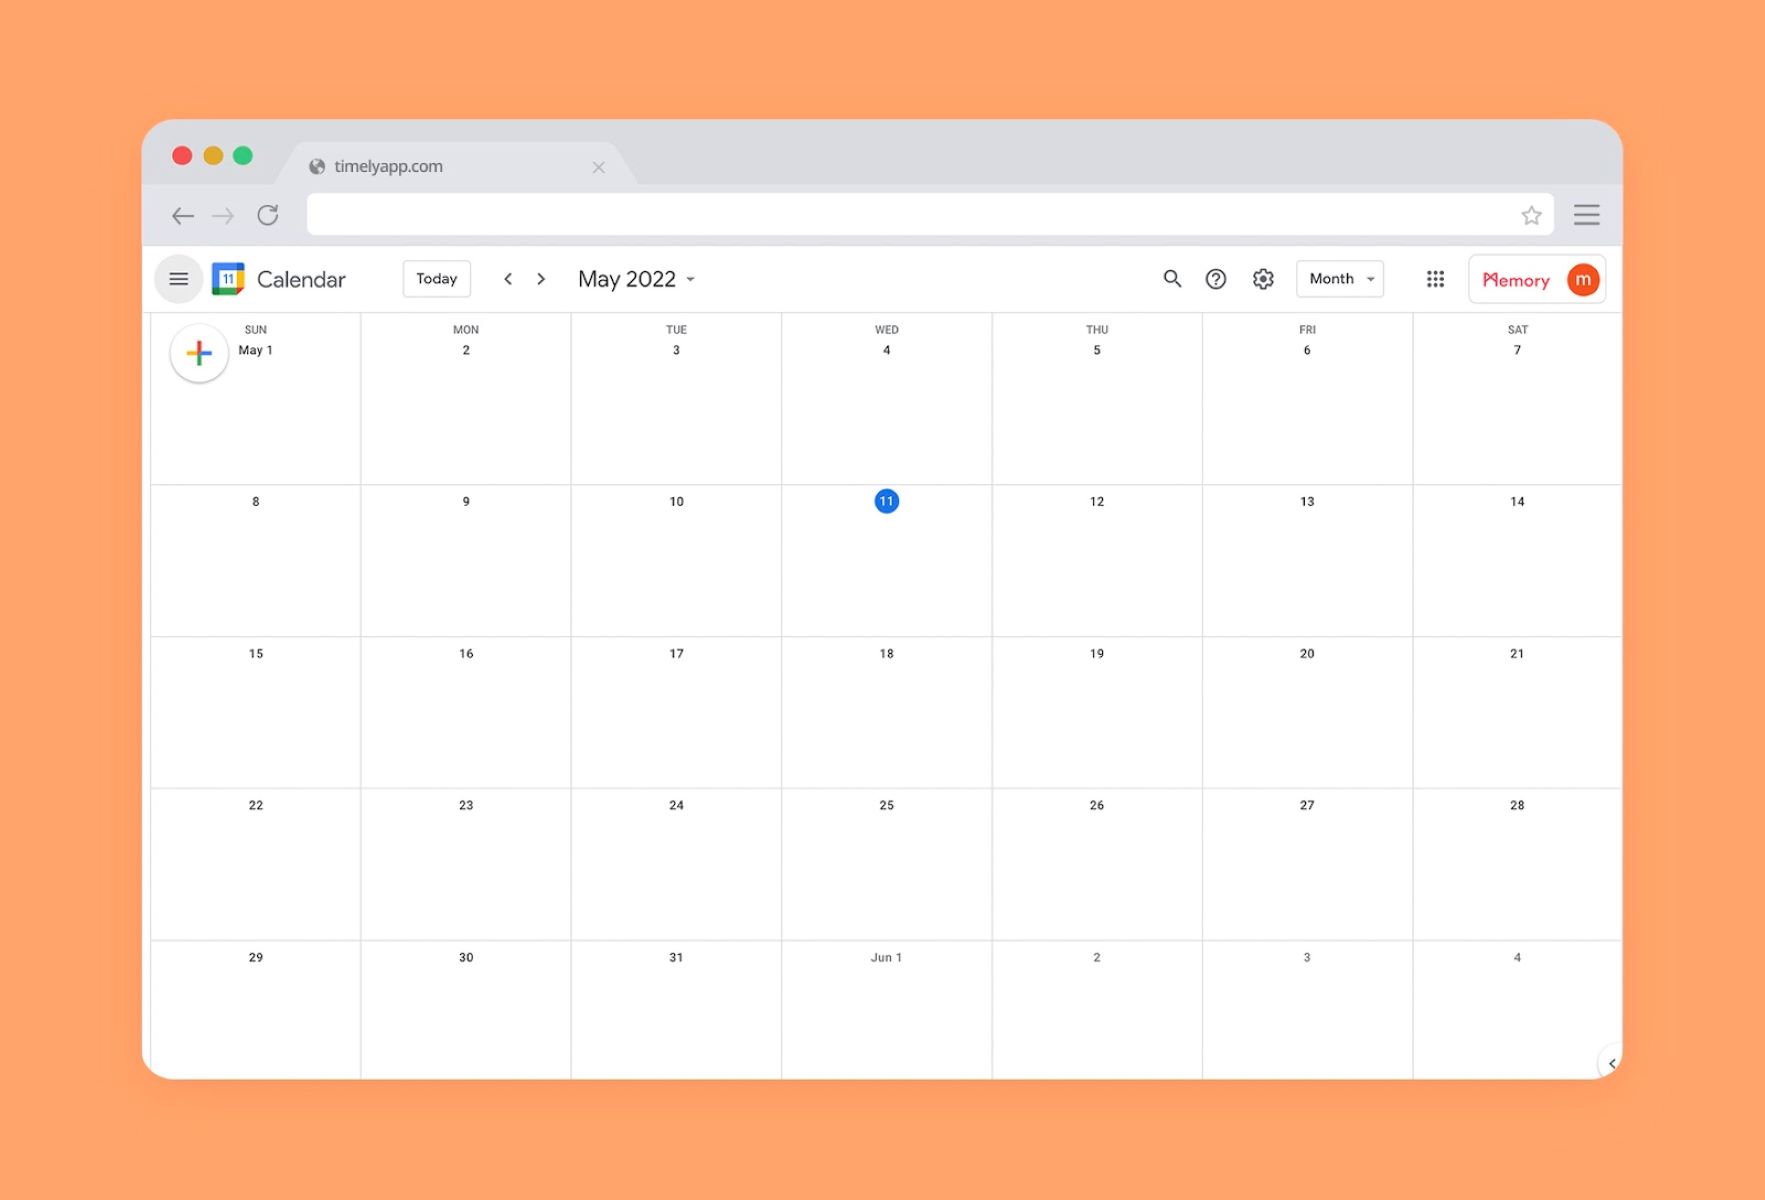
If you’re new to Google Calendar, take a moment to familiarize yourself with the layout and navigation. The calendar view will typically display the current month, but you can navigate to different dates by using the arrows or the date picker.
You’ll also notice various buttons and tabs on the screen, such as “Create,” “Search,” and “Settings.” These buttons provide access to additional functionalities within Google Calendar, which we’ll explore more as we go through the steps.
Opening Google Calendar is the first step towards customizing your calendar and removing those unwanted holidays. Once you have the calendar open, you can proceed to the next steps based on the method you choose to remove or hide the holidays.
# Step 2: Locate the Holidays Calendar
After opening Google Calendar, the next step is to locate the Holidays calendar. This calendar contains all the holidays from various countries and religions that are automatically added to your Google Calendar.
To find the Holidays calendar, look for the “Other calendars” section on the left-hand side of the Google Calendar interface. This section may be collapsed, so you may need to click on the arrow or the “More” button to expand it and reveal the list of calendars.
Scroll through the list of calendars until you find the one labeled “Holidays” or “Holidays in [country/region]”. The specific name of the calendar may vary depending on your location and the language settings of your Google account.
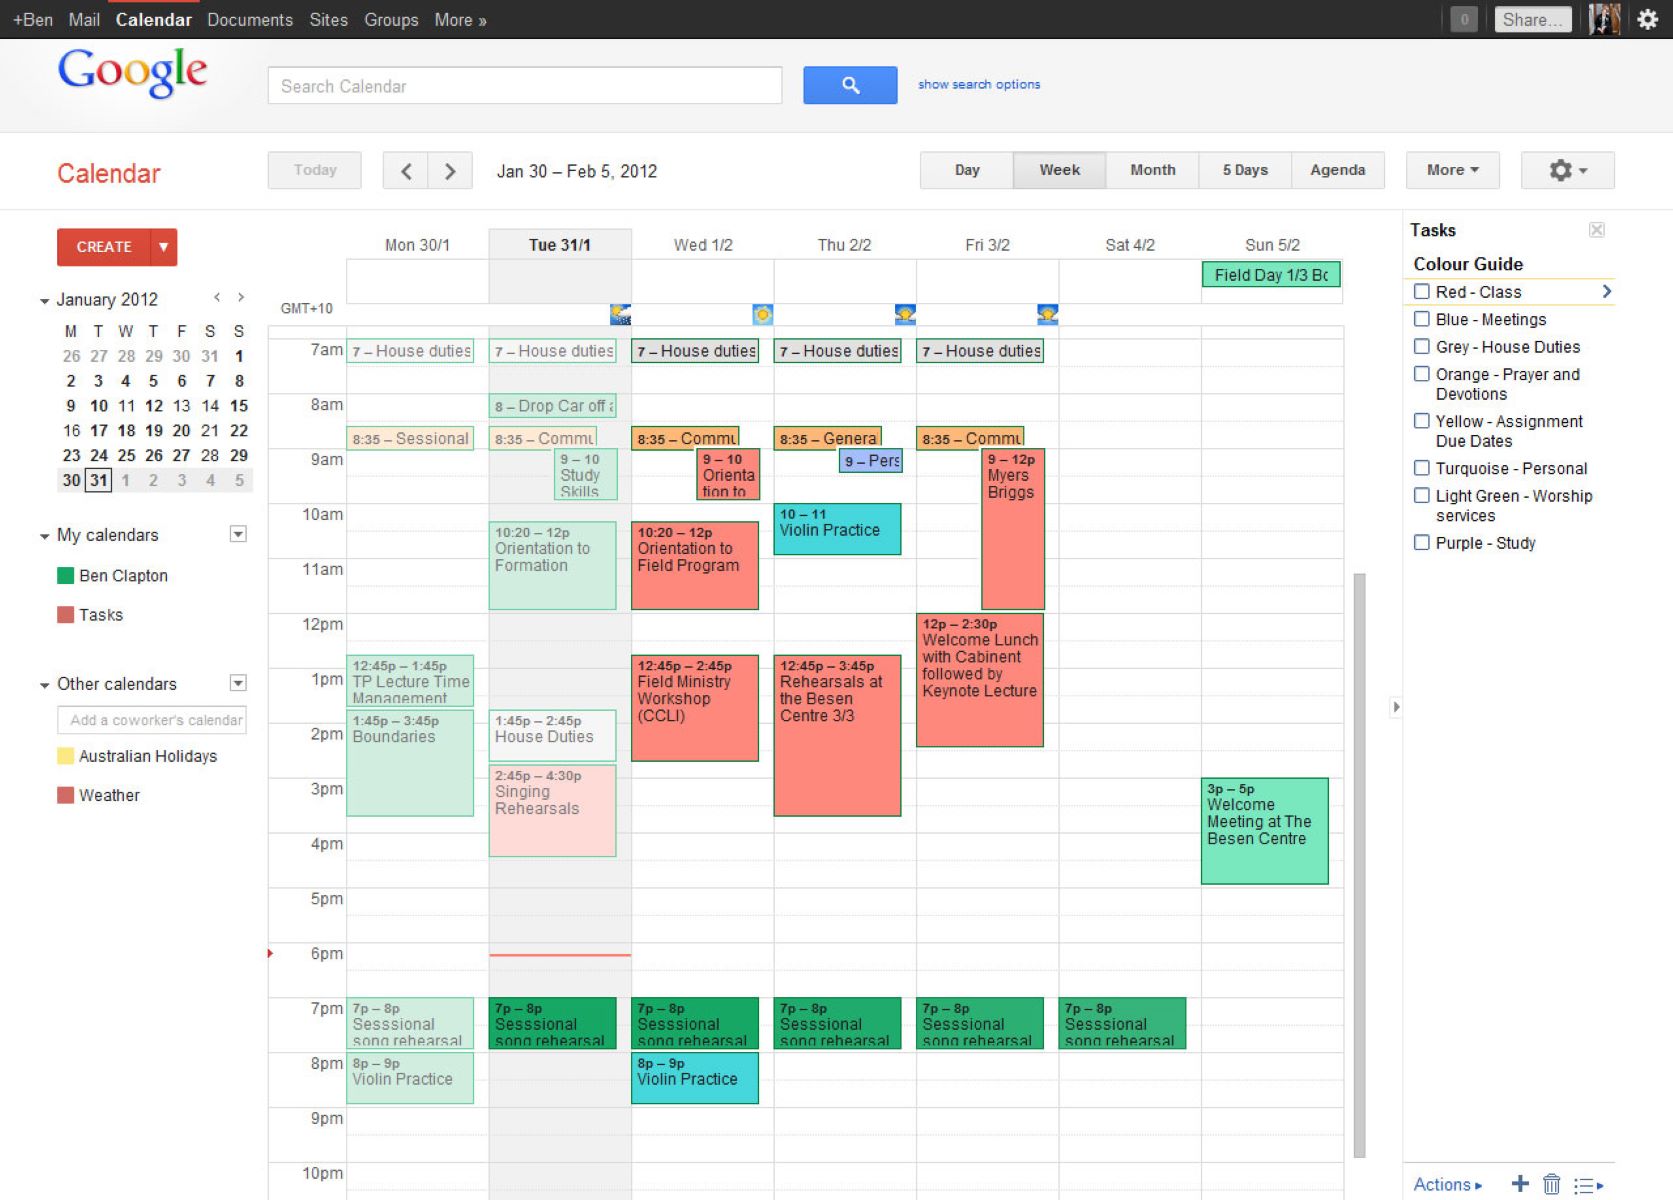
The Holidays calendar is usually color-coded differently from your primary calendar to distinguish it from your personal events and appointments. You may notice different shades of red or another color associated with the holidays. This color coding helps in easily identifying the events related to holidays.
If you’re having trouble locating the Holidays calendar, try using the search function within Google Calendar. Look for the search bar at the top of the interface, enter “Holidays,” and press Enter. Google Calendar will display the relevant calendars, making it easier for you to find the Holidays calendar.
Once you’ve located the Holidays calendar, you’re one step closer to removing or hiding the holidays from your Google Calendar. The next step will depend on the method you choose to proceed with – either removing the calendar altogether or hiding it from view. Continue to the next section for more information on how to proceed.
# Step 3: Unsubscribe from the Holidays Calendar
Now that you have located the Holidays calendar in Google Calendar, the next step is to unsubscribe from it. By unsubscribing, the holidays will no longer be displayed on your calendar, giving you a clean and personalized view.
To unsubscribe from the Holidays calendar, simply uncheck the box next to it in the “Other calendars” section. This action indicates that you no longer wish to see the holidays on your calendar. As a result, the holidays will be removed from your view, but they will not be deleted from the calendar altogether.
Unsubscribing from the Holidays calendar provides you with the flexibility to re-subscribe at any time if you decide to have the holidays displayed on your calendar again. To re-subscribe, simply check the box next to the Holidays calendar in the “Other calendars” section, and the holidays will reappear on your calendar.
By unsubscribing from the Holidays calendar, you can have a more focused and tailored view of your schedule. This is particularly helpful if you want to prioritize your personal events and appointments without the distraction of holidays.
Remember that unsubscribing from the Holidays calendar is specific to your Google account, so it won’t affect anyone else’s view of the calendar. Others who are subscribed to the same Holidays calendar will still see the holidays on their calendars unless they choose to unsubscribe as well.
Congratulations! You have successfully unsubscribed from the Holidays calendar, and the holidays are no longer cluttering your Google Calendar. If you prefer a more permanent solution and want to hide the holidays completely, continue reading to explore another method.
Method 2: Hiding Holidays
If you want to remove the holidays from your view without actually unsubscribing from the Holidays calendar, you can choose to hide the calendar instead. This method allows you to keep the holidays calendar and easily toggle its visibility whenever you want.
Here’s how to hide the Holidays calendar in Google Calendar:
Step 1: Open Google Calendar
Begin by opening Google Calendar in your web browser or using the Google Calendar app on your mobile device. Ensure that you are signed in with the correct Google account associated with your calendar.
Step 2: Locate the Holidays Calendar
Once you are in Google Calendar, locate the Holidays calendar in the “Other calendars” section on the left-hand side of the interface. Look for the calendar labeled “Holidays” or “Holidays in [country/region]”.
Step 3: Hide the Holidays Calendar
To hide the Holidays calendar, click on the colored box or checkbox next to it in the “Other calendars” section. By clicking on it, you toggle the visibility of the calendar. When the checkbox or colored box is unchecked or faded, it means that the calendar is hidden from view.
By hiding the Holidays calendar, the holidays will no longer be displayed on your Google Calendar. However, unlike the previous method, the calendar is still subscribed to, and you can easily show the holidays again by checking the box or clicking on the colored box to make it visible.
Hiding the Holidays calendar is a convenient option if you occasionally want to see the holidays or if you have specific occasions where you want to have them displayed on your calendar temporarily.
Now that you know how to hide the holidays, you have more control over the visibility of the Holidays calendar on your Google Calendar. If you prefer a more permanent solution and want to create a separate calendar without holidays, continue reading to learn about another method.
# Step 1: Open Google Calendar
To hide the holidays on your Google Calendar, start by opening Google Calendar in your web browser. You can do this by visiting https://calendar.google.com and signing in to your Google account if prompted. Alternatively, you can open the Google Calendar app on your mobile device.
Once you have accessed Google Calendar, you will be presented with a clean and organized interface. The calendar default view shows the current month, but you can navigate to different dates using the arrows or the date picker at the top.
Take a moment to familiarize yourself with the various features and options available in Google Calendar. On the web version, you will find the navigation pane on the left-hand side, which allows you to switch between different calendars, view your tasks, and access other settings. On the mobile app, the navigation options may be accessible through a menu icon or tabs at the bottom of the screen.
It’s worth noting that the steps to open Google Calendar may vary slightly depending on whether you’re using the web version or the mobile app. However, the general process remains the same: launch Google Calendar and make sure you’re signed in with your Google account.
Opening Google Calendar is the first step towards customizing your calendar and hiding those pesky holidays. Once you have the calendar open, you can proceed to the next steps based on the method you choose to hide the holidays. Continue reading to learn how to locate the Holidays calendar within Google Calendar.
# Step 2: Locate the Holidays Calendar
After opening Google Calendar, the next step is to locate the Holidays calendar. This calendar contains all the holidays from various countries and religions that are automatically added to your Google Calendar.
To find the Holidays calendar, look for the “Other calendars” section on the left-hand side of the Google Calendar interface. This section may be collapsed, so you may need to click on the arrow or the “More” button to expand it and reveal the list of calendars.
Scroll through the list of calendars until you find the one labeled “Holidays” or “Holidays in [country/region]”. The specific name of the calendar may vary depending on your location and the language settings of your Google account.
The Holidays calendar is usually color-coded differently from your primary calendar to distinguish it from your personal events and appointments. It may be marked with shades of red or another color associated with holidays. This color coding helps in easily identifying the events related to holidays.
If you’re having trouble locating the Holidays calendar, try using the search function within Google Calendar. Look for the search bar at the top of the interface, enter “Holidays,” and press Enter. Google Calendar will display the relevant calendars, making it easier for you to find the Holidays calendar.
Once you’ve located the Holidays calendar, you’re ready to proceed to the next step. Whether you want to remove the calendar entirely or hide it from your view, continue to the next section to learn how to take the appropriate action.
# Step 3: Hide the Holidays Calendar
After locating the Holidays calendar in Google Calendar, the next step is to hide it from view. Hiding the calendar will remove the holidays from your calendar display, giving you a cleaner and more customized view of your schedule. Here’s how to hide the Holidays calendar:
Step 1: Open Google Calendar
Start by opening Google Calendar in your web browser or on your mobile device. Ensure that you are signed in to your Google account associated with your calendar.
Step 2: Locate the Holidays Calendar
Within Google Calendar, locate the “Other calendars” section on the left-hand side of the interface. Scroll through the list of calendars until you find the one labeled “Holidays” or “Holidays in [country/region]”.
Step 3: Hide the Holidays Calendar
To hide the Holidays calendar, click on the colored box or checkbox next to it in the “Other calendars” section. Clicking on it will toggle the visibility of the calendar. When the checkbox or colored box is unchecked or faded, it means that the calendar is hidden from view.
By hiding the Holidays calendar, the holidays will no longer be displayed on your Google Calendar. However, the calendar remains subscribed, and you can easily show the holidays again by checking the box or clicking on the colored box to make it visible.
Hiding the Holidays calendar is a convenient option if you occasionally want to see the holidays or if you prefer to have them hidden from view for a specific period. You have the flexibility to toggle the visibility according to your preferences.
Congratulations! You have successfully hidden the Holidays calendar, and now your Google Calendar is free from the clutter of holidays. If you prefer a more permanent solution and want to create a separate calendar without holidays, continue reading to learn about another method.
Method 3: Creating a New Calendar
If you want a separate calendar that is free from holidays, you can create a new calendar in Google Calendar. This method allows you to transfer events from the Holidays calendar to the new calendar, giving you full control over the visibility and customization of your holiday events.
Here are the steps to create a new calendar in Google Calendar:
Step 1: Open Google Calendar
Start by opening Google Calendar in your web browser or on your mobile device. Sign in to your Google account if you haven’t already.
Step 2: Create a New Calendar
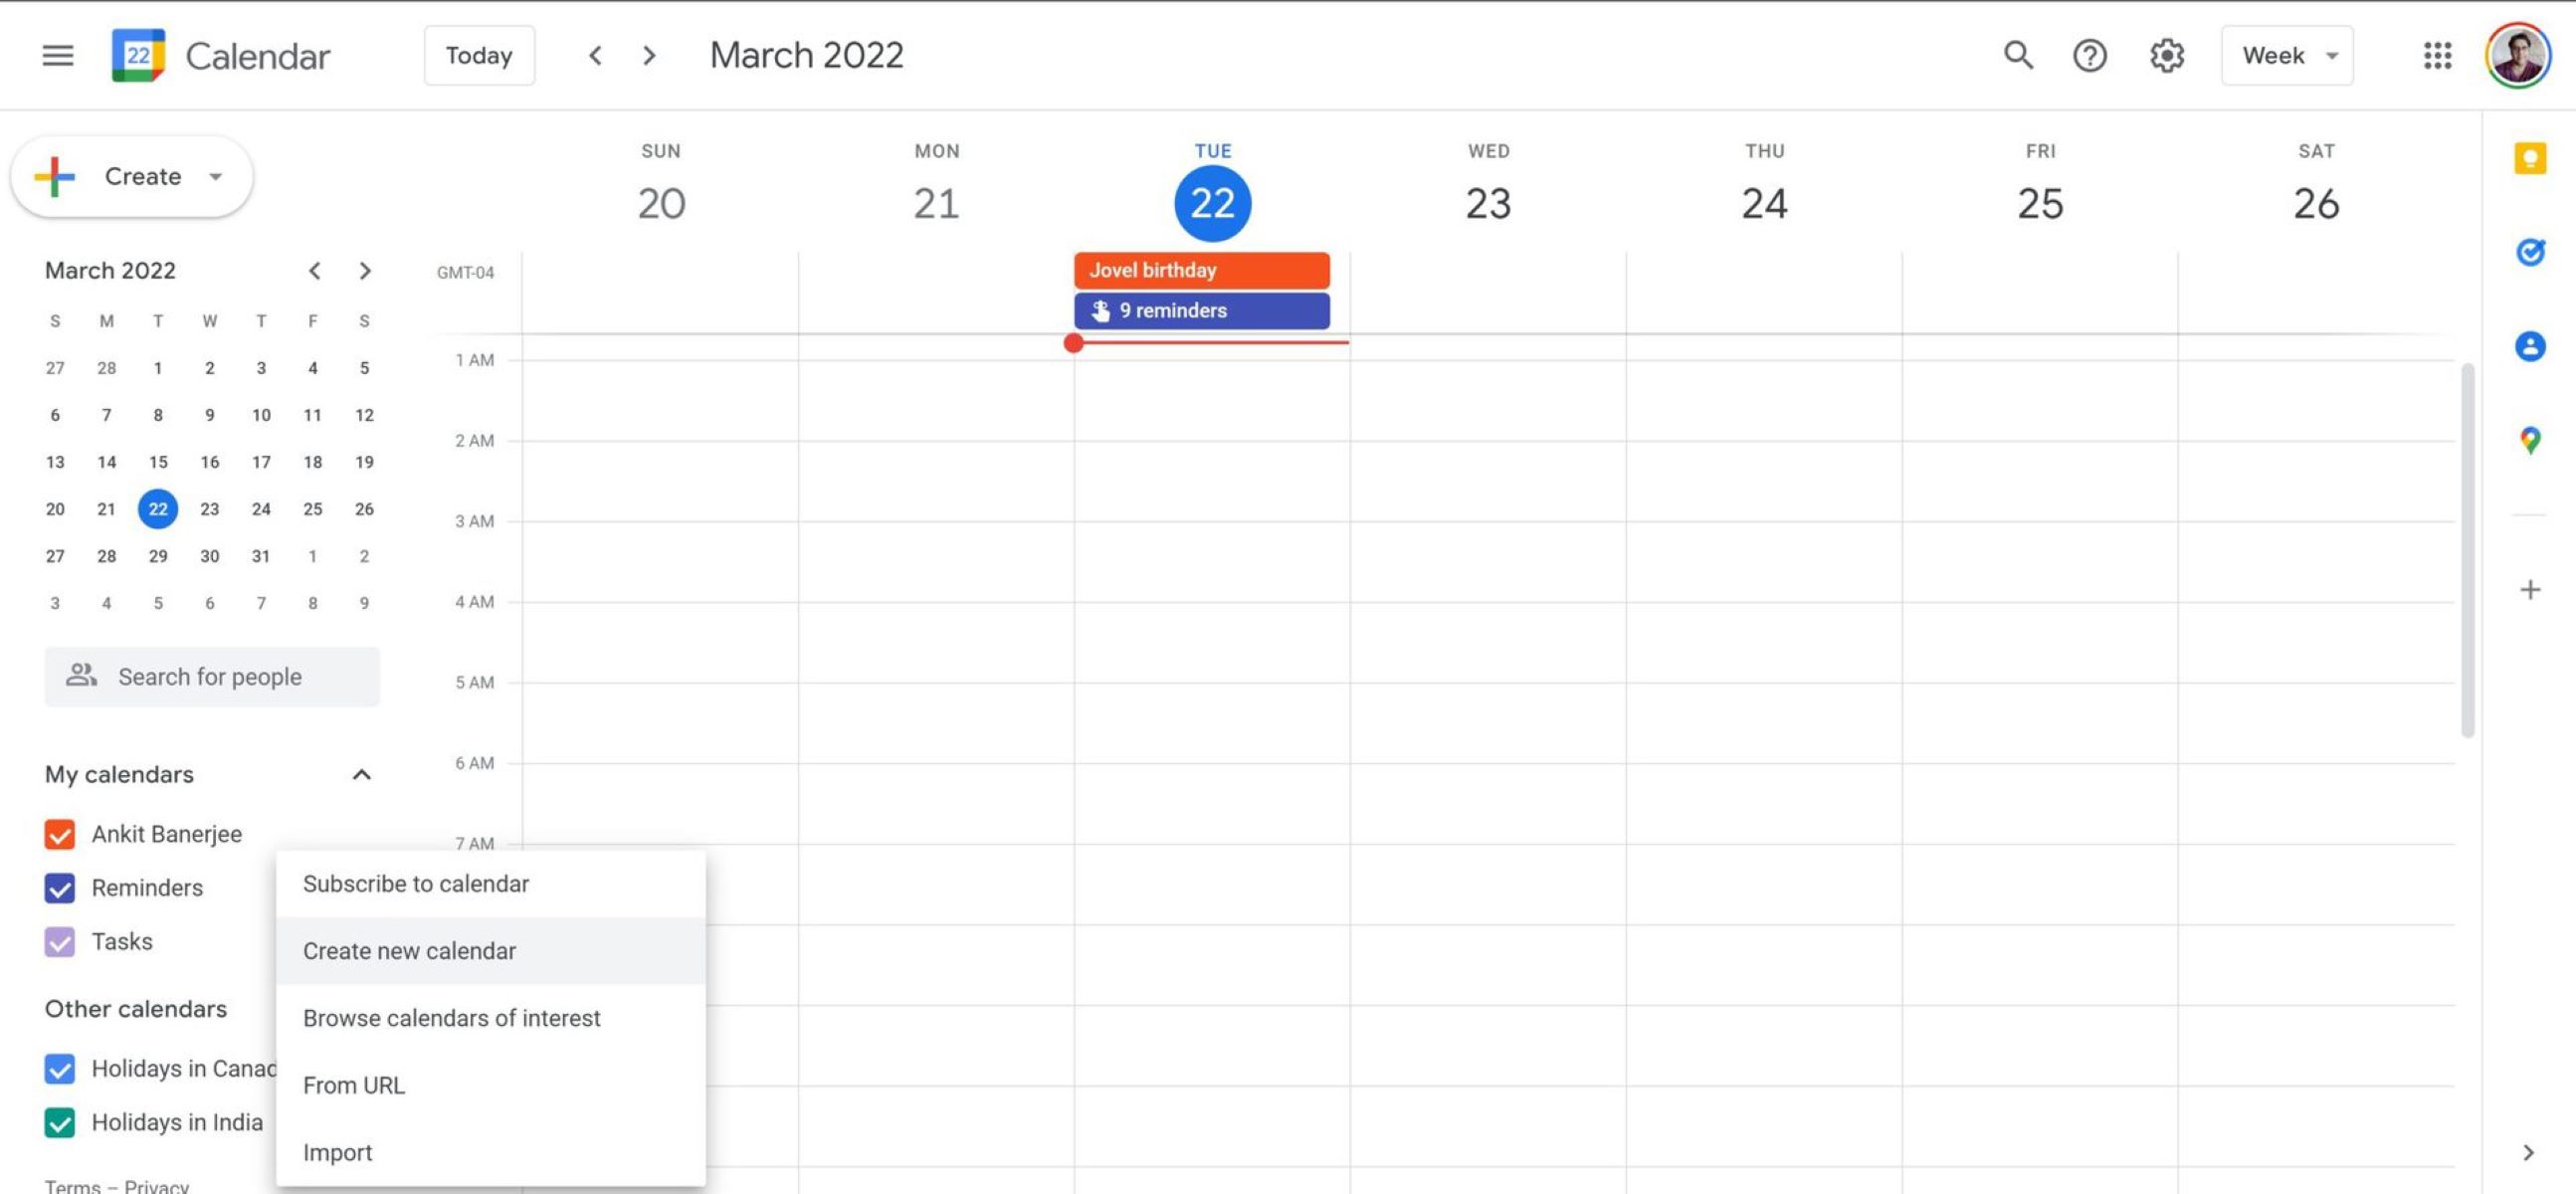
Within Google Calendar, locate the “Other calendars” section on the left-hand side of the interface. Click on the “+” button or the “Add calendar” option to create a new calendar.
A dialogue box will appear asking you to provide the details for the new calendar. Enter a name for the calendar, such as “Personal” or “My Events,” and customize any other settings or preferences as desired. Once you’re finished, click “Create calendar” or the equivalent button to create the new calendar.
Step 3: Move Events to the New Calendar
To transfer events from the Holidays calendar to the new calendar, go back to the main calendar view. Locate an event that you want to move, such as a holiday event, and click on it to open the event details.
Within the event details, look for the calendar drop-down menu or the option to “Move to another calendar.” Select the new calendar you just created, and the event will be moved to the new calendar.
Repeat this step for each holiday event you want to transfer to the new calendar. This process allows you to curate a calendar specifically for your personal events while keeping the Holidays calendar intact. You can also customize the settings and color-coding of the new calendar to differentiate it from the Holidays calendar.
Step 4: Delete the Holidays Calendar
Once you have transferred all the necessary events to the new calendar, you can choose to delete the Holidays calendar. This step is optional but recommended if you no longer need the holidays to be displayed on your main calendar view.
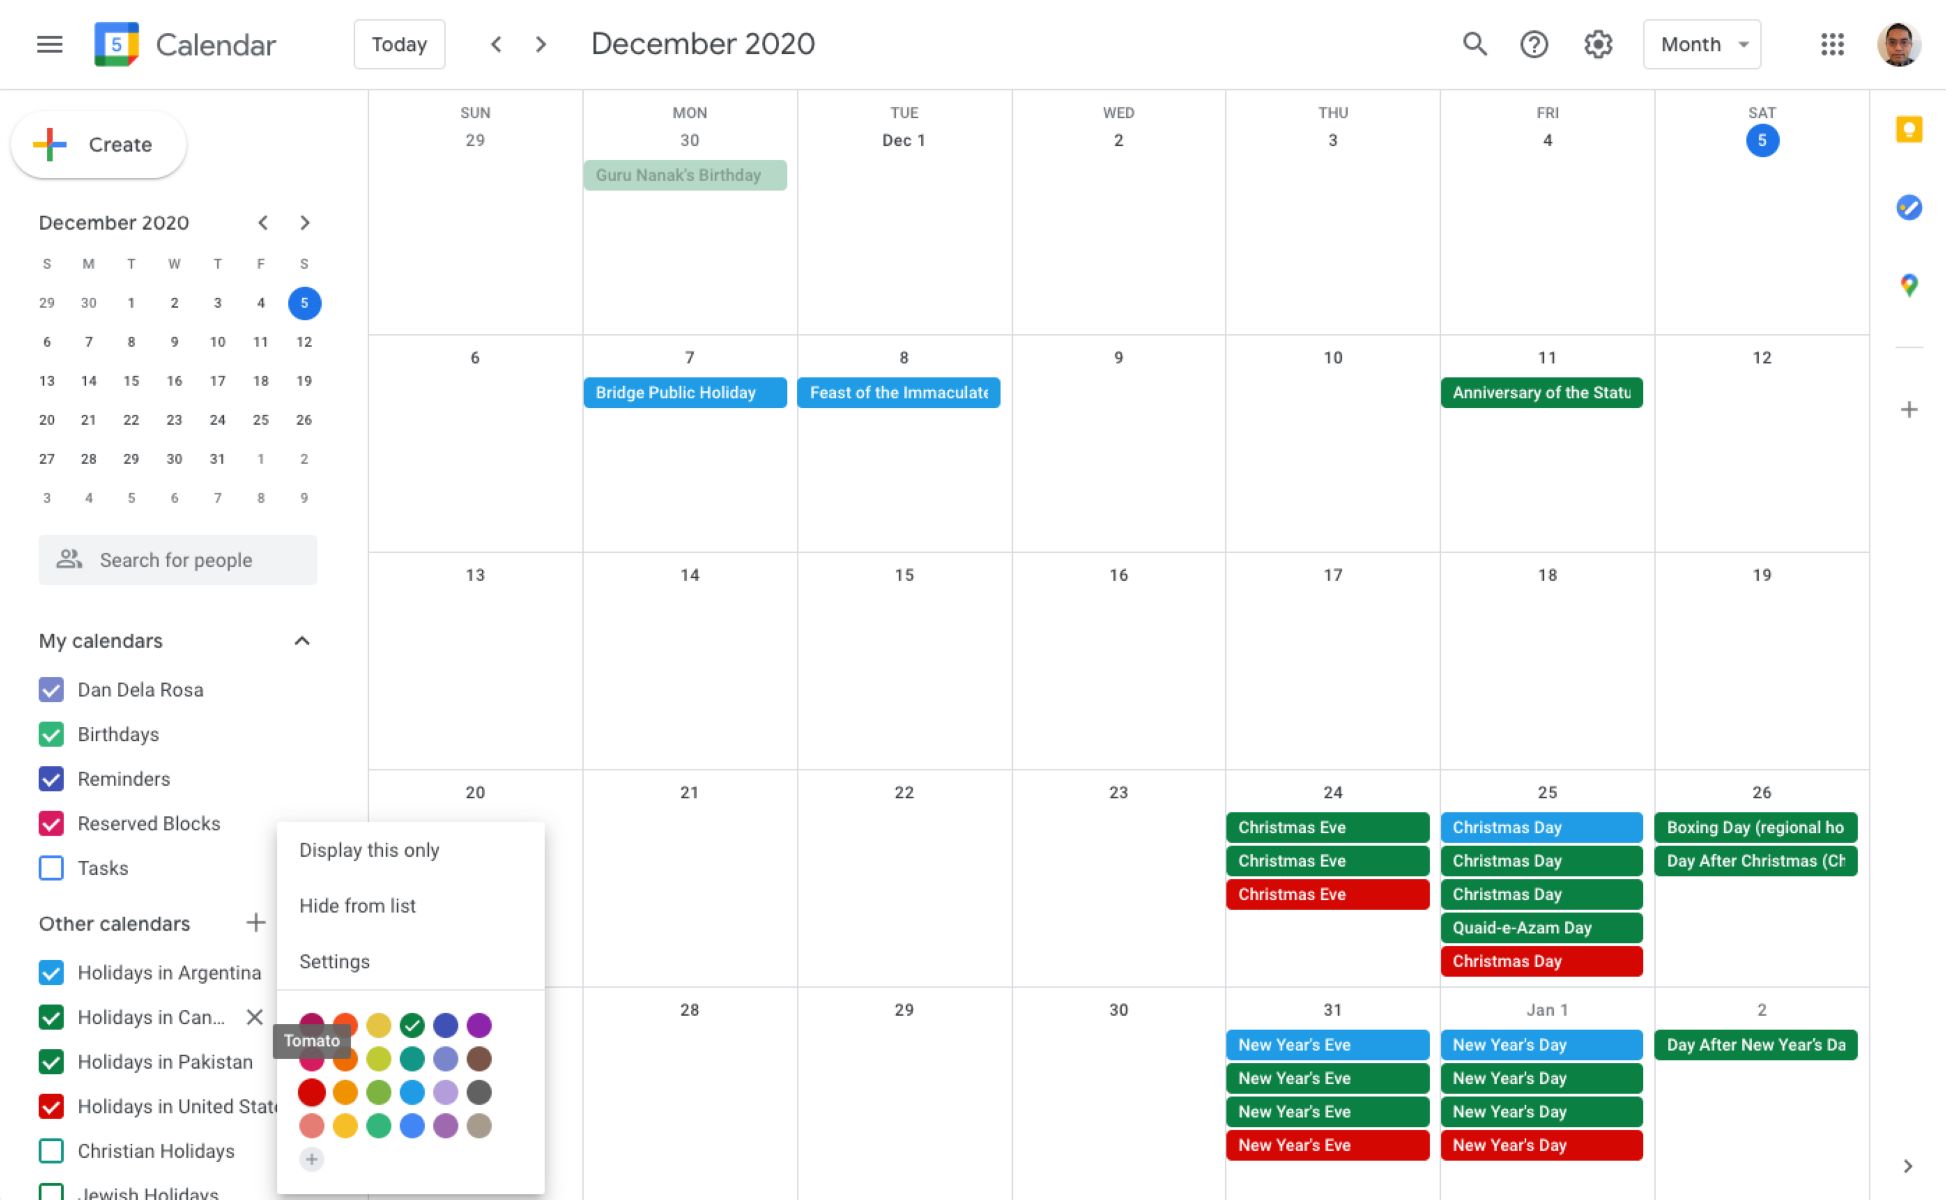
To delete the Holidays calendar, go back to the “Other calendars” section and locate the Holidays calendar. Click on the three-dot menu or the settings icon next to it, and select the “Remove” or “Delete” option. Confirm the deletion if prompted.
By creating a new calendar and transferring holiday events to it, you have full control over the visibility and customization of your holiday events. You can choose to display or hide the new calendar as needed, ensuring that your Google Calendar fits your preferences and requirements.
Now that you’ve learned how to create a new calendar, feel free to explore additional features and settings within Google Calendar to further optimize your scheduling experience.
# Step 1: Open Google Calendar
To create a new calendar in Google Calendar, start by opening the application in your web browser. Simply visit calendar.google.com and ensure that you are signed in to your Google account.
The Google Calendar interface will appear, showcasing your existing calendars and any events you may already have. Take a moment to familiarize yourself with the layout and features. You’ll see the main calendar display where your events are listed, along with options for creating new events, managing calendars, and adjusting settings.
If you prefer to use the Google Calendar mobile app, open the app on your device instead. Make sure you are signed in to the correct Google account associated with your calendar.
The mobile app offers a similar interface but optimized for smaller screens. You can access the menu by tapping the three horizontal lines in the top-left corner or by swiping from the left edge of the screen to reveal the navigation panel.
Whether you’re using the web version or the mobile app, ensure that you have a stable internet connection to access all the features of Google Calendar.
Now that you have Google Calendar open, you’re ready to create a new calendar and customize it according to your preferences. Proceed to the next step to learn how to create a new calendar within Google Calendar.
# Step 2: Create a New Calendar
After opening Google Calendar, the next step is to create a new calendar. This will allow you to have a separate calendar where you can organize specific events or categories of events. Follow the steps below to create a new calendar in Google Calendar:
Step 1: Open Google Calendar
Start by opening Google Calendar in your web browser or on your mobile device. Make sure you are signed in to your Google account associated with your calendar.
Step 2: Access Calendar Settings
In the web version, click on the settings gear icon at the top right corner of the Google Calendar interface. From the drop-down menu, select “Settings”. On the mobile app, tap the menu icon (usually represented by three horizontal lines) and then select “Settings”.
Step 3: Create a New Calendar
In the settings menu, locate and select the “Calendars” or “Manage calendars” option. This will display a list of your existing calendars.
Look for the option to “Create new calendar” or a plus sign (“+”) icon to add a new calendar. Click on it to create a new calendar.
Step 4: Customize Calendar Details
After selecting the option to create a new calendar, you’ll be prompted to provide details for the calendar. Choose a name for your new calendar, such as “Work,” “Personal,” or any other descriptive term that aligns with the purpose of the calendar.
You can also customize the color of the calendar to make it easily identifiable, especially if you have multiple calendars. Adjust any other settings as per your preference, such as the time zone or sharing options for the calendar.
Step 5: Save the New Calendar
Once you have customized the details, click on the “Save” or “Create” button to create the new calendar. The calendar will now be added to your list of calendars, and you can start using it to organize events.
Congratulations! You have successfully created a new calendar in Google Calendar. This provides you with a dedicated space to manage specific events or categories, helping you stay organized and focused. Now, you can move on to the next step to learn how to utilize and manage events within the new calendar.
# Step 3: Move Events to the New Calendar
With the new calendar created in Google Calendar, you can now start moving events from other calendars, including the Holidays calendar, to the newly created calendar. This will help you organize your events and categorize them according to your preferences. Follow the steps below to move events to the new calendar:
Step 1: Open Google Calendar
Begin by opening Google Calendar in your web browser or on your mobile device. Ensure that you are signed in to your Google account associated with your calendar.
Step 2: Locate the Event
Navigate to the event that you want to move to the new calendar. This could be a holiday event from the Holidays calendar or any other event you want to categorize differently.
Step 3: Edit the Event
Click on the event to open its details. Look for the option to “Edit” or “Modify” the event. Select this option to make changes to the event.
Step 4: Change the Calendar
Within the event details, locate the option to change the calendar. This could be a drop-down menu or an option to select the calendar directly.
Choose the newly created calendar from the list of available calendars to move the event to that calendar. Make sure to save the changes once you have selected the new calendar.
Step 5: Repeat for other Events
If you have multiple events that you want to move, repeat the above steps for each event. This allows you to transfer all the necessary events from different calendars to the new calendar.
By moving events to the new calendar, you are effectively categorizing them and making it easier to manage and view specific types of events. This could include personal events, work-related events, or any other categories you wish to create.
Congratulations! You have successfully moved events from other calendars to the newly created calendar. Your Google Calendar is now organized according to your preferences, and you can easily view and manage events specific to the new calendar. Continue to the next step to learn about deleting the unnecessary or unwanted Holidays calendar.
# Step 4: Delete the Holidays Calendar
Once you have successfully transferred all the necessary events from the Holidays calendar to your newly created calendar, you may choose to delete the Holidays calendar altogether. This step will remove the Holidays calendar from your Google Calendar, keeping your calendar view clean and focused on your personalized events. Here’s how to delete the Holidays calendar:
Step 1: Open Google Calendar
Start by opening Google Calendar in your web browser or on your mobile device. Make sure you are signed in to your Google account associated with your calendar.
Step 2: Locate the Holidays Calendar
Within Google Calendar, find the “Other calendars” section on the left-hand side of the interface. Look for the Holidays calendar that you want to delete.
Step 3: Access Calendar Settings
Click on the three-dot menu or the gear icon next to the Holidays calendar. This will open a context menu or a drop-down menu with various options.
Step 4: Delete the Holidays Calendar
From the menu options, select “Remove” or “Delete calendar”. Confirm the deletion when prompted. Note that this action will permanently delete the Holidays calendar and all its associated events.
By deleting the Holidays calendar, you can further streamline your Google Calendar and eliminate any unwanted clutter. The holidays will no longer be displayed, and you will have a clean slate to focus on your customized events.
It’s important to note that deleting the Holidays calendar is irreversible. If you change your mind in the future and want to re-add the holidays, you would need to subscribe to the Holidays calendar again.
Congratulations! You have successfully deleted the Holidays calendar from your Google Calendar, leaving you with a personalized and organized calendar view. Take advantage of the flexibility and customization options in Google Calendar to manage your events efficiently.
Conclusion
Managing your Google Calendar and customizing it to fit your needs is crucial for staying organized and productive. In this article, we explored three methods for removing or hiding holidays from your Google Calendar.
The first method involved manually unsubscribing from the Holidays calendar. By unchecking the box next to the Holidays calendar in the “Other calendars” section, you can remove the holidays from your view while still having the flexibility to subscribe to it again in the future.
The second method focused on hiding the Holidays calendar. By clicking on the colored box or checkbox next to it, you can toggle the visibility of the calendar, keeping the holidays hidden without removing them completely. This method is ideal if you want to occasionally view the holidays or have specific occasions where you want them displayed temporarily.
The third method centered around creating a new calendar. By creating a new calendar within Google Calendar, you can transfer specific events, including holidays, to the new calendar. This approach allows you to categorize your events and have a separate calendar tailored to your preferences. You also have the option to delete the Holidays calendar once you have moved all the relevant events.
Remember that these methods are applicable to the web version of Google Calendar, although the general principles can be adapted for the mobile app as well. By implementing these methods, you can have a clean and personalized view of your Google Calendar, focusing on the events that are important to you.
As you continue to use Google Calendar, feel free to explore additional features and settings to enhance your productivity and streamline your scheduling process. By utilizing the power of Google Calendar, you can stay organized, manage your time effectively, and ensure that your calendar aligns with your unique needs and preferences.