Introduction
Welcome to this step-by-step guide on how to remove an account from an Android tablet. Whether you no longer use an account or want to switch to a different one, removing an account from your tablet is a straightforward process that can be done in just a few simple steps.
Your Android tablet is likely connected to various accounts for email, social media, cloud storage, and other services. These accounts provide access to your personal information, contacts, and files. When you remove an account, it disconnects your tablet from that particular service and removes any associated data or settings.
Before we proceed, it’s important to note that removing an account from your tablet will not delete the account itself or any data associated with it. It simply removes the account’s access from your tablet.
In this guide, we will walk you through each step, from backing up your data to confirming the account removal. So let’s get started and learn how to remove an account from your Android tablet.
Backup Your Data
Before you proceed with removing an account from your Android tablet, it’s imperative to back up any important data associated with that account. This ensures that you don’t lose any contacts, emails, photos, or other essential information.
There are a few different methods you can use to back up your data, depending on the type of account you are removing:
- Email Accounts: If you are removing an email account, such as Gmail or Yahoo Mail, it’s advisable to sync your emails with a desktop email client like Microsoft Outlook or Mozilla Thunderbird. By setting up the account on your desktop client, you can download and save a local copy of your emails and folders.
- Cloud Storage Accounts: For cloud storage accounts like Google Drive or Dropbox, make sure to download any important files or folders to your tablet’s local storage or transfer them to another cloud service.
- Social Media Accounts: If you have social media accounts connected to your tablet, consider using the official social media apps or third-party apps that offer export features to save your posts, photos, and other account data.
- Other Accounts: Depending on the account you are removing, explore options to export or back up any valuable data associated with that account.
Once you have backed up your data, you can proceed with confidence, knowing that your important information is securely saved. Now, let’s move on to the next step: opening the settings on your Android tablet.
Open Settings
To remove an account from your Android tablet, you’ll need to access the device settings. The settings menu allows you to customize various aspects of your tablet’s functionality, including managing accounts.
Follow these steps to open the settings on your Android tablet:
- Unlock your tablet and navigate to the home screen.
- Look for the “Settings” app icon, typically represented by a gear or cogwheel.
- Tap on the “Settings” app icon to open the settings menu.
Alternatively, you can swipe down from the top of your tablet’s screen to reveal the notification panel, then tap on the gear icon to access the settings directly. This method may vary slightly depending on your tablet’s manufacturer and Android version.
Once you’ve successfully opened the settings menu, you’re ready to move on to the next step: navigating to the accounts section.
Navigate to Accounts
After opening the settings menu on your Android tablet, the next step is to locate the “Accounts” section. In the Accounts section, you’ll find a list of all the accounts connected to your tablet.
Here’s how you can navigate to the Accounts section:
- In the settings menu, scroll down or swipe up to find the “Accounts” option. It is typically located towards the bottom of the menu, but the exact placement may vary depending on your tablet’s manufacturer and Android version.
- Tap on the “Accounts” option to access the accounts management screen.
On some Android tablets, the Accounts section might be labeled as “Users & accounts” or “Cloud and accounts.” Look for similar options if you don’t see a specific “Accounts” label.
Once you’ve successfully navigated to the Accounts section, you are ready to move on to the next step: selecting the account you want to remove from your tablet.
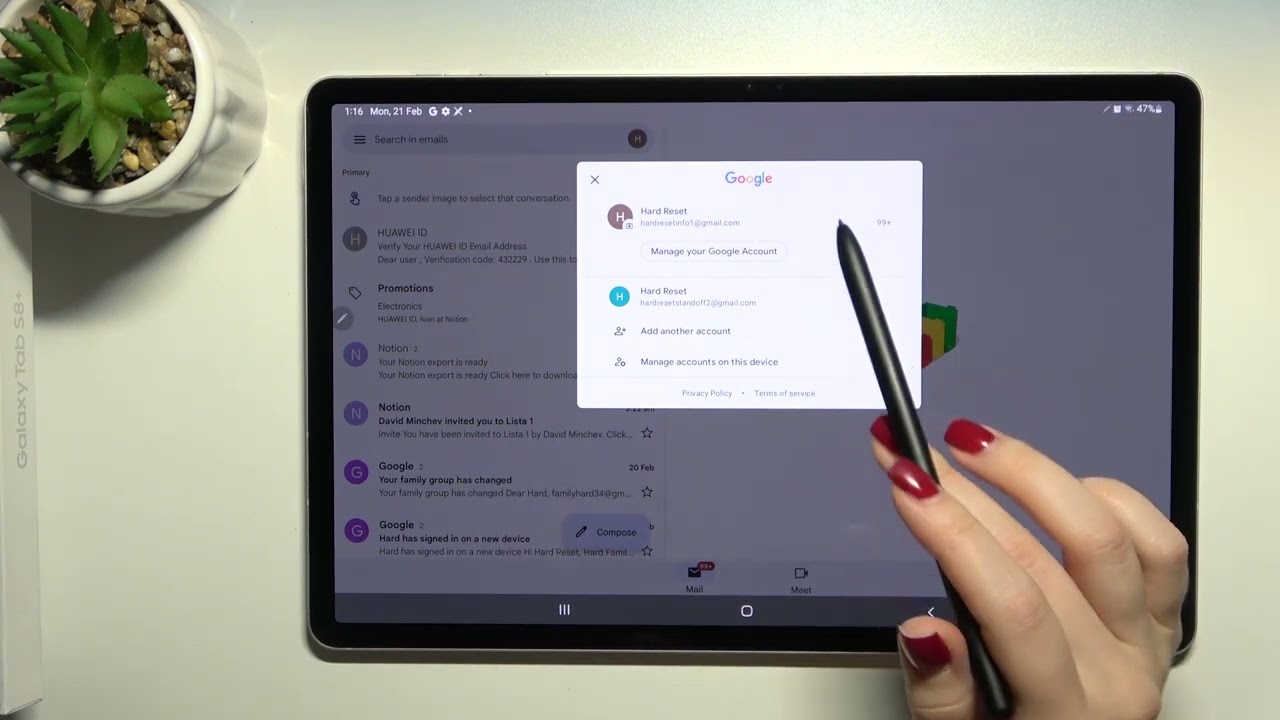
Select the Account to Remove
With the Accounts section open on your Android tablet, it’s time to identify and select the specific account that you want to remove. This step allows you to choose the account from the list of connected accounts on your tablet.
Follow these steps to select the account you wish to remove:
- Scroll through the list of accounts to locate the one you want to remove. The accounts will typically be displayed with their respective icons and names.
- Tap on the account that you wish to remove. This will open the account settings and options related to that specific account.
Take a moment to ensure that you have selected the correct account for removal. It’s essential to double-check as removing the wrong account can lead to loss of data or access to certain services.
Once you have selected the account, you are ready to proceed to the next step, which involves removing the account from your Android tablet.
Remove the Account
Now that you have selected the account you want to remove, it’s time to proceed with removing it from your Android tablet. By following these steps, you can easily disconnect the account from your device:
- Within the account settings, look for the option to remove or delete the account. This option is usually labeled as “Remove account,” “Delete account,” or “Remove from device.”
- Tap on the “Remove account” option. Depending on your tablet’s manufacturer and Android version, you may be prompted to enter your screen lock pattern, PIN, or password for security purposes.
- Confirm your selection when prompted. A pop-up message will appear asking you to confirm that you want to remove the account from your tablet. Review the details and consequences of removing the account, and if you are sure, tap on “OK” or a similar confirmation button.
After confirming the removal, your Android tablet will initiate the process of removing the account. This may take a few seconds, depending on the amount of data associated with the account and the speed of your tablet.
Once the account has been successfully removed, you will be taken back to the Accounts section, and you will no longer see the removed account listed.
Congratulations! You have now removed the selected account from your Android tablet. The next step involves confirming the removal and restarting your tablet, which we will discuss in the following section.
Confirm Removal
After removing the account from your Android tablet, it’s important to confirm that the removal was successful. This step ensures that the account has been fully disconnected from your device and that all associated data and settings have been removed.
Here’s how you can confirm the removal of the account:
- Return to the main settings menu on your Android tablet.
- Navigate back to the Accounts section or the area where you initially selected the account for removal.
- Scan through the list of accounts to verify that the account you removed is no longer listed. If you cannot find the account, it confirms that the removal was successful.
In some cases, you may also notice that certain apps or services associated with the removed account are no longer accessible on your tablet. This further confirms that the account has been successfully removed.
If you encounter any issues or still see the account listed after the removal, double-check the steps you followed and make sure you selected the correct account for removal. If needed, repeat the process to remove the account again.
Once you have confirmed the successful removal of the account, it’s a good idea to proceed to the next step: restarting your tablet. This step helps ensure that all changes are fully implemented and any residual data or settings are cleared.
Restart Your Tablet
After removing an account from your Android tablet, it’s recommended to restart your device. Restarting your tablet helps to finalize the removal process and ensures that any lingering data or settings associated with the removed account are fully cleared.
Here’s how you can restart your tablet:
- Press and hold the power button on your tablet until a menu appears on the screen.
- From the menu options, select the “Restart” or “Reboot” option. The exact wording may vary depending on your tablet’s manufacturer and Android version.
- Confirm your selection if prompted and wait for your tablet to power off and then restart.
Once your tablet has restarted, it will go through the boot-up process and load the home screen. This signifies that the restart is complete and any changes made, including the removal of the account, have been fully implemented.
By restarting your tablet after removing an account, you can ensure that your device operates smoothly, without any remnants of the removed account affecting its performance or functionality.
Now that you have successfully restarted your tablet, it’s time to move on to the next step: verifying that the account removal was successful. We will explore this step further in the following section.
Verify Account Removal
After restarting your Android tablet, it’s important to verify that the account removal was successful. Verifying the removal ensures that the account is no longer present on your device and that all associated data and settings have been properly cleared.
Here’s how you can verify the account removal:
- Go to the settings menu on your tablet.
- Navigate back to the Accounts section or the area where you initially selected the account for removal.
- Check the list of accounts to ensure that the removed account is no longer listed. If the account is no longer appearing, it confirms that the removal was successful.
In addition to checking the Accounts section, you can also attempt to access any apps or services that were associated with the removed account. If the account removal was successful, you should no longer be able to log in or access the account-related features of those apps or services.
If you still see the account listed or encounter any issues, it’s possible that the removal process was not completed correctly. In such cases, it’s recommended to repeat the steps and ensure that you follow the instructions accurately.
By verifying the account removal, you can have peace of mind knowing that the account and its associated data are no longer accessible on your Android tablet.
If the verification is successful, and you no longer need the removed account, you may proceed to set up a new account if desired. However, setting up a new account is optional and entirely dependent on your needs and preferences.
Set Up a New Account (Optional)
After removing an account from your Android tablet, you have the option to set up a new account if needed. Setting up a new account allows you to connect to different services, access new features, and personalize your tablet to better suit your preferences.
If you decide to set up a new account, here are the general steps to follow:
- Go to the settings menu on your tablet.
- Navigate to the Accounts section or the area where you initially removed the account.
- Look for the option to add a new account, typically labeled as “Add account” or “+ Add account.” Tap on it.
- Select the type of account you want to add, such as Google, Microsoft, or a social media platform.
- Follow the on-screen prompts to enter the necessary credentials and set up the account.
- Once you have successfully set up the new account, you can customize its settings and access the services and features associated with it.
It’s important to note that the process of setting up a new account may vary depending on the type of account and your tablet’s manufacturer. Follow the specific instructions and prompts provided on your screen for a seamless setup experience.
Setting up a new account can offer you a fresh start and the opportunity to explore different apps, services, and features on your Android tablet. Whether it’s an email account, cloud storage account, or a social media account, adding a new account allows you to expand your tablet’s functionality according to your preferences.
Remember, setting up a new account is entirely optional. If you don’t need or want to add another account at this time, you can proceed to use your Android tablet without any additional accounts.
Conclusion
Removing an account from your Android tablet is a simple process that can be done in a few easy steps. By following the instructions outlined in this guide, you can disconnect accounts that are no longer needed or switch to a different account. It’s important to ensure that you back up any important data associated with the account before proceeding with the removal.
We covered the essential steps, from backing up your data to confirming the successful removal of the account. Remember to navigate to the Accounts section in the settings, select the account you want to remove, and follow the prompts to complete the removal process. Restarting your tablet after the removal helps ensure that all changes are fully implemented.
After removing an account, it’s crucial to verify that the removal was successful by checking the Accounts section and attempting to access any related apps or services. If you encounter any issues or the account is still present, ensure that you followed the steps correctly and consider repeating the process if necessary.
Lastly, setting up a new account is entirely optional and depends on your needs. If you choose to set up a new account, follow the instructions provided in the settings to add and configure the new account according to your preferences.
By following these steps, you can easily manage and customize the accounts on your Android tablet, ensuring a seamless and personalized user experience.