Introduction
An external hard drive is a popular storage solution for individuals and businesses alike. It offers the convenience of additional storage space that can be easily connected to computers or other devices. However, there may come a time when you need to reformat your external hard drive.
Reformatting an external hard drive is the process of erasing all the data on the drive and setting it up with a new file system. This can be necessary for a variety of reasons, such as preparing the drive for a different operating system, resolving issues with corrupted files, or improving performance.
In this article, we will explore why reformatting an external hard drive is necessary and provide step-by-step instructions for reformatting on different operating systems. Whether you are a Windows, Mac, or Linux user, or if you prefer using third-party software, we’ve got you covered.
Before diving into the reformatting process, it is important to note that reformatting will erase all the data on the external hard drive. Therefore, ensure that you have backed up any important files before proceeding with the reformatting process. Take the time to review the content on your external hard drive and carefully transfer any files you want to keep to a safe location.
Now that we understand the basics, let’s delve into the reasons why reformatting is necessary for an external hard drive.
Why reformatting an external hard drive is necessary
There are several reasons why reformatting an external hard drive may be necessary. Let’s explore some of the primary reasons:
1. Compatibility: External hard drives come pre-formatted with a specific file system that may not be compatible with your operating system. For example, if you have a Windows computer and the external hard drive is formatted for Mac, you may experience difficulties in accessing and using the drive. By reformatting the drive to match your operating system’s file system, you ensure seamless compatibility and smooth data transfer.
2. File system optimization: Over time, the file system on your external hard drive can become fragmented or corrupted. This can lead to slower performance, file errors, and data loss. Reformatting the drive cleans up the file system, removes any errors, and optimizes it for improved performance and reliability.
3. Virus or malware removal: If your external hard drive has been infected with viruses or malware, reformatting can help eliminate these malicious programs. By wiping the drive and starting fresh, you can ensure that any existing infections are completely removed, offering a clean and secure storage solution.
4. Repurposing the drive: If you no longer need the data on your external hard drive or if you want to repurpose it for a different use, reformatting is necessary. You can erase all the existing data and set up the drive according to your new requirements, whether it’s for storing media files, creating backups, or using it as a bootable drive.
5. Solving drive errors: If you’re experiencing issues with your external hard drive, such as frequent crashes, inaccessible files, or strange error messages, reformatting can help resolve these problems. It can help rectify file system errors, bad sectors, and other drive-related issues, providing a fresh start and potentially fixing the problems you were encountering.
By understanding the reasons why reformatting an external hard drive is necessary, you can make informed decisions about when and how to reformat your drive. In the next sections, we will provide step-by-step instructions for reformatting on different operating systems, ensuring a smooth and successful process.
Before you begin: Preparing your external hard drive
Before jumping into the reformatting process, it is crucial to properly prepare your external hard drive. Taking a few necessary steps beforehand will help ensure a smooth and successful reformatting process. Here are some important considerations:
1. Backup your data: As mentioned earlier, reformatting an external hard drive will erase all the data on it. Therefore, it is essential to back up any important files before proceeding. You can either transfer the files to another storage device, such as a different external hard drive or a cloud storage service, or create a backup on your computer. Double-check to ensure that you have copied all the necessary files as you won’t be able to recover them after reformatting.
2. Check for compatibility: Before reformatting, ensure that your external hard drive is compatible with the system you plan to use it with. Confirm the file system requirements of your operating system, as different systems may have different preferences. For example, Windows typically uses NTFS or exFAT, while Macs prefer APFS or HFS+.
3. Remove unnecessary files: Take the time to declutter your external hard drive and only keep the files that are necessary. Delete any redundant or obsolete files, as this will help optimize the reformatting process and make it quicker.
4. Disconnect any devices: Before reformatting, ensure that your external hard drive is the only device connected to your computer. Disconnect any other external hard drives, USB drives, or memory cards to avoid any accidental reformatting of the wrong device.
5. Disable write protection: Some external hard drives come with a write protection feature, which prevents any changes from being made to the drive. If your drive has this feature enabled, you will need to disable it before reformatting. Check the manufacturer’s instructions or the drive settings to learn how to disable write protection.
6. Check for firmware updates: It’s always a good idea to ensure that your external hard drive’s firmware is up to date. Visit the manufacturer’s website and look for any available firmware updates for your specific model. Updating the firmware can improve drive performance and compatibility.
7. Note down important drive information: Before proceeding with the reformatting process, make a note of your external hard drive’s serial number, model number, and any other important information. This information may be useful for future reference or if you encounter any issues during the reformatting process.
By following these steps and properly preparing your external hard drive, you can proceed with confidence to the reformatting process. Now that you are ready, let’s explore the step-by-step instructions for reformatting on different operating systems.
Option 1: Reformatting on Windows
If you are using a Windows operating system, reformatting your external hard drive is a straightforward process. Follow these step-by-step instructions:
1. Connect the external hard drive: Plug in your external hard drive to an available USB port on your Windows computer. Wait for the device to be recognized and show up in the File Explorer.
2. Open the Disk Management utility: Right-click on the Start button and select “Disk Management” from the context menu. Alternatively, you can press the Windows key + X and choose “Disk Management” from the menu.
3. Select the external hard drive: In the Disk Management utility, locate your external hard drive from the list of available disks. Be cautious to select the correct drive, as reformatting will erase all data on the selected disk.
4. Delete existing partitions: Right-click on each partition on the external hard drive and select “Delete Volume” from the context menu. Confirm any prompts that may appear. Repeat this process for all partitions on the drive until it shows as unallocated space.
5. Create a new partition: Right-click on the unallocated space and select “New Simple Volume.” Follow the instructions in the New Simple Volume Wizard to specify the partition size, assign a drive letter, and choose the file system format. For optimal compatibility, it is recommended to use the NTFS file system.
6. Format the partition: Once the new partition is created, right-click on it and select “Format” from the context menu. Choose the file system format, give the partition a name, and select the quick format option if desired. Click “OK” to start the formatting process.
7. Wait for the formatting to complete: The formatting process may take a few minutes to complete, depending on the size of your external hard drive. Once the process is finished, the partition will be ready for use.
8. Safely eject the external hard drive: Before disconnecting the external hard drive, ensure that all processes involving the drive are closed. Right-click on the drive in the File Explorer and select “Eject” from the context menu. Wait for the “Safe to Remove Hardware” message to appear before disconnecting the drive.
That’s it! Your external hard drive is now reformatted and ready to be used with your Windows computer. Remember, reformatting erases all data on the drive, so ensure that you have backed up any important files before proceeding. In the next section, we will explore the reformatting process for Mac users.
Option 2: Reformatting on Mac
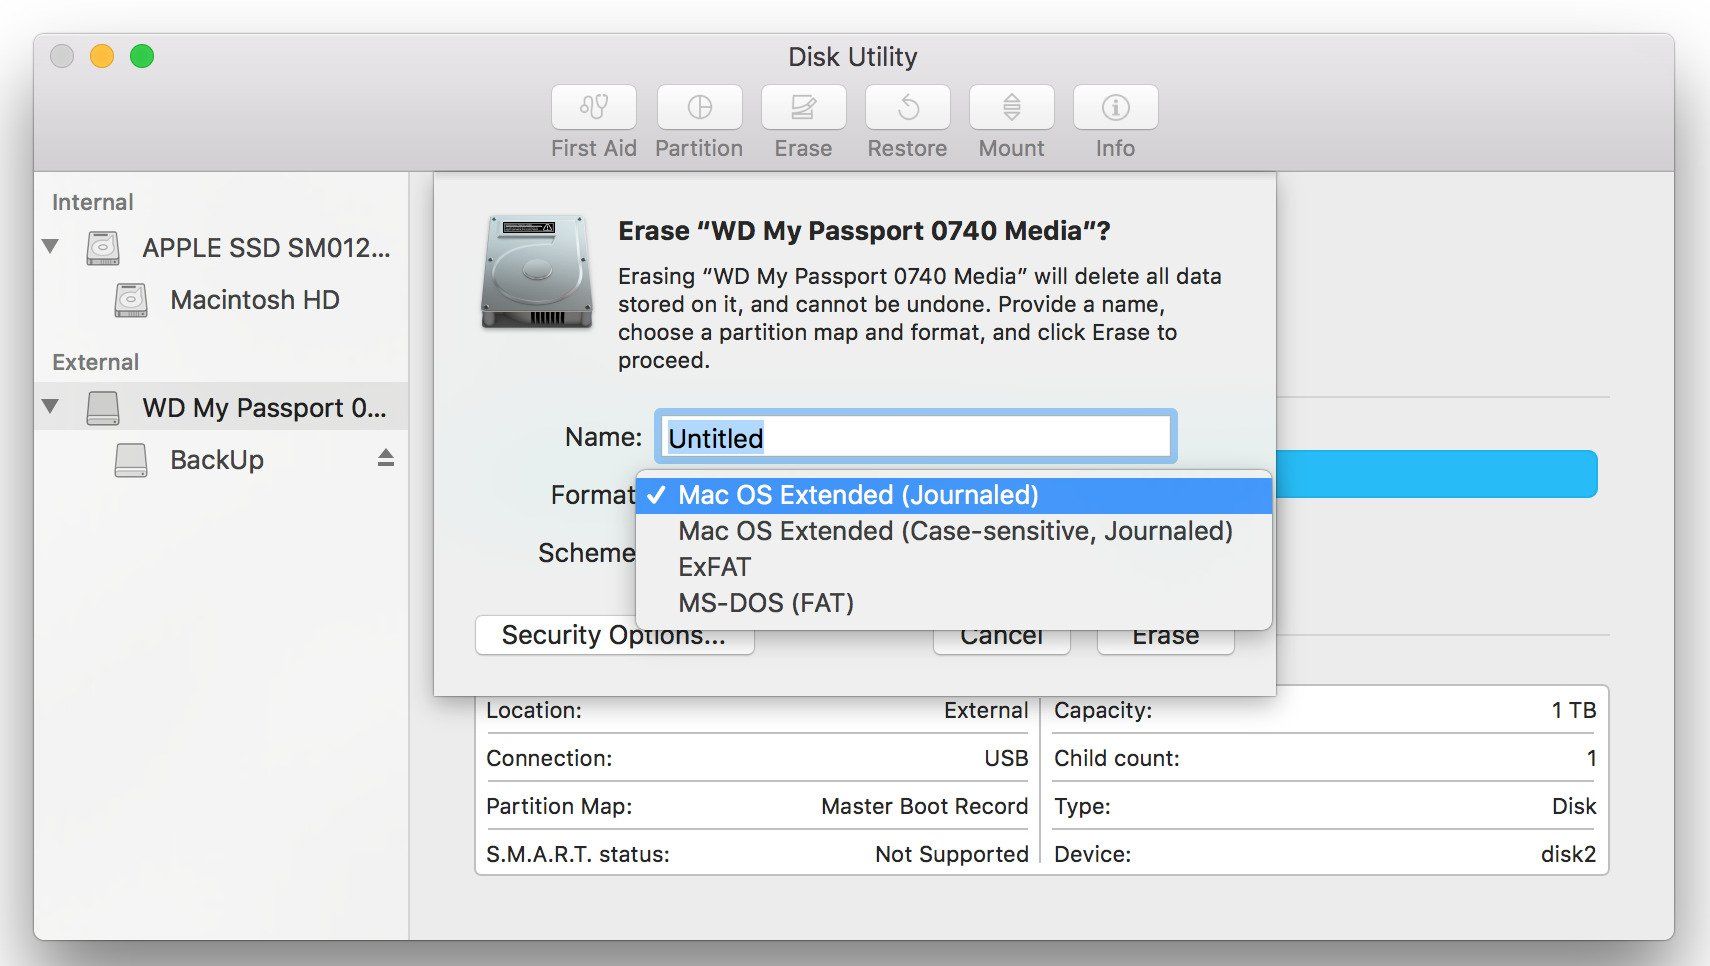
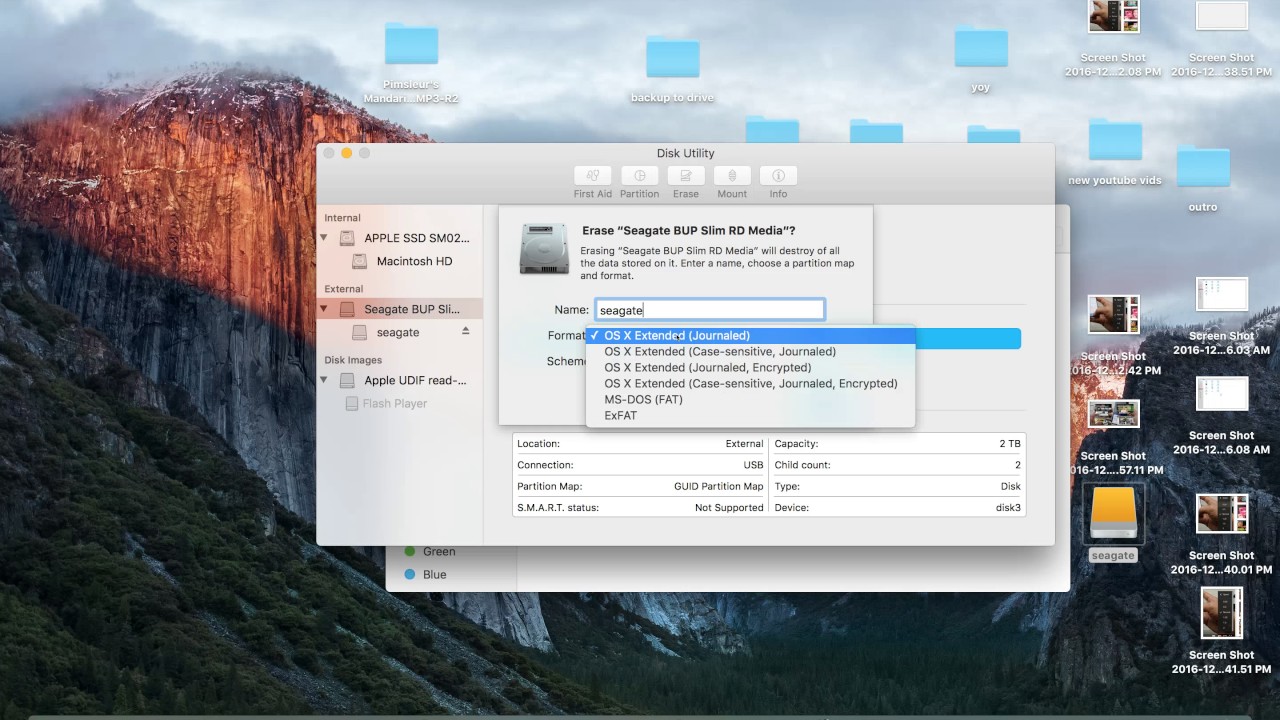
If you are using a Mac computer, reformatting your external hard drive is a straightforward process. Follow these step-by-step instructions:
1. Connect the external hard drive: Plug in your external hard drive to an available USB or Thunderbolt port on your Mac. Wait for the device to be recognized and appear on the desktop or in Finder.
2. Open Disk Utility: Click on the “Go” menu in the Menu bar and select “Utilities” from the drop-down menu. Then, double-click on “Disk Utility” to launch the app.
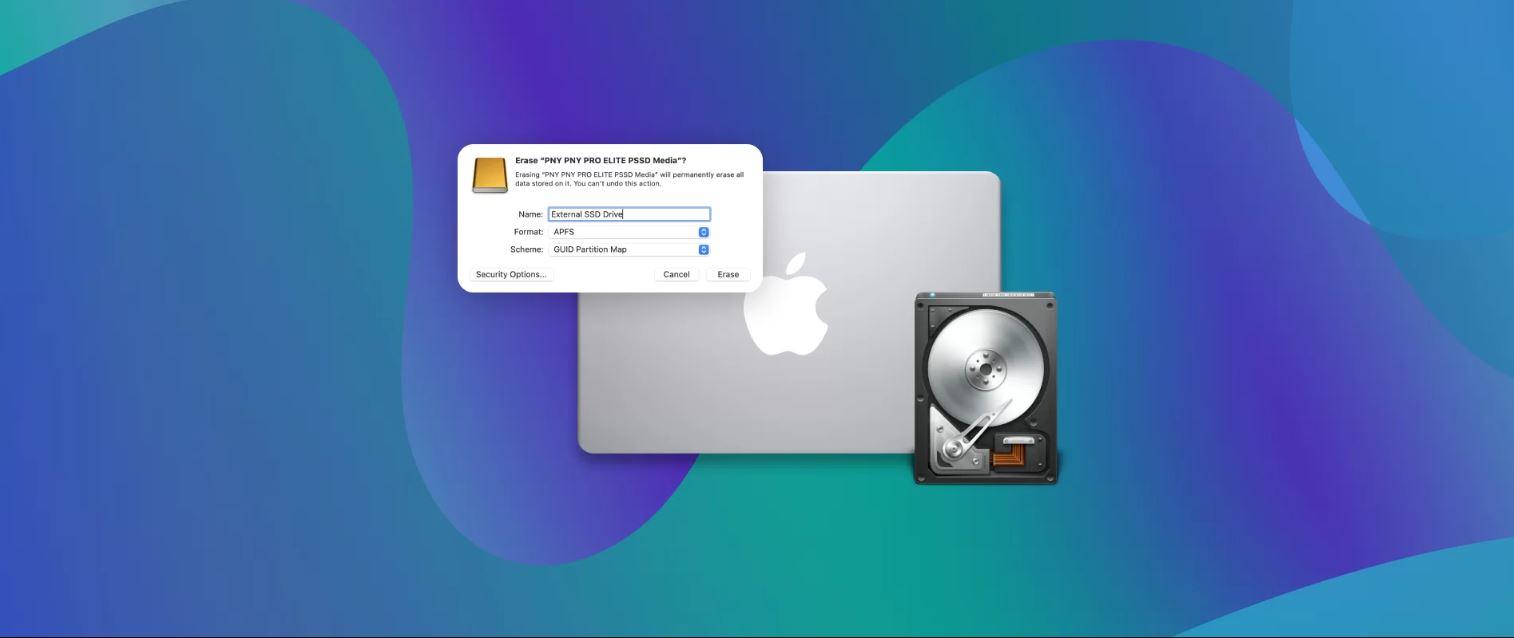
3. Select the external hard drive: From the list of drives and volumes on the left side of the Disk Utility window, select your external hard drive.
4. Erase the drive: Click on the “Erase” button in the toolbar at the top of the Disk Utility window. A new window will appear with options for erasing the drive.
5. Choose a new file system format: In the Erase window, select the desired file system format, such as APFS (Apple File System) or Mac OS Extended (also known as HFS+). If you plan to use the drive with both Mac and Windows systems, select exFAT for maximum compatibility.
6. Configure additional options: You can enter a name for the external hard drive and choose whether to use the GUID Partition Map or Master Boot Record partition scheme. The default settings are usually suitable for most users.
7. Start the reformatting process: Double-check the settings and then click on the “Erase” button. A warning message will appear, notifying you that all data on the drive will be deleted. Confirm the erase operation and wait for the process to complete.
8. Eject the external hard drive: Once the reformatting process is finished, you can safely eject the external hard drive. Right-click on the drive icon on the desktop or in Finder and select “Eject” from the context menu. Wait for the drive to unmount before physically disconnecting it.
That’s it! Your external hard drive is now reformatted and ready to be used with your Mac computer. Remember to back up any important files before proceeding, as reformatting will erase all data on the drive. In the next section, we will explore the reformatting process for Linux users.
Option 3: Reformatting on Linux
If you are using a Linux operating system, reformatting your external hard drive can be done through the terminal or using a graphical tool like GParted. Here are two common methods you can use:
Method 1: Terminal
1. Connect the external hard drive: Plug in your external hard drive to an available USB port on your Linux computer. Wait for the device to be recognized.
2. Open the terminal: Launch the terminal by searching for “Terminal” in the application menu or by pressing Ctrl + Alt + T.
3. Identify the external hard drive: In the terminal, use the following command to list the connected storage devices:
sudo fdisk -l
Look for the entry that corresponds to your external hard drive. It is usually identified by a name like “/dev/sdX” where X is a letter representing the drive.
4. Unmount the drive: Before reformatting, you need to unmount the drive. Use the following command, replacing “/dev/sdX” with the appropriate drive identifier:
sudo umount /dev/sdX
5. Format the drive: Use the following command to format the drive, replacing “/dev/sdX” with the appropriate drive identifier and “filesystem” with the desired file system (e.g., ext4, NTFS, exFAT):
sudo mkfs.filesystem /dev/sdX
For example, to format the drive with the ext4 file system:
sudo mkfs.ext4 /dev/sdX
6. Safely remove the drive: Once the formatting is complete, you can safely remove the drive using the following command:
sudo eject /dev/sdX
Method 2: GParted
1. Install GParted: Open the terminal and run the following command to install GParted:
sudo apt-get install gparted
2. Launch GParted: Open GParted either through the application menu or by running the following command in the terminal:
gksudo gparted
3. Select the external hard drive: From the list of drives and partitions in GParted, select your external hard drive.
4. Format the drive: Right-click on the external hard drive and select “Format to” from the context menu. Choose the desired file system for formatting (e.g., ext4, NTFS, exFAT).
5. Apply the changes: Click on the “Apply” button in the toolbar or select “Apply All Operations” from the Edit menu to apply the formatting changes. Confirm any prompts that may appear.
6. Safely remove the drive: Once the process is complete, safely remove the drive by right-clicking on it in the file manager and selecting “Eject” from the context menu.
That’s it! Your external hard drive is now reformatted and ready to be used with your Linux computer. Remember to back up any important files before proceeding, as reformatting will erase all data on the drive. In the next section, we will explore the option of using third-party software for reformatting.
Option 4: Using third-party software for reformatting
If you prefer using third-party software for reformatting your external hard drive, there are several reliable options available. These software tools offer additional features, enhanced compatibility, and more control over the reformatting process. Here are a few popular third-party software options:
1. EaseUS Partition Master: EaseUS Partition Master is a comprehensive disk management tool that allows you to reformat your external hard drive effortlessly. It provides an intuitive interface with step-by-step instructions, making it easy for both beginners and advanced users to reformat their drives. Simply launch the software, select your external hard drive, choose the desired file system, and follow the on-screen prompts to complete the reformatting process.
2. MiniTool Partition Wizard: MiniTool Partition Wizard is another powerful and user-friendly partition manager. It offers a simple interface with a range of features, including the ability to reformat external hard drives. With MiniTool Partition Wizard, you can easily select your drive, choose the file system, and initiate the reformatting process. The software also provides options for resizing partitions, recovering lost data, and more.
3. AOMEI Partition Assistant: AOMEI Partition Assistant is a comprehensive disk partition management tool that offers a wide range of features, including the ability to reformat external hard drives. With AOMEI Partition Assistant, you can easily select your drive, choose the desired file system, and customize various formatting options. The software also provides advanced features like disk cloning, partition alignment, and partition recovery.
4. DiskGenius: DiskGenius is a powerful disk management software that allows you to reformat and manage external hard drives with ease. It offers a user-friendly interface and a wide range of features, including the ability to reformat your drive using various file systems. DiskGenius also provides advanced options for data recovery, partition backup, and partition resizing.
When using third-party software for reformatting, it is important to choose a reputable and trustworthy tool from a reliable source. Always read user reviews, research the software’s features and compatibility, and follow the instructions provided by the software developer.
By using these third-party software tools, you can take advantage of additional features and flexibility when reformatting your external hard drive. Whether you need advanced customization options, comprehensive disk management capabilities, or specialized features, these tools can help you achieve your desired reformatting goals.
Remember to back up any important data before proceeding with the reformatting process, as it will erase all data on the drive. Take your time to explore the available options and choose the software that best suits your needs and preferences.
With the reformatting options we’ve explored in this article, you can confidently reformat your external hard drive according to your specific requirements. Whether you are using Windows, Mac, Linux, or third-party software, the reformatting process will help optimize your external hard drive’s compatibility, performance, and security.
Considerations and tips for reformatting
While reformatting your external hard drive can be a straightforward process, there are a few considerations and tips to keep in mind to ensure a successful and smooth experience. Here are some important factors to consider:
1. Backup your data: Before reformatting your external hard drive, it is crucial to back up any important files. This will prevent the loss of valuable data during the reformatting process. Consider using a cloud storage service, an additional external hard drive, or a computer backup solution to create a backup of your files.
2. Choose the right file system: When reformatting, choose the file system that best suits your needs. Consider the operating systems you will be using, as well as compatibility requirements for certain devices or software. For maximum compatibility between different operating systems, consider using exFAT or FAT32 as the file system.
3. Partitioning and allocation size: During the reformatting process, you may have the option to partition the external hard drive and allocate specific sizes to each partition. Consider your requirements and how you plan to use the drive. For example, you may want separate partitions for different file types or specific storage purposes.
4. Verify firmware updates: Before reformatting, check if there are any firmware updates available for your external hard drive. Updating the firmware can help improve performance, stability, and compatibility, ensuring optimal functionality for your drive.
5. Be patient during the process: Reformatting an external hard drive may take some time, especially for larger drives. Be patient and avoid interrupting the process, as doing so could potentially lead to data corruption or drive malfunction. Allow the reformatting process to complete uninterrupted.
6. Test the reformatted drive: After reformatting, it is a good practice to test the drive to ensure that it functions as expected. Connect the reformatted external hard drive to your computer and access files to verify that everything is working properly.
7. Keep track of the formatting details: Note down the details of the formatting process, including the file system used, partition sizes, and any other customized settings. This information can be helpful in case you need to troubleshoot or refer back to the specific formatting configuration in the future.
8. Maintain regular backups: Even after reformatting, it is important to maintain regular backups of your data. This will provide an extra layer of protection in case of any unforeseen events or accidents that could lead to data loss.
By considering these tips and practicing proper data management, you can ensure a successful reformatting process for your external hard drive. Remember to take the necessary precautions, back up your data, and choose the appropriate settings to optimize the drive’s performance and compatibility.
Now that you are equipped with the necessary knowledge and considerations, you can confidently proceed with reformatting your external hard drive according to your specific requirements.
Conclusion
Reformatting an external hard drive can be a necessary and beneficial process to optimize its performance, compatibility, and security. Whether you are using Windows, Mac, Linux, or third-party software, the step-by-step instructions provided in this article can help you reformat your external hard drive with ease.
We explored the reasons why reformatting is necessary, such as improving compatibility, optimizing the file system, removing viruses or malware, repurposing the drive, and solving drive errors. It is important to understand these reasons to make informed decisions about when and why to reformat your external hard drive.
Before initiating the reformatting process, it is crucial to back up any important files, verify compatibility, and disconnect any unnecessary devices. Taking these preparatory steps will ensure that your data is safe and that the reformatting process goes smoothly.
For Windows users, the Disk Management utility provides a simple and effective way to reformat an external hard drive. Mac users can use Disk Utility to accomplish the same task, while Linux users have the option of using the terminal or third-party software like GParted.
In cases where users prefer more control, flexibility, or additional features, third-party software options like EaseUS Partition Master, MiniTool Partition Wizard, AOMEI Partition Assistant, and DiskGenius offer comprehensive disk management capabilities, including the ability to reformat external hard drives.
Throughout the reformatting process, it is important to be cautious, patient, and attentive. Backup your data, choose the appropriate file system, and consider the partitioning and allocation sizes that suit your needs. Additionally, keeping track of firmware updates, testing the reformatted drive, and maintaining regular backups are essential practices to ensure a smooth experience and data integrity.
By following the guidelines and tips provided in this article, you can confidently reformat your external hard drive and enjoy its optimized performance and compatibility. Remember to always back up your data before proceeding with any formatting process.
Now that you have the necessary knowledge and steps to reformat an external hard drive, go ahead and take control of your storage solution to meet your specific requirements.