Introduction
Welcome to the world of digital storage! As we accumulate a plethora of files, documents, and media, it’s common to find ourselves in need of additional storage space. This is where external hard drives come to the rescue, providing a convenient and secure way to store and backup our valuable data. However, there may come a time when you need to reformat your external hard drive, whether it’s to ensure compatibility with your Mac, improve performance, or simply start fresh.
In this article, we will guide you through the process of reformatting an external hard drive on your Mac. Don’t worry if you’re new to the world of technology—our step-by-step instructions will make it easy for anyone to follow along!
Before we dive into the process, it’s important to note that reformatting an external hard drive will erase all data stored on it. So, make sure you have a backup of any important files before proceeding. Once you’re ready, let’s get started!
Step 1: Connect the external hard drive
The first step in reformatting your external hard drive on a Mac is to ensure that it is properly connected to your computer. Locate the USB or Thunderbolt cable that came with your external hard drive, and plug one end into the appropriate port on your Mac.
If you’re using a newer Mac with USB-C ports, you may need to use an adapter or a USB-C to USB-A cable to connect your external hard drive. Once connected, you should hear a confirmation sound and see the external hard drive appear on your desktop or in the Finder.
It’s essential to ensure a stable connection during the reformatting process, as a sudden disconnection could lead to data loss or corruption. If you’re using a portable external hard drive, make sure it’s placed on a stable surface and the cable is securely connected.
If your external hard drive requires an external power source, such as a power adapter or USB hub, make sure it is also properly connected and supplying power to the drive. Be sure to check the manufacturer’s instructions for any specific requirements or recommendations for your particular external hard drive.
Once you have verified that your external hard drive is connected and powered on, you’re ready to move on to the next step.
Step 2: Open Disk Utility
Now that your external hard drive is connected to your Mac, it’s time to open Disk Utility. Disk Utility is a built-in application on macOS that allows you to manage and format storage devices, including external hard drives.
To open Disk Utility, you have a couple of options:
- Navigate to your Applications folder, then open the Utilities folder. Find and launch the Disk Utility application.
- Use Spotlight by pressing Command + Spacebar, then type “Disk Utility” and press Enter when it appears in the search results.
Once Disk Utility is open, you will see a list of all the storage devices connected to your Mac, including your external hard drive. The drives are typically listed on the left-hand side of the Disk Utility window.
If you can’t find your external hard drive in the list, make sure it is properly connected to your Mac and powered on. You may also need to click the “Show All Devices” button in the toolbar to display all connected storage devices.
Now that you have Disk Utility open and your external hard drive is visible, you’re ready to proceed to the next step.
Step 3: Select the external hard drive
With Disk Utility open and your list of storage devices visible, it’s time to select your external hard drive. This step is crucial because you will be performing actions on the selected drive, including formatting it.
To select your external hard drive, simply click on its name in the list of devices. You should see the name of your external hard drive highlighted or selected, indicating that it is the active drive.
If you have multiple external hard drives connected to your Mac, make sure to choose the correct one. Double-check the name and any identifying information of the drive to ensure you don’t accidentally format the wrong device.
If you’re not sure which drive to select, you can verify it by checking its size and capacity. If the details match your external hard drive, then you can proceed confidently.
It’s important to note that once you select a drive, Disk Utility will display detailed information about that specific drive in the right-hand pane. Take a moment to review this information to confirm that you have indeed selected the correct external hard drive.
Once you have selected the correct drive, you’re ready to move on to the next step and begin the reformatting process.
Step 4: Erase the external hard drive
Now that you have selected your external hard drive in Disk Utility, it’s time to proceed with erasing it. The erase function will remove all data from the drive and prepare it for reformatting.
To erase the external hard drive, follow these steps:
- In the Disk Utility window, look for the toolbar at the top of the screen. Click on the “Erase” button, which looks like a trash can.
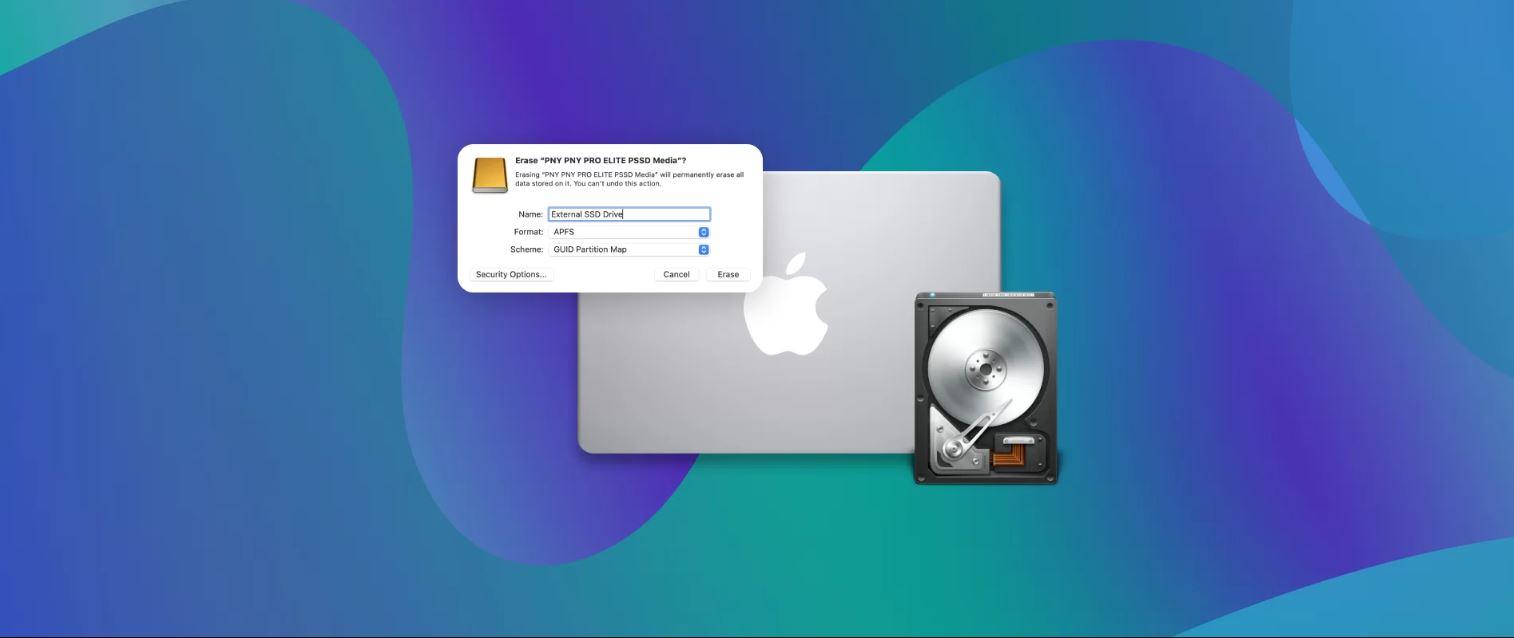
- A new window will appear, allowing you to configure the erase settings for your external hard drive.
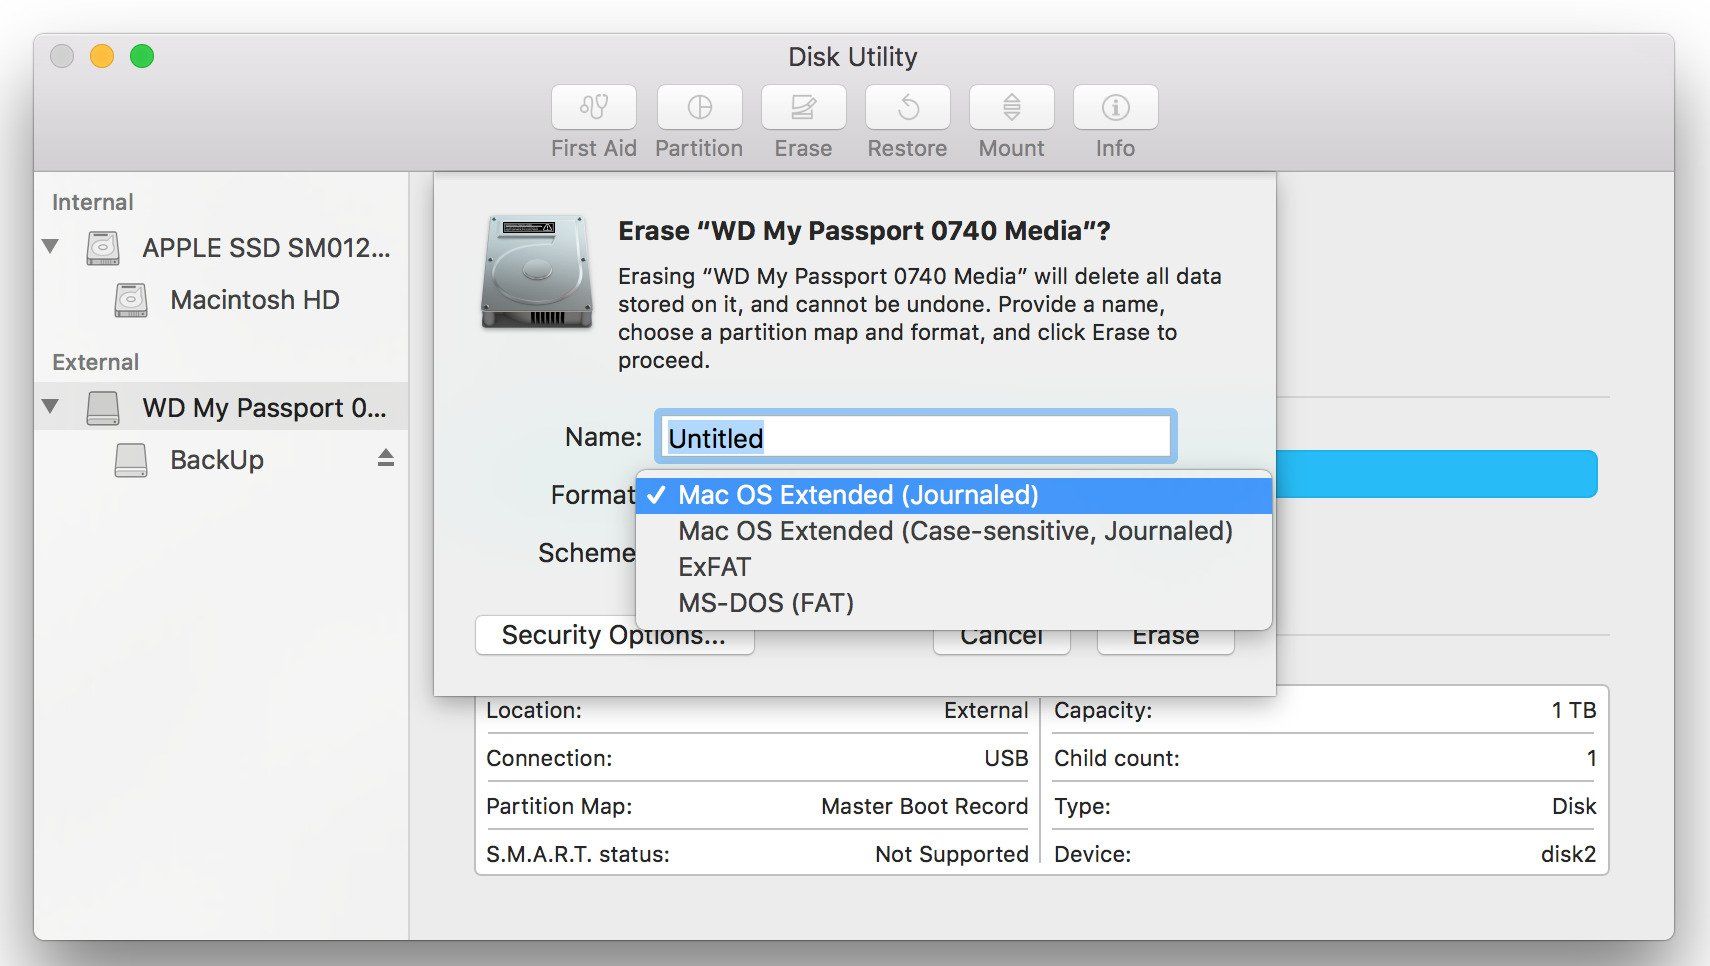
- First, give your external hard drive a new name if desired. This can be done by entering a name in the “Name” field.
- Next, select the desired format for your external hard drive. Mac supports various formats, including APFS (Apple File System) and Mac OS Extended (Journaled). Choose the format that best suits your needs.
- If you’re unsure which format to choose, consider selecting APFS, as it is the default format for modern Macs and offers better performance and compatibility.
- Lastly, for additional security, you can choose to enable the “Security Options” button. This will allow you to select a level of data overwriting, providing more robust erasure of your data.
- Once you have configured the erase settings to your preference, double-check that you have selected the correct drive. Then, click the “Erase” button to proceed.
At this point, Disk Utility will start erasing the external hard drive and reformatting it with the settings you chose. The duration of this process will depend on the size and speed of your external hard drive.
Note that erasing the drive will permanently delete all data, so ensure that you have made a backup of any important files before proceeding.
Once the erasure process is complete, you’re ready to move on to the next step and configure the formatting options for your external hard drive.
Step 5: Choose the desired format
Now that your external hard drive is erased, it’s time to choose the desired format. The format you choose will determine how the drive is structured and the type of file system it uses.
When selecting the format, consider the following factors:
- Compatibility: Different formats have varying levels of compatibility with different operating systems. If you plan to use the external hard drive solely with your Mac, formats like APFS or Mac OS Extended (Journaled) are recommended. If you need cross-platform compatibility with Windows or Linux systems, consider formats like ExFAT or FAT32.
- File size limitations: Some formats have limitations on the maximum file size they can support. For example, FAT32 can’t handle files larger than 4GB. If you work with large files, such as high-resolution videos or disk images, it’s important to choose a format that can accommodate them.
- Mac OS compatibility: Certain older Mac models may have specific requirements or limitations when it comes to the format of external storage devices. Be sure to consider the compatibility of your Mac with the selected format.
To choose the desired format, follow these steps:
- In the Disk Utility window, select your newly erased external hard drive from the left-hand pane.
- Click the “Erase” tab in the main Disk Utility window.
- Under the “Format” dropdown menu, select the format that best suits your needs. Consider the factors mentioned above when making your selection.
- Double-check that the other settings, such as the name and scheme, are as desired.
- Once you have made your selections, click the “Erase” button.
Disk Utility will now reformat your external hard drive with the selected format. The time required for this process depends on the size of your drive and the speed of your Mac.
Congratulations! You have successfully chosen the desired format for your external hard drive. In the next step, we will name the drive for easy identification.
Step 6: Name the external hard drive
Now that your external hard drive is reformatted with the desired format, it’s time to give it a name. Naming your drive is especially useful when you have multiple external drives connected to your Mac, as it allows for easy identification.
To name your external hard drive, follow these steps:
- In the Disk Utility window, select your reformatted external hard drive from the left-hand pane.
- Click the “Erase” tab in the main Disk Utility window.
- Next to the “Name” field, enter the desired name for your drive. Choose a name that will help you easily identify the contents or purpose of the drive.
- Take a moment to double-check the other settings, such as the format and scheme, to ensure they are as desired.
- Once you have entered the name and verified the settings, click the “Erase” button.
Disk Utility will now complete the process of naming your external hard drive. This step is quick and should take only a few seconds.
Having a meaningful and distinctive name for your external hard drive will make it easier to locate in Finder or other applications and prevent confusion when working with multiple storage devices.
With the drive now named, you’re ready to move on to the next step and explore optional partition options for your external hard drive.
Step 7: Adjust partition options (optional)
Adjusting partition options is an optional step in the reformatting process and is only necessary if you wish to divide your external hard drive into multiple partitions. Partitioning allows you to create separate sections on the drive, each appearing as a different volume on your Mac.
Partitioning can be useful for various reasons, such as organizing different types of files or setting up a dual-boot system with multiple operating systems. If you don’t have a specific need for partitioning, you can skip this step and proceed to the next one.
If you do want to adjust partition options, follow these steps:
- In the Disk Utility window, select your named external hard drive from the left-hand pane.
- Click the “Partition” tab in the main Disk Utility window.
- You will see a visual representation of your drive, displaying the total available space.
- To add a new partition, click the “+” button below the visual representation.
- Adjust the size of the partition by dragging the divider between the partitions. You can also enter a specific size value in the “Size” field.
- Choose the desired format for each partition, keeping in mind the same considerations mentioned in the previous step.
- If needed, you can click the “-” button to remove a partition.
- Double-check that the partition settings are as desired.
- Click the “Apply” button to confirm and apply the partition changes.
After applying the partition changes, Disk Utility will modify the structure of your external hard drive accordingly. The time required for this process depends on the size of your drive and the speed of your Mac.
Remember, partitioning is an optional step, and if you don’t require multiple partitions, you can move on to the next step.
Step 8: Confirm the reformatting process
Before proceeding with the reformatting process, it’s important to take a moment to confirm all the settings and options you have chosen. This step ensures that you have configured the formatting, naming, and partitioning (if applicable) of your external hard drive exactly as desired.
To confirm the reformatting process, follow these steps:
- In the Disk Utility window, review all the settings for your external hard drive, including the format, name, and partition options (if applicable).
- Double-check the information displayed in the right-hand pane to confirm that you have selected the correct drive.
- If you need to make any adjustments or changes, go back to the respective steps and modify the settings as needed.
- Once you are confident that all the settings are correct, click the “Apply” or “Erase” button, depending on the version of Disk Utility you are using.
By clicking the “Apply” or “Erase” button, you are confirming your intention to proceed with reformatting the external hard drive according to the selected settings. Keep in mind that this process will permanently erase all data on the drive, so ensure that you have a backup of any important files.
After clicking the button, Disk Utility will display a warning message informing you that all data on the drive will be erased. Read the message carefully and confirm your decision to proceed. Once confirmed, Disk Utility will begin the reformatting process.
Depending on the size and speed of your external hard drive, the reformatting process may take some time. Remain patient and avoid disconnecting or interrupting the process to prevent any potential data loss or drive corruption.
Once the reformatting process is complete, you’re ready to move on to the final step and wait for the process to finish.
Step 9: Wait for the reformatting to complete
After confirming the reformatting process, it’s time to exercise a little patience and allow Disk Utility to complete the task. The duration of the reformatting process will depend on the size of the external hard drive and the speed of your Mac.
While waiting for the reformatting to complete, it’s important to avoid any actions that may interrupt or interfere with the process. Do not disconnect the external hard drive or shut down your Mac until the process is finished.
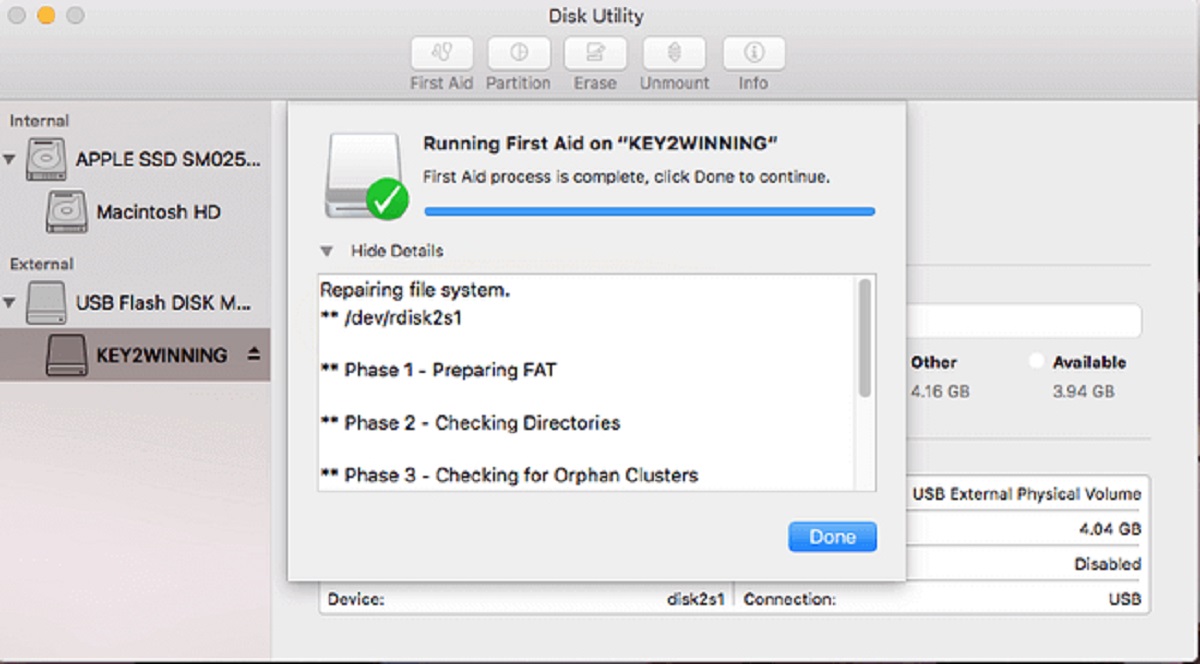
During this time, you may see a progress bar or status indicator in Disk Utility, providing an estimate of the remaining time for the formatting process. It’s important to note that these estimates are approximate and may vary depending on various factors.
It’s highly recommended to use this waiting time to ensure you have a backup of any important files or data. Reformatting an external hard drive will permanently erase all existing data, so having a backup ensures that you don’t lose any valuable information.
Once the reformatting process is complete, Disk Utility will display a message indicating that the process was successful. You can now safely disconnect the external hard drive or use it for your desired purposes.
Congratulations! You have now successfully reformatted your external hard drive on your Mac. It’s now ready to be used for storage, backups, or any other specific needs you have in mind.
Remember to properly eject the external hard drive from your Mac before physically disconnecting it to avoid any potential data loss or damage to the drive.
Thank you for following this step-by-step guide. We hope it has been helpful in assisting you with the reformatting process of your external hard drive on your Mac.
Conclusion
Reformatting an external hard drive on your Mac may seem like a daunting task, but with the help of Disk Utility and this step-by-step guide, the process becomes straightforward and manageable.
We covered the entire process from connecting the external hard drive to selecting and formatting it, adjusting partition options if desired, and confirming the reformatting process. Each step is crucial to ensure a successful and customized reformatting experience.
Remember to back up any important files before proceeding with the reformatting process, as it will permanently erase all data on the drive. Taking this precaution ensures that you won’t lose any valuable information during the procedure.
Throughout the guide, we highlighted important considerations to help you make informed decisions regarding the format, naming, and partition options for your external hard drive. These aspects allow you to tailor the drive to your specific needs, whether for compatibility, file size limitations, or organizational purposes.
Lastly, be patient and allow Disk Utility to complete the reformatting process. Rushing or interrupting the process can lead to data loss or drive corruption. Waiting for the process to finish ensures a successful reformatting outcome.
With your reformatted external hard drive now ready for use, you can enjoy its optimized performance, compatibility, and organizational structure. Whether you use it for storage, backups, or other needs, the reformatting process ensures that your external hard drive is set up to meet your requirements.
We hope this guide has been helpful in assisting you with reformatting your external hard drive on your Mac. If you have any further questions or need assistance, consult the documentation provided by the manufacturer or seek support from the appropriate channels.
Thank you for following along, and we wish you success in all your endeavors with your newly reformatted external hard drive!