Introduction
Welcome to this guide on how to reformat an external hard drive on Mac. Whether you want to repurpose your hard drive, fix any issues, or simply start fresh, reformatting is a straightforward process that can be done through Apple’s built-in Disk Utility. By reformatting your external hard drive, you can ensure compatibility with your Mac and optimize its performance.
Reformatting an external hard drive involves erasing all existing data and configuring it with a specific file system format that suits your needs. It is important to note that reformatting will permanently delete all data on the drive, so make sure to back up any important files before proceeding.
In this guide, we will walk you through the step-by-step process of reformatting your external hard drive on Mac using Disk Utility. Whether you are a newbie to Mac or a seasoned user, you’ll find this guide easy to follow and complete in no time.
Before we begin, ensure that you have a compatible external hard drive connected to your Mac and are logged in with administrative privileges. Let’s dive in and learn how to reformat your external hard drive on Mac!
Step 1: Connect the external hard drive to your Mac
The first step in reformatting your external hard drive on Mac is to connect it to your computer. Make sure your Mac is powered on and the external hard drive is properly plugged into a USB or Thunderbolt port.
Once connected, your Mac should recognize the external hard drive and display it on the desktop or in the Finder. If it doesn’t appear right away, try disconnecting and reconnecting the drive to ensure a secure connection. If the issue persists, you may need to troubleshoot the connection or verify compatibility between your Mac and the external hard drive.
It is important to note that certain external hard drives may require additional power sources, such as an AC adapter, especially if they are larger or have multiple drives built-in. Double-check the manufacturer’s instructions for your specific external hard drive to ensure it is properly powered.
Once the external hard drive is connected and recognized by your Mac, you can proceed to the next step, which involves launching Disk Utility to begin the reformatting process.
Step 2: Launch Disk Utility
With the external hard drive connected to your Mac, it’s time to launch Disk Utility, which is the built-in application for managing storage devices and disks on macOS.
To open Disk Utility, you have a few different options:
- Navigate to the “Applications” folder, then open the “Utilities” folder and double-click on “Disk Utility.”
- Click on the magnifying glass icon in the top-right corner of the screen to open Spotlight Search, type in “Disk Utility,” and select the application from the search results.
- Click on the Launchpad icon in the dock, type “Disk Utility” in the search field, and click on the application icon when it appears.
Once Disk Utility is launched, you will see a window displaying the connected storage devices on the left-hand side. The main section of the window will show detailed information about the selected drive.
Take a moment to verify that the external hard drive you want to reformat is listed in Disk Utility. Ensure that you’ve selected the correct drive to avoid accidentally reformatting the wrong disk, which could result in permanent data loss.
Now that Disk Utility is open and you’ve confirmed the correct external hard drive is selected, you are ready to move on to the next step, where we will discuss how to choose the external hard drive in Disk Utility for formatting.
Step 3: Select the external hard drive
After launching Disk Utility, the next step in reformatting your external hard drive on Mac is to select the specific drive you want to format.
In the Disk Utility window, you will see a sidebar on the left-hand side that lists all the connected storage devices. Take a moment to locate and identify your external hard drive in the sidebar.
External hard drives are usually listed under the “External” section in the sidebar, but the name may vary depending on the specific model and how it is labeled. Look for a name that closely resembles the model or brand of your external hard drive.
Click on the name of the external hard drive to select it. This will highlight the drive in the sidebar and display detailed information about it in the main section of the Disk Utility window.
Before proceeding, double-check that you have selected the correct external hard drive. Verifying the drive name and information ensures that you don’t accidentally format the wrong disk, which could result in permanent data loss.
Now that you have selected the external hard drive in Disk Utility, it’s time to move on to the next step, where we will discuss how to erase the hard drive.
Step 4: Erase the hard drive
Now that you have selected the external hard drive in Disk Utility, it’s time to erase the drive. Erasing the hard drive will remove all the data stored on it, so make sure to back up any important files before proceeding.
To erase the hard drive, follow these steps:
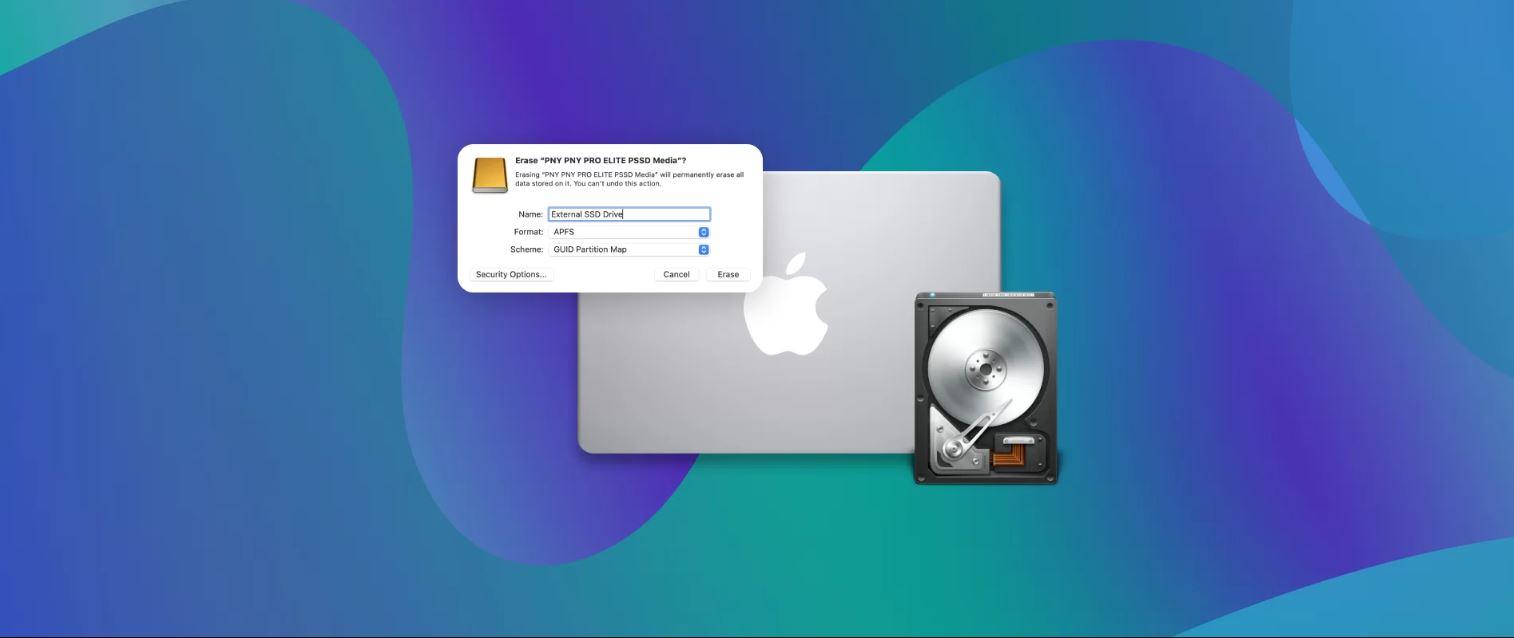
- In the Disk Utility window, click on the “Erase” button located in the toolbar at the top of the screen. This will open the Erase window.
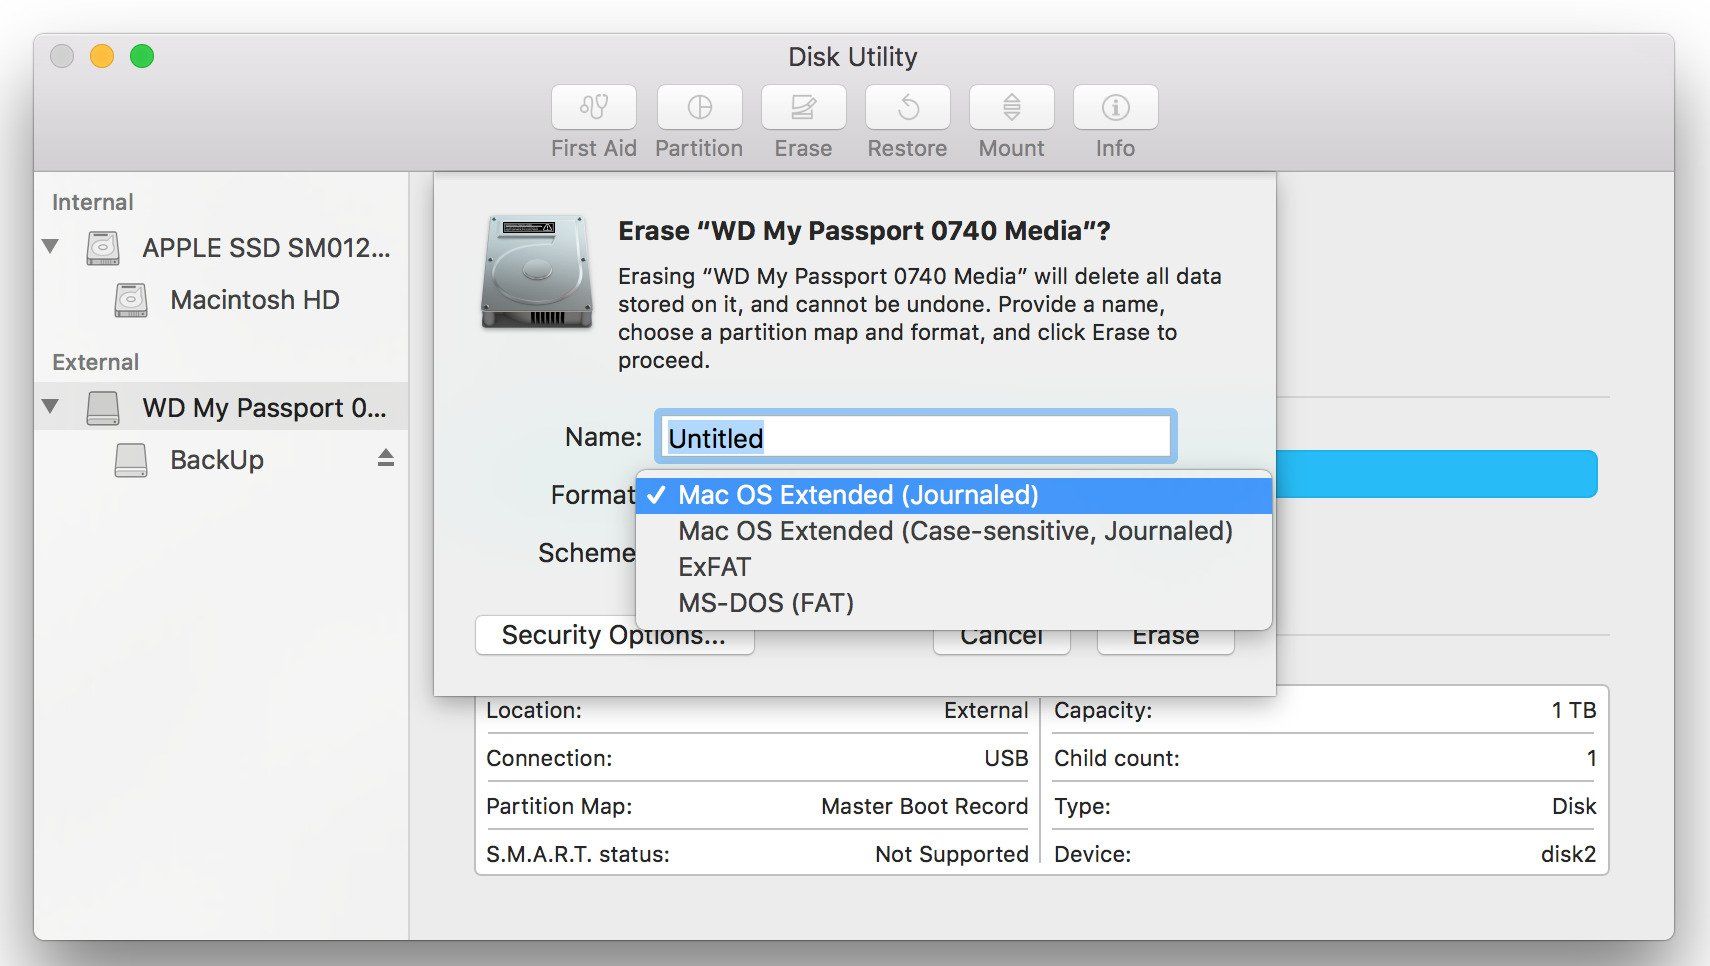
- In the Erase window, you can choose the name and format for the newly reformatted drive. Enter a suitable name for the drive in the “Name” field. You can choose any name you prefer.
- Next, click on the drop-down menu next to “Format” to choose the file system format for the drive. Mac supports various file system formats, including APFS (Apple File System) and Mac OS Extended (Journaled).
- Consider your specific needs and compatibility requirements when selecting the format. If you plan to use the drive exclusively with macOS systems, selecting APFS is recommended for optimal performance. If you need compatibility with older Mac systems or plan to use the drive with other operating systems like Windows, selecting Mac OS Extended (Journaled) is a better choice.
- Finally, you have the option to choose the scheme for the drive if it is larger than 2TB. For drives 2TB or smaller, leave the scheme as “GUID Partition Map.” For drives larger than 2TB and using Mac OS Extended (Journaled) format, you can choose “GUID Partition Map” or “Apple Partition Map” depending on your needs.
Once you have entered the desired name and selected the appropriate format and scheme, you are ready to proceed with erasing the hard drive. Click on the “Erase” button in the Erase window to start the process.
Keep in mind that erasing the hard drive will permanently delete all the data on it, so make sure you have a backup of any important files. The erasure process might take a few minutes, depending on the size of the hard drive.
Now that you have successfully erased the hard drive, it’s time to move on to the next step, where we will discuss how to rename and finalize the formatting of the drive.
Step 5: Choose the file system format
After erasing the hard drive, the next step in reformatting your external hard drive on Mac is to choose the file system format. The file system format determines how the data will be organized and stored on the drive.
When selecting the file system format, you have two primary options:
- Mac OS Extended (Journaled): This format is compatible with all versions of macOS and offers robust data protection with journaling. It is suitable if you plan to use the drive primarily on Mac systems or need compatibility with older Mac operating systems.
- APFS (Apple File System): This is the default file system format for macOS High Sierra and later. It offers improved performance, enhanced security, and support for modern storage technologies such as SSDs. It is recommended if you plan to use the drive exclusively on macOS systems, especially with newer versions of macOS.
Consider your specific needs, compatibility requirements, and the system you primarily use when selecting the file system format. If you’re unsure, it’s generally safe to choose APFS unless you need specific compatibility with older systems.
To choose the file system format, follow these steps:
- During the erasure process, after entering a name for the drive and selecting the desired format, click on the “Erase” button to initiate the reformatting.
- Disk Utility will prompt you to confirm the formatting and data deletion. Read through the confirmation message and ensure that you have backed up any important files. Click on “Erase” to proceed.
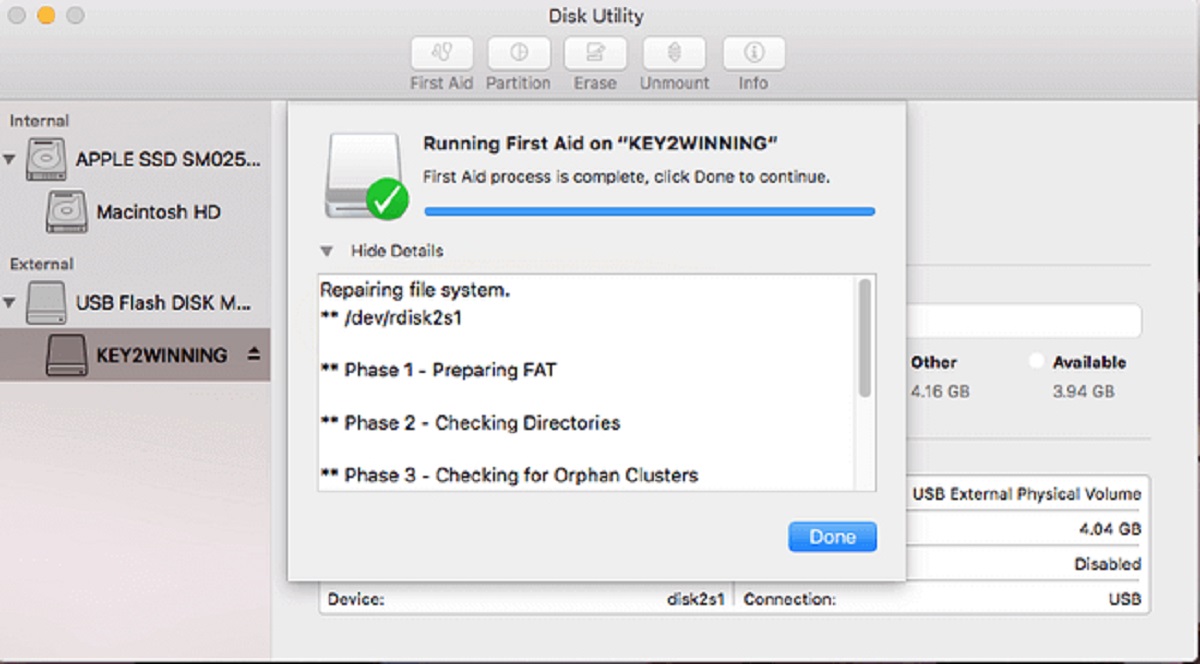
- The reformatting process will begin, and a progress bar will be displayed. The time it takes to complete will depend on the size of the drive.
- Once the reformatting process is complete, Disk Utility will display a confirmation message. Click on “Done” to close the window.
Congratulations! You have successfully chosen the file system format for your external hard drive. Now, let’s move on to the next step where we will discuss how to rename and finalize the formatting of the drive.
Step 6: Rename and erase the drive
After selecting the file system format for your external hard drive, the next step in reformatting on Mac is to rename the drive and finalize the formatting process. Renaming the drive allows you to give it a unique and recognizable name that suits your preferences.
To rename and finalize the formatting of the drive, follow these steps:
- After the reformatting process is complete, the drive will be mounted and appear on the desktop or in the Finder sidebar, depending on your Finder preferences.
- Click on the drive to select it, then press the “Return” key on your keyboard or right-click and choose “Get Info” from the context menu.
- A new window will open, displaying detailed information about the drive. At the top of the window, you will see the current name of the drive.
- To rename the drive, click on the name field and enter a new name of your choice. You can use any combination of letters, numbers, and symbols to create a unique name for your drive.
- After renaming the drive, close the “Get Info” window by clicking the “X” button or pressing “Command + W” on your keyboard.
Now that you have successfully renamed the drive, it’s time to finalize the formatting process by ejecting the external hard drive properly.
To eject the external hard drive, follow these steps:
- Make sure all files or applications that are accessing the drive are closed.
- Click on the drive icon on your desktop or in the Finder sidebar to select it.
- Right-click on the drive and select “Eject” from the context menu, or simply drag the drive icon to the trash bin in the dock.
- Wait for a few seconds until the drive icon disappears from the desktop or Finder sidebar, indicating that the drive has been safely ejected.
By following these steps, you have successfully renamed the drive and completed the reformatting process on your external hard drive. Congratulations!
Step 7: Confirm the reformatting process
After renaming and finalizing the formatting of your external hard drive, it is important to confirm that the reformatting process was successful. By verifying the changes, you can ensure that your hard drive is now properly reformatted and ready to be used.
To confirm the reformatting process, follow these steps:
- Make sure the external hard drive is still connected to your Mac.
- Open Disk Utility again by following the steps outlined in Step 2.
- In the Disk Utility window, locate the external hard drive in the sidebar on the left-hand side.
- Click on the drive to select it, and observe the information displayed in the main section of the Disk Utility window.
- Take note of the new name you assigned to the drive and check that it matches the name displayed in Disk Utility.
- Verify that the file system format you selected (e.g., Mac OS Extended, APFS) is also displayed correctly.
If the name and file system format match your preferences, it indicates that the reformatting process was successful. Congratulations!
However, if you notice any discrepancies or errors, you may need to repeat the reformatting process and double-check the steps to ensure accuracy. It is also worth considering that in rare cases, there could be issues with the external hard drive itself that require further troubleshooting.
Now that you have confirmed the reformatting process, you are ready to proceed to the next step, where we will discuss how to wait for the reformatting to complete.
Step 8: Wait for the reformatting to complete
After confirming the reformatting process, you will need to wait for the process to complete. The time it takes to reformat the external hard drive depends on its size and the speed of your Mac. It is important to be patient and let the process run its course without interruption.
During the reformatting process, Disk Utility will display a progress bar indicating the status of the operation. It will also provide an estimated time remaining, although this can vary depending on various factors.
While waiting for the reformatting to complete, it is advisable to avoid performing any resource-intensive tasks or disconnecting the external hard drive. Interrupting the process may result in incomplete formatting or data corruption.
It is worth noting that larger hard drives may take longer to reformat. If you are reformatting a particularly large drive, it is not uncommon for the process to take several minutes or even hours. Therefore, it is essential to be patient and allow Disk Utility to complete the reformatting without interruption.
Once the reformatting process is finished, Disk Utility will display a notification or confirmation message. This indicates that the external hard drive has been successfully reformatted, and it is now ready to be used.
Now that you have patiently waited for the reformatting process to complete, you are ready to proceed to the final step, where we will discuss how to safely eject the external hard drive.
Step 9: Eject the external hard drive
After the reformatting process is complete and you have confirmed the success of the operation, it is important to safely eject the external hard drive before disconnecting it from your Mac. Ejecting the drive ensures that all data has been written and that there is no risk of data corruption or loss.
To safely eject the external hard drive, follow these steps:
- Make sure all files or applications that are accessing the drive are closed.
- Locate the drive icon on your desktop or in the Finder sidebar.
- Right-click on the drive icon and select “Eject” from the context menu.
- Alternatively, you can also click and drag the drive icon to the trash bin in the dock.
- Wait for a few seconds until the drive icon disappears from the desktop or Finder sidebar, indicating that the drive has been safely ejected.
It is crucial to follow the proper ejection process to avoid data corruption or damage to the external hard drive. Disconnecting the drive without ejecting it first may result in the loss of data or potential errors when using the drive in the future.
Once the drive has been safely ejected, you can disconnect the cable from your Mac or power off the external hard drive, if applicable.
Congratulations! You have successfully reformatted and safely ejected your external hard drive on your Mac. Your drive is now ready to be used for storing files, backups, or any other purposes you have in mind.
Remember, when you connect the external hard drive to your Mac in the future, it will appear on the desktop or in the Finder sidebar with its newly formatted name. You can now transfer files to and from the drive or use it for any other storage needs.
Conclusion
Reformatting an external hard drive on your Mac may seem like a daunting task, but by following these step-by-step instructions using Disk Utility, you can easily accomplish it. Whether you want to repurpose the drive, fix any issues, or start fresh, reformatting allows you to optimize its performance and ensure compatibility with your Mac.
Throughout this guide, we have covered the essential steps involved in reformatting an external hard drive on Mac. From connecting the drive to your Mac and launching Disk Utility, to selecting the drive, erasing it, choosing the file system format, renaming it, and finally ejecting it safely, you have learned the necessary procedures to successfully reformat your external hard drive.
Remember, before proceeding with the reformatting process, it is crucial to back up any important files as reformatting will permanently delete all data on the drive. Take the time to carefully select the file system format that suits your needs and ensure that you have chosen the correct drive at each step to avoid any accidental data loss.
By following these steps and patiently waiting for the reformatting process to complete, you can confidently reformat your external hard drive on your Mac, knowing that it is ready for use. Whether you intend to use the reformatted drive for additional storage, backups, or any other purpose, you can now enjoy the improved performance and compatibility it offers.
Now that you have successfully reformatted your external hard drive, feel free to explore its new capabilities and make the most of its storage potential. With a fresh start, you can organize your files, transfer data, and confidently use the drive for your personalized needs.
Thank you for following this guide, and we hope it has been helpful in assisting you with reformatting your external hard drive on Mac!