Introduction
Welcome to our comprehensive guide on how to print checks in QuickBooks Online. Printing checks directly from your QuickBooks account can save you time and provide a convenient way to distribute payments to vendors and employees. Whether you are a small business owner or a bookkeeper managing multiple clients, this guide will walk you through the process, step by step.
Using QuickBooks Online for check printing not only streamlines your payment process, but it also helps you keep accurate records of your transactions. You can easily track and reconcile payments, ensuring that your financials are up to date and organized.
In this guide, we will cover everything you need to know to set up check printing in QuickBooks Online, customize check templates, and troubleshoot any common issues that may arise. By the end of this guide, you will have all the knowledge and tools to print checks efficiently and effectively in QuickBooks Online.
Before we dive into the details, please make sure you have a working QuickBooks Online account and access to a compatible printer. It is also essential to have pre-printed check stock that is compatible with your printer to ensure accurate check printing.
Now, let’s get started with the process of setting up check printing in QuickBooks Online and customizing your check templates according to your business needs.
Setting Up Check Printing in QuickBooks Online
Before you can start printing checks in QuickBooks Online, you need to set up the check printing feature. Follow these steps to get started:
- Open your QuickBooks Online account and navigate to the Gear icon in the upper-right corner of the screen. Click on “Account and Settings” from the drop-down menu.
- In the left-hand menu, select “Payments” and choose the “Check Settings” tab.
- Click on the “Edit” button next to the check format you want to use. QuickBooks Online provides default check formats that you can customize.
- Review and update the check details, including the check number and starting number. You can also add your logo and customize the font, alignment, and colors according to your branding.
- If necessary, enable the option to print a signature line on your checks. This is especially useful if you want checks to be signed manually.
- Once you have made all the necessary changes, click “Save” to apply the settings.
Now that you have set up the check printing feature in QuickBooks Online, you are ready to start printing your checks.
Note: If you encounter any difficulties during the setup process, consult the QuickBooks Online Help Center or contact their support team for assistance.
Customizing Check Templates
QuickBooks Online allows you to customize your check templates to align with your company’s branding and meet your specific needs. Here’s how you can customize your check templates:
- Go to the Gear icon in the upper-right corner of the QuickBooks Online screen and select “Custom Form Styles” under the “Your Company” column.
- Click on the “New Style” button to create a new custom template.
- Choose “Check” as the type of form you want to customize.
- Select how you want the check to look by either starting from scratch or using a pre-designed template provided by QuickBooks Online.
- You can customize various elements of the check, such as the layout, font styles, colors, and even add your company’s logo and tagline.
- Preview the changes as you make them to see how the check will look once printed.
- Once you are satisfied with the changes, save the custom template and give it a recognizable name.
- Make sure to set the custom template as the default check template by clicking on the “Make Default” button.
By customizing your check templates, you can make your checks look professional and reflect your brand identity. Additionally, you can include any necessary legal disclosures or payment terms specific to your business.
Remember to save any changes you make to your custom templates to ensure they are applied when you print checks in QuickBooks Online.
Note: If you require more advanced customization or need assistance with template design, consider consulting a QuickBooks ProAdvisor or a professional graphic designer who specializes in QuickBooks templates.
Printing Checks
Once you have set up check printing and customized your check templates in QuickBooks Online, you are ready to print your checks. Follow these simple steps:
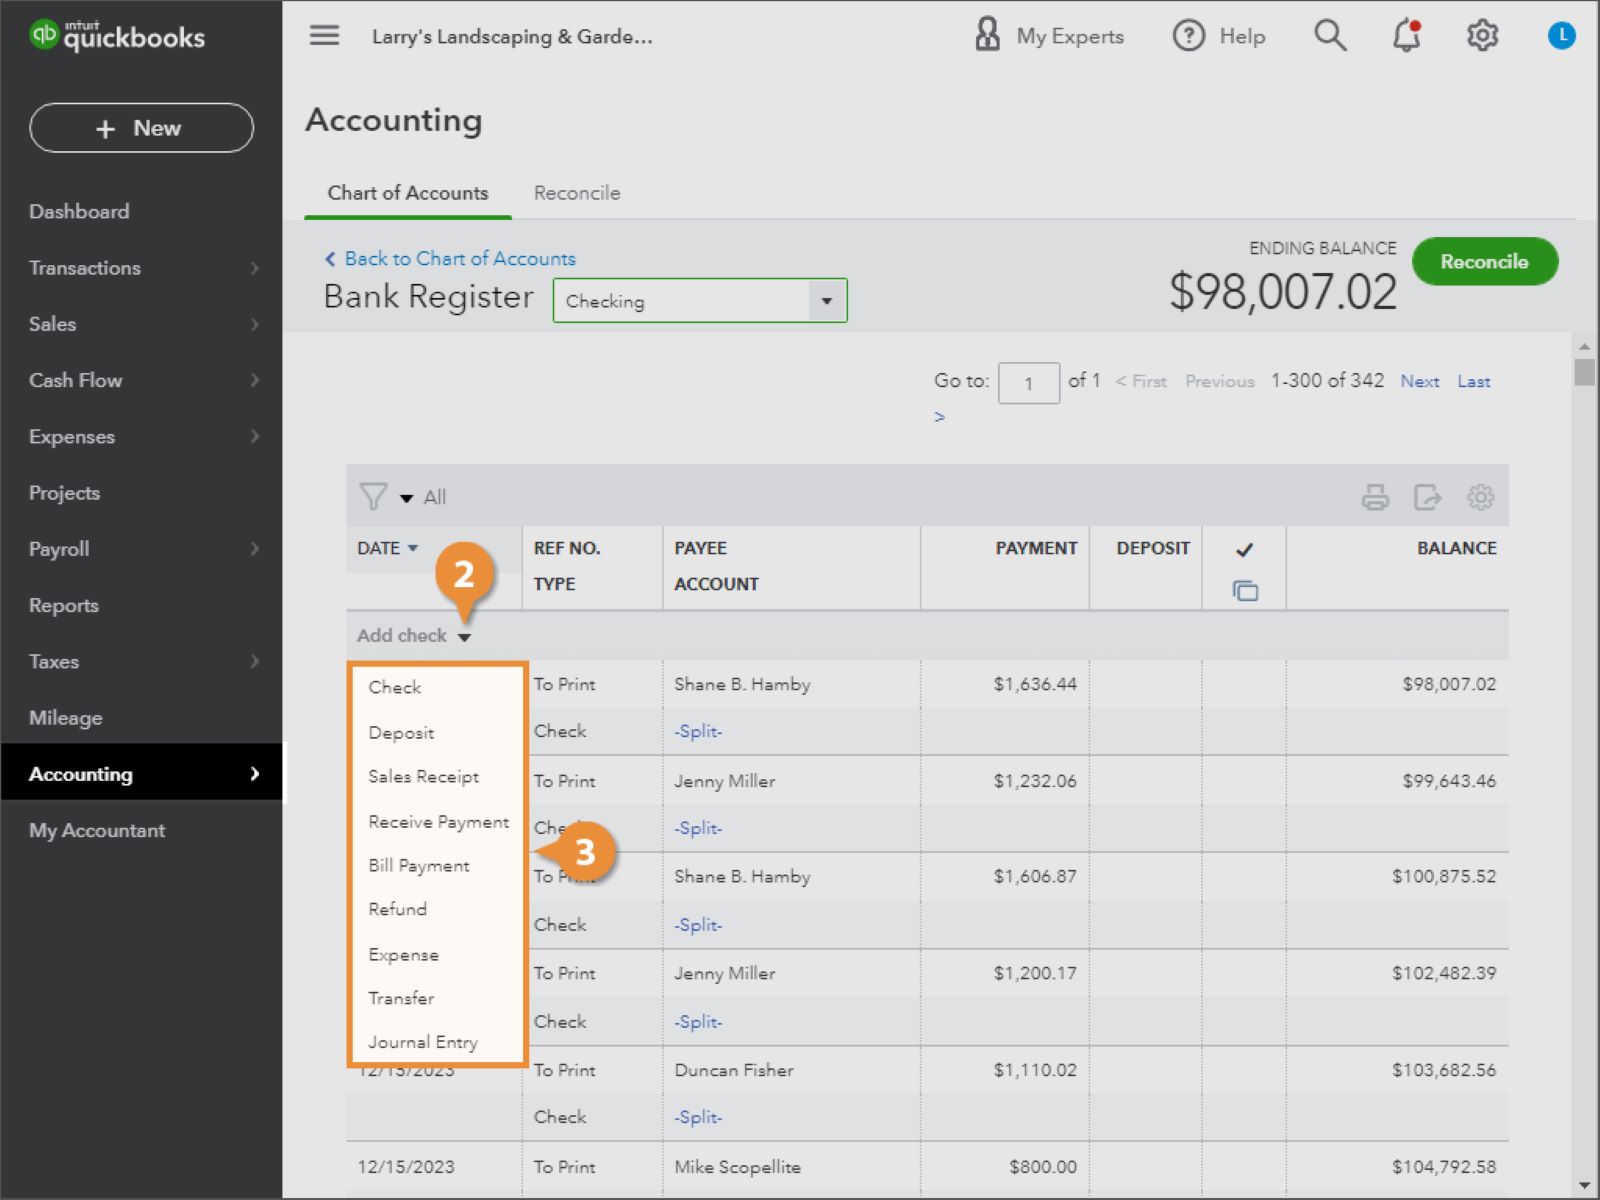
- Navigate to the QuickBooks Online Dashboard and click on the “+” sign at the top to create a new transaction.
- Select “Print Checks” from the drop-down menu.
- Choose the bank account from which you want to make the payment.
- Select the vendor or employee to whom the check is being issued.
- Enter the payment details, such as the payment amount and any necessary memos or notes.
- Click on the “Preview and Print” button to review the check information and ensure its accuracy.
- Ensure that you have pre-loaded the appropriate check stock into your printer according to the specific requirements of your printer.
- Click “Print” to print the check. Make sure to check the print preview to ensure everything is aligned correctly.
- Once the check is printed, click “Save and Close” to record the payment in QuickBooks Online.
Make sure to keep a copy of the printed check for your records and include it in your reconciliation process.
Note: It is important to regularly review and reconcile your bank statements with your QuickBooks Online transactions to ensure accuracy and detect any discrepancies.
Printing checks directly from QuickBooks Online simplifies your payment process and helps you maintain accurate records of your financial transactions.
If you encounter any issues or face difficulties while printing checks in QuickBooks Online, please refer to the troubleshooting section below or consult the QuickBooks Online Help Center for further assistance.
Troubleshooting Common Issues
While printing checks in QuickBooks Online is generally a smooth process, there may be times when you encounter some common issues. Here are some troubleshooting tips to help you resolve these issues:
- Printer Not Responding: Make sure that your printer is properly connected to your computer and turned on. Check for any error messages on the printer and ensure that it has enough paper and ink.
- Alignment Issues: If the printed checks are not aligning properly on the check stock, adjust the print settings by going to “Settings” in QuickBooks Online and selecting “Printers and Devices.” Choose the correct printer and check paper size settings to ensure proper alignment.
- Check Printing Errors: If you notice any errors on the printed checks, such as incorrect bank account information or missing payment details, double-check the information entered in QuickBooks Online. Make any necessary corrections and re-print the checks.
- Printing Blank Checks: If your printer is printing blank checks, verify that the check stock is loaded correctly, and the print settings in QuickBooks Online are accurate. Also, check if the printer drivers are up to date.
- Printing Streaks or Smudges: If you are experiencing streaks or smudges on your printed checks, clean the printer heads and ensure that the check stock is free from any dirt or debris. You may also need to replace the printer cartridge or adjust the printer settings.
- Incorrect Check Alignment: If the information on the checks is shifted too far to one side or is not aligned properly, you may need to adjust the check template settings in QuickBooks Online. Go to “Custom Form Styles,” select the appropriate template, and make adjustments to the alignment settings.
If you have followed these troubleshooting tips and are still experiencing issues with printing checks in QuickBooks Online, consider reaching out to QuickBooks Online support for further assistance. They can provide expert guidance in resolving technical issues specific to your account or printer setup.
Remember, staying vigilant and regularly maintaining your printer and QuickBooks Online settings can help minimize issues and ensure smooth check printing in the future.
Conclusion
Printing checks in QuickBooks Online offers a convenient and efficient way to manage your payment process and maintain accurate financial records. By following the steps outlined in this guide, you can easily set up check printing, customize your check templates, and print checks with confidence.
Remember to double-check the accuracy of your check information before printing and ensure that your printer is properly connected and loaded with the correct check stock.
In case you encounter any issues during the check printing process, refer to the troubleshooting tips provided in this guide or reach out to QuickBooks Online support for assistance. They have the expertise to help you resolve any technical issues specific to your account or printer setup.
By leveraging the check printing feature in QuickBooks Online, you can save time, streamline your payment process, and maintain organized financial records. This, in turn, allows you to focus on growing your business and serving your customers.
We hope this guide has been helpful in guiding you through the process of printing checks in QuickBooks Online. Implement these steps, customize your check templates, and enjoy the benefits of simplified check management with QuickBooks Online!