Introduction
Printing check stubs in QuickBooks is an essential task for any business that uses the software for payroll management. Check stubs provide employees with a detailed breakdown of their earnings, deductions, and taxes for each pay period.
By offering this information to employees, businesses can ensure transparency and build trust within their workforce. QuickBooks simplifies the process of generating check stubs, making it easy to provide accurate and professional-looking documents.
However, before you can start printing check stubs in QuickBooks, there are a few prerequisites and setup steps to consider. This guide will walk you through the necessary configurations and procedures to ensure a smooth and hassle-free process.
In this article, we will cover the steps to set up check stubs in QuickBooks, customize check stub preferences, enter payroll information, review and verify payroll data, preview check stubs, and finally, print them. Let’s jump right in and get started!
Prerequisites for Printing Check Stubs in QuickBooks
Before you can start printing check stubs in QuickBooks, there are a few prerequisites you need to fulfill. These requirements will ensure that you have the necessary information and settings in place to generate accurate and informative check stubs for your employees. Let’s take a look at what you need to do:
1. Set up employees in QuickBooks: Make sure you have entered all relevant employee information, including names, addresses, Social Security numbers, email addresses, and pay rates. This information is vital for calculating accurate earnings and deductions on the check stubs.
2. Set up payroll items: Payroll items refer to the different components that make up an employee’s paycheck, such as wages, taxes, and deductions. Ensure that you have set up the appropriate payroll items in QuickBooks and associated them with the correct employees. This step is crucial for calculating and displaying accurate earnings and deductions on the check stubs.
3. Verify payroll tax setup: Double-check that your payroll tax settings in QuickBooks are accurate and up-to-date. This includes checking the tax rates, exemptions, and any other relevant tax information. Accurate tax calculations are essential for providing correct tax information on the check stubs.
4. Update employee details: Ensure that all employee information, such as addresses, phone numbers, and email addresses, is current and accurate. This step will ensure that the check stubs display the correct contact information for each employee.
5. Enable check stub printing: In QuickBooks, go to the Payroll Preferences and make sure the option to print check stubs is enabled. This step allows you to generate and print check stubs for your employees.
By completing these prerequisites, you will be ready to set up and print check stubs in QuickBooks. Taking the time to ensure accurate employee and payroll information will result in professional, detailed, and error-free check stubs that your employees can rely on.
Step 1: Set Up Check Stubs in QuickBooks
The first step in printing check stubs in QuickBooks is to set up the necessary configurations within the software to generate accurate and comprehensive stubs. Follow these steps to set up check stubs in QuickBooks:
1. Open QuickBooks: Launch QuickBooks and sign in to your company file with administrator privileges.
2. Access Payroll Preferences: From the top menu, go to ‘Edit’ and select ‘Preferences’. In the left-hand menu, click on ‘Payroll & Employees’ and then select the ‘Company Preferences’ tab.
3. Enable paycheck printing: Under the ‘Paystub & Voucher Printing’ section, select the ‘Full page’ or ‘Voucher only’ option, depending on your preference. This will determine the layout and content of the check stubs.
4. Review check printing options: In the same preferences window, review the options related to check printing. You can choose to print the company name and address on the stub, adjust the number of stubs per page, and customize other printing settings as desired.
5. Save changes: Once you have reviewed and adjusted the necessary check stub settings, click ‘OK’ to save the changes and exit the preferences window.
By completing these steps, you will have successfully set up the check stub configurations in QuickBooks. This initial setup ensures that the software is ready to generate accurate and professional-looking check stubs for your employees.
In the next step, we will explore how to customize the check stub preferences to tailor them to your specific requirements.
Step 2: Customize Check Stubs Preferences
Customizing the check stub preferences in QuickBooks allows you to tailor the appearance and content of the check stubs to meet your specific needs. Follow these steps to customize check stub preferences in QuickBooks:
1. Access Customization Settings: From the top menu, go to ‘Edit’ and select ‘Preferences’. In the left-hand menu, click on ‘Payroll & Employees’ and then select the ‘Company Preferences’ tab.
2. Customize Check Layout: Under the ‘Paystub & Voucher Printing’ section, click on the ‘Customize’ button. This will open a window where you can customize the layout of the check stubs.
3. Modifying Standard Elements: In the customization window, you can modify various standard elements on the check stubs. This includes adding or removing fields such as employee name, pay period dates, earnings, deductions, and taxes. You can also choose the font style and size for these elements.
4. Add Company Logo: If desired, you can add your company logo to the check stubs. To do this, click on the ‘Add Logo’ button and select the image file containing your company logo. Adjust the position and size of the logo on the check stub as needed.
5. Preview the Check Stub: Once you have made the desired customizations, click on the ‘Preview’ button to see a sample check stub. Review the layout and content to ensure it meets your requirements.
6. Save Changes: If you are satisfied with the check stub customizations, click ‘OK’ to save the changes and exit the customization window. If you wish to make further adjustments, you can continue modifying the settings until you achieve the desired result.
By following these steps, you will be able to customize the check stub preferences in QuickBooks to match your branding and display the necessary information for your employees. This customization adds a professional touch to the check stubs and ensures that they provide all the required details for payroll transparency.
Now that you have customized the check stub preferences, we can move on to entering payroll information in the next step.
Step 3: Enter Payroll Information
Entering accurate and up-to-date payroll information is crucial for generating correct check stubs in QuickBooks. Follow these steps to enter payroll information:
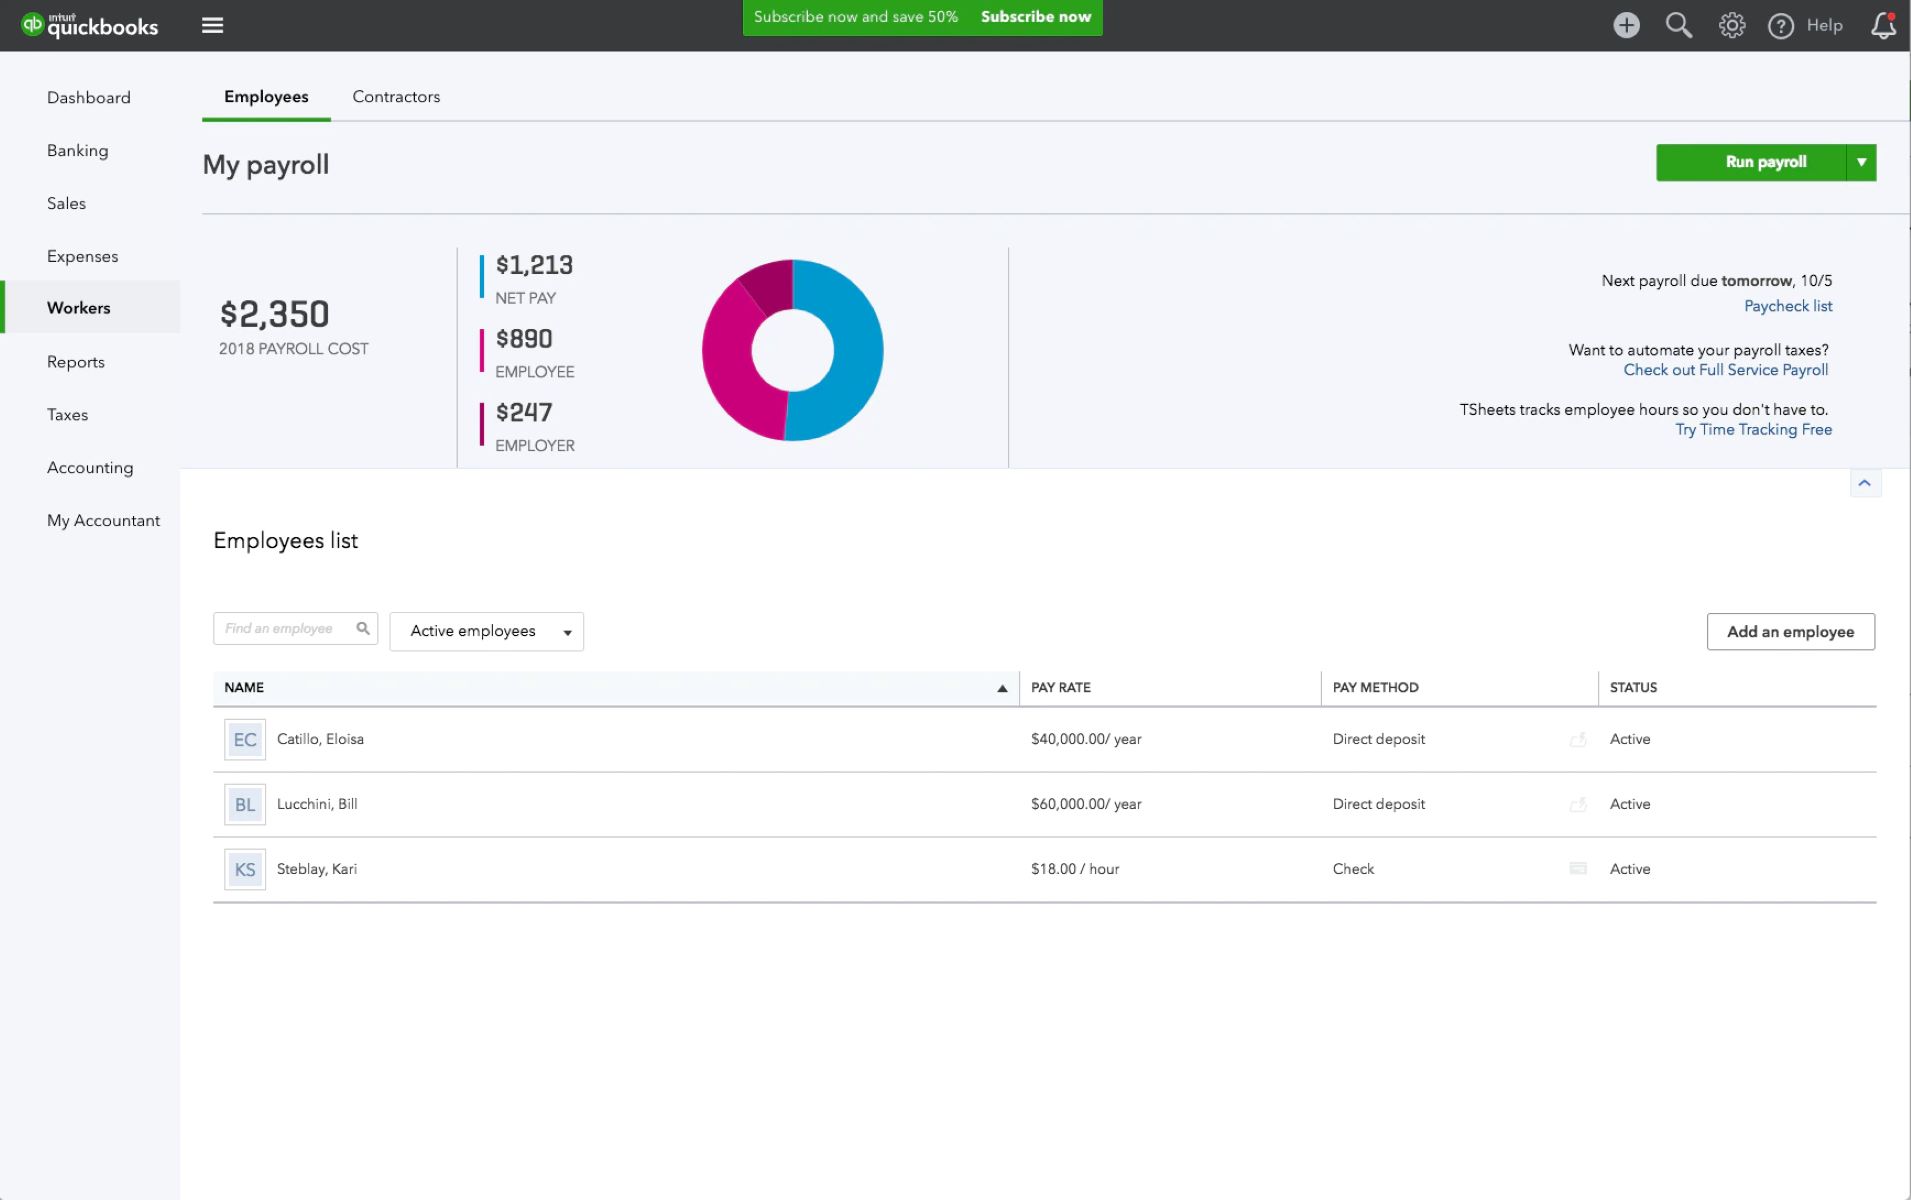
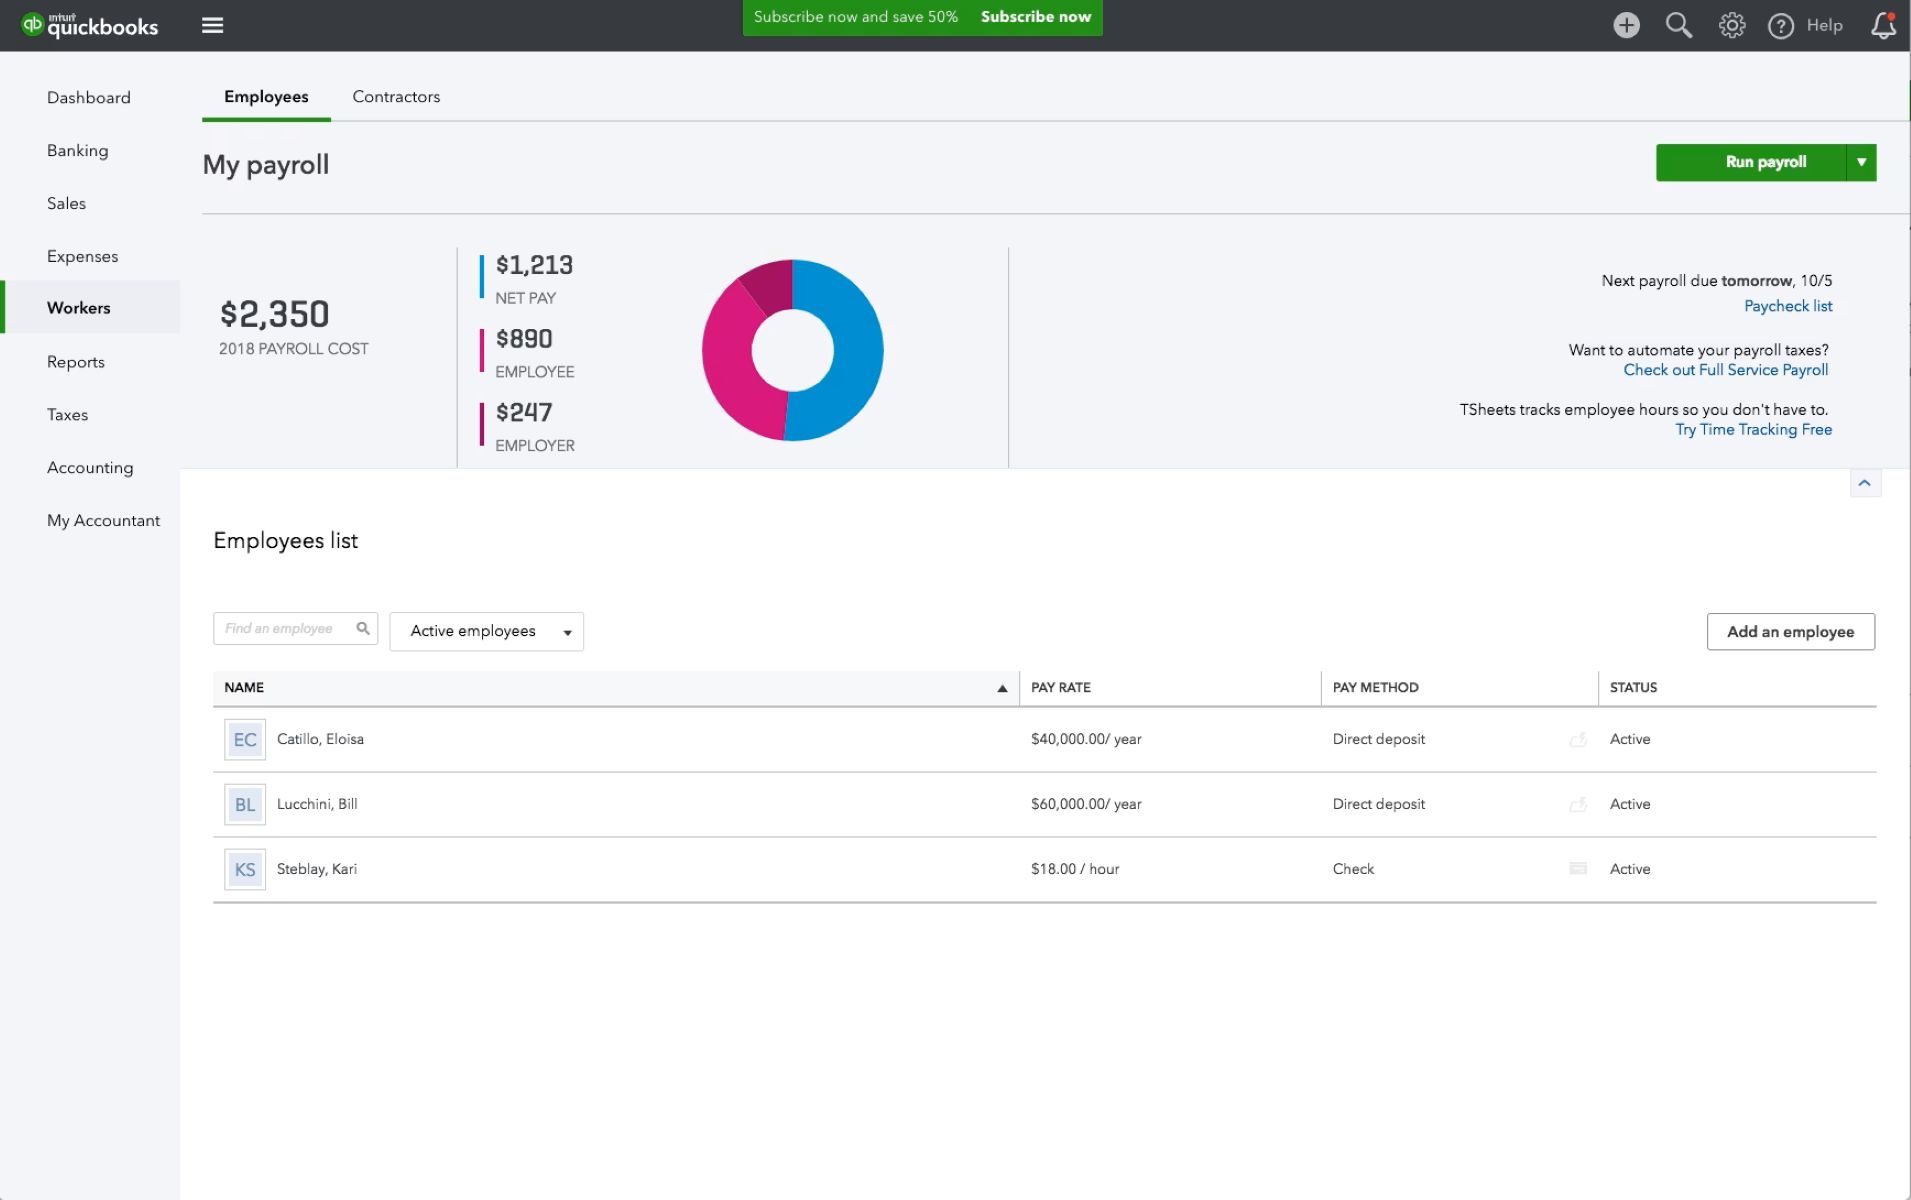
1. Navigate to Payroll Center: From the top menu, go to ‘Employees’, then select ‘Payroll Center’. This will open the Payroll Center window.
2. Select Pay Employees: In the Payroll Center window, click on the ‘Pay Employees’ tab.
3. Choose Pay Schedule: Select the appropriate payroll schedule from the drop-down menu. This determines how frequently you pay your employees, such as weekly, biweekly, or monthly.
4. Select Employees: Check the box next to the employees you want to include in the payroll run. If you want to pay all employees, leave all boxes checked.
5. Enter Hours and Other Earnings: In the ‘Enter Hours’ column, enter the number of hours each employee worked during the pay period. If applicable, enter any other earnings such as overtime, bonuses, or commissions.
6. Review Deductions: Go through each employee’s deductions, such as taxes, health insurance premiums, retirement contributions, and any other applicable deductions. Ensure that the amounts are accurate for each employee.
7. Review Employer Contributions: If your company provides employer contributions for benefits such as retirement plans or health insurance, review and verify these amounts for each employee.
8. Confirm Taxes: QuickBooks will calculate the required taxes based on the payroll information provided. Review the taxes calculated and ensure that they are accurate for each employee.
9. Save and Close: Once you have entered all the necessary payroll information, click ‘Save & Close’ to save the payroll run.
By completing these steps, you have successfully entered the payroll information for the selected employees in QuickBooks. This information will be used to generate the check stubs with accurate earnings, deductions, and taxes for each employee.
In the next step, we will review and verify the payroll information before proceeding with the check stub generation process.
Step 4: Review and Verify Payroll Information
Before generating and printing the check stubs in QuickBooks, it is crucial to review and verify the payroll information to ensure accuracy and avoid any discrepancies. Follow these steps to review and verify the payroll information:
1. Access Payroll Center: From the top menu, go to ‘Employees’ and select ‘Payroll Center’ to open the Payroll Center window.
2. Select Pay Employees: In the Payroll Center window, click on the ‘Pay Employees’ tab.
3. Choose Pay Schedule: Ensure that the correct pay schedule is selected from the drop-down menu. This ensures that you are reviewing the payroll information for the intended pay period.
4. Review Employee Details: Go through the list of employees and verify that their names, pay rates, and other relevant information are correct. Double-check any changes made to their payroll details to ensure accuracy.
5. Review Hours and Earnings: Check the hours worked and other earnings for each employee. Ensure that the figures entered accurately reflect the hours worked and any additional earnings for the pay period in question.
6. Verify Deductions: Review the deductions for each employee, including taxes, health insurance premiums, retirement contributions, and any other applicable deductions. Confirm that the amounts are correct and in line with the employee’s payroll setup.
7. Confirm Taxes: QuickBooks calculates the appropriate taxes based on the payroll information provided. Review the taxes calculated for each employee and ensure that they are accurate and aligned with the current tax laws.
8. Make Corrections if Needed: If you identify any errors or discrepancies during the review process, make the necessary corrections. Double-check the updated payroll information to ensure accuracy.
9. Save and Close: Once you have reviewed and verified the payroll information, click ‘Save & Close’ to finalize the payroll run.
By completing these steps, you have thoroughly reviewed and verified the payroll information in QuickBooks. This ensures that the generated check stubs will accurately reflect the employees’ earnings, deductions, and taxes for the specified pay period.
Next, we will move on to the next step, where we will preview the check stubs before printing them.
Step 5: Preview Check Stubs
Before finalizing the printing process, it is essential to preview the check stubs in QuickBooks to ensure that they appear as intended and contain accurate information. Here are the steps to preview check stubs:
1. Access Payroll Center: From the top menu, navigate to ‘Employees’ and select ‘Payroll Center’ to open the Payroll Center window.
2. Select Pay Employees: In the Payroll Center window, click on the ‘Pay Employees’ tab.
3. Choose Pay Schedule: Verify that the appropriate pay schedule is selected from the drop-down menu. This ensures that you are previewing the check stubs for the correct pay period.
4. Preview Check Stubs: Review the list of employees and ensure that the ones you want to preview are checked. Click on the ‘Preview Paycheck’ button to generate a sample check stub for each selected employee.
5. Review Check Stub Details: Carefully examine each check stub and verify that the employee’s name, pay period dates, earnings, deductions, taxes, and any other relevant information are displayed accurately. Pay attention to the formatting, layout, and font style to ensure a professional appearance.
6. Make Adjustments if Needed: If you notice any errors or discrepancies on the check stubs, such as incorrect amounts or missing information, go back to the appropriate payroll screens and make the necessary adjustments. Repeat the preview process to ensure that the updates are reflected correctly.
7. Save and Close: Once you are satisfied with the check stub previews and have made any necessary adjustments, click ‘Save & Close’ to save the payroll information.
By following these steps, you will be able to preview the check stubs in QuickBooks to ensure that they accurately reflect the employees’ earnings, deductions, and taxes. This step provides the opportunity to catch any errors or inconsistencies before printing the final check stubs.
In the next step, we will cover the final process of printing check stubs in QuickBooks.
Step 6: Print Check Stubs
Once you have reviewed and verified the check stubs in QuickBooks, it’s time to proceed with the final step: printing the check stubs. Follow these steps to print check stubs from QuickBooks:
1. Open Payroll Center: From the top menu, go to ‘Employees’ and select ‘Payroll Center’ to open the Payroll Center window.
2. Select Pay Employees: In the Payroll Center window, click on the ‘Pay Employees’ tab.
3. Choose Pay Schedule: Ensure that the correct pay schedule is selected from the drop-down menu. This ensures that you are printing check stubs for the intended pay period.
4. Select Employees: Check the box next to the employees for whom you want to print the check stubs. If you want to print check stubs for all employees, leave all boxes checked.
5. Preview Check Stub: If you want to preview the check stubs one last time before printing, click on the ‘Preview Paycheck’ button to generate a sample stub for each selected employee. This step is optional but can help ensure accuracy.
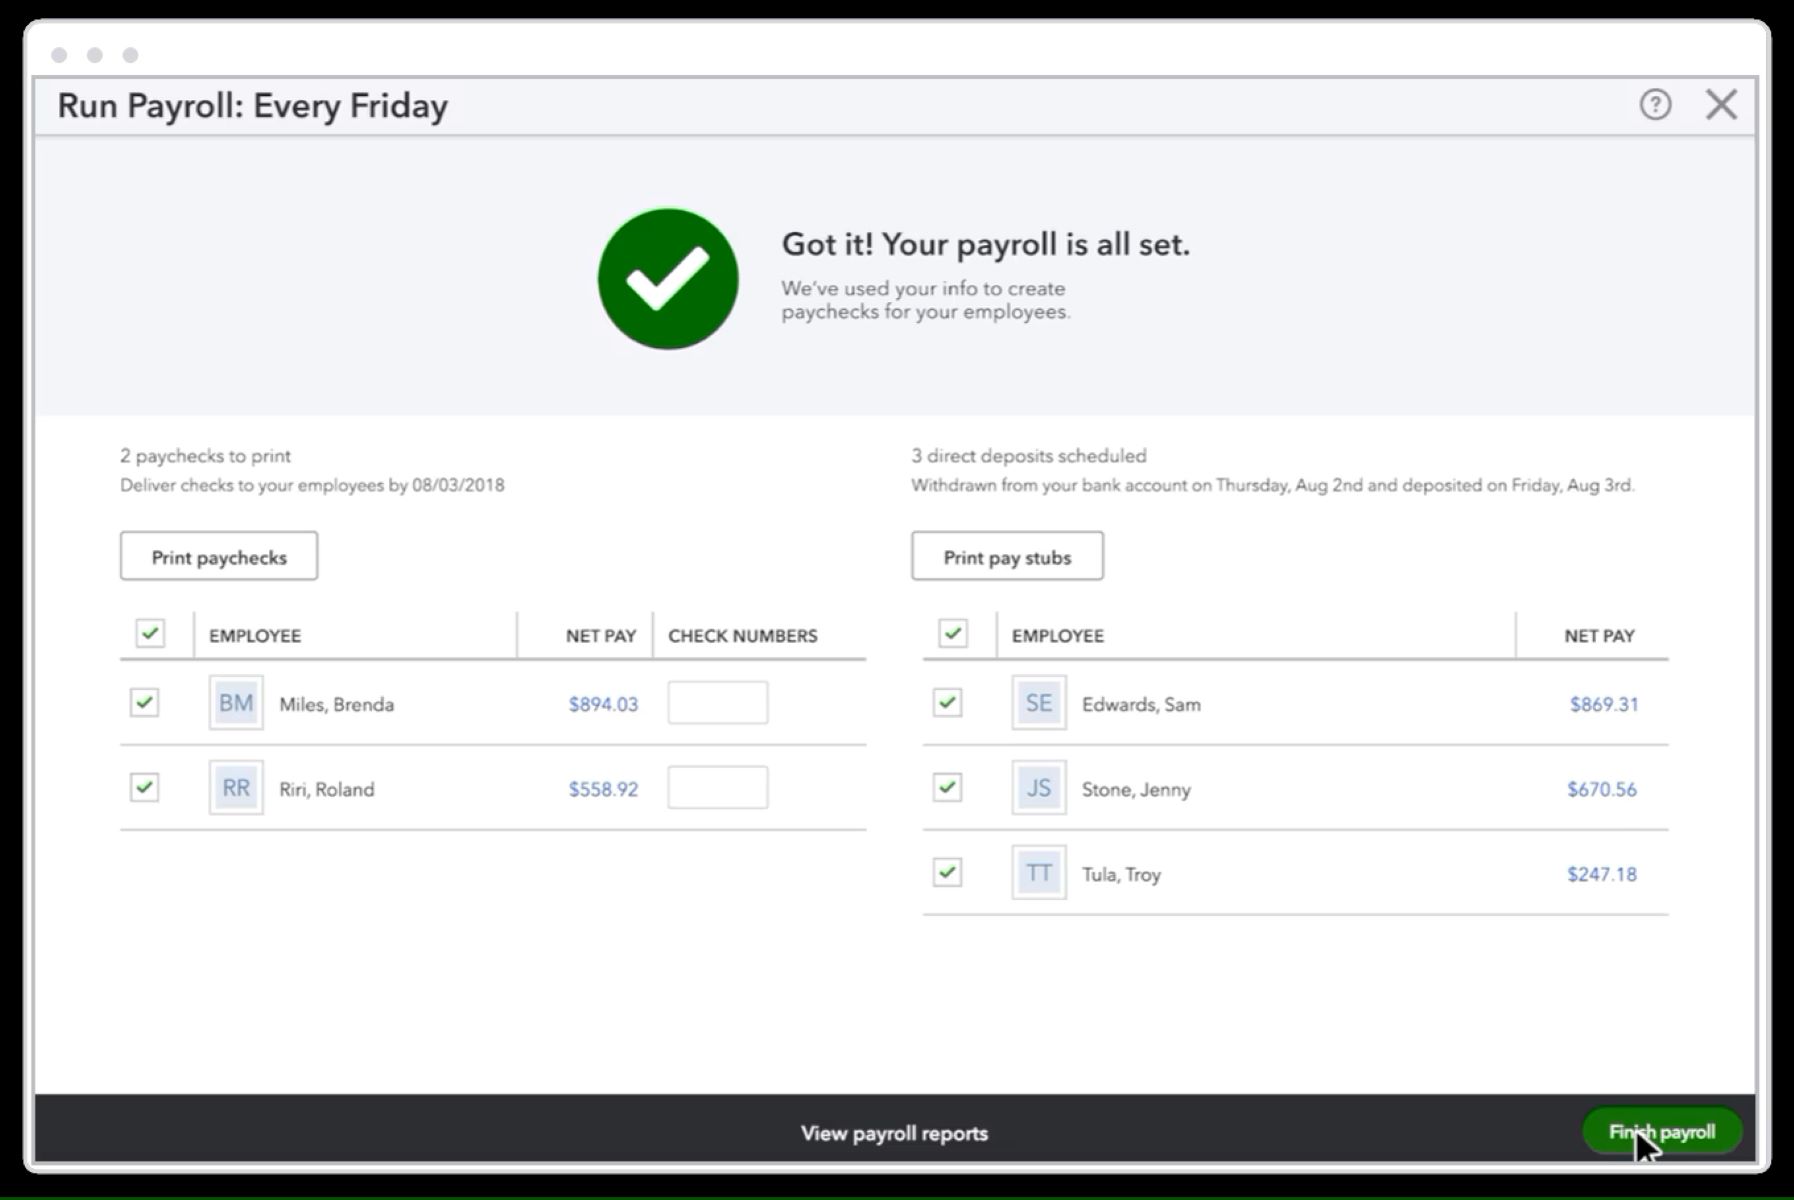
6. Print Check Stubs: Once you are ready to print the check stubs, click on the ‘Print’ button. QuickBooks will prompt you to select your printing preferences, such as the printer to use and the number of copies to print.
7. Adjust Print Settings: In the print settings dialog box, review and adjust the print options as needed. This includes selecting the appropriate paper size, orientation, and any other print settings required by your printer.
8. Start Printing: When you have finalized the print settings, click ‘Print’ to start printing the check stubs. Make sure your printer is properly connected and loaded with the necessary paper.
9. Verify Printed Check Stubs: Once the printing is complete, check the printed check stubs to ensure that they appear as expected. Check for any smudging, misalignment, or other print quality issues that may affect legibility.
By following these steps, you will successfully print check stubs from QuickBooks. Ensure that you store the printed check stubs securely and distribute them to your employees in a timely manner.
Printing accurate and professional-looking check stubs is essential for maintaining transparency and providing employees with detailed payroll information.
Congratulations! You have completed the process of printing check stubs in QuickBooks.
Conclusion
Printing check stubs in QuickBooks is an integral part of payroll management for businesses. By following the steps outlined in this guide, you can set up check stubs, customize their preferences, enter payroll information accurately, review and verify the data, preview the check stubs, and finally, print them. This process ensures that your employees receive detailed and accurate information about their earnings, deductions, and taxes.
Setting up check stubs in QuickBooks involves configuring the necessary settings and preferences to generate professional-looking stubs. Customizing the check stub preferences allows you to tailor the appearance and content to match your branding and provide the required information.
Entering and reviewing payroll information is crucial to ensure accuracy. By double-checking employee details, hours worked, earnings, deductions, and taxes, you can identify and correct any errors or discrepancies before generating check stubs.
Previewing the check stubs in QuickBooks provides the opportunity to review the layout, content, and formatting, ensuring they meet your requirements. This step allows for further adjustments and ensures the accuracy and professionalism of the final check stubs.
Finally, printing the check stubs completes the process. Review the printed stubs for print quality and accuracy before distributing them to employees.
By following these steps, you can efficiently and effectively print check stubs in QuickBooks, promoting transparency and trust within your workforce while providing employees with essential payroll information.
Remember, maintaining accurate payroll records is not only crucial for compliance but also helps build a strong relationship with your employees. With the right systems in place, such as QuickBooks, you can streamline your payroll management processes and ensure that your employees are well-informed about their earnings.