Introduction
Welcome to this guide on how to print an Outlook email. Microsoft Outlook is a popular email client that allows you to manage your emails efficiently. Sometimes, you may need to print out an important email for various reasons, such as creating a hard copy for recordkeeping, sharing it with others, or simply to have a physical copy for your reference.
Printing an email from Outlook is a straightforward process that can be done with just a few clicks. In this guide, we will take you through the step-by-step process of printing an Outlook email, ensuring that you can easily and effectively print your emails whenever needed.
By the end of this guide, you will be equipped with the knowledge and skills to print your Outlook emails effortlessly. So, whether you are a professional who needs to print business-related emails or an individual who wants to print personal correspondence, this guide will help you accomplish that task with ease.
Let’s get started with the first step of printing an Outlook email.
Step 1: Open Microsoft Outlook
The first step in printing an Outlook email is to open Microsoft Outlook on your computer. Microsoft Outlook is part of the Microsoft Office suite and is typically installed on most Windows computers.
To open Microsoft Outlook, you can either click on the Outlook icon on your desktop or navigate to it through the Start menu. Once you locate the Outlook application, click on it to launch the program.
If this is your first time opening Outlook, you will be prompted to set up your email account. Follow the on-screen instructions to provide the necessary information, such as your email address and password. Once the setup is complete, Outlook will open to your inbox.
If you already have Outlook set up with your email account, simply launch the application, and it will open to your inbox or the last folder you were working in.
Ensure that you have a stable internet connection before opening Outlook, as it may need to sync any new emails or updates from your email server. This ensures that you have the most up-to-date information and can access all your emails.
Remember to check your email account regularly, especially before printing, to ensure that you have the latest version of the email you want to print. This is important to avoid printing outdated information and to ensure that you have the most accurate representation of the email.
Once you have opened Outlook and have access to your inbox or the specific folder where the email is located, you are ready to move on to the next step.
Step 2: Select the Email to Print
After you have opened Microsoft Outlook, the next step is to select the specific email that you want to print. Outlook organizes your emails in different folders based on your settings, such as the inbox, sent items, or custom folders you have created.
To select the email you want to print, navigate to the appropriate folder that contains the email. You can do this by clicking on the corresponding folder in the left-hand sidebar of Outlook. For example, if the email you want to print is in your inbox, click on the “Inbox” folder to display the list of emails.
Once you are in the correct folder, locate the email you wish to print. You can scroll through the email list to find it or use the search functionality in Outlook to search for specific keywords or the sender’s name.
When you have found the email you want to print, click on it to open it in the reading pane. The reading pane allows you to preview the contents of the email without fully opening it in a separate window. This can be helpful if you want to quickly review the email before printing.
If you want to print multiple emails at once, you can hold down the Ctrl key on your keyboard and click on each email you want to select. This allows you to select multiple emails simultaneously. Alternatively, you can use the Shift key to select a range of emails.
Once you have selected the email or emails you wish to print, you are ready to proceed to the next step, where we will learn how to open the print window in Outlook.
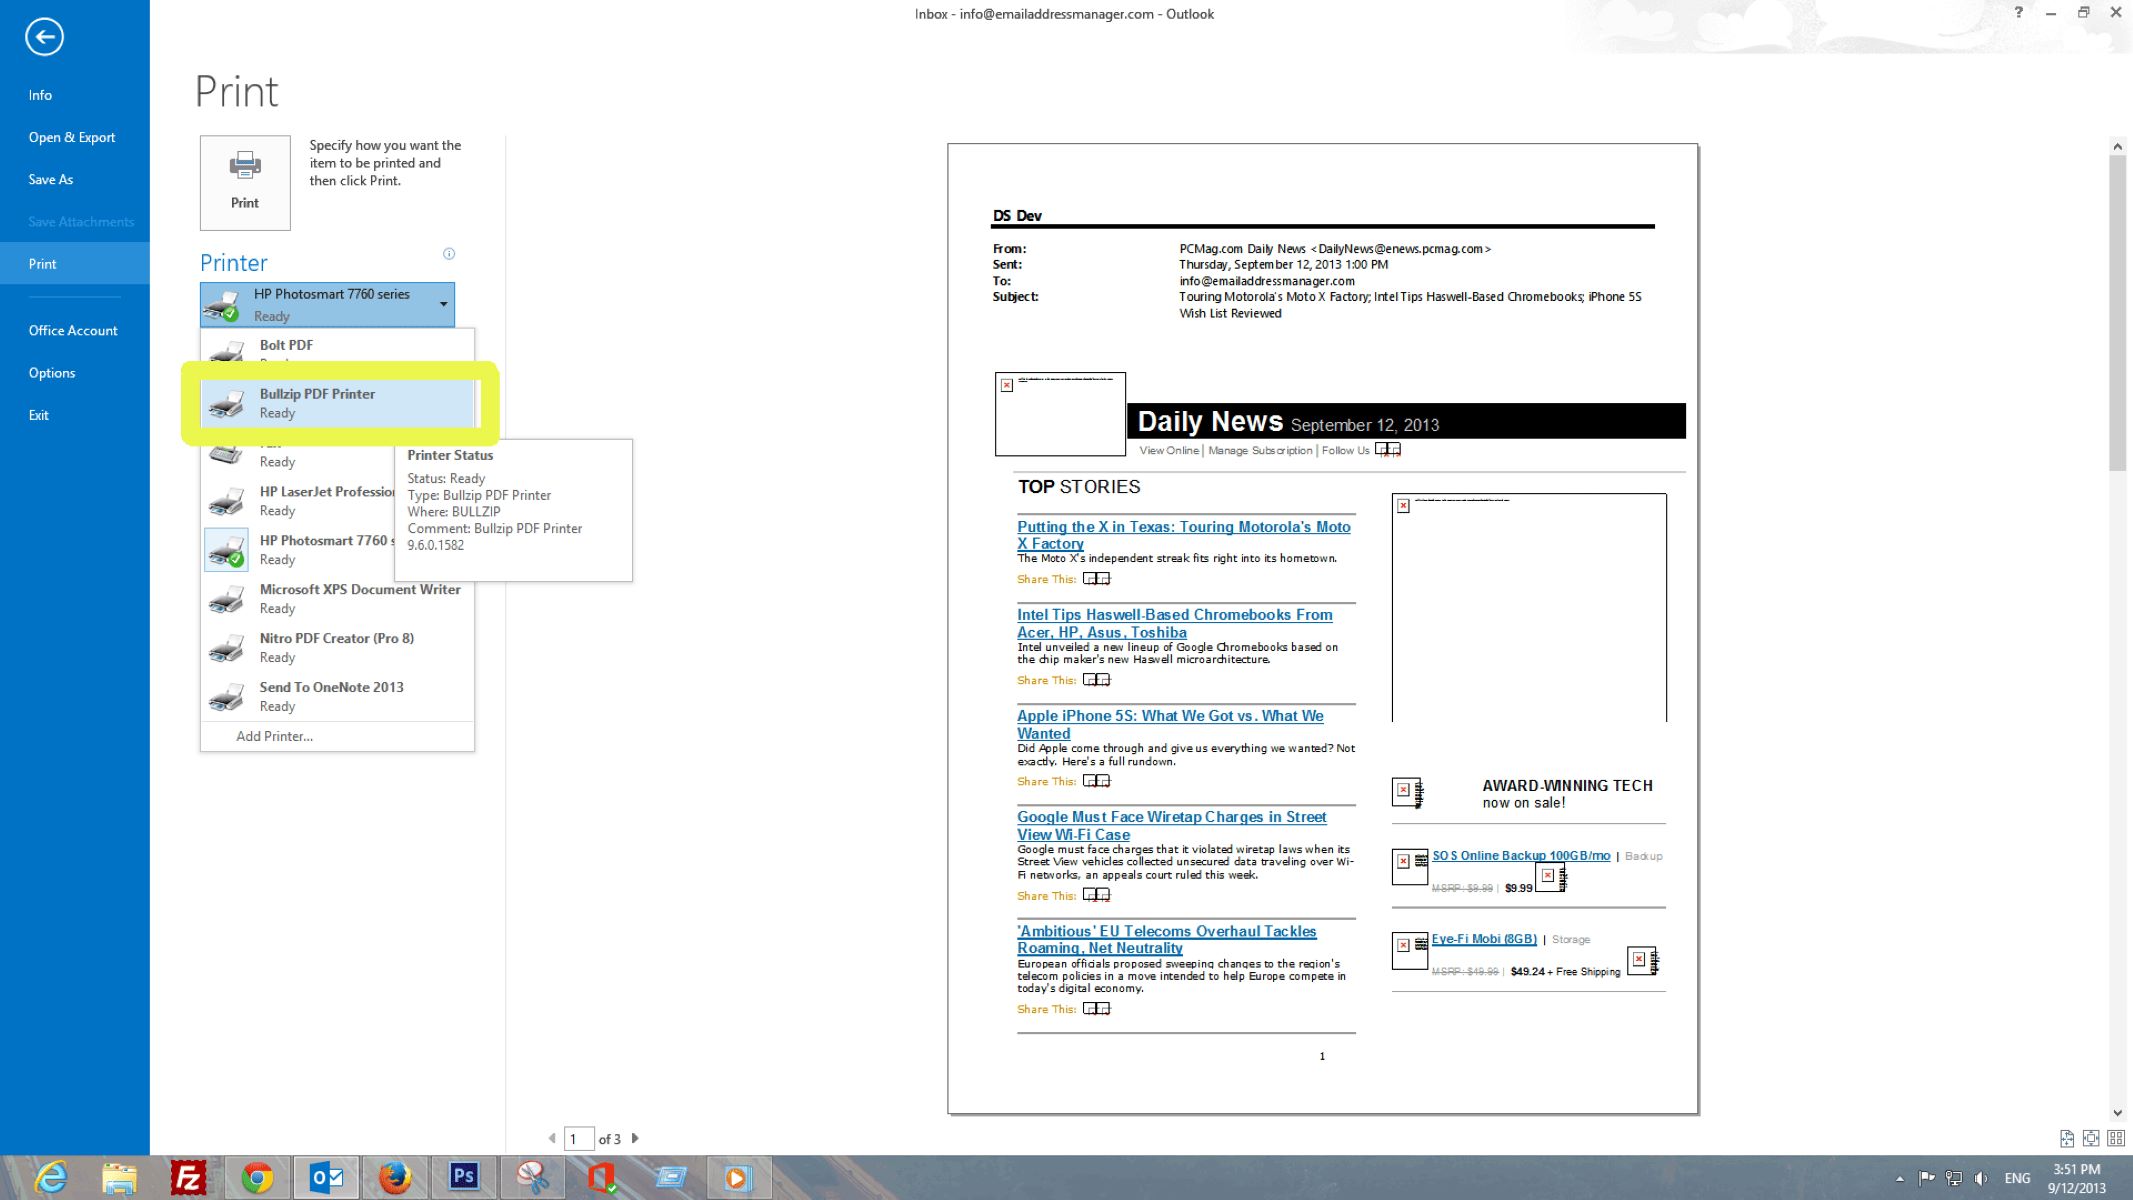
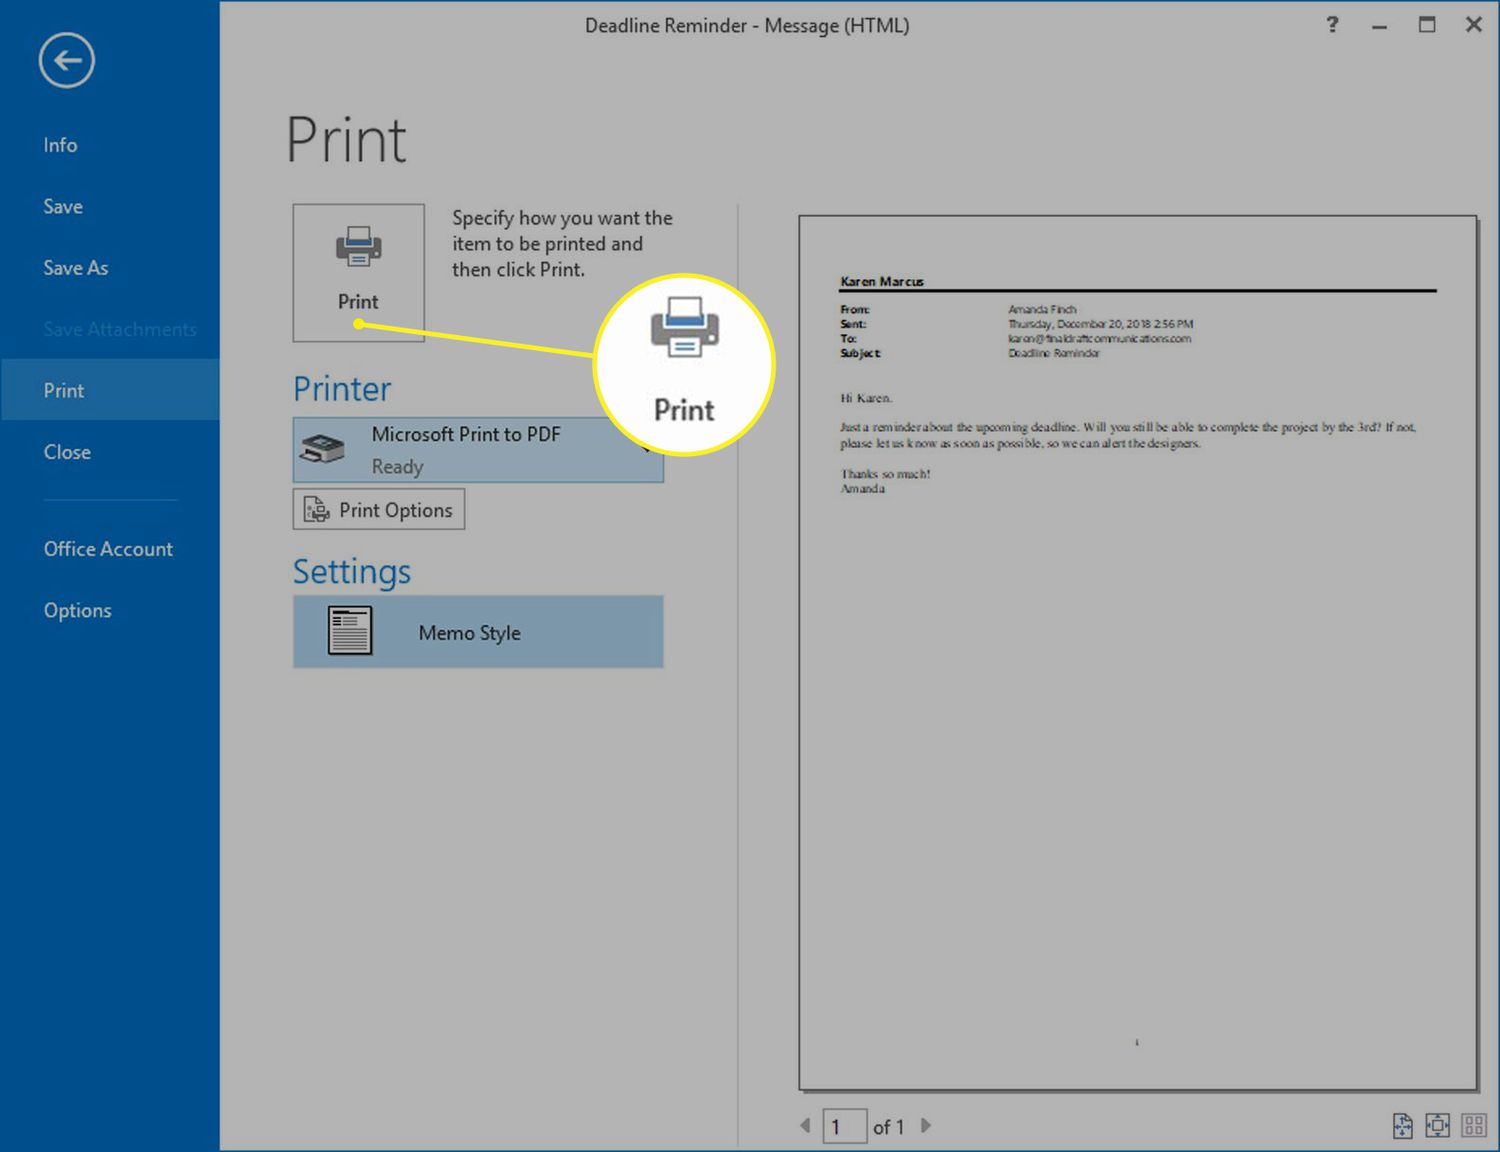
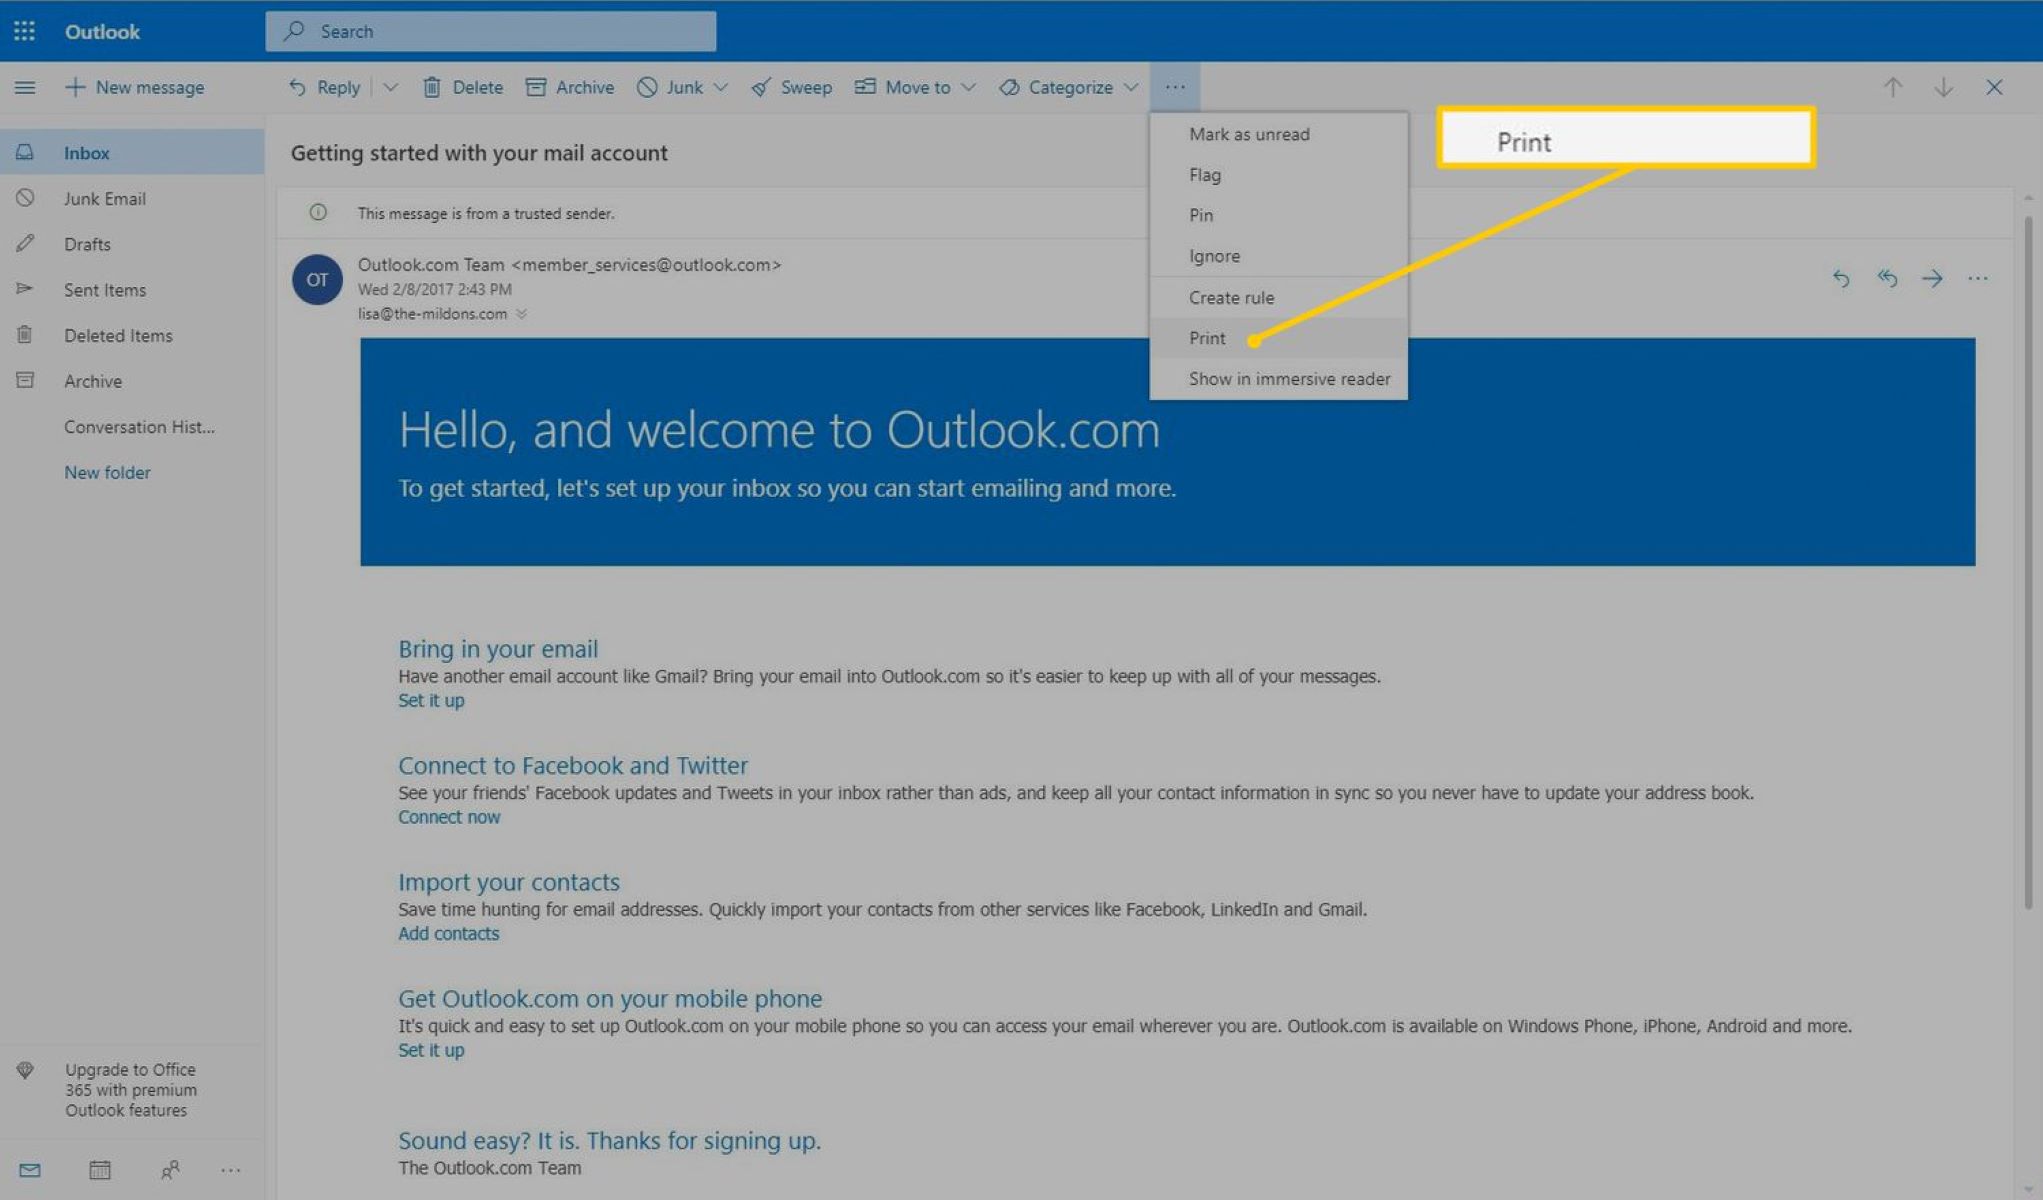
Step 3: Open the Print Window
Once you have selected the email you want to print in Microsoft Outlook, the next step is to open the print window. The print window allows you to customize the print settings and preview how the email will appear on paper before sending it to the printer.
To open the print window, you can use one of the following methods:
- Click on the “File” tab in the Outlook menu bar at the top of the screen, then select “Print” from the dropdown menu. This will open the print window.
- Alternatively, you can use the keyboard shortcut by pressing “Ctrl + P” on Windows or “Command + P” on Mac to open the print window directly.
- You can also right-click on the selected email or the reading pane and choose the “Print” option from the context menu. This will open the print window as well.
Regardless of the method you choose, the print window will appear, allowing you to configure the print settings. The print window provides options such as choosing the printer, selecting the number of copies to print, adjusting the page orientation, and more.
Take a moment to review the settings in the print window and make any necessary adjustments to ensure that the printed email reflects your desired preferences. You can also use the print preview function to see how the email will look on paper before printing.
Once you are satisfied with the print settings and the preview of the email, you are ready to proceed to the next step, where we will discuss how to configure the print settings in Microsoft Outlook.
Step 4: Configure Print Settings
After opening the print window in Microsoft Outlook, the next step is to configure the print settings to ensure that the printed email meets your requirements. The print settings allow you to customize various aspects of the printed output, such as page size, orientation, headers/footers, and more.
Here are the key print settings that you can configure:
- Printer Selection: Choose the printer that you want to use for printing the email. If you have multiple printers installed on your computer, make sure to select the correct one.
- Number of Copies: Specify the number of copies you want to print. You can increase or decrease the value as needed.
- Page Range: Determine which pages of the email you want to print. You can choose to print all pages, select a specific page range, or even print a single page.
- Page Layout: Adjust the page orientation (portrait or landscape) and set the paper size according to your preference.
- Print Options: Customize additional print options such as printing attachments, printing double-sided, or printing in color or grayscale.
- Headers and Footers: Decide whether to include headers and footers in the printed email. Headers and footers can include information such as the date, page numbers, and your email address.
- Print Preview: Utilize the print preview function to see how the email will look when printed. This allows you to make any necessary adjustments before sending the email to the printer.
Take your time to review and configure the print settings according to your preferences. Ensure that all the settings are set as desired to achieve the desired outcome when printing the email.
Once you have configured the print settings to your satisfaction, you are ready to move on to the final step, where we will discuss how to choose the printer and print the email in Microsoft Outlook.
Step 5: Choose Printer and Print
After configuring the print settings in Microsoft Outlook, the final step is to choose the printer and print the email. Once you have reviewed and adjusted the print settings to your liking, you can proceed with sending the email to the printer for a hard copy.
Here’s how to choose the printer and print the email:
- In the print window, locate the “Printer” section. This will display the list of available printers on your computer.
- Select the printer that you want to use from the list. If you are not sure which printer to choose, consult your computer’s documentation or ask your system administrator for guidance.
- Once you have selected the printer, you can choose to print the email right away by clicking on the “Print” button in the print window.
- Alternatively, you can adjust any final print settings or review the print preview one last time before clicking on the “Print” button.
- After clicking the “Print” button, Outlook will send the email to the designated printer, and the printing process will begin.
- Wait for the printer to complete printing the email. This may vary depending on the length of the email and the printing speed of your printer.
- Once the email is printed, collect the printed copy from the printer’s output tray.
Ensure that you have enough paper and ink/toner in your printer before printing to avoid any interruptions during the printing process. It is also a good practice to double-check the printed copy for any errors or formatting issues before filing or sharing the hard copy.
Congratulations! You have successfully printed an Outlook email. You can now use this process to print any important emails that you may need as physical copies.
Conclusion
Printing an Outlook email is a simple process that can be done with just a few steps. By following the systematic approach outlined in this guide, you can easily print important emails for recordkeeping, sharing, or personal reference.
We started by opening Microsoft Outlook and ensuring that we have a stable internet connection to sync our emails. We then selected the specific email we wanted to print, either from the inbox or any custom folder. Next, we opened the print window, where we could configure various print settings such as printer selection, number of copies, and page layout.
Once we had customized the print settings to our preferences, we proceeded to choose the printer and initiated the printing process. Finally, we waited for the printer to complete printing and collected the printed copy.
Remember, it’s important to review the print settings and preview the email before printing to ensure that the printed copy meets your requirements. Additionally, make sure you have sufficient paper and ink/toner in your printer to avoid any disruptions during the printing process.
By following these steps, you can easily print any important emails from Microsoft Outlook and have physical copies for your records or other purposes. Printing an email can be beneficial in situations where a hard copy is required, such as legal matters, business transactions, or archiving important information.
Now that you have mastered the process of printing Outlook emails, make sure to use this knowledge whenever needed. Printing emails can be a convenient way to have a tangible record of important communication or information.
So, go ahead and start printing your Outlook emails with confidence!