Introduction
Welcome to this step-by-step guide on how to download emails from Outlook Web App. Outlook Web App (also known as OWA) is a web-based email client that allows you to access and manage your emails, calendar, and contacts online. While OWA offers a convenient way to access your emails from any device with an internet connection, you may want to download your emails for offline access, archiving purposes, or transferring them to another email account. In this guide, we will walk you through the process of downloading emails from OWA using different methods.
Downloading emails from OWA can be crucial in certain situations. For instance, if you’re heading out without an internet connection, having your emails downloaded allows you to access and read them offline. Moreover, downloading emails can be helpful when you need to store important conversations or attachments locally for future reference. Additionally, if you’re switching email providers or accounts, downloading your emails ensures that you have a backup and can easily transfer them to your new account.
Fortunately, OWA offers various methods to download your emails, depending on your needs and preferences. In this guide, we will explore how to download emails as attachments, export emails as PST files, save emails as PDFs, and even move emails to another email account.
Before we dive into the specific steps, please ensure that you have a valid and active Outlook Web App account. If you’re not currently using OWA, you may need to sign up for an account or check with your organization or email provider to determine if OWA is available to you.
Now that you’re ready to take control of your email management, let’s get started with the different methods to download emails from Outlook Web App!
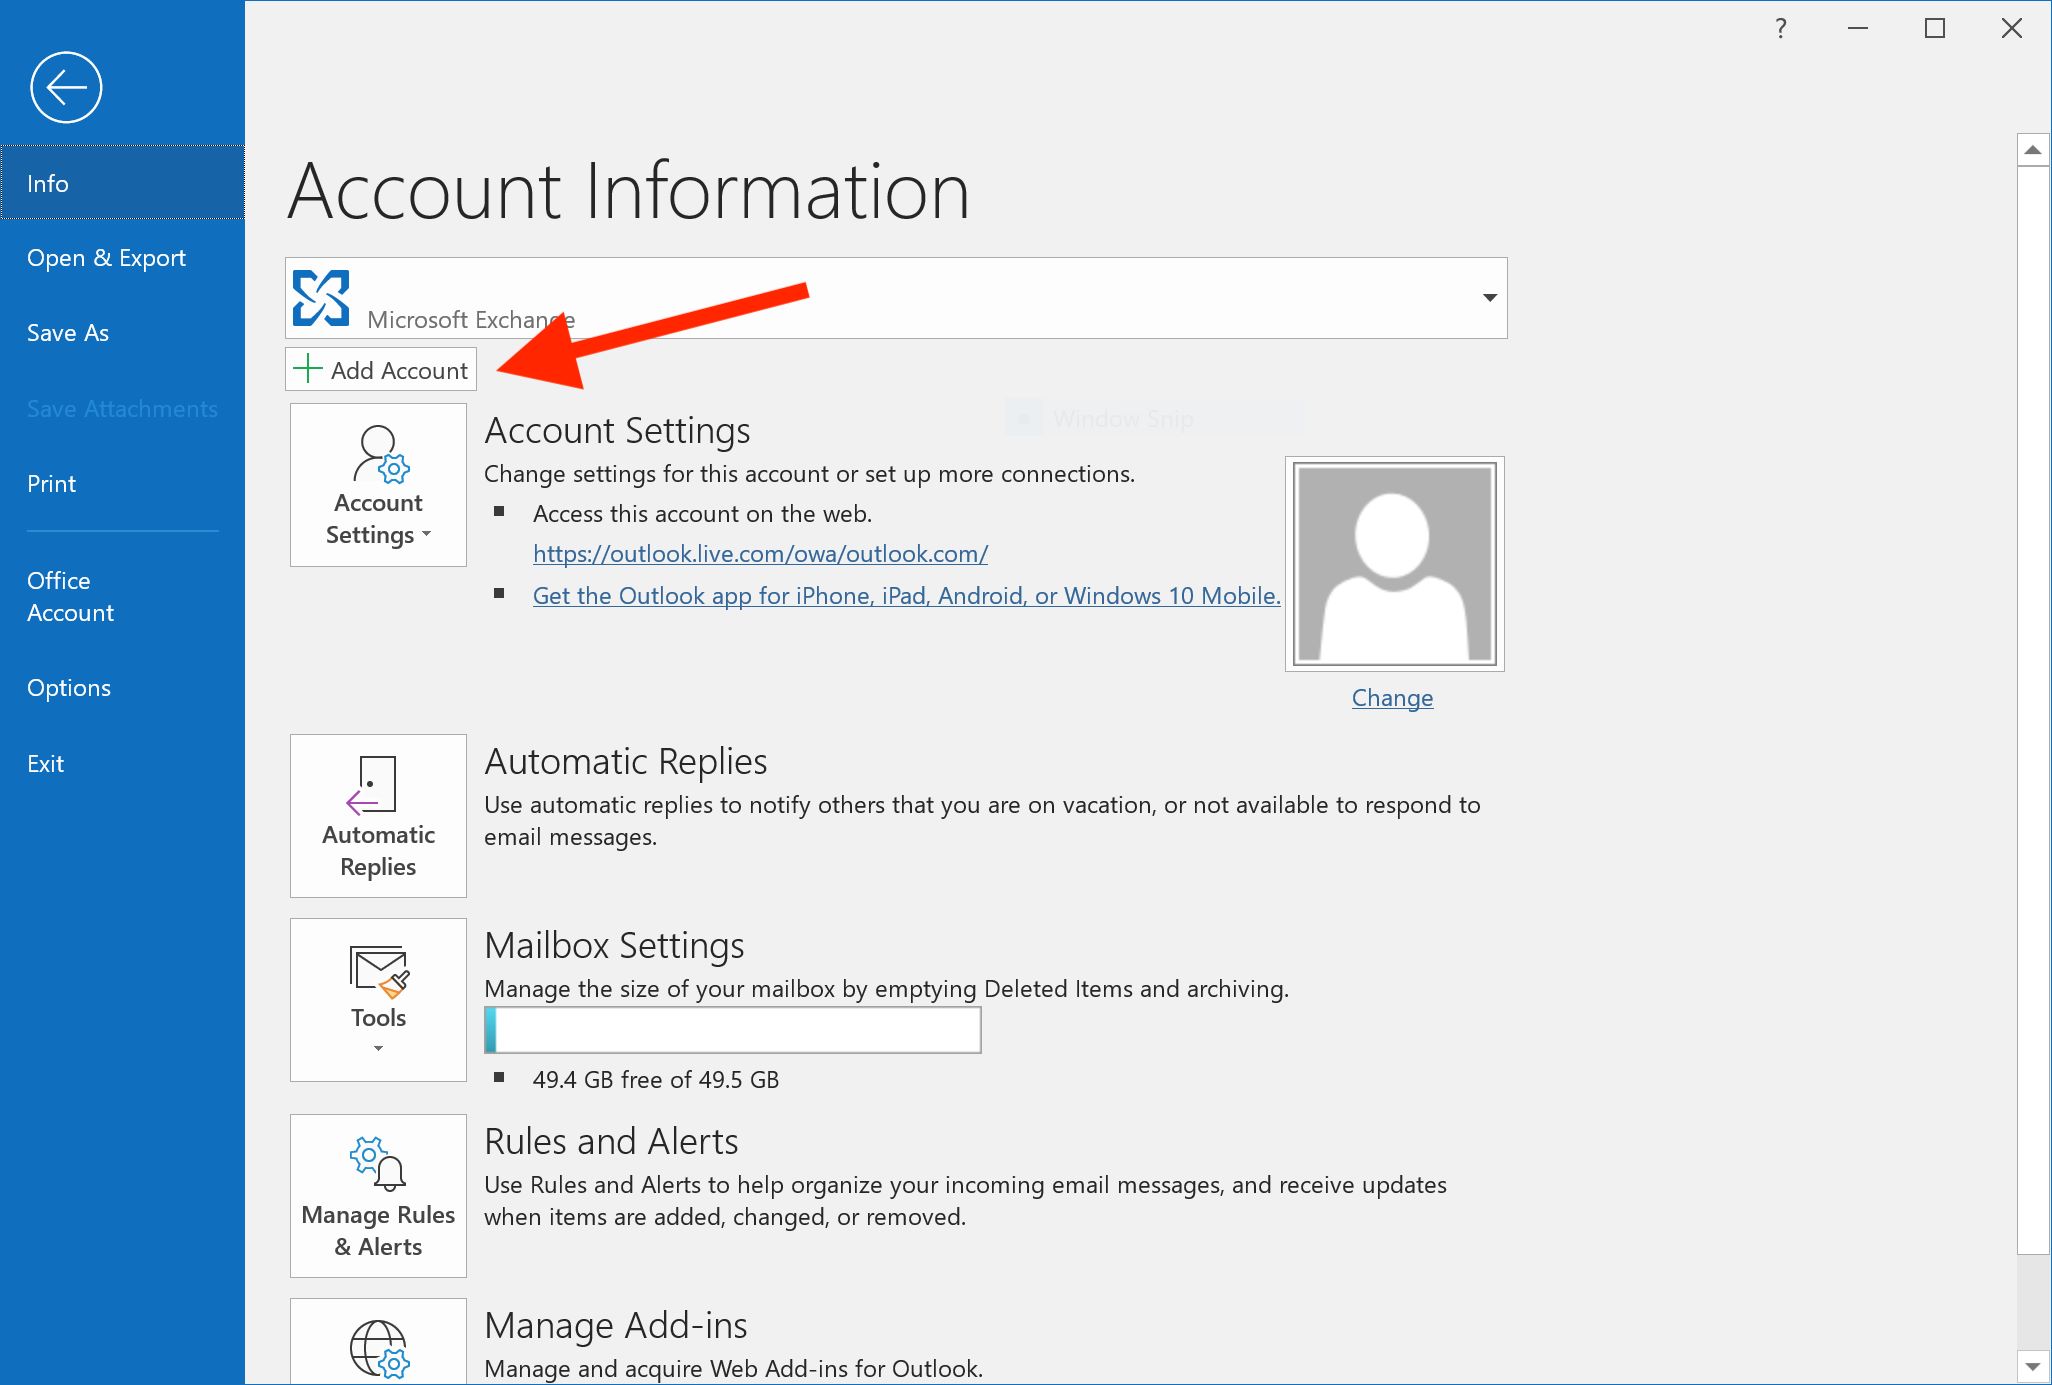
Step 1: Accessing the Outlook Web App
In order to download emails from Outlook Web App, you first need to access the platform. Here’s how you can do it:
- Open your preferred web browser (such as Chrome, Firefox, or Safari).
- Type the URL or web address of the Outlook Web App login page in the browser’s address bar. This can vary depending on your email provider or organization. For example, it could be something like “https://outlook.office.com” or “https://mail.yourcompany.com”.
- Press the Enter key on your keyboard or click the Go button.
- You will now see the Outlook Web App login page. Enter your email address and password in the respective fields. If necessary, select the appropriate option to indicate whether you’re accessing a personal or work/school account.
- Click the Sign In button to proceed.
- If your credentials are correct, you will be logged in to the Outlook Web App and taken to your mailbox, where you can see your inbox and other folders.
Please note that the specific steps to access the Outlook Web App may vary depending on your email provider or organization. If you’re unsure of the login page or encounter any difficulties during the login process, it’s recommended to reach out to your IT department or email provider’s support for assistance.
Once you have successfully accessed the Outlook Web App and are logged in to your account, you are now ready to proceed with the next steps to download your emails.
Step 2: Selecting and Filtering Emails
After accessing the Outlook Web App and logging in to your account, the next step is to select and filter the emails you want to download. Here’s how you can do it:
- Open your mailbox in the Outlook Web App by clicking on the “Mail” tab or navigating to the inbox icon.
- Scan through your inbox and other folders to locate the specific emails you want to download. You can use various methods to select multiple emails, such as:
- Selecting individual emails by checking the checkboxes next to them.
- Selecting a range of emails by checking the checkbox of the first email in the range, holding down the Shift key, and then checking the checkbox of the last email in the range.
- Selecting all emails in a folder by checking the checkbox at the top of the email list.
- Once you have selected the desired emails, you may want to further filter them based on specific criteria. This can be particularly useful if you have a large number of emails and want to narrow down the selection. Outlook Web App provides various filtering options, including:
- Date range: Specify a specific date range to filter emails that fall within that range.
- Sender: Filter emails by the sender’s email address or name.
- Subject: Filter emails based on specific keywords or phrases in the subject line.
- Attachments: Filter emails that have attachments.
- Flagged: Filter emails that you have flagged for follow-up.
- Categories: Filter emails that have been categorized using specific labels or tags.
- To apply filters, navigate to the appropriate filter options in the Outlook Web App interface and make the necessary selections. Once the filters are applied, the email list will update to display only the emails that meet the specified criteria.
By selecting and filtering your emails in the Outlook Web App, you can narrow down the list to include only the ones you want to download, making the process more efficient and targeted. This ensures that you don’t have to download unnecessary emails, saving storage space and time.
With the emails selected and filtered, you’re now ready to proceed to the next step of downloading them as attachments or exporting them in different formats.
Step 3: Downloading Emails as Attachments
Once you have selected and filtered the emails you want to download in Outlook Web App, you can proceed to download them as attachments. Follow the steps below to complete this process:
- In the Outlook Web App, make sure the desired emails are selected and filtered based on your preferences, as outlined in the previous step.
- With the selected emails displayed, look for the option to download them as attachments. This option is typically represented by an icon or a menu command, such as “Download”, “Save As”, or “Export”.
- Click on the appropriate download option, and a dialog box will appear, prompting you to choose a location to save the email attachments on your device.
- Browse to the desired location on your device and click the “Save” button or the equivalent action to commence the download process.
- Wait for the download to complete. The length of time it takes will depend on the size and number of emails being downloaded.
- Once the download is finished, you can open the location on your device where the email attachments were saved. The emails will usually be saved as individual files, and their names may reflect the subject line or a combination of date and time.
Downloading emails as attachments from Outlook Web App allows you to have a local copy of the email, complete with all the content and attachments. This method is particularly useful when you want to archive important conversations or save specific attachments for further reference.
Remember to organize and label the downloaded email attachments appropriately so that you can easily locate and access them in the future. You can create folders and subfolders on your device to store the emails based on categories, projects, or any other logical structure that suits your needs.
Now that you have successfully downloaded the selected emails as attachments, you can move on to the next step to learn how to export emails as PST files for more comprehensive backup and transfer options.
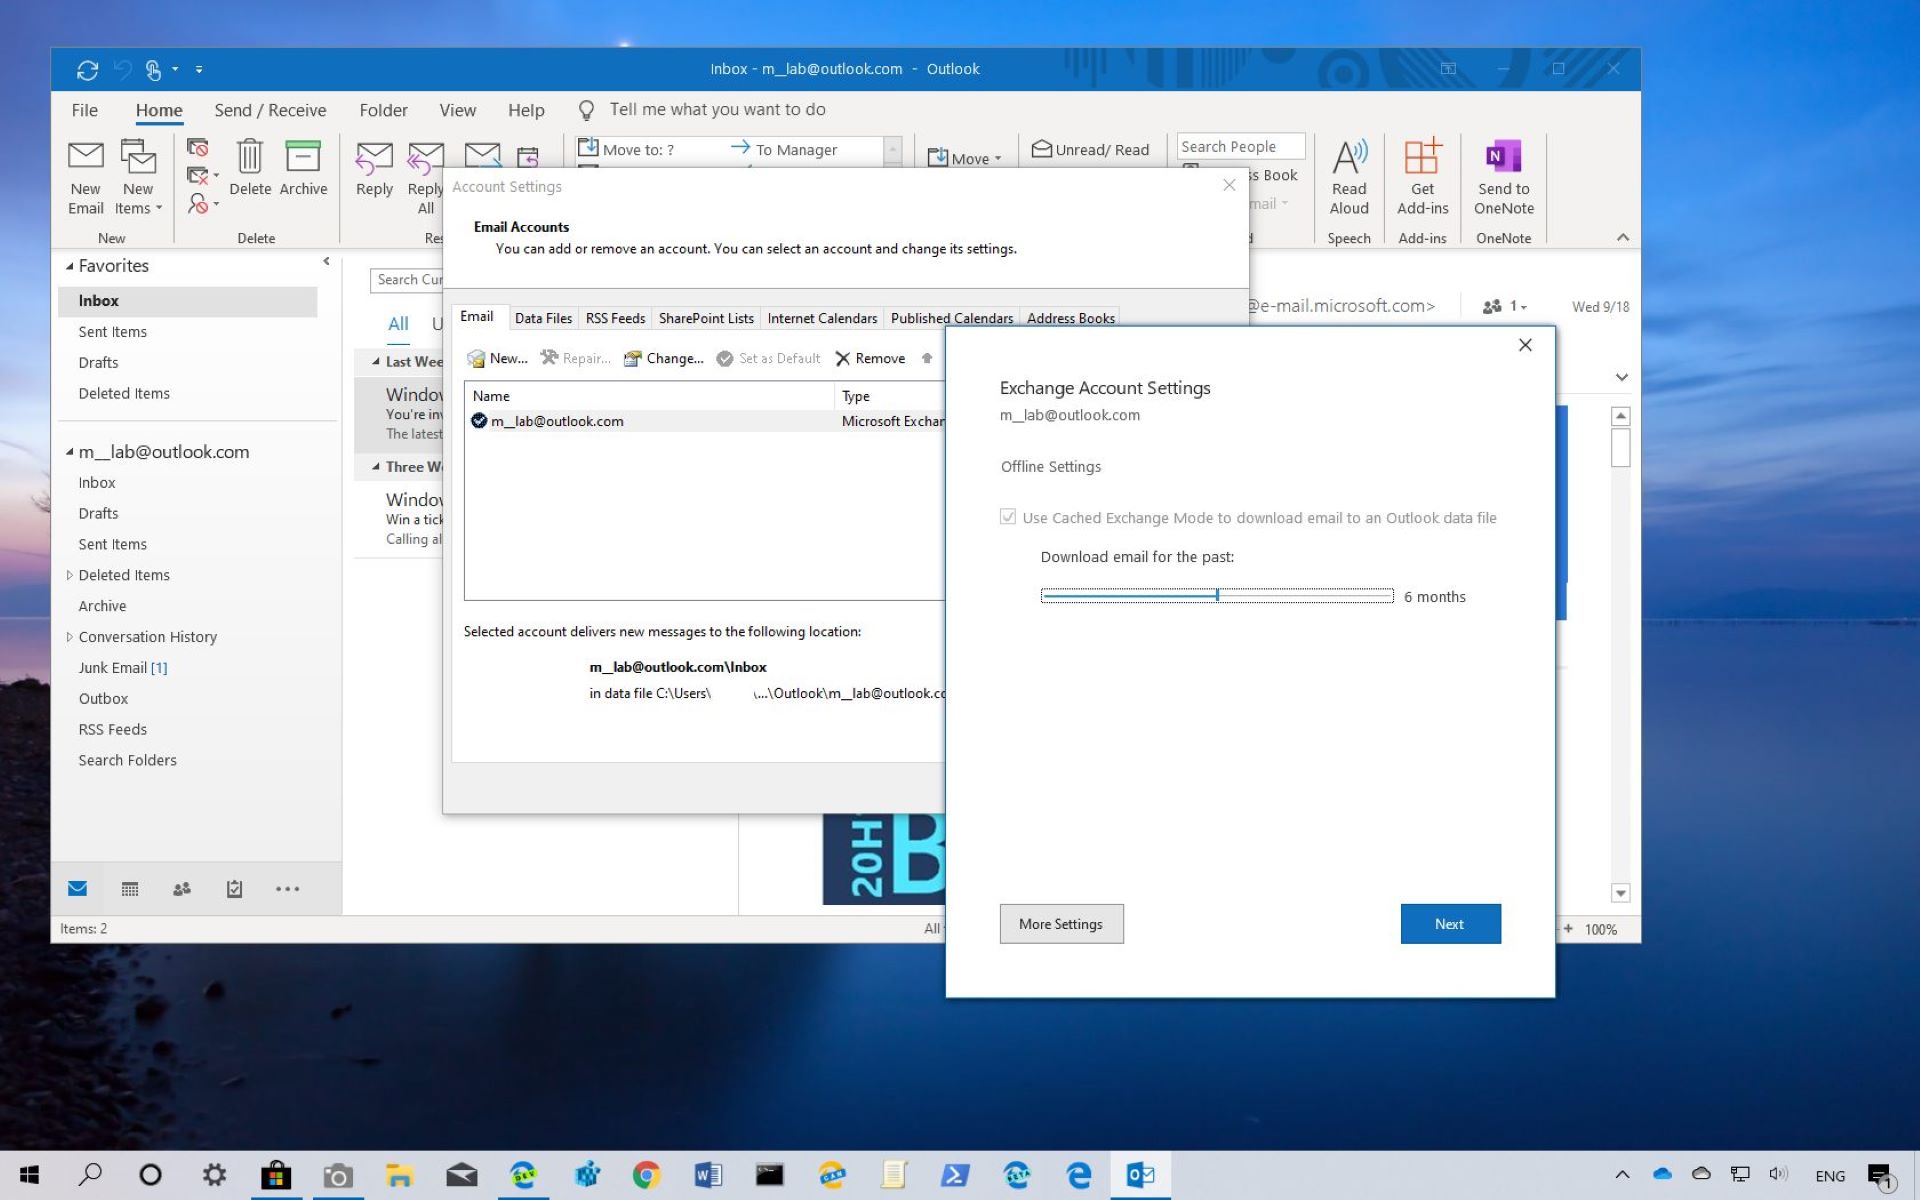
Step 4: Exporting Emails as PST Files
If you need a more comprehensive backup or want to transfer your emails to another email client or account, exporting them as PST (Personal Storage Table) files can be a suitable option. Here’s how you can export emails as PST files in Outlook Web App:
- In Outlook Web App, ensure that the desired emails are still selected and filtered based on your preferences.
- Look for the option to export the selected emails as PST files. Typically, you can find this option under a menu command like “Export”, “Save As”, or “Archive”. It may be located in the toolbar, the context menu (right-click menu), or in the settings/options section of the Outlook Web App interface.
- Click on the export option, and a dialog box or wizard will appear to guide you through the export process.
- Follow the instructions in the dialog box or wizard to specify the export settings. This may include selecting the destination folder where the PST file will be saved, choosing the desired email folders to include in the export, and applying any additional filters or options, such as including subfolders or excluding specific email types.
- Once you have configured the export settings, click the “Export” or “Finish” button (or equivalent action) to initiate the export process.
- Wait for the export to complete. The duration will depend on the size and number of emails being exported.
- After the export is finished, locate and access the destination folder where the PST file was saved. The PST file will essentially serve as a container that holds all the exported emails and their respective folders.
Exporting emails as PST files provides you with a versatile format that can be easily imported into various email clients, such as Microsoft Outlook or other compatible applications. This enables you to access your emails, folders, and even metadata seamlessly in a different email environment.
It’s recommended to keep the exported PST file in a safe and secure location because it contains sensitive and confidential information. You can create a backup of the PST file to ensure its preservation and prevent data loss in case of any unforeseen events.
The ability to export emails as PST files gives you more control and flexibility over your email data. Whether you’re migrating to a new email client or simply want an additional backup, exporting emails as PST files provides a comprehensive solution.
Now that you have successfully exported your emails as PST files, let’s move on to the next step to learn how to save emails as PDFs for easy sharing and portability.
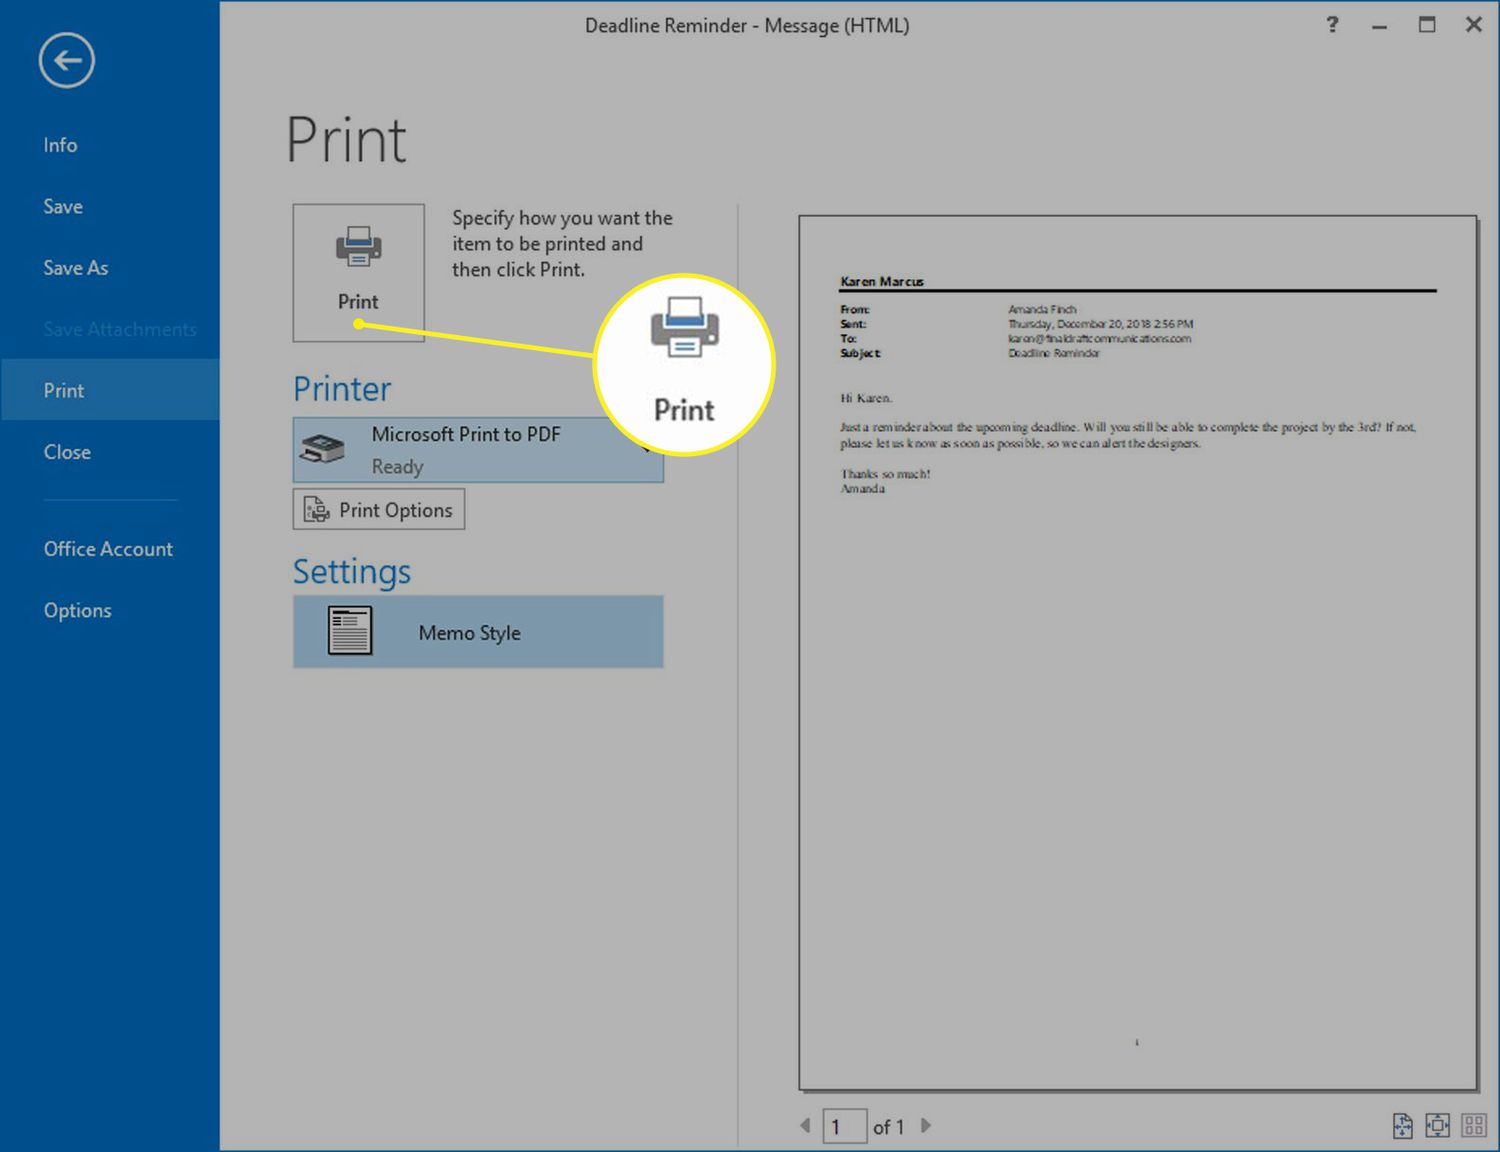
Step 5: Saving Emails as PDFs
If you need to share your emails with others or want a portable and easily readable format, saving them as PDF (Portable Document Format) files can be an ideal choice. Follow these steps to save emails as PDFs in Outlook Web App:
- Once again, ensure that the desired emails are selected and filtered according to your requirements.
- Look for the option to save the selected emails as PDF files. This option may be available as a direct command or under a menu option like “Save As”, “Export”, or “Print”. The location of this option can vary depending on the version of Outlook Web App you are using.
- Click on the appropriate option, and a print dialog box or window will appear on the screen.
- From the list of available printers, choose the option to save as PDF. If this option is not initially visible, you may need to scroll or expand the printer selection dropdown to find it.
- Configure any additional settings or preferences for the PDF export in the print dialog box. This may include selecting the page orientation, adjusting the paper size, or specifying the page range.
- Once you have set the desired options, click the “Print” or “Save” button to start the conversion process.
- Choose a location on your device to save the PDF file, and click the “Save” button to complete the process. The emails will now be converted to PDF format and saved as individual files.
Saving emails as PDFs provides several benefits. PDF files are widely compatible and can be opened and viewed on almost any device or operating system without the need for specialized software. This makes them an excellent choice for sharing important emails with colleagues, clients, or other stakeholders who may not have access to Outlook Web App.
Furthermore, by saving emails as PDFs, you can preserve the original formatting, including text, images, attachments, and even hyperlinks. This ensures that the recipient of the PDF file sees the email exactly as you intended, regardless of the device or email client they are using.
Remember to choose a descriptive file name for each PDF file to make it easier to identify and locate specific emails in the future. Organizing the saved PDFs into folders or using a logical naming convention can help streamline your file management process.
With your emails now saved as PDFs, you have a portable and universally readable format that can be easily shared and accessed. Proceed to the next step to learn how to move emails to another email account if needed.
Step 6: Moving Emails to Another Email Account
If you need to transfer your emails from Outlook Web App to another email account, whether it’s a different provider or a personal account, you can do so using the following steps:
- First, access the Outlook Web App and ensure that the emails you want to transfer are selected and filtered according to your preferences.
- Look for the option to move or forward the selected emails. This option is typically accessible through a menu command or toolbar icon, often labeled as “Move”, “Forward”, or “Transfer”.
- Click on the appropriate option, and a new window or dialog box will appear.
- In the new window or dialog box, enter the email address of the destination account where you want to move the emails to. Make sure you provide the full and correct email address to ensure successful delivery.
- Choose any additional preferences or options for the transfer, such as whether to keep a copy of the emails in the original account.
- Once you have configured the desired settings, click the “Move” or “Send” button to initiate the transfer process. The selected emails will be sent to the specified email account as a new message or as part of an existing thread, depending on the destination email service and configuration.
- Depending on the size and number of emails being transferred, the process may take some time. Be patient and allow the transfer to complete.
- Once the transfer is finished, verify that the emails have been successfully moved to the new email account. Access the account and check the inbox or proper folders to ensure that the transferred emails are present.
Moving emails to another email account can be useful when you want to consolidate your email correspondence, switch providers, or keep a backup copy of important emails in a separate account. It allows you to access and manage all your emails from a single interface, making it more convenient to stay organized and efficient.
It is important to note that the specific steps and options for moving emails may vary depending on the email service or provider involved. If you encounter any difficulties during the transfer process or if certain features are not available, we recommend consulting the help documentation or contacting the support team of the respective email services for further assistance.
With the ability to move your emails to another account, you have now completed all the necessary steps for downloading, exporting, saving, and transferring your emails from Outlook Web App. By leveraging these techniques, you can efficiently manage your emails, ensure data security, and optimize your productivity.
Conclusion
Congratulations! You have reached the end of this step-by-step guide on how to download emails from Outlook Web App. We have explored various methods, including downloading emails as attachments, exporting them as PST files, saving them as PDFs, and moving them to another email account.
By following these steps, you can take control of your email management, whether it’s for offline access, archiving important conversations, or transferring emails to a different email account. Each method offers its own advantages, allowing you to choose the most suitable option based on your specific needs.
Remember to always access the Outlook Web App using a reliable and secure internet connection to protect your account and data. Additionally, make sure to follow any guidelines or policies set by your organization or email provider when it comes to downloading and managing your emails.
Whether you’re a busy professional, a student, or simply someone who relies heavily on email communication, having the ability to download and manage your emails effectively is a valuable skill. It allows you to access important information whenever and wherever you need it, ensuring productivity and seamless communication.
Now that you have learned these valuable techniques, take the time to explore and experiment with them in your Outlook Web App. Customize your settings, organize your emails, and make the most of the features available to you.
Thank you for joining us on this journey to becoming proficient in downloading emails from Outlook Web App. We hope this guide has provided you with the knowledge and confidence to make the most out of your email management experience. Happy downloading!