Introduction
Are you looking to download your email from Outlook? Whether you want to access your emails offline or back them up for safekeeping, downloading your email from Outlook is a straightforward process. In this guide, we will walk you through the steps to download your email from Outlook so that you can have your messages readily available on your device.
Outlook, developed by Microsoft, is one of the leading email service providers with a user-friendly interface and versatile features. With Outlook, you can manage your emails, contacts, and calendars all in one place, making it a popular choice for both personal and professional use. By downloading your Outlook email, you can have peace of mind knowing that your data is easily accessible, even when you are offline or without an internet connection.
In the following sections, we will provide a step-by-step guide to help you download your email from Outlook. Whether you are using Outlook on your computer or mobile device, these instructions will help you effortlessly retrieve your messages and keep them at your fingertips. So let’s get started with the first step – opening your web browser to access the Microsoft website.
Step 1: Open your web browser
To begin the process of downloading your email from Outlook, you need to open your preferred web browser on your computer or mobile device. Whether you use Google Chrome, Mozilla Firefox, Safari, or any other browser, launch it by clicking on its icon in your applications or taskbar.
If you are using a mobile device, locate the web browser app on your home screen or in your app drawer. Tap on the browser icon to open it and proceed to the next step.
Opening the web browser is the first step as it allows you to access the Microsoft website where you will find the necessary resources to download your Outlook email. Ensure that you have a stable internet connection before proceeding to the next step to ensure a smooth downloading process.
Once your web browser is open, move on to the next step to visit the Microsoft website, where you can sign in to your Microsoft account and access the Outlook app.
Step 2: Go to the Microsoft website
Now that you have your web browser open, the next step is to navigate to the official Microsoft website. The Microsoft website is the central hub for all Microsoft services, including Outlook.
To go to the Microsoft website, type “www.microsoft.com” in the address bar of your web browser and press Enter. Alternatively, you can search for “Microsoft” in a search engine like Google, and click on the official Microsoft website link in the search results.
Once you are on the Microsoft website, you will see the homepage with various options and sections highlighting Microsoft’s products and services. Look for the navigation menu or search bar on the top of the page to easily find the Outlook app.
If you are using the search bar, type in “Outlook” and press Enter. This will direct you to the Outlook app page, where you can access your email account and download your emails. If you are using the navigation menu, hover over the “Products” or “Services” section and locate the “Outlook” option. Click on it to proceed.
Ensure that you are visiting the official Microsoft website to ensure the safety and security of your information. Be cautious of phishing websites or unauthorized sources that may attempt to gather your personal data. Double-check the URL in the address bar to confirm that you are on the legitimate Microsoft website.
Now that you have successfully arrived at the Microsoft website, it’s time to move on to the next step – signing in to your Microsoft account to access the Outlook app.
Step 3: Sign in to your Microsoft account
To download your email from Outlook, you need to sign in to your Microsoft account. Your Microsoft account is the key to accessing all Microsoft services, including Outlook. If you don’t already have a Microsoft account, you can quickly create one by following the instructions on the Microsoft website.
On the Microsoft website, look for the “Sign In” or “Log In” button in the top right corner of the page. Click on it to proceed to the login page. Here, you will be prompted to enter your email address associated with your Microsoft account.
Type in your email address and click on the “Next” button. If you have already entered your email address before, your browser may remember it and automatically populate the field for you.
On the next page, you will be asked to enter your password. Carefully type in your password and make sure it is correct. Passwords are case-sensitive, so check that your Caps Lock key is not enabled if you’re having trouble.
If you have forgotten your password, click on the “Forgot password?” link to initiate the password recovery process. Follow the prompts to reset your password and regain access to your Microsoft account.
Once you have entered your email address and password correctly, click on the “Sign In” button to proceed. If the credentials are correct, you will be successfully logged in to your Microsoft account and gain access to the Outlook app.
Now that you are signed in to your Microsoft account, it’s time to move on to the next step – accessing the Microsoft Outlook app to download your email.
Step 4: Access the Microsoft Outlook app
Now that you are signed in to your Microsoft account, it’s time to access the Microsoft Outlook app. The Outlook app provides you with a user-friendly interface to manage your emails, calendars, and contacts efficiently.
On your Microsoft account homepage, look for the “Outlook” option. This may be located in the navigation menu or as a separate tile on the homepage. Click on it to open the Outlook app.
Once you access the Outlook app, you will be greeted by your email inbox. The Outlook app is designed to streamline your email experience, making it easy to search, organize, and respond to your messages.
You will find various tabs or sections within the Outlook app, such as “Inbox,” “Sent,” “Deleted Items,” and more. These sections help you navigate and manage your email folders efficiently.
Take some time to familiarize yourself with the Outlook app’s interface. You may notice additional features like the calendar, contact list, and custom folders that enable you to further organize and streamline your email experience.
It’s important to note that if you have multiple email accounts linked to your Microsoft account, you will be able to access all of them within the Outlook app. This allows you to manage multiple email addresses in a single location, making it convenient and efficient.
Now that you have successfully accessed the Microsoft Outlook app, let’s move on to the next step – choosing your email account and proceeding with the download process.
Step 5: Choose your email account
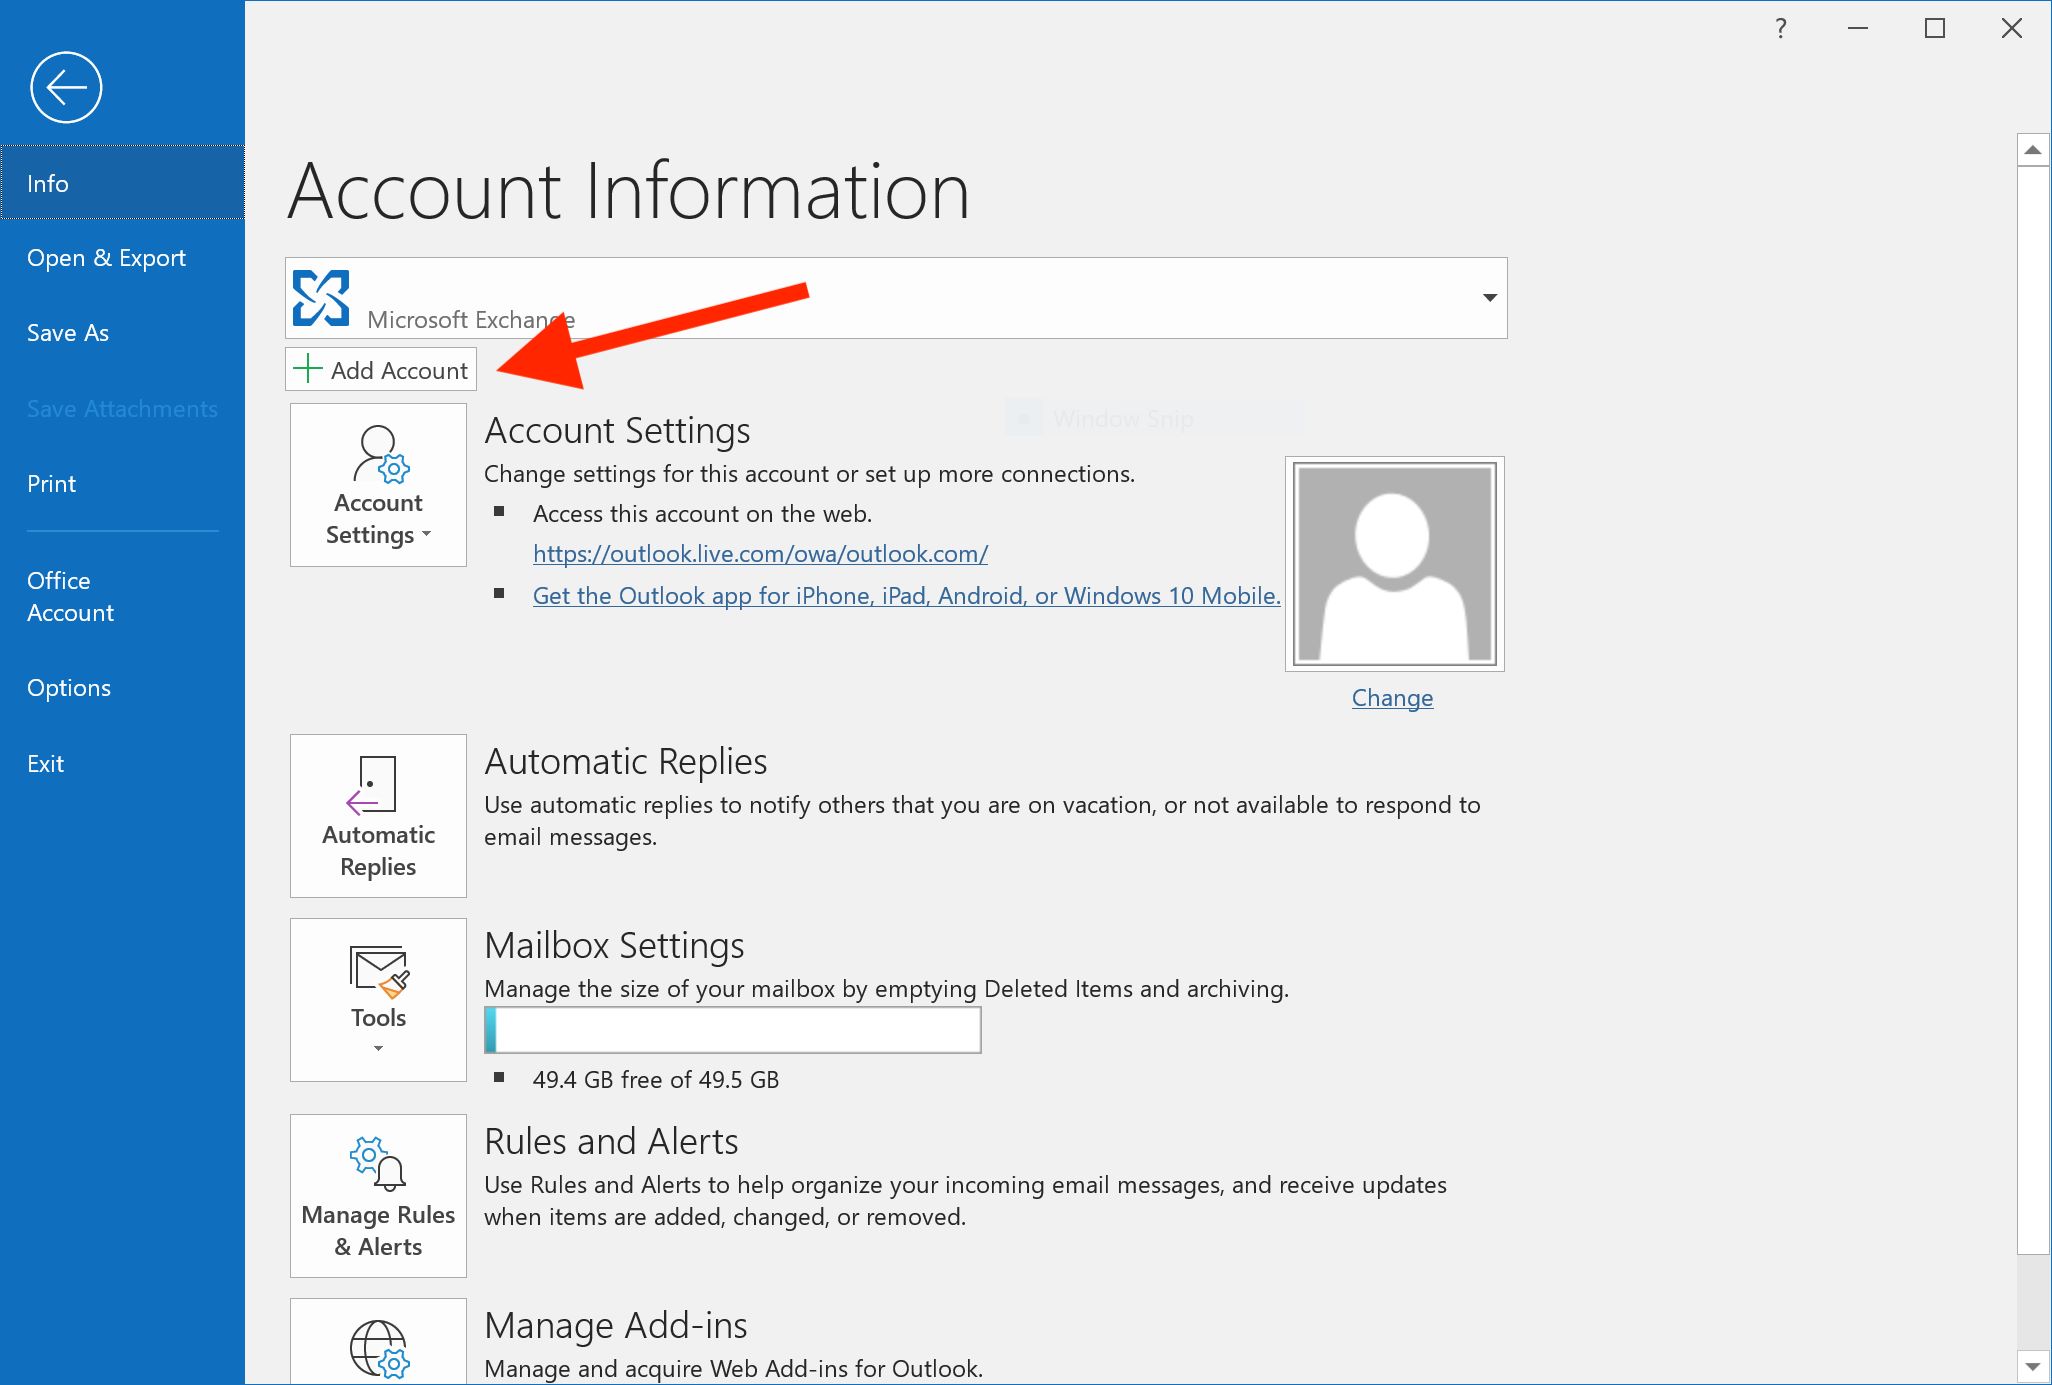
Once you have accessed the Microsoft Outlook app, it’s time to choose the specific email account that you want to download. If you have multiple email accounts linked to your Microsoft account, this step allows you to select the desired account and proceed with the download process.
In the Outlook app, look for your email account listed in the sidebar or navigation menu. It may be labeled with the name or email address associated with that account. Click on the account to select it.
When you choose your email account, the Outlook app will display all the folders and messages associated with that account. This ensures that you are downloading the emails specifically from the selected account.
If you only have one email account linked to your Microsoft account, this step may not be applicable as the Outlook app will automatically display the messages from that account upon opening.
However, if you have multiple email accounts, it is crucial to select the correct account to download the desired emails. Double-check the account name or email address to ensure you are working with the correct inbox.
Once you have chosen your email account, you are ready to proceed to the next step – clicking on the Download button to initiate the email download process. This will allow you to save your emails locally on your device for offline access or backup purposes.
By choosing the specific email account, you ensure that you have control over which emails are downloaded, making it easier to manage and organize your Outlook data. Now that you have selected your email account, let’s move on to the final step of the process – downloading your emails from Outlook.
Step 6: Click on the Download button
Now that you have chosen the specific email account that you want to download, it’s time to initiate the email download process by clicking on the Download button. This action will save your emails locally on your device, allowing you to access them offline or create a backup for future reference.
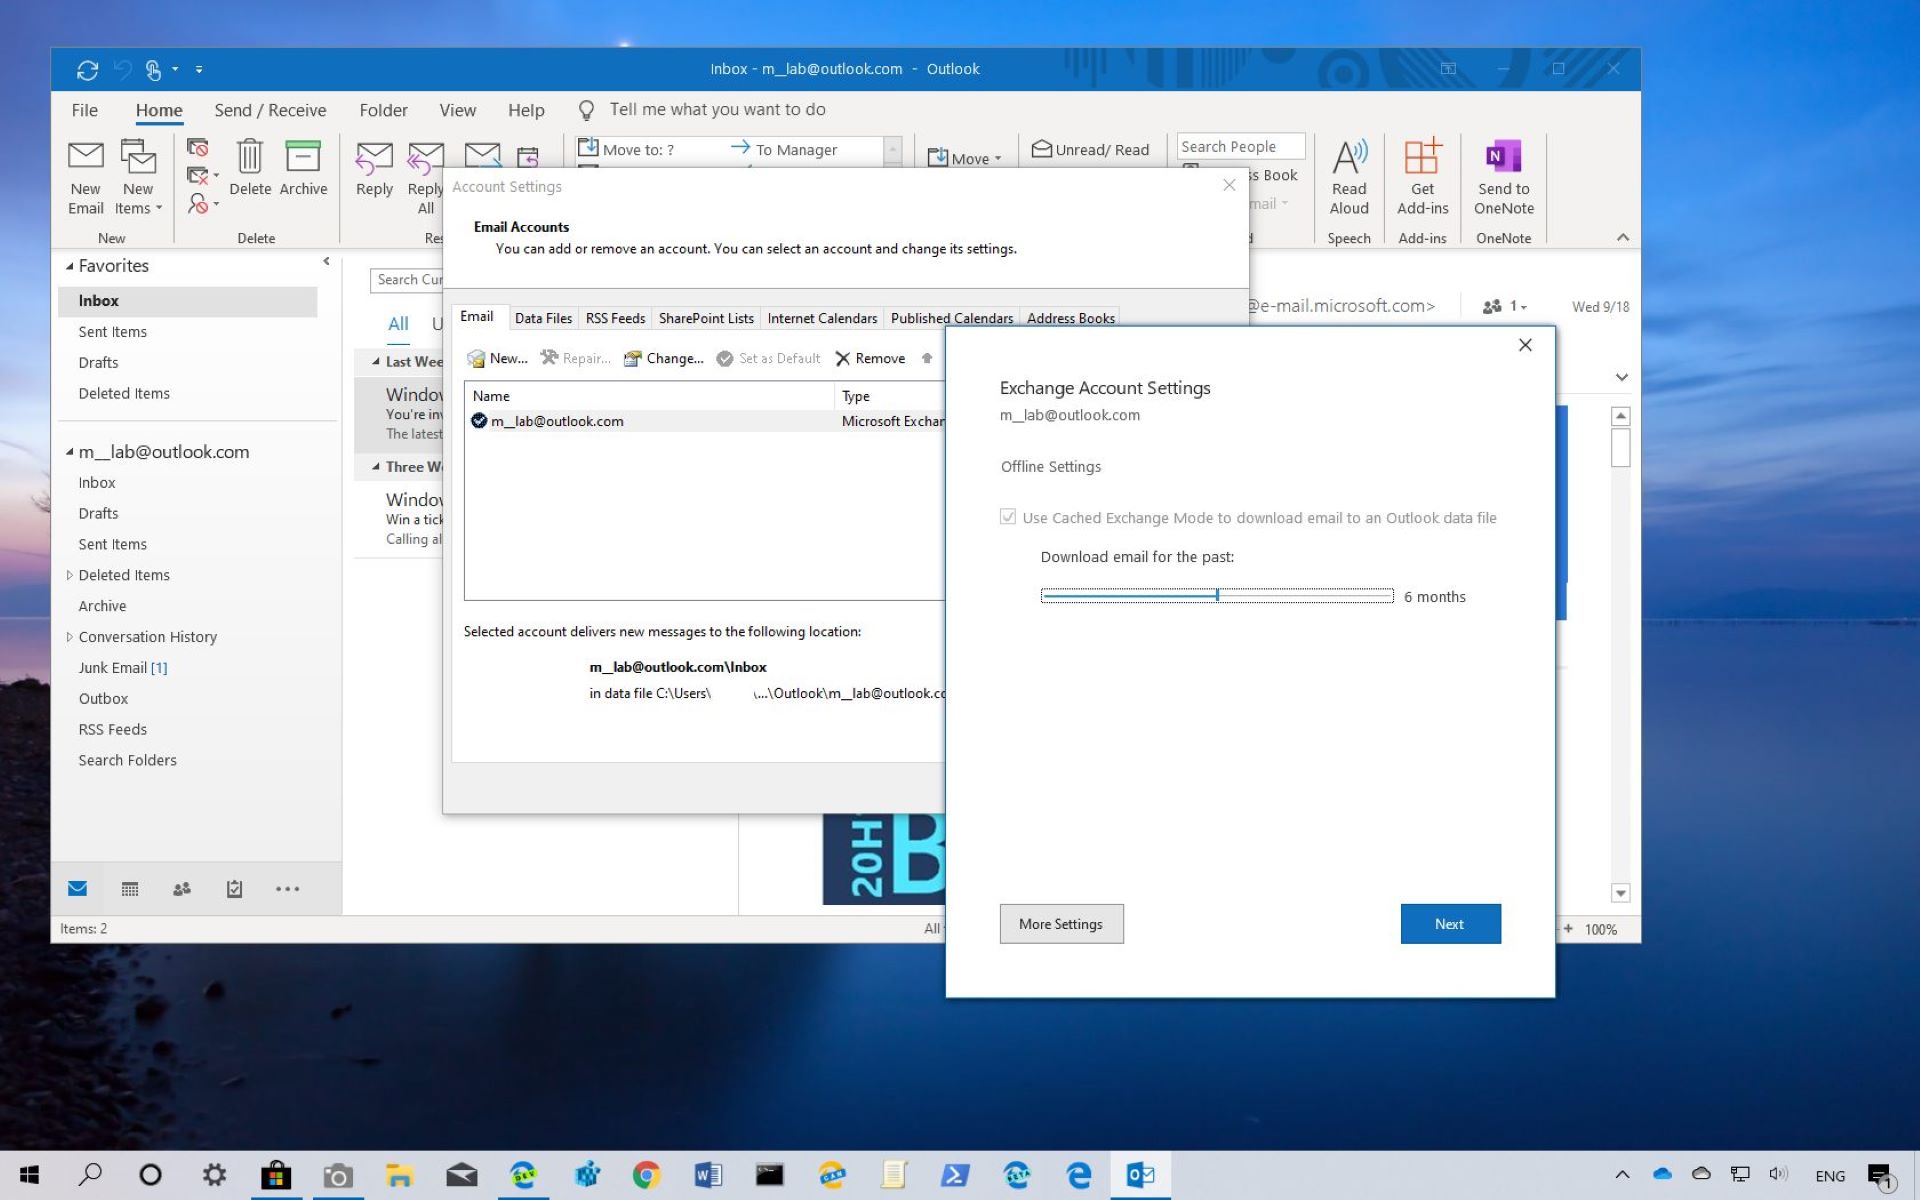
In the Outlook app, look for the Download button, which is usually located in the toolbar or menu options. The appearance of the Download button may vary based on the version of the Outlook app you are using, but it is typically represented by a downward arrow icon or the word “Download.”
Clicking on the Download button will prompt the Outlook app to start downloading your emails. The time required for the download process will depend on the amount of data to be downloaded and the speed of your internet connection. It is advisable to have a stable and reliable internet connection to ensure a smooth and uninterrupted download.
While the download is in progress, it is essential to avoid making any changes to your email account or closing the Outlook app. Doing so may interrupt the download process and result in incomplete or missing email data. It is best to let the Outlook app complete the download before performing any other tasks.
Once the download is complete, the Outlook app will inform you of the successful download and may provide a summary of the downloaded emails. You can now access your downloaded emails offline, even without an internet connection. Simply navigate to the respective folders in the Outlook app to view the downloaded messages.
Having your emails downloaded and readily available on your device offers convenience and peace of mind. Whether you are traveling or experiencing internet connectivity issues, you can still access and manage your emails without any hiccups.
Congratulations! You have successfully completed the process of downloading your emails from Outlook. You now have the freedom to access your messages offline and keep them securely saved on your device.
Conclusion
Downloading your email from Outlook can provide you with easy access to your messages, even without an internet connection. By following the step-by-step guide outlined above, you can quickly and efficiently download your emails from Outlook. Let’s recap the process:
- Open your web browser to access the Microsoft website.
- Go to the Microsoft website and sign in to your Microsoft account.
- Access the Microsoft Outlook app.
- Choose the specific email account you want to download.
- Click on the Download button to initiate the download process.
By following these steps, you can ensure that your emails are safely stored on your device and readily available whenever you need them. Whether you want to access them offline or create a backup, downloading your Outlook email offers convenience and peace of mind.
Remember to be cautious when downloading your emails and ensure that you have a stable internet connection throughout the process. It is also crucial to double-check the account you are working with to ensure you download the correct emails.
We hope this guide has been helpful in assisting you with downloading your emails from Outlook. Enjoy the convenience of accessing your messages offline and managing your mailbox efficiently. If you have any additional questions or need further assistance, feel free to consult the official Outlook support resources or reach out to Microsoft for help.