Introduction
Welcome to this step-by-step guide on how to create labels from Google Sheets. Labels are a versatile tool for organizing and categorizing items in various contexts. Whether you need to create address labels for a mailing campaign, product labels for your small business, or any other type of labels, Google Sheets can be a convenient and efficient platform to assist you.
Google Sheets is a web-based spreadsheet application that offers powerful features for managing data. With its user-friendly interface and collaborative capabilities, it provides a practical solution for creating and customizing labels. By leveraging the functionality of Google Sheets, you can streamline the label-making process and avoid the hassle of manually formatting and printing labels.
In this guide, we will walk you through the steps to create labels using Google Sheets. You do not require any advanced technical knowledge to follow along. Whether you are a beginner or an experienced user, this guide will provide you with the necessary instructions to produce professional-looking labels.
Before we dive into the steps, make sure you have a Google account and access to Google Sheets. If you haven’t already, create a Google Sheets document where you will store your label data. Once you have set up your document, you can proceed with the following steps to create and print your labels efficiently.
Let’s get started!
Step 1: Create a Google Sheets Document
The first step in creating labels from Google Sheets is to create a new Google Sheets document. If you already have an existing document that you want to use, you can skip this step and proceed to Step 2.
To create a new Google Sheets document, follow these simple steps:
- Open your web browser and go to Google Sheets.
- If you’re not already signed in to your Google account, sign in with your credentials. If you don’t have a Google account, you can create one for free.
- Once you’re signed in, click on the “+ New” button on the left-hand side of the page and select “Google Sheets” from the dropdown menu.
- A new blank Google Sheets document will open. You can give it a descriptive name by clicking on “Untitled spreadsheet” at the top of the page and entering your preferred title.
Now you have your Google Sheets document ready to be populated with data for creating labels. In the next step, we’ll discuss setting up your label template.
Step 2: Set Up Your Label Template
Once you have created your Google Sheets document, it’s time to set up your label template. The label template will define the layout and design of your labels.
Here’s how you can set up your label template in Google Sheets:
- In your Google Sheets document, go to the first row and first column where you want your labels to be placed. This will be the starting cell for your label template.
- Select the number of rows and columns that correspond to the size and quantity of labels you want on each sheet.
- With the cells selected, click on “Format” in the menu bar, then select “Merge Cells” to merge the selected cells together. This will create a single cell that spans across the selected rows and columns.
- Next, click on “Format” again and select “Text wrapping.” Choose the option that best suits your label design, such as wrapping text within the cell or merging cells to fit all the text.
- Now, you can customize the appearance of your label template by applying formatting options such as font styles, colors, and borders. Use the formatting tools in the toolbar to make your labels visually appealing.
Remember to leave some space between each label to ensure they are properly separated when printed. Additionally, consider adding any desired headers or categories to your label template to further organize your data.
Once you have set up your label template, you are ready to import your data into Google Sheets. In the next step, we will discuss how to import your data seamlessly.
Step 3: Import Your Data into Google Sheets
Now that you have your label template set up in Google Sheets, it’s time to import your data. This step involves transferring your label information into the Google Sheets document. There are a few different methods you can use to import your data:
Method 1: Manual Entry
If you have a small number of labels or prefer to manually enter the data, follow these steps:
- Click on the first cell of your label template in Google Sheets.
- Enter the desired information for the first label (e.g., name, address, product details).
- Continue entering the information for each label, moving to the next cell in the template.
Method 2: Copy and Paste
If you already have your label information stored in another document or spreadsheet, you can save time by copying and pasting the data into Google Sheets:
- Open the document containing your label data.
- Select the cells containing the data you want to import.
- Copy the selected cells (either right-click and choose “Copy” or use the Ctrl+C or Command+C shortcut).
- Switch back to your Google Sheets document.
- Select the first cell in your label template.
- Paste the copied data (either right-click and choose “Paste” or use the Ctrl+V or Command+V shortcut).
Method 3: Import from a File
If your label data is saved in a file format such as CSV or Excel, you can import the data directly into Google Sheets:
- In your Google Sheets document, click on “File” in the menu bar and select “Import”.
- Choose the option to upload a file from your computer.
- Select the file containing your label data and click on “Open”.
- Follow the prompts to specify how you want the data to be imported (e.g., delimiter settings).
- Click on “Import data” to import the data into Google Sheets.
Once you have imported your data into Google Sheets, ensure that it is accurately displayed in your label template. In the next step, we will discuss how to customize your label design to make it visually appealing and professional.
Step 4: Customize Your Label Design
Now that your label data is imported into Google Sheets, it’s time to customize the design of your labels. Google Sheets offers various formatting options to make your labels visually appealing and professional. Here’s how you can customize your label design:
- Select the range of cells that contain your label data.
- Click on the “Format” menu in the toolbar and explore the different formatting options available.
- You can change the font style, size, and color of your label text to match your preferences.
- To add borders around your labels, click on the “Borders” icon and choose the desired border style.
- You can also add background color to the cells by selecting the “Fill color” icon and selecting your desired color.
- Consider using conditional formatting to highlight specific labels based on certain criteria. This can be useful for filtering and sorting your label data.
- If you have images or logos you want to include on your labels, you can insert them by clicking on “Insert” in the menu bar and choosing “Image”.
Remember to preview your label design from time to time to ensure that it meets your requirements. Experiment with different formatting options to achieve the desired look for your labels.
It’s also worth mentioning that you can save your label template as a reusable template for future use. This allows you to quickly create labels with the same design without going through the setup process again.
Once you are satisfied with your label design, it’s time to move on to the final step – printing your labels from Google Sheets.
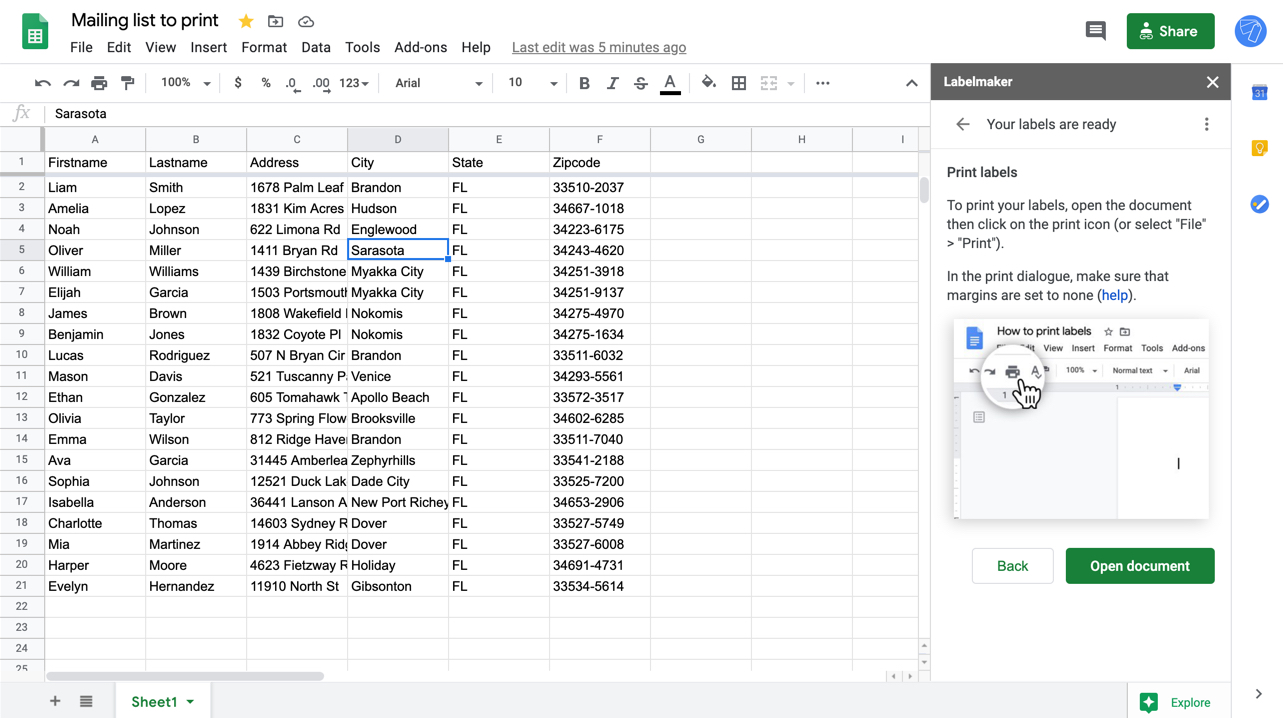
Step 5: Print Your Labels from Google Sheets
After customizing your label design in Google Sheets, you’re ready to print your labels. Here’s how you can do it:
- Make sure your printer is connected and turned on.
- In Google Sheets, go to “File” in the menu bar and select “Print”.
- Review the print settings to ensure they match your requirements. You can specify the number of copies, paper size, orientation, and other print options.
- Click on the “Print” button to send the document to your printer.
Before printing, it’s advisable to do a test print on a blank sheet of paper to ensure the alignment and formatting of your labels. This way, you can make any necessary adjustments before printing a large batch.
If you have a large number of labels or if you need to print on specific label sheets, it may be beneficial to use a label printing software that integrates with Google Sheets. These software solutions can provide additional features and flexibility for your label printing needs.
Remember to double-check your label sheets to ensure that they are compatible with your printer. Some label sheets have specific instructions or templates provided by the manufacturer that you should follow for optimal printing results.
Once you have successfully printed your labels, you’re ready to use them for your desired purpose, such as mailing, organizing, or promoting your products.
Congratulations! You have now completed the process of creating and printing labels from Google Sheets. With the convenience and versatility of Google Sheets, you can efficiently manage your label-making tasks and save time and effort.
Remember, the steps outlined in this guide can be adjusted according to your specific requirements and workflows. Feel free to explore further customization options and techniques to create labels that perfectly align with your needs.
Conclusion
Creating labels from Google Sheets offers a convenient and efficient method for organizing and categorizing various items. By following the step-by-step guide outlined in this article, you can easily create, customize, and print labels to suit your specific requirements.
With Google Sheets’ user-friendly interface and powerful features, you can import your label data, set up a label template, customize the design, and print your labels with ease. The ability to collaborate and access your label documents from any device adds to the convenience and flexibility of using Google Sheets for label creation.
Remember to experiment with different formatting options and techniques to create visually appealing and professional-looking labels. Take advantage of features like conditional formatting and image insertion to further enhance your label design.
Before printing your labels, always perform a test print and ensure that your label sheets are compatible with your printer to avoid any formatting or alignment issues.
By utilizing Google Sheets for label creation, you can streamline your label-making process, improve organization, and save time and effort. Whether you need labels for mailing, product branding, or any other purpose, Google Sheets can serve as your go-to tool.
We hope this guide has helped you understand how to make labels from Google Sheets. Now you can confidently create and print your own labels, bringing efficiency and professionalism to your personal or business projects.
Get started today and unlock the power of Google Sheets for label creation!