Introduction
Google Calendar is a powerful tool that allows you to organize your schedule, set reminders, and share events with others. Whether you need to plan a meeting, invite friends to a party, or schedule a conference call, Google Calendar makes it easy to coordinate with others and keep everyone on the same page. In this article, we will guide you through the steps of inviting someone to Google Calendar, ensuring that you can organize your events and collaborate seamlessly.
By using Google Calendar’s invitation feature, you can notify others about upcoming events and allow them to RSVP, ensuring everyone is aware of the details and can plan accordingly. Whether you need to invite colleagues, friends, or family, Google Calendar simplifies the process by providing a user-friendly interface and a range of customizable options.
In the following sections, we will walk you through the step-by-step process of inviting someone to Google Calendar. Whether you’re a seasoned user or new to Google Calendar, this guide will help you navigate the platform with ease.
So, if you’re ready to start inviting others to your events and streamlining your scheduling process, let’s dive into the details and get started!
Step 1: Accessing Google Calendar
Before you can start inviting someone to Google Calendar, the first step is to access the platform. If you already have a Google account, you can simply sign in to your account and navigate to Google Calendar. If you don’t have a Google account, you will need to create one by visiting the Google account creation page.
Once you have access to your Google account, follow these steps to access Google Calendar:
- Open a web browser and go to https://calendar.google.com.
- Sign in to your Google account using your username and password. If you have multiple Google accounts, make sure you sign in with the account you want to use for Google Calendar.
- After signing in, you will be redirected to the Google Calendar main page. Here, you will find your calendar view, with the current date displayed along with any existing events.
Alternatively, you can also access Google Calendar through the Google apps menu, which can be found by clicking on the grid icon (also known as the “App Launcher”) typically located in the top-right corner of your Google account homepage. From the apps menu, select “Calendar” to open Google Calendar.
Once you have successfully accessed Google Calendar, you’re ready to move on to the next step: creating a new event.
Step 2: Creating a New Event
Now that you have accessed Google Calendar, it’s time to create a new event. Whether you’re planning a meeting, a birthday party, or a project deadline, Google Calendar provides a simple and intuitive interface to help you create and manage your events. Follow these steps to create a new event:
- On the main Google Calendar page, click on the “+” button or the “Create” button. This will open the event creation interface.
- In the event creation interface, enter the title of your event. Choose a descriptive and memorable title that clearly represents the purpose of the event.
- Select the date and time for your event. You can choose a specific date and time, or you can select a range of dates for events that span multiple days.
- Set a duration for your event by specifying the start time and end time. If your event doesn’t have a specific end time, you can leave it open-ended.
- Choose the time zone for the event. This ensures that the event is displayed correctly for all participants in different time zones.
- Optional: Add a location for your event. This could be a physical address, a conference room name, or an online meeting link.
- Optional: Add a description to provide additional details or instructions about the event.
Once you have filled in the necessary event details, you’re ready to move on to the next step: adding guests to the event.
Step 3: Adding Guests to the Event
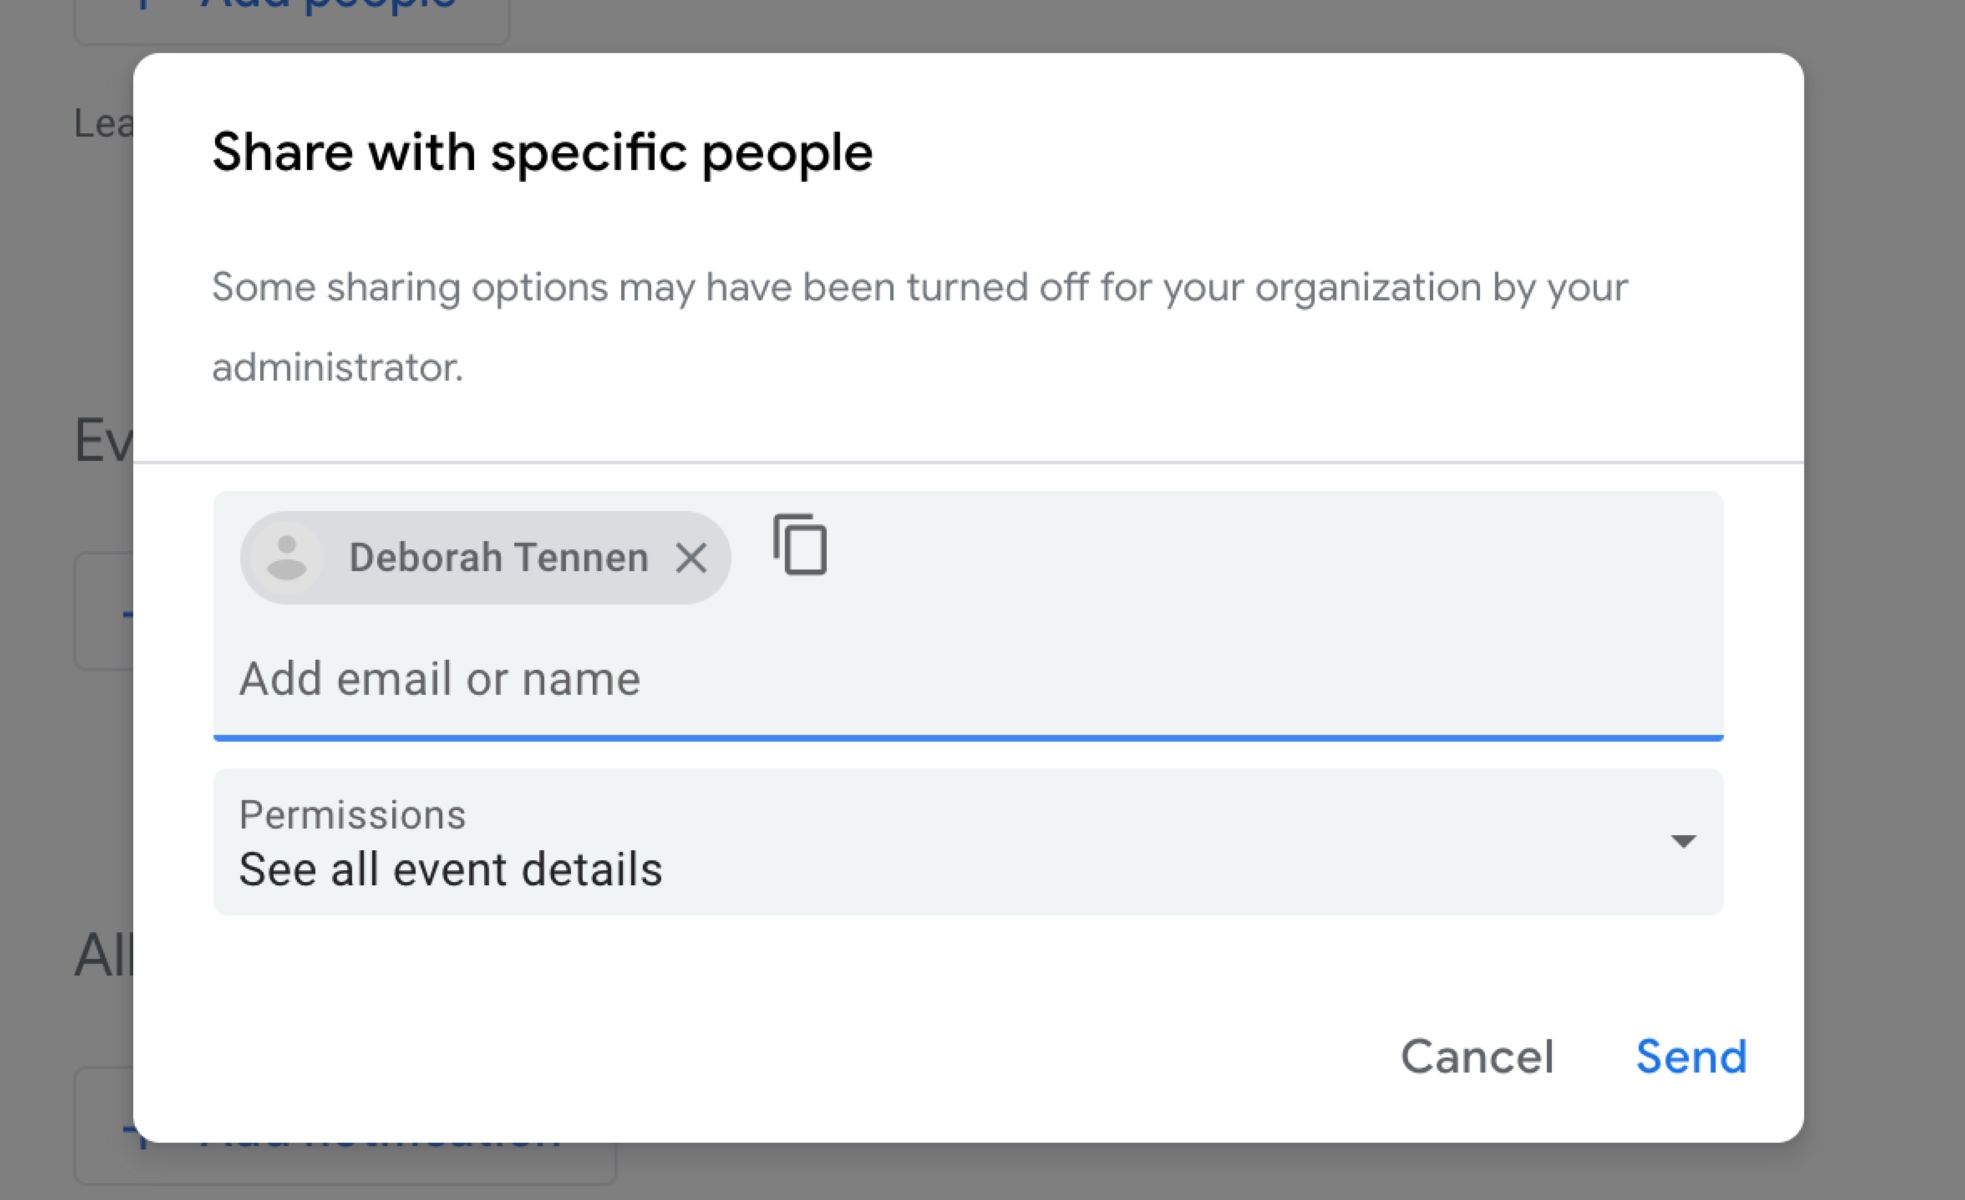
After creating a new event in Google Calendar, it’s time to invite others to join. Adding guests to the event ensures that they receive an invitation and can view the event details, RSVP, and collaborate with you. Follow these steps to add guests to your event:
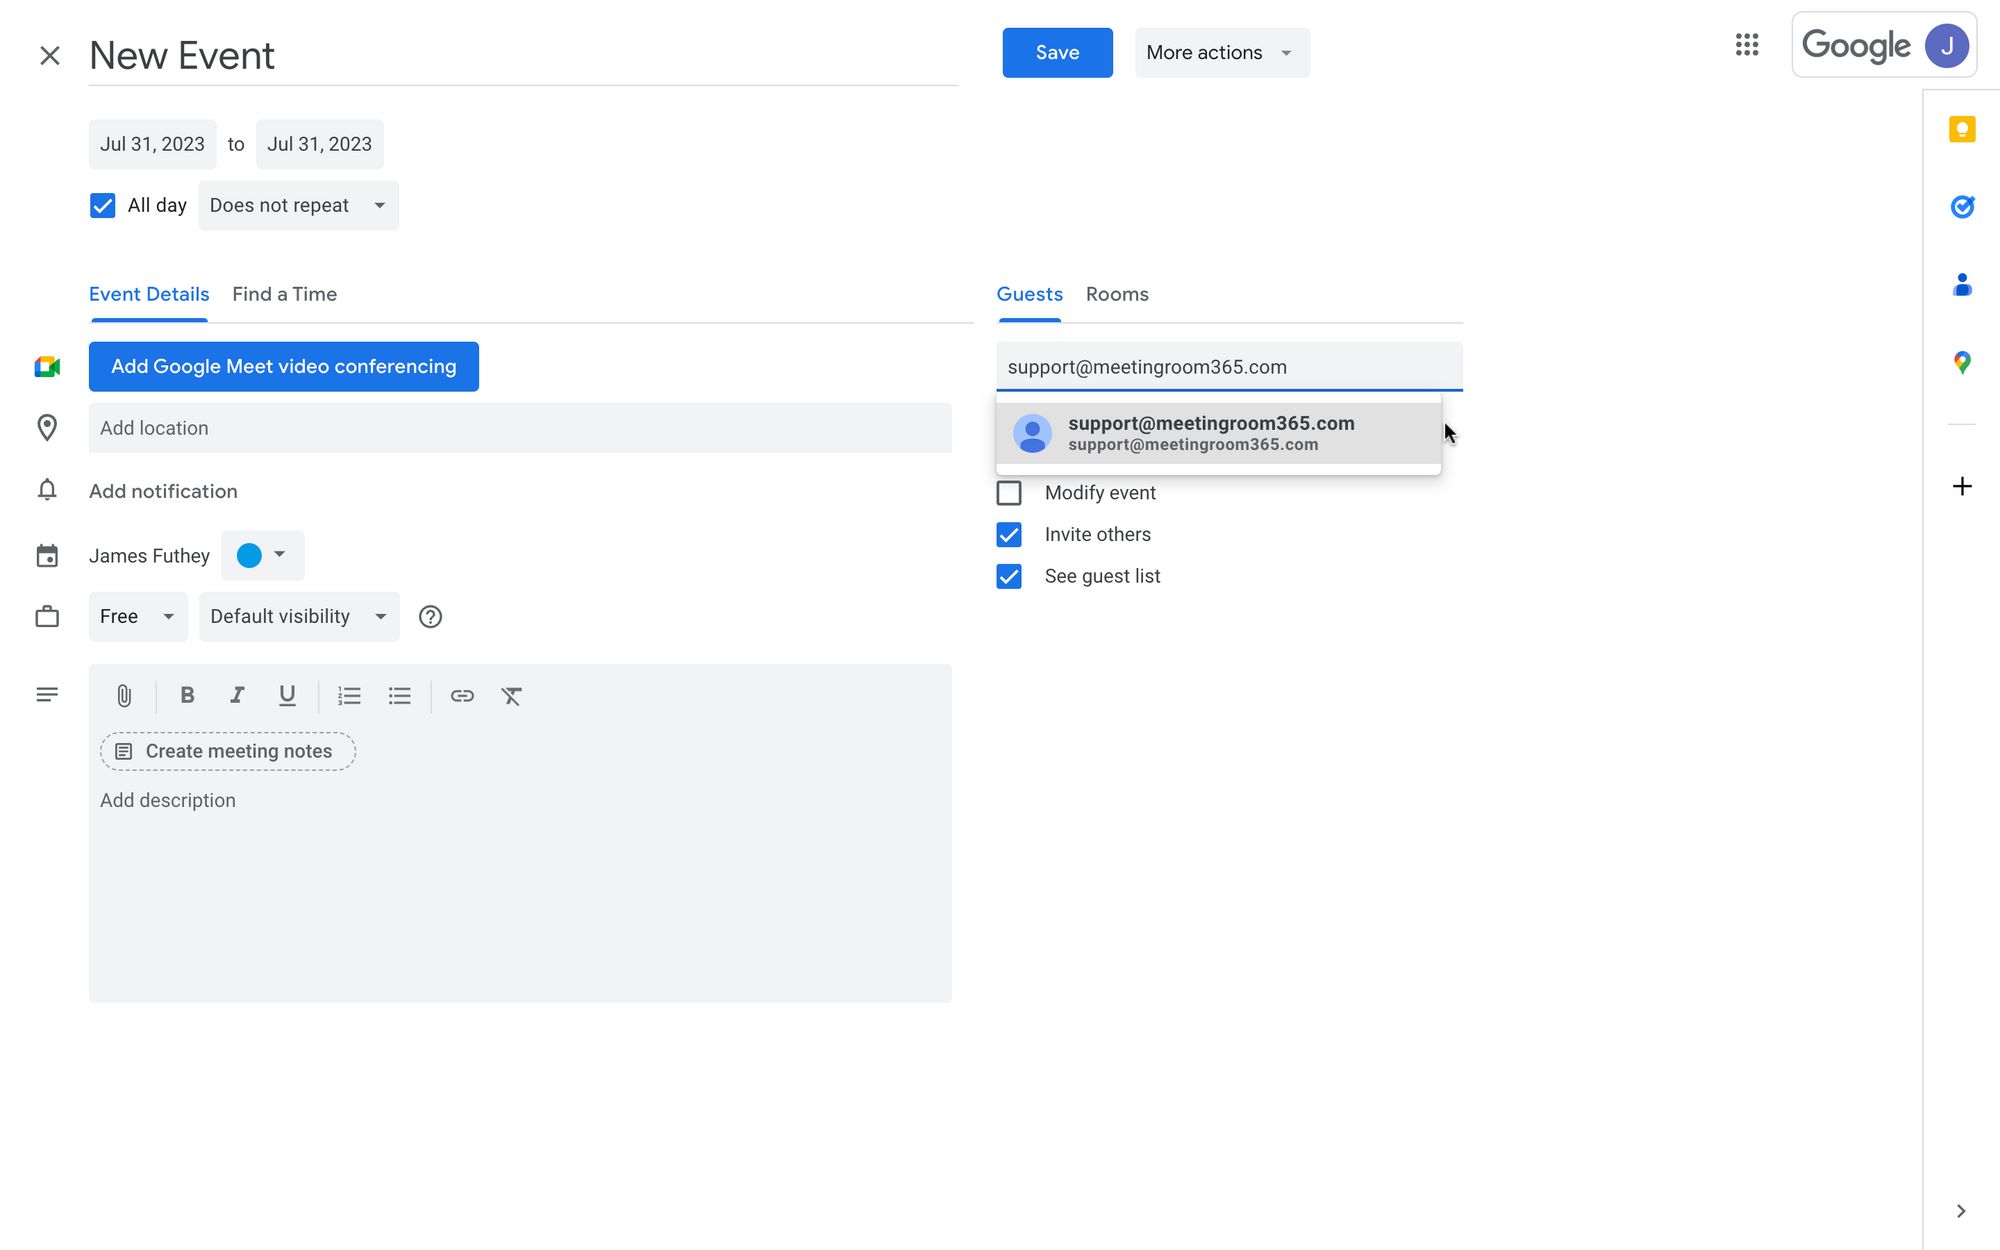
- In the event creation interface, look for the “Add guests” field. This field may be labeled as “People” or “Guests”, depending on the version of Google Calendar you are using.
- Enter the email addresses of the people you want to invite to your event. You can add multiple guests by separating their email addresses with commas.
- As you type the email addresses, Google Calendar will auto-suggest contacts from your address book. This makes it easier to select the right guests.
- Optional: Modify the guest’s permission settings by clicking on the drop-down next to their email address. You can choose whether guests should only be able to see the event details, make changes to the event, or have full administrative access.
When you add guests to the event, they will receive an email invitation from Google Calendar. The email will include the event details, such as the title, date, time, and location (if applicable). Guests can click on the “Yes,” “No,” or “Maybe” buttons in the email to RSVP to the event.
Adding guests to your event ensures that everyone is on the same page and can view the event details. It also allows you to track RSVPs and make changes to the event if needed. Now that you’ve added guests to your event, let’s move on to the next step: inviting others via email.
Step 4: Inviting Others via Email
Inviting others via email is an important step in ensuring that they receive the event details and can easily RSVP to your event. Google Calendar provides a seamless way to send invitations to guests through email. Follow these steps to invite others via email:
- In the event creation interface, after adding guests to the event, you will see a checkbox labeled “Send invitations.” Make sure this checkbox is selected to enable the email notifications.
- Customize your email invitation by clicking on the pencil icon or the “Edit message” button. This will allow you to personalize the invitation message to provide more information, instructions, or any other relevant details.
- Review the email invitation to ensure that it includes all the necessary event details, such as the title, date, time, location, and any other important information you want to convey to your guests. Make sure the email is clear, concise, and professional.
- Click on the “Save” or “Send” button to send the invitations. This will trigger the email notifications to all the guests you have added to the event.
When the invitations are sent, each guest will receive an email with the event details and a link to view and RSVP to the event in Google Calendar. They can simply click on the link to access the event and respond with their attendance status.
Inviting others via email is a convenient way to ensure that your guests are informed about the event and have access to all the necessary details. It also allows you to communicate any specific instructions or additional information related to the event. Once you’ve invited others via email, you can proceed to the next step: adjusting event details.
Step 5: Adjusting Event Details
After sending the invitations, it’s important to review and adjust the event details as needed. Google Calendar provides flexibility in modifying the event settings and making necessary updates. Follow these steps to adjust event details:
- Locate the event on your Google Calendar and click on it to open the event details.
- In the event details, you can modify the title, date, time, location, and description by clicking on the respective fields and making the necessary changes.
- If you want to add more guests to the event, click on the “Edit guests” option. Here, you can add additional email addresses to invite more people or remove guests that you no longer want to include.
- Customize any additional settings for the event by clicking on the “More options” or “Settings” button. This will allow you to adjust the event visibility, notifications, and other advanced settings according to your preferences.
- Review all the changes you have made to ensure that the event details accurately reflect your desired settings and updates.
By adjusting event details, you can ensure that all the information related to the event is up-to-date and accurate. This is particularly important if there are any changes or modifications to the event that need to be communicated to the guests. Once you have made the necessary adjustments, you can proceed to the final step: sending the invitation.
Step 6: Sending the Invitation
Once you have made all the necessary adjustments to the event details and are ready to finalize and send the invitation, follow these steps:
- Review the event details one final time to ensure that everything is accurate and up-to-date.
- Click on the “Save” or “Update” button to save the changes you made to the event.
- If you made any changes to the guest list, Google Calendar will give you the option to send updated invitations. Select the appropriate option based on whether you want to send the updates to all guests or only those who have not responded yet.
- Click on the “Send” button to send the invitation updates. This will trigger email notifications to the guests with the updated event details, if applicable.
By sending the invitation updates, you are providing your guests with any necessary information changes and allowing them to stay informed about the event. It also serves as a reminder for those who haven’t responded to the previous invitations.
After sending the invitations, it is recommended to periodically check your Google Calendar to monitor the RSVP status and handle any queries or updates from the guests. You can easily track the attendance status of each guest in the event details.
Congratulations! You have successfully completed all the steps to invite someone to Google Calendar. By following this guide, you can effectively collaborate with others, coordinate events, and ensure that everyone is on the same page.
Now that you have mastered the art of inviting others to Google Calendar, you can enjoy the benefits of efficient scheduling and seamless coordination. Happy event planning!
Conclusion
Google Calendar provides a convenient and user-friendly platform for organizing your schedule and inviting others to collaborate. By following the step-by-step process outlined in this article, you can easily invite someone to Google Calendar and ensure that everyone is aware of the event details and can RSVP accordingly.
Starting with accessing Google Calendar, you can effortlessly create a new event and add guests to it. Through the email invitation feature, you can send personalized invitations to your guests, allowing them to receive updates and RSVP to the event. Adjusting event details and sending updates ensures that all information is accurate and up-to-date.
By mastering the art of inviting others to Google Calendar, you can enhance your productivity, streamline communication, and effectively collaborate with others. Whether you’re planning a business meeting, a social gathering, or a personal event, this guide equips you with the necessary knowledge to make the most of Google Calendar’s features.
Remember, Google Calendar provides a range of additional functionalities and customization options that can further enhance your scheduling experience. Explore features such as event reminders, recurring events, color-coding, and integration with other Google apps to optimize your productivity and organization.
So, put your newfound knowledge into action and start benefiting from the power of Google Calendar. Invite others, coordinate events effortlessly, and never miss an important appointment again. Happy scheduling!