Introduction
Welcome to the world of digital event invitations! In today’s fast-paced and interconnected world, organizing and coordinating events can be a daunting task. Fortunately, with the help of technology, sending out invitations and managing RSVPs has become easier than ever before. One powerful tool that can simplify this process is Google Calendar.
Google Calendar is a popular online calendar tool that allows you to create, manage, and share events with ease. It offers a wide range of features, including the ability to send event invitations to participants and track RSVPs. Whether you’re planning a small gathering or a large-scale conference, Google Calendar can help streamline the invitation process and ensure that your event runs smoothly.
By using Google Calendar for your invitations, you can enjoy several benefits. First and foremost, it eliminates the need for paper invitations, reducing your environmental impact and saving you time and money on printing and postage. Secondly, by sending digital invitations through Google Calendar, you can easily keep track of who has received and responded to your invitations, making it easier to manage your guest list. Additionally, you can customize your invitations, add event details, and send reminders to participants, ensuring that everyone stays informed and on track for your event.
In this guide, we will take you through the process of setting up Google Calendar for invitations, creating and customizing event invitations, inviting participants, managing RSVPs, and addressing common issues that may arise along the way. Whether you’re a seasoned event planner or a beginner, this article will provide you with the knowledge and tools you need to successfully navigate the world of digital event invitations using Google Calendar.
Why use Google Calendar for invitations?
When it comes to sending out invitations for your events, Google Calendar offers numerous advantages over traditional methods. Let’s explore why you should consider using Google Calendar for your invitation needs.
1. Ease of Use: Google Calendar is user-friendly and intuitive, making it easy for anyone to navigate and utilize its features. Whether you’re tech-savvy or not, you can quickly set up and start sending invitations without any hassle.
2. Accessibility: With Google Calendar, you can access your event invitations from anywhere, at any time. Whether you’re on your computer, smartphone, or tablet, you can view and manage your invitations on the go. This accessibility ensures that you can stay organized and responsive, even when you’re away from your desk.
3. Seamless Integration: If you’re already using other Google products or services, such as Gmail, Google Drive, or Google Meet, utilizing Google Calendar for invitations seamlessly integrates with these tools. This integration allows for a smoother flow of communication and collaboration, saving you time and effort.
4. Real-Time Updates: When you send invitations through Google Calendar, any changes or updates you make to the event details are automatically reflected in the invitations. This ensures that all participants receive the most up-to-date information and eliminates confusion or miscommunication that can occur with manual updates.
5. Customization Options: Google Calendar provides a range of customization options to make your invitations stand out. You can add event descriptions, location details, attachments, and even include images or logos to personalize your invitations and make them more visually appealing.
6. Reminder System: One of the most useful features of Google Calendar is the ability to send automatic reminders to participants. You can set reminders to be sent a few days or hours before the event, ensuring that everyone has the event on their radar and reducing the chances of no-shows.
7. RSVP Tracking: Keeping track of who is attending your event is crucial for planning and logistics. With Google Calendar, you can easily track RSVPs in real-time. Participants can respond directly to the invitation, letting you know if they are coming, not coming, or unsure. This valuable information allows you to plan accordingly and make necessary adjustments.
Overall, Google Calendar offers convenience, flexibility, and organization when it comes to managing event invitations. By utilizing its features, you can streamline the invitation process, enhance communication, and ensure that your event is a success.
How to set up Google Calendar
Setting up Google Calendar for invitations is a straightforward process. Follow these steps to get started:
1. Create a Google account: If you don’t already have a Google account, you’ll need to create one. Go to the Google account creation page and follow the instructions to set up your account. Once you have your Google account, you’ll have access to Google Calendar.
2. Access Google Calendar: To access Google Calendar, go to calendar.google.com or log in to your Google account and click on the “Calendar” icon in the top right corner of the screen. This will take you to the main calendar interface.
3. Familiarize yourself with the interface: Take a moment to explore the different features and options available in Google Calendar. Familiarize yourself with the navigation, settings, and event creation tools. This will make it easier for you to navigate and utilize the calendar effectively.
4. Customize your calendar settings: Click on the gear icon in the top right corner of the screen and select “Settings” from the dropdown menu. Here, you can personalize your calendar by adjusting preferences such as time zone, working hours, and notification settings. Take some time to customize these settings to match your preferences.
5. Add calendars: Google Calendar allows you to create multiple calendars for different purposes. You can add calendars for personal, work, or specific event categories. To add a new calendar, click on the “+” icon next to “Add a friend’s calendar” in the left sidebar. Follow the prompts to create and customize your new calendar.
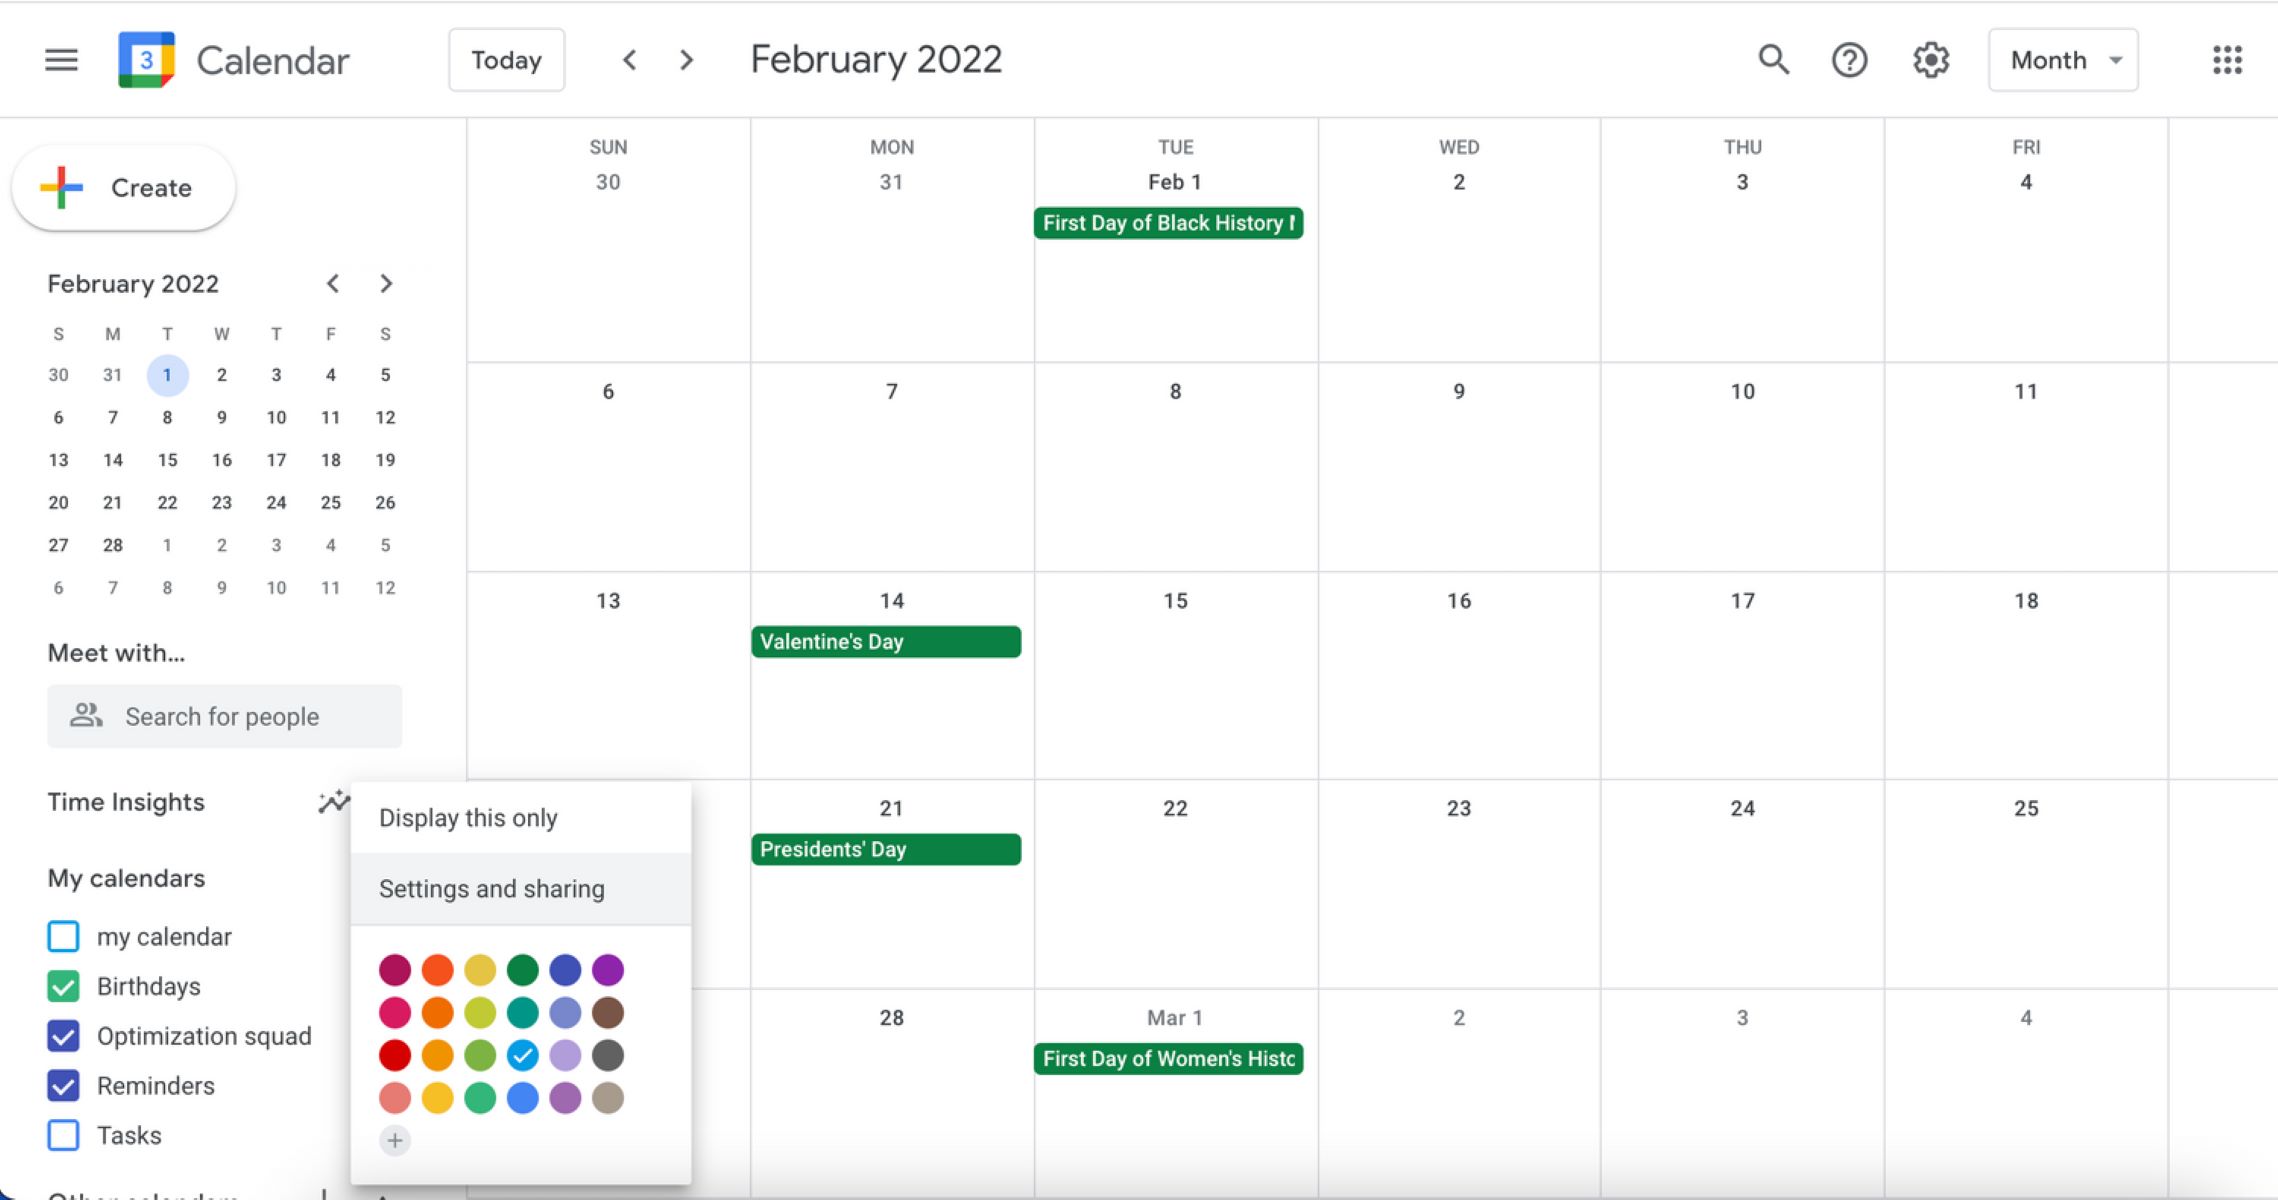
6. Share your calendar: To invite participants to your events, you’ll need to share your calendar with them. Click on the three vertical dots next to the calendar you want to share in the left sidebar and select “Settings and sharing.” Under the “Access permissions” section, click on the “Add people” button and enter the email addresses or names of the people you want to share your calendar with. Select their permission level and click “Send” to invite them.
7. Sync with other devices: To ensure that your calendar is accessible across all your devices, enable syncing. You can do this by installing the Google Calendar app on your smartphone or tablet and logging in with your Google account credentials. Once installed, your events and invitations will sync automatically across all devices.
With these steps, you’ll have your Google Calendar set up and ready to send out invitations for your events. Next, we’ll explore how to create and customize event invitations using Google Calendar.
Creating an event
Once you have set up your Google Calendar, creating events and sending out invitations is a simple process. Follow these steps to create an event:
1. Open Google Calendar: Access your Google Calendar by going to calendar.google.com or launching the Google Calendar app on your device. Make sure you are logged in to your Google account.
2. Click on the desired date and time: Navigate to the date and time you want to schedule your event by using the calendar’s grid view. Click on the specific time slot you want the event to begin.
3. Add event details: In the event creation pop-up window, enter a descriptive title for your event in the “Title” field. Add additional details such as location, duration, and any important notes in the provided fields.
4. Select the calendar: If you have multiple calendars set up, choose the calendar you want to associate the event with from the drop-down menu. This helps keep your events organized and easily distinguishable.
5. Specify the time zone: If your event is taking place in a different time zone, click on the “Time zone” field and select the appropriate time zone to ensure accuracy in the event invitations.
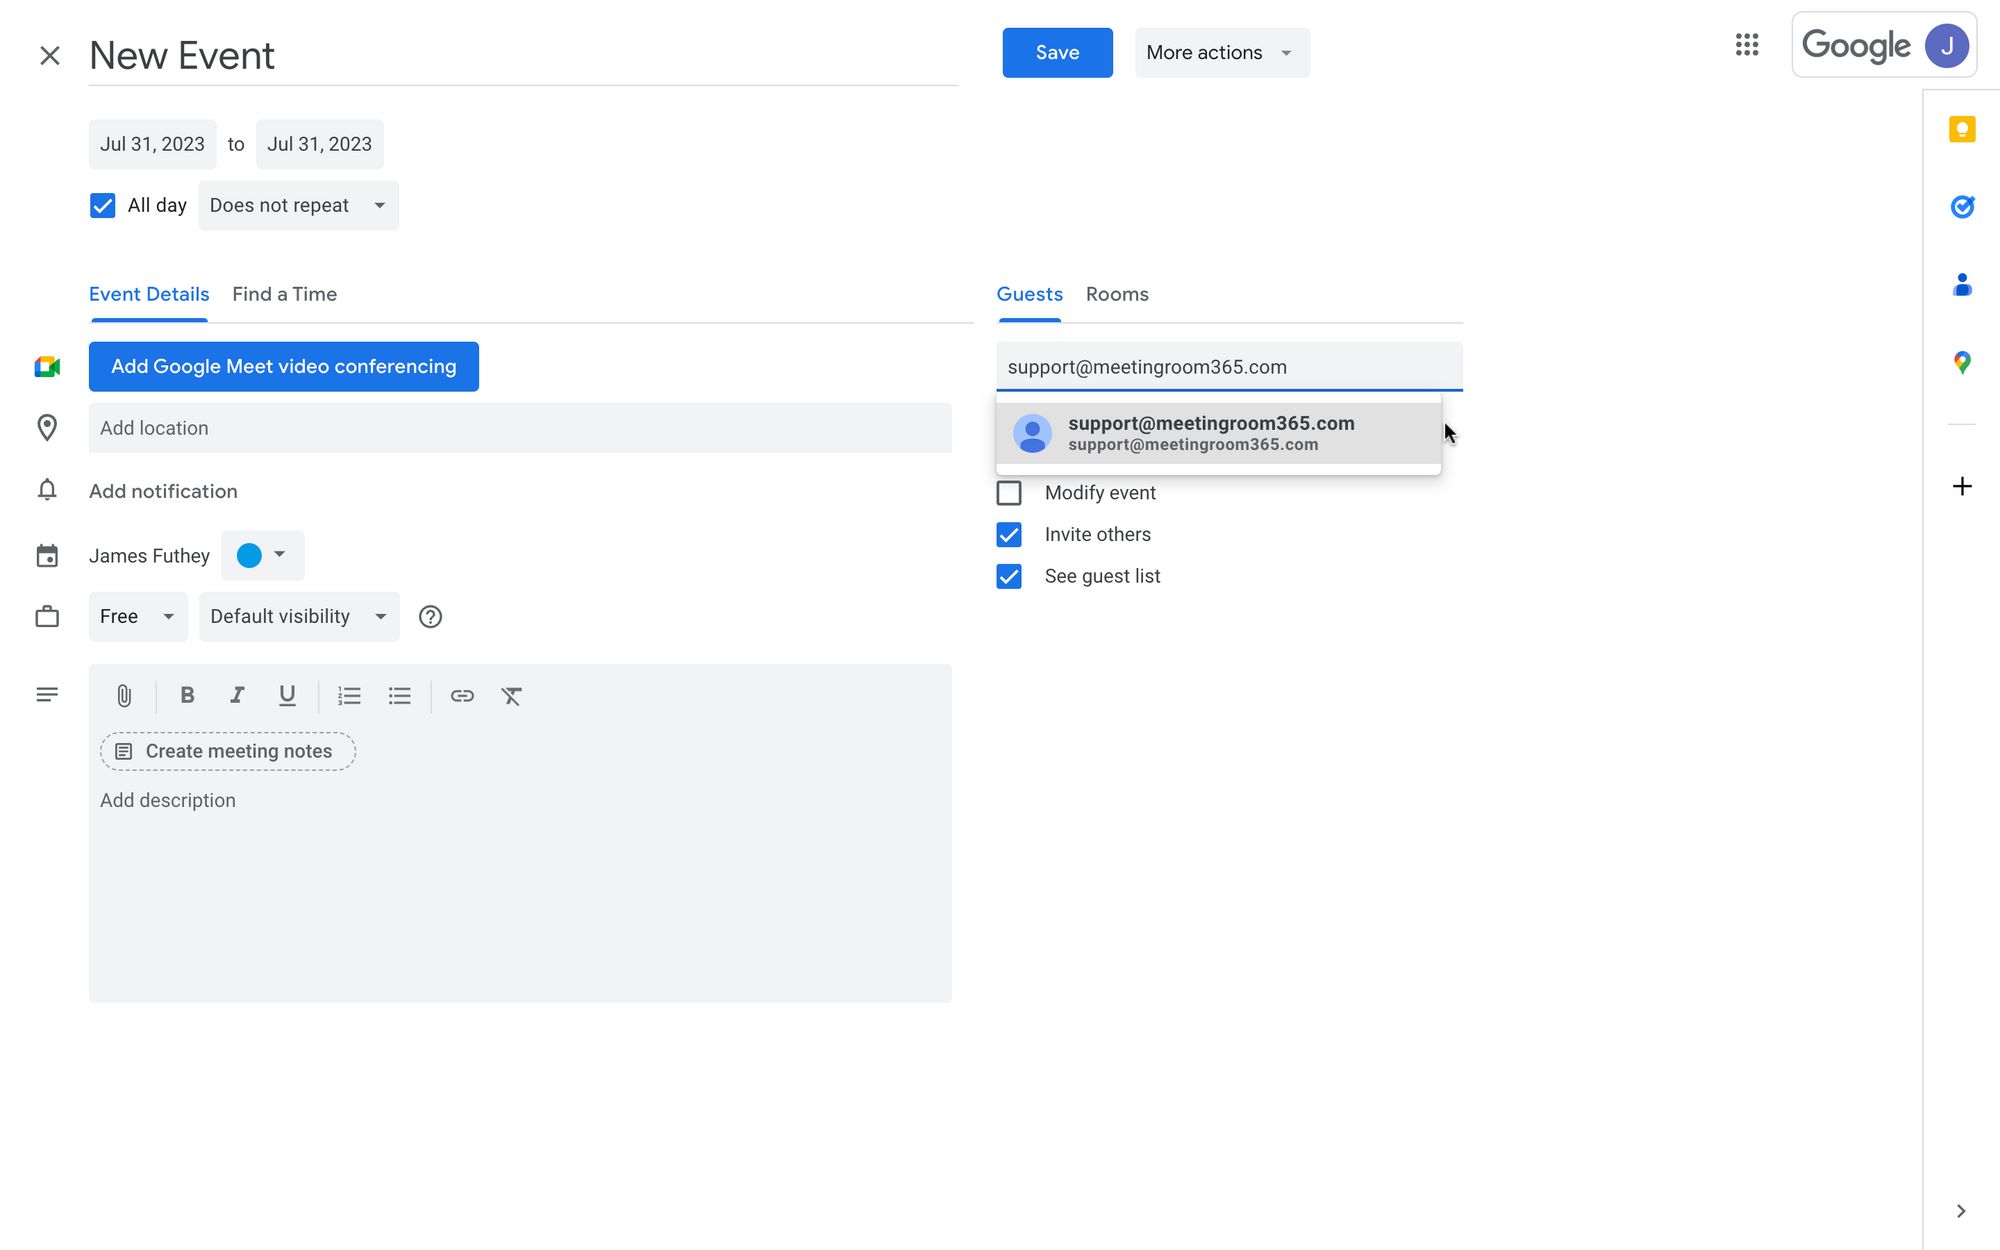
6. Invite participants: To invite participants, enter their email addresses in the “Add guests” field. As you type, Google Calendar will suggest contacts from your address book. You can also invite guests by sharing the event link or sending them an invitation email by clicking on the “More options” button.
7. Add event notifications: Set up event notifications to remind participants about your event. Select the desired notification options, such as email reminders or pop-up notifications, and specify when they should be sent.
8. Save the event: Once you have filled in all the necessary details, click on the “Save” button to create your event. The event will be added to your calendar, and invitations will be sent to the participants.
9. Check event details: After creating the event, double-check the event details to ensure accuracy. You can view and edit the event by clicking on it in your calendar. Make any necessary changes and save the event to update the details for all participants.
Creating an event in Google Calendar is a breeze, allowing you to quickly schedule and invite participants to your events. In the next section, we will explore how to invite participants and customize event invitations using Google Calendar.
Inviting participants
One of the key features of Google Calendar is the ability to invite participants to your events. Here’s how you can invite participants using Google Calendar:
1. Create or select an event: Start by creating a new event or selecting an existing event from your calendar.
2. Add participants: In the event details, there is a section labeled “Add guests” or “Guests.” Enter the email addresses of the individuals you want to invite as participants. As you type, Google Calendar will suggest contacts from your address book to make the process easier. You can invite multiple participants by separating their email addresses with commas.
3. Set participants’ permissions: By default, participants will be set as “Guests.” This means they can view the event details, respond to the invitation, and see the guest list. If you want to grant specific participants the ability to modify the event details or invite additional guests, you can change their permission level to “Can modify event” or “Can invite others” respectively.
4. Notify participants: Once you have entered the email addresses and set the permissions, Google Calendar will send an invitation email to each participant. The email will contain the event details, date, time, and a link to RSVP to the event.
5. Send updates or reminders: If there are any changes to the event details, such as a time or venue change, you can update the event and choose to send an update email to all participants. Additionally, you can send reminders to participants by enabling notifications in the event settings. Reminders can be set to be sent a few days or hours before the event, ensuring that participants are reminded to attend.
6. Track RSVPs: Participants can respond to the invitation directly from the email or by accessing the event in their own Google Calendar. As the event organizer, you will be able to see the RSVP status for each participant, allowing you to keep track of who is attending, who is not attending, and who is still undecided.
7. Manage participant list: As participants respond to the invitation, their RSVP status will be displayed in the event details. You can access the participant list and make updates as needed. You can also manually add or remove participants from the list if necessary.
By following these steps, you can easily invite participants and manage their RSVPs using Google Calendar. In the next section, we will explore how to customize event invitations and make them more personalized.
Customizing event invitations
Google Calendar allows you to customize your event invitations and make them more personalized. Here are some ways to customize your event invitations:
1. Add a description: When creating an event, you have the option to add a description to provide more details about the event. This can include information such as the agenda, special instructions, or any other pertinent information that attendees may need to know.
2. Include location details: If your event has a physical location, make sure to include the address in the event invitation. This will make it easier for participants to find the venue and plan their travel accordingly. You can also include additional location information, such as parking instructions or nearby landmarks, to assist attendees.
3. Attach files: If there are any relevant files or documents that you want to share with participants, you can attach them to the event invitation. This could include presentation slides, handouts, or any other materials that will enhance the event experience for attendees. Participants can easily access and download these attachments directly from the invitation.
4. Add images or logos: To make your event invitations more visually appealing and recognizable, you can include images or logos. This is particularly useful for branding purposes or when organizing events for a specific organization or company. You can upload an image or insert a URL to include the desired visuals in the event invitation.
5. Customize event colors: Google Calendar allows you to assign colors to different events and calendars. This can help you visually organize your events and make them easily distinguishable at a glance. Choose colors that align with the theme or nature of your event, creating a more cohesive and visually appealing invitation.
6. Use bold or italicized text: To emphasize important information or headings in the event invitation, you can utilize formatting options such as bold or italicized text. This can make specific details stand out and catch the attention of participants, ensuring that they don’t miss any crucial information.
7. Preview the invitation: Before sending out the event invitations, it’s a good idea to preview how the invitation will appear to participants. This allows you to check for any formatting or content errors and make any necessary adjustments to ensure that the invitation looks professional and polished.
By customizing your event invitations with these tips, you can create inviting and visually appealing invitations that capture the attention of participants and effectively convey the details of your event. In the next section, we will explore how to send reminders to participants to ensure they don’t forget about your event.
Sending reminders to participants
One of the great features of Google Calendar is the ability to send reminders to participants to ensure they don’t forget about your event. Reminders can be a helpful tool for keeping attendees engaged and informed. Here’s how you can send reminders using Google Calendar:
1. Set up event notifications: When creating an event or editing an existing one, you can configure event notifications to send reminders to participants. Click on the “Add notification” button in the event details and specify when you want the notifications to be sent. You can choose to send notifications a few days, hours, or minutes before the event.
2. Select notification methods: Google Calendar offers various notification methods to cater to participants’ preferences. You can choose to send reminders via email or as pop-up notifications on participants’ devices. Additionally, if participants have the Google Calendar app installed on their smartphones, they can receive push notifications directly to their mobile devices.
3. Customize reminder messages: When setting up notifications, you can customize the message that will be sent as the reminder. Add a personal touch by including a friendly and informative message that reminds participants of the event date, time, and any important details they need to know.
4. Send reminders for event updates: If there are any changes or updates to the event details, you have the option to send update notifications to participants. This ensures that everyone is aware of any modifications, such as time or location changes, so they can adjust their plans accordingly.
5. Review the notification settings: Before sending out the event invitations and reminders, double-check the notification settings to ensure they are accurately set up. Confirm the timing, email addresses of the participants, and the content of the reminder messages to avoid any confusion or discrepancies.
6. Monitor participant responses: As the event organizer, you can keep track of participants’ responses and view their RSVP status in real-time. This allows you to easily identify if someone has not responded to the invitation or if they have declined the request. If necessary, you can follow up with individual participants to ensure they are aware of the event and to address any questions or concerns they may have.
Sending reminders to participants is an effective way to ensure that your event stays top of mind and that participants are prepared and excited to attend. In the next section, we will explore how to manage RSVPs and make any necessary changes to the participant list.
Managing RSVPs
Managing RSVPs effectively is crucial for event planning. With Google Calendar, you can easily keep track of participants’ responses and make necessary adjustments. Here are some tips for managing RSVPs using Google Calendar:
1. View RSVP status: As participants respond to the event invitation, their RSVP status will be displayed in the event details. You can easily see who has accepted, declined, or not responded to the invitation. This allows you to have a clear picture of the expected attendance.
2. Modify participant responses: Sometimes, participants may change their RSVP status after initially responding. As the event organizer, you have the ability to modify participant responses in Google Calendar. This can be helpful if someone informs you of a change in their availability or if there was an error in their initial response.
3. Add or remove participants: If there are new participants you’d like to invite, or if someone who did not initially receive an invitation needs to be added, you can manually add participants to the event. Similarly, if there are participants who are no longer able to attend, you can remove them from the participant list.
4. Send reminders to non-responders: If there are participants who have not yet responded to the invitation, you may want to send them a friendly reminder to ensure they don’t overlook the event. Google Calendar allows you to easily identify non-responders and send them a follow-up message, encouraging them to RSVP.
5. Export participant list: If you need to share the participant list with other team members or stakeholders, you can export it from Google Calendar. This can be helpful for event planning purposes, as it provides a comprehensive record of the attendees and their contact information.
6. Communicate with participants: Google Calendar also allows you to communicate with participants directly through the event details. You can send messages to participants to provide additional information, updates, or any other important details related to the event. This can help ensure everyone is informed and on the same page.
By effectively managing RSVPs, you can stay organized and make any necessary adjustments to your event plans. In the next section, we will explore how to resend invitations in case participants need a reminder or if there are any changes to the event details.
Resending invitations
Resending invitations can be necessary in certain situations, such as when participants need a reminder or when there are changes to the event details. With Google Calendar, you can easily resend invitations to ensure that all participants have the latest information. Here’s how you can resend invitations using Google Calendar:
1. Open the event: Locate the event for which you want to resend the invitations in your Google Calendar. Click on the event to open its details.
2. Choose the participants: In the event details, you will see the list of participants who have received the original invitations. If you want to resend invitations to all participants, you can skip this step. Otherwise, remove any participants who do not need to receive the new invitation.
3. Edit the event details (if needed): If there are changes to the event details that require updating, make the necessary edits. This can include adjusting the date, time, location, or any other pertinent information.
4. Resend the invitations: Once you have made the desired changes, click on the option to resend invitations. This can typically be found in the event details, often indicated by an icon resembling an envelope or the text “Resend invitations.” Clicking on this option will generate new invitation emails for the selected participants.
5. Customize the invitation message (optional): Before sending out the invitations, you have the option to customize the invitation message. If there are any specific updates or reminders you want to include, you can add them in the invitation message. However, keep in mind that it’s best to keep the message concise and to the point, focusing on the most important details.
6. Confirm the invitation recipients: Double-check that the correct participants are included in the invitation list. Verify that all intended recipients are present and that any participants who should not receive the new invitation have been removed from the list.
7. Send the invitations: Once you are satisfied with the changes and all the necessary recipients are included, click on the option to send the invitations. Google Calendar will generate and send the new invitation emails to the selected participants.
Resending invitations ensures that participants have the most up-to-date information about the event. Whether it’s a reminder or a change in the event details, resending invitations through Google Calendar allows you to keep everyone informed and engaged. In the next section, we will explore common invitation issues and how to troubleshoot them.
Troubleshooting common invitation issues
While Google Calendar is a powerful tool for managing invitations, it’s not uncommon to encounter some common issues. Here are a few typical invitation issues and how you can troubleshoot them:
1. Participants not receiving invitations: If participants are not receiving their invitations, there are a few factors to consider. First, verify that you entered their email addresses correctly. Also, ask participants to check their spam or junk folders, as the invitation email may have been filtered there. Finally, confirm that the participants’ email accounts are not blocking emails from Google Calendar.
2. Incorrect time or time zone: If participants are seeing the wrong event time or time zone, it’s likely a setting or synchronization issue. Participants should check their device or calendar settings to ensure the correct time zone is selected. Additionally, remind participants to keep their devices and systems updated to avoid any potential time-related discrepancies.
3. RSVP confusion: Sometimes participants may accidentally RSVP with the wrong response, or their responses may not be accurately reflected in the event details. In these cases, manually update the RSVP status for participants or communicate directly with them to clarify and resolve any confusion.
4. Event clashes: If participants indicate that they already have conflicting events at the same time as yours, find a way to accommodate their schedule. You can consider rescheduling the event to a more convenient time for all participants or find alternative solutions such as recording the event or sharing event materials afterwards.
5. Reminders not reaching participants: If participants report not receiving event reminders, ensure that the reminder settings are properly configured in Google Calendar. Participants should double-check their notification preferences to ensure they haven’t accidentally disabled reminder notifications for events.
6. Attachments not accessible: If participants are having trouble accessing attached files or documents, make sure the files are in a compatible format and that participants have the necessary permissions to access them. Consider providing alternative file sharing options such as cloud storage services or direct links to ensure participants can easily access the attachments.
7. Event visibility issues: If participants are unable to view or access the event details, check the calendar’s sharing settings. Make sure the calendar is shared with the participants at an appropriate permission level. Adjust the sharing settings if necessary to ensure participants can view and interact with the event.
When troubleshooting invitation issues, it’s important to communicate with participants promptly and provide clear instructions if any action is required from their end. Keeping open lines of communication and offering support can help resolve issues and ensure a smooth event experience for all participants.
In the final section, we will summarize the main points discussed throughout the article, reinforcing the benefits of using Google Calendar for event invitations.
Conclusion
Google Calendar is a powerful tool for managing event invitations. By utilizing its features, you can streamline the invitation process, ensure accurate RSVP tracking, and keep participants informed and engaged. Here’s a recap of the key points discussed:
– Setting up Google Calendar: Create a Google account and access Google Calendar to start managing your events and invitations.
– Creating an event: Easily create events by selecting the date, adding event details, and specifying the calendar. Customize the event to include location details, attachments, and more.
– Inviting participants: Invite participants by entering their email addresses in the guest list. Specify their permissions and send out invitation emails.
– Customizing event invitations: Add descriptions, location details, attachments, and images/logos to make your invitations more personalized and visually appealing.
– Sending reminders: Set up event notifications to send reminders to participants. Choose the notification methods and customize the reminder messages for maximum impact.
– Managing RSVPs: Keep track of participants’ responses, modify RSVPs, and communicate with participants directly through Google Calendar.
– Resending invitations: If needed, resend invitations to ensure participants have the latest event information. Customize the invitations and confirm the recipient list before sending them.
– Troubleshooting invitation issues: Handle common issues by ensuring participants receive invitations, addressing time zone discrepancies, clarifying RSVP confusion, and resolving any other technical difficulties that may arise.
Incorporating Google Calendar into your event planning process streamlines communication, enhances organization, and saves time and effort. From small gatherings to large-scale conferences, Google Calendar provides the tools necessary to manage event invitations efficiently.
So, why wait? Start harnessing the power of Google Calendar for your event invitations and enjoy the benefits of seamless collaboration, real-time updates, and effortless RSVP management.