Introduction
Welcome to this guide on how to make guests optional in Google Calendar. Whether you’re planning a team meeting, a social gathering, or a family event, Google Calendar offers a convenient way to schedule and share events with others. By default, when you invite guests to an event, they are typically required to respond and attend. However, in some cases, you may want to give your guests the flexibility to choose whether they will attend or not.
In this article, we will walk you through the steps to make guests optional in Google Calendar. This means that when you invite someone to an event, they will have the freedom to accept or decline the invitation without any obligation. Whether you’re organizing a large conference or just a casual get-together, making guests optional can help you better manage your events and accommodate the scheduling preferences of your invitees.
Before we get started, it’s important to note that this feature is only available for events created in Google Calendar, and it requires some configuration at the event level. By following the steps outlined in this guide, you’ll be able to give your guests the flexibility they need while keeping your events organized and ensuring everyone is on the same page.
So, if you’re ready to learn how to make guests optional in Google Calendar, let’s dive into the details in the next sections.
Prerequisites
Before you can proceed with making guests optional in Google Calendar, there are a few prerequisites you need to fulfill. Ensuring that you have the necessary requirements in place will help you smoothly navigate through the steps outlined in this guide. Here are the prerequisites you need to consider:
- Google Account: To use Google Calendar, you must have a valid Google Account. If you don’t have one, you can easily create a new account by visiting the Google Account creation page.
- Access to Google Calendar: You need to have access to Google Calendar to create and manage events. You can access Google Calendar through your web browser or by downloading the Google Calendar mobile app on your smartphone or tablet.
- Basic Familiarity with Google Calendar: It’s beneficial to have some familiarity with the basic features and functionality of Google Calendar. This includes creating and editing events, inviting guests, and managing event settings. If you’re new to Google Calendar, you can refer to the official Google Calendar documentation or explore tutorials on how to use the platform effectively.
- Internet Connection: Since Google Calendar is an online service, you’ll need a stable internet connection to access and make changes to your events. Ensure that you have a reliable internet connection before proceeding with the steps.
- Permissions: Depending on the type of event you’re organizing, you may need the necessary permissions to make changes to the event settings and invite guests. Make sure you have the required permissions to modify events and invite guests in the Google Calendar account you’re using.
By having the above prerequisites in place, you’ll be ready to proceed with making guests optional in Google Calendar. If you meet all the requirements, let’s move on to the next sections where we’ll explore the step-by-step process to achieve this.
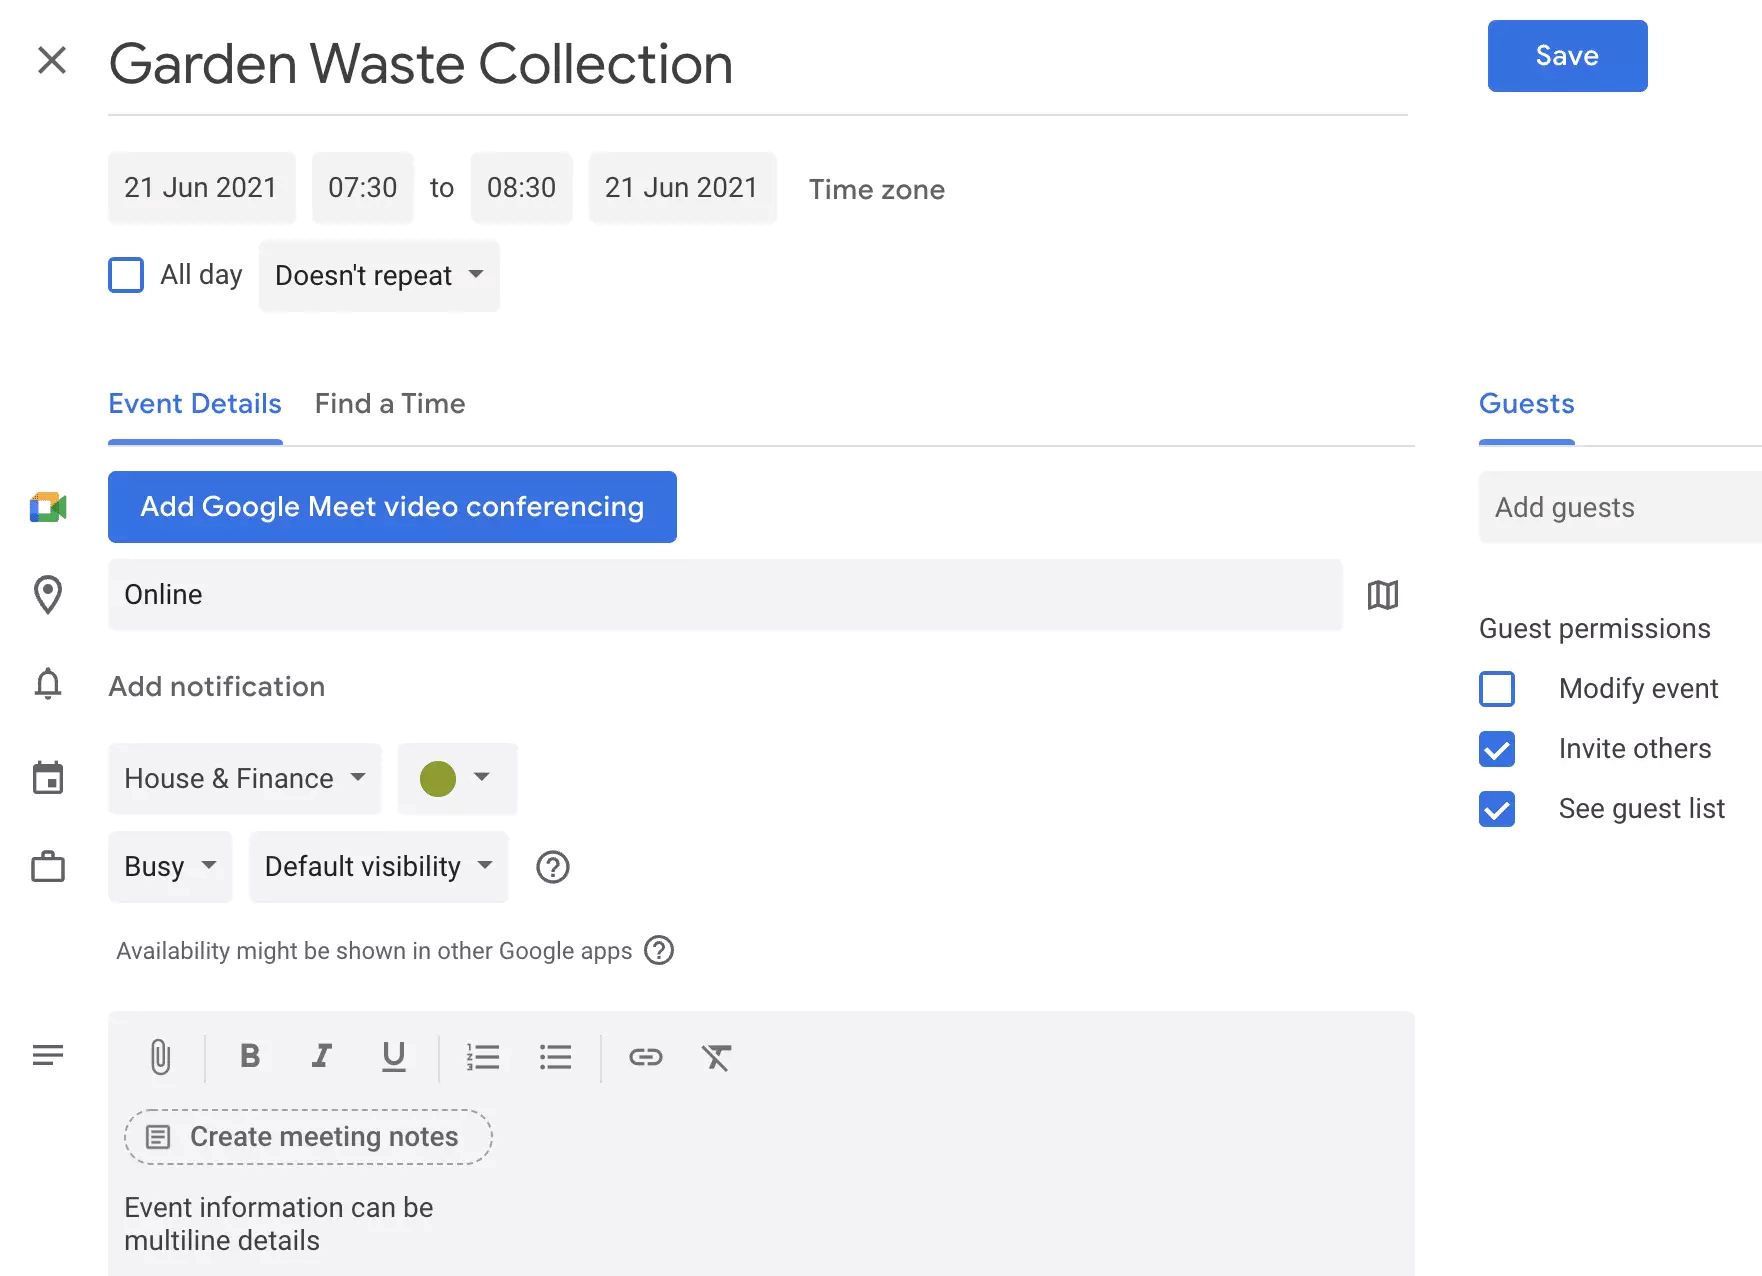
Step 1: Enable “Guests can modify event” setting
The first step in making guests optional in Google Calendar is to enable the “Guests can modify event” setting. By enabling this option, you provide your guests with the ability to make changes to the event details, including their attendance status. Here’s how you can enable this setting:
- Open Google Calendar in your web browser or through the mobile app.
- Create a new event or edit an existing event that you want to make guests optional for.
- In the event details section, look for the “Guests can modify event” option. This option may be located under the “Guests” or “Permissions” section, depending on the version of Google Calendar you’re using.
- Toggle the switch or checkbox to enable the “Guests can modify event” setting. Once enabled, the switch or checkbox should appear in an “ON” or “Checked” state.
Enabling this setting allows your guests to modify their attendance status, add notes, or make any other necessary changes to the event. They will have the freedom to update their RSVP without requiring your approval or confirmation. It empowers your guests to manage their schedule based on their availability and preferences.
Keep in mind that enabling this setting means that the event details can be modified by any guest who has access to the event invitation. If you want to restrict certain changes or limit the number of guests who can modify the event, you can explore additional event settings and permissions, which we’ll discuss in the later steps.
Once you’ve successfully enabled the “Guests can modify event” setting, you’re ready to move on to the next step, where we’ll explore how to create an event in Google Calendar.
Step 2: Create an event
After enabling the “Guests can modify event” setting, the next step is to create an event in Google Calendar. Creating an event allows you to set the date, time, location, and other details for your gathering or meeting. Here’s how you can create an event:
- Open Google Calendar in your web browser or through the mobile app.
- Click on the desired date and time slot or select the “Create” button to open the event creation window.
- In the event creation window, enter the event title, which should provide a brief description of the gathering or meeting.
- Select the date and time for the event by choosing the start and end times from the calendar or using the drop-down menus.
- Specify the event location, whether it’s an in-person venue or an online meeting link. You can also add additional notes or descriptions in the event description field.
- Next, add yourself as an attendee by entering your email address or name in the “Invite guests” field. This step is necessary to ensure that you can modify the event settings and make guests optional.
- Optionally, you can add more guests by entering their email addresses or names. Remember that by default, all guests will be required to respond to the invitation.
- Once you’ve filled in all the necessary event details, click on the “Save” or “Create” button to finalize the event creation process.
By creating an event, you set the foundation for establishing the gathering or meeting in Google Calendar. Remember to include any important details or instructions in the event description to provide clarity to your guests.
Now that you’ve successfully created an event, let’s explore how to share the event with guests (if needed) in the next step.
Step 3: Share the event with guests (optional)
Sharing the event with your guests is an optional step but can be useful if you want to ensure that they have direct access to the event details and can easily RSVP. Here’s how you can share the event with your guests:
- Open the event you created in Google Calendar.
- Look for the option to share the event with guests. This option is typically located in the event details section, near the attendee list or under the “Guests” or “Invitations” tab.
- Click on the “Share” or “Invite” button to initiate the sharing process.
- You will be provided with different sharing options, such as sending invitations via email, copying a shareable link, or selecting specific guests from your contact list.
- Choose the desired sharing method based on your preferences and the convenience of your guests.
- If you’re sending invitations via email, enter the email addresses of the guests you want to invite. You can also add a personalized message to the invitation.
- Review the invitation message and the list of guests that will receive it, ensuring everything is accurate.
- Click on the “Send” or “Share” button to send the invitations.
Sharing the event with your guests ensures that they receive the event details and can easily access and RSVP to the event. Depending on the sharing method you choose, they may receive an email invitation with a direct link to the event or a notification in their Google Calendar.
By sharing the event, you enable your guests to have direct access to the event details, including the ability to modify their RSVPs if the “Guests can modify event” setting is enabled. This step helps streamline the communication process and ensures that everyone stays informed about the event.
Now that you’ve shared the event with your guests (if desired), let’s move on to the next step, where we’ll explore how to set the event visibility.
Step 4: Set event visibility
Setting the event visibility determines who can view the event details and RSVP to the event. By default, events in Google Calendar are usually set to “Public”, meaning anyone with the event link can access and RSVP to it. However, you can adjust the visibility settings to suit your needs. Here’s how you can set the event visibility:
- Open the event you created in Google Calendar.
- Look for the option to set the event visibility. This option is typically located in the event details section, near the attendee list or under the “Visibility” or “Access” tab.
- Click on the visibility setting to open the dropdown menu of options.
- Choose the desired visibility setting based on your preferences:
- Public: This setting allows anyone who has the event link to view and RSVP to the event. It is the default setting in Google Calendar.
- Private: When you set an event as private, only you as the event creator can view and modify the event details. Guests will not be able to view or RSVP to the event.
- Organization: This setting limits the event visibility to members within your organization. Only individuals with a valid email address from the same organization will be able to view and RSVP to the event.
- Custom: In some cases, you may have specific guests or a guest list that you want to invite while restricting access to others. The custom setting allows you to choose specific individuals or groups who can view and RSVP to the event.
- Once you’ve selected the desired visibility setting, it will be applied to the event.
By setting the event visibility, you determine who can access and RSVP to the event. This helps ensure that only those who are intended to be part of the event can view and respond to the invitation. It adds an extra layer of privacy and control over who can interact with the event.
Now that you’ve successfully set the event visibility, let’s move on to the final step, where we’ll explore how to edit event settings to further customize your event.
Step 5: Edit event settings
Editing event settings allows you to further customize and fine-tune the details of your event in Google Calendar. By adjusting these settings, you can add more information, set reminders, and manage notifications to ensure a smooth event experience. Here’s how you can edit event settings:
- Open the event you created in Google Calendar.
- Look for the option to edit event settings. This option is typically located in the event details section, near the date and time information or under the “Settings” or “More options” tab.
- Click on the edit or settings option to open the event settings menu.
- Explore the different settings and customize them to your preference. Some common event settings you can modify include:
- Description: Add more detailed information about the event, such as the agenda, dress code, or any other relevant details.
- Reminders: Set reminders to ensure you and your guests receive timely notifications about the event. You can choose to receive reminders via email, pop-up notifications, or both.
- Notifications: Manage notifications related to the event, such as receiving updates when guests RSVP, when there are changes to the event, or when guests leave comments or notes.
- Availability: Specify your availability for the event by marking certain time slots as busy or free. This allows other event participants or potential guests to see your availability and plan accordingly.
- Once you’ve made the necessary modifications, save the changes to apply them to the event.
Editing event settings allows you to add more context, set reminders, and manage notifications to ensure a well-organized and successful event. It helps you communicate important details and updates to your guests, keeping everyone on the same page.
With the completion of this step, you’ve successfully edited the event settings. You’re now ready to manage and enjoy your event using Google Calendar.
Remember, these steps are intended to make guests optional in Google Calendar, providing them with the flexibility to choose their attendance status. By enabling the “Guests can modify event” setting and customizing the event settings, you create an inclusive and efficient event planning experience for both you and your guests.
Conclusion
Congratulations! You have successfully learned how to make guests optional in Google Calendar. By following the steps outlined in this guide, you can provide your guests with the flexibility to RSVP to events according to their availability and preferences. This approach allows for easier event management and ensures that everyone involved has a seamless and enjoyable experience.
Throughout this guide, you discovered how to enable the “Guests can modify event” setting, create events, share them with guests if desired, set event visibility, and customize event settings. These processes empower you to tailor your events to suit your specific needs and enable your guests to participate on their own terms.
Remember that Google Calendar offers a wide range of features and functionalities to further enhance your event planning experience. You can explore options like creating recurring events, adding attachments or links, integrating with other applications, and more. Continuously exploring and experimenting with these features will help you leverage Google Calendar to its fullest potential.
Whether you’re organizing business meetings, social gatherings, or family events, having the ability to make guests optional ensures that you can accommodate the scheduling preferences of your invitees. It fosters a collaborative and flexible environment, promoting better communication and coordination.
So, go ahead and start applying these techniques to your Google Calendar events. Enjoy the convenience, simplicity, and efficiency that comes with making guests optional, and make the most out of your event planning experience!