Introduction
When it comes to expanding your storage capacity and keeping your important files organized, an external hard drive is a valuable accessory for your Mac. Whether you’re a professional photographer with thousands of high-resolution images or a student with a growing collection of digital textbooks and documents, having an external hard drive can help you manage your data efficiently.
However, before you can start using an external hard drive with your Mac, you need to initialize it. The process of initializing involves preparing the hard drive for use, formatting it with a compatible file system, and partitioning it if needed. This ensures that the hard drive is ready to store and access your files effectively.
In this guide, we’ll walk you through the steps to initialize an external hard drive on your Mac using the built-in Disk Utility tool. Whether you have purchased a brand new hard drive or you want to repurpose an existing one, this process will help you get it ready for use with your Mac. So, let’s dive in and get your external hard drive up and running!
Step 1: Connect the external hard drive to your Mac
The first step in initializing an external hard drive on your Mac is to connect it to your computer. Start by ensuring that your Mac is powered on and running the latest operating system version. Then, locate the USB or Thunderbolt port on your Mac, depending on the type of connection your external hard drive supports.
Once you’ve located the port, plug in the appropriate cable (USB or Thunderbolt) into your Mac. Now, take the other end of the cable and connect it to your external hard drive. Make sure the connection is secure and that the cable is properly inserted into both the Mac and the hard drive. If your external hard drive requires external power, ensure that it is connected to a power source as well.
Once the external hard drive is connected, you should see a notification pop up on your Mac confirming the connection. You can also verify the connection by checking in the Finder or on the desktop. The external hard drive should appear as a new drive or volume.
It’s important to note that some external hard drives may require additional drivers or software to be installed on your Mac for proper functionality. If this is the case, refer to the manufacturer’s instructions and download the necessary drivers or software from their website. Install them on your Mac before proceeding to the next steps.
Now that your external hard drive is successfully connected to your Mac, you’re ready to move on to the next step: launching Disk Utility to begin the initialization process.
Step 2: Launch Disk Utility
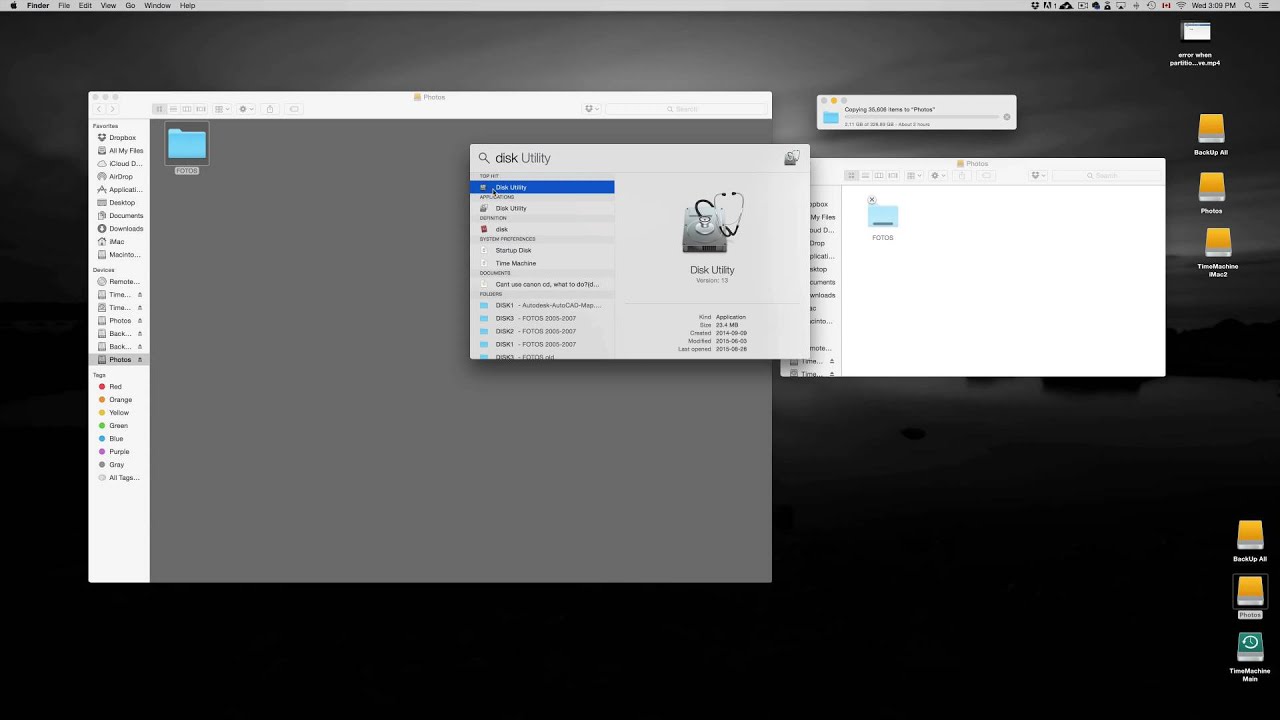
Disk Utility is a built-in utility on your Mac that allows you to manage and manipulate storage devices, including external hard drives. To launch Disk Utility, follow these steps:
- Click on the “Finder” icon in your dock or navigate to the “Applications” folder in your Mac’s hard drive.
- Scroll down and open the “Utilities” folder.
- Locate and double-click on the “Disk Utility” application to launch it.
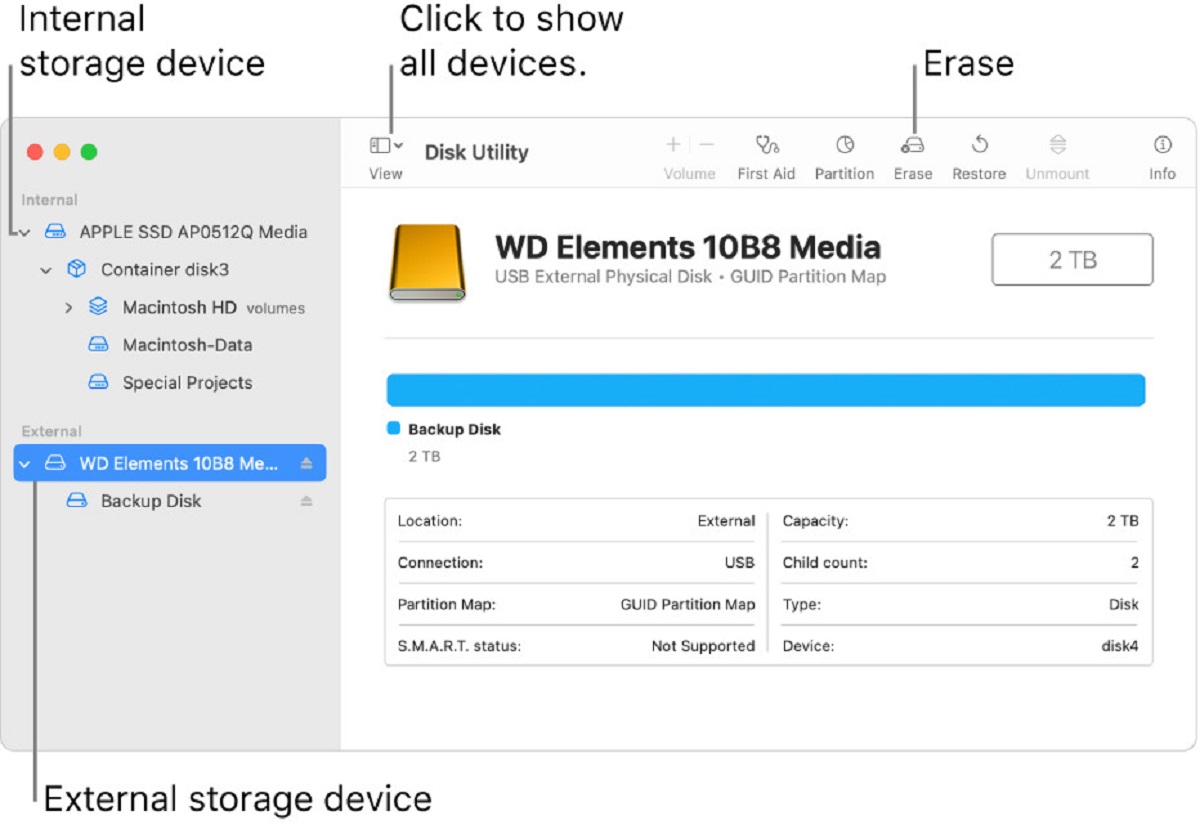
Once Disk Utility is open, you will see a list of storage devices on the left-hand side. This includes your Mac’s internal hard drive, as well as any connected external hard drives or SSDs. The selected drive will be highlighted in blue and its details will be displayed on the right-hand side of the window.
If your external hard drive is not displayed in Disk Utility, ensure that it is properly connected to your Mac and powered on. You can also try disconnecting and reconnecting the cable to establish a new connection. If the issue persists, consider troubleshooting the connection or seeking technical assistance from the manufacturer.
Once you have successfully launched Disk Utility and ensured that your external hard drive is recognized, you’re now ready to proceed to the next step: selecting the external hard drive from the sidebar.
Step 3: Select the external hard drive from the sidebar
In order to initialize your external hard drive, you need to select it from the sidebar in Disk Utility. Once you have launched Disk Utility, follow these steps to select your external hard drive:
- Look at the left-hand sidebar in Disk Utility, where you will find a list of all connected storage devices.
- Locate your external hard drive in the list. It should be displayed with its brand or model name.
- Click once on your external hard drive to select it.
Once you have successfully selected your external hard drive, its details and available actions will be displayed in the main window of Disk Utility. Make sure to double-check that you have selected the correct drive, as initializing the wrong drive could result in data loss.
If you have multiple external hard drives connected to your Mac, it is important to identify the correct one before proceeding. You can refer to the size, brand, or model number of the drive to ensure you are working with the intended device.
Now that you have selected your external hard drive in Disk Utility, you are ready to move on to the next step: erasing the external hard drive to prepare it for initialization.
Step 4: Erase the external hard drive
Before you can initialize your external hard drive, you need to erase any existing data and format it with a compatible file system. Follow these steps to erase your external hard drive in Disk Utility:
- In the main window of Disk Utility, click on the “Erase” button located at the top toolbar.
- A new window will appear, prompting you to provide a name for the erased drive.
- Enter a descriptive name for your external hard drive. This name will be used to identify it on your Mac.
- Next, choose the appropriate format for the file system. For Mac compatibility, select “Mac OS Extended (Journaled)”. If you plan to use the drive on both Mac and Windows systems, choose “ExFAT”.
- If desired, you can select a scheme for partitioning the drive. For most users, the default “GUID Partition Map” is sufficient.
- Double-check that you have selected the correct drive and settings for erasing. This process will permanently delete all existing data on the drive.
- Once you are ready, click on the “Erase” button to proceed with the process.
- Wait for Disk Utility to erase and format the external hard drive. The duration of this process may vary depending on the size of the drive.
- When the process is complete, Disk Utility will display a notification confirming successful erasure.
It’s important to note that erasing your external hard drive will permanently delete all data on the drive. Make sure you have backed up any important files before proceeding. If you are erasing a brand new drive, there is no need to worry about data loss.
Now that your external hard drive has been successfully erased, you are ready to move on to the next step: choosing the appropriate file system format for your needs.
Step 5: Choose the appropriate file system format
After erasing your external hard drive, you need to select the appropriate file system format for your needs. The file system format determines how your Mac organizes and reads data on the drive. Follow these steps to choose the right format in Disk Utility:
- In the main window of Disk Utility, select your newly erased external hard drive from the left-hand sidebar.
- Click on the “Erase” tab located at the top of the Disk Utility window.
- In the “Format” dropdown menu, select the desired file system format:
- Mac OS Extended (Journaled): This format is compatible with Mac computers and is suitable for most users. It supports files larger than 4GB.
- APFS (Apple File System): This is the newer file system format introduced by Apple and is optimized for use with macOS High Sierra and later versions.
- ExFAT: This format is compatible with both Mac and Windows systems, allowing you to transfer files between the two platforms without any issues.
- MS-DOS (FAT): This format is primarily used for compatibility with older Windows systems. It has a file size limit of 4GB.
- Choose the format that best suits your needs and preferences.
- Double-check that you have selected the correct drive and format. Keep in mind that this process will permanently format the drive using the chosen file system.
- Once you are confident with your selection, click on the “Erase” button to proceed.
- Wait for Disk Utility to reformat the external hard drive with the chosen file system. The duration of this process may vary depending on the size of the drive.
- Once the formatting process is completed, Disk Utility will display a notification confirming that the drive has been successfully formatted with the chosen file system.
Choosing the appropriate file system format is crucial as it determines the compatibility and functionality of the external hard drive with your Mac system. Consider your specific requirements and the platforms you intend to use the drive on before making a decision.
With the file system format chosen and applied, you are now ready to proceed to the next step: naming and partitioning the external hard drive.
Step 6: Name and partition the external hard drive
After choosing the appropriate file system format for your external hard drive, the next step is to name and, if desired, partition the drive. Naming the drive helps you easily identify it on your Mac, while partitioning allows you to divide the drive into multiple sections. Follow these steps in Disk Utility to accomplish this:
- In Disk Utility, locate your newly formatted external hard drive in the left-hand sidebar and click on it to select.
- Click on the “Partition” tab at the top of the Disk Utility window.
- You will see a graphical representation of your external hard drive, displaying its allocated space. By default, it will be a single partition taking up the entire drive.
- To change the partition scheme, click on the “+” button located beneath the partition diagram.
- A new partition will be created, and you can adjust its size by dragging its borders.
- If you have created multiple partitions, you can click on each one and give it a name in the “Name” field.
- Enter a descriptive name for your external hard drive or the individual partitions to help you differentiate them.
- Once you are satisfied with the partitioning and naming, double-check that all settings are correct.
- Click on the “Apply” button to apply the changes and finalize the naming and partitioning process.
- Wait for Disk Utility to partition and name the external hard drive according to your specifications. The duration of this process may vary depending on the size of the drive and the number of partitions.
- Once the process is complete, Disk Utility will display a notification confirming the successful naming and partitioning of the external hard drive.
Partitioning your external hard drive can be useful if you want to separate data or create a dedicated section for a different operating system. However, if you don’t require partitioning, you can simply skip this step and continue with a single partition.
With the external hard drive properly named and potentially partitioned, you are now ready to proceed to the next step: initializing the drive to make it accessible on your Mac.
Step 7: Initialize the external hard drive
After completing the previous steps, it’s time to initialize your external hard drive in order to make it fully accessible on your Mac. Follow these instructions in Disk Utility to initialize the drive:
- In Disk Utility, select the newly named and, if applicable, partitioned external hard drive from the left-hand sidebar.
- Click on the “First Aid” tab at the top of the Disk Utility window.
- At the top of the window, you will see the option to “Verify Disk” or “Repair Disk”. Click on either of these options to ensure the integrity of the drive.
- Disk Utility will perform a scan and repair any errors it finds. This step is essential to ensure the drive is in good working condition.
- Once the verification and repair process is complete, click on the “Initialize” button located at the top toolbar in Disk Utility.
- A warning message will appear, notifying you that initializing the drive will erase all data on it. Make sure you have backed up any important files before proceeding.
- Confirm your decision to initialize the drive by clicking on the “Initialize” button in the warning message.
- Wait for Disk Utility to initialize the external hard drive. This process may take some time depending on the size of the drive.
- Once the initialization process is complete, Disk Utility will display a notification confirming that the drive has been successfully initialized.
The initialization process ensures that your external hard drive is prepared to store and access data effectively. By verifying and repairing any errors and then initializing the drive, you can ensure a solid foundation for your storage needs.
With the external hard drive successfully initialized, you are now ready to move on to the next step: waiting for the process to complete.
Step 8: Wait for the process to complete
After initializing your external hard drive, it’s important to give the process some time to complete. The duration of the process will depend on the size of the drive and the specific tasks being performed. Follow these instructions to ensure that the process is allowed sufficient time to finish:
- Once you have initialized the external hard drive, avoid interrupting the process or disconnecting the drive from your Mac.
- Keep an eye on the progress bar or any status indicators provided by Disk Utility during the process. This will give you a general idea of how much time is remaining.
- While waiting, refrain from performing any demanding tasks or running resource-intensive applications on your Mac. This will help ensure that Disk Utility has the necessary resources to complete the initialization process efficiently.
- It is normal for the process to take some time, especially if you are working with a large external hard drive. Patience is key in allowing the process to complete without interruptions.
During the waiting period, you may want to take the opportunity to explore the various features and settings offered by Disk Utility. Familiarizing yourself with the utility will help you make the most of its capabilities in the future.
Once Disk Utility has finished the initialization process, you will receive a notification confirming its completion. At that point, the external hard drive is ready for you to use and enjoy its expanded storage capacity on your Mac.
With the initialization process underway, the final step is just around the corner: ejecting the external hard drive from your Mac.
Step 9: Eject the external hard drive
Once the initialization process is complete and you have finished using your external hard drive, it’s important to safely eject it from your Mac. Ejecting the drive ensures that all data has been written and that it is safe to physically disconnect it. Follow these steps to properly eject your external hard drive:
- In the Finder, click on the eject icon next to the name of your external hard drive. Alternatively, you can right-click on the drive icon and select “Eject” from the context menu.
- Wait for a few seconds to allow the Mac to finish any pending read or write processes on the drive.
- You will receive a notification confirming that it is safe to disconnect the drive. At this point, the external hard drive icon will disappear from the desktop and Finder sidebar.
- Physically disconnect the cable from the Mac and the external hard drive.
It is crucial to always eject the external hard drive before disconnecting it from your Mac. Failure to do so can result in data corruption or loss. Ejecting ensures that all data has been properly written, caches have been cleared, and the file system has been updated.
If you plan on reconnecting the external hard drive to your Mac at a later time, make sure to store it in a safe and dust-free environment to prevent any potential damage.
Congratulations! You have successfully initialized and safely ejected your external hard drive. It is now ready to be used for storing and accessing your important files, providing you with the additional storage space you need.
Conclusion
Initializing an external hard drive on your Mac is a necessary step to make it compatible with your system and ready to store and access your files. Through the process of connecting, launching Disk Utility, erasing, choosing the file system format, naming and partitioning, initializing, and finally ejecting the drive, you have successfully set up your external hard drive for optimal performance.
By following these steps, you can expand your storage capacity, keep your files organized, and ensure that your data is easily accessible whenever you need it. Whether you’re a professional who needs to store large media files or a casual user looking for a backup solution, initializing an external hard drive on your Mac allows you to manage your data efficiently and securely.
Remember to always double-check your actions, especially when erasing or initializing the drive, as these processes permanently delete data. It’s crucial to back up any important files before proceeding to avoid any potential loss of data.
Now that you are equipped with the knowledge of how to initialize an external hard drive on your Mac, you can take full advantage of the benefits it offers. Enjoy the additional storage space, improved file organization, and seamless access to your files for a more productive and enjoyable Mac experience.