Introduction
When it comes to connecting to a wireless network, one of the key pieces of information you need is the SSID (Service Set Identifier). This unique identifier is used to distinguish one WiFi network from another, allowing devices to join the correct network. Whether you’re setting up a new device, troubleshooting connectivity issues, or simply curious about the network you’re connected to, knowing how to find the SSID for WiFi is crucial.
An SSID can be thought of as a WiFi network’s name. It is typically set by the router or access point and is used by devices to identify and connect to the network. Without the SSID, devices wouldn’t know which network to connect to, making it impossible to access the internet or share files over the local network.
In this article, we will explore various methods to help you find the SSID for WiFi. By understanding these methods, you will be able to locate the necessary information to connect your devices or troubleshoot any issues you may encounter.
It is important to note that finding the SSID for WiFi usually requires you to have access to the router or a device that is already connected to the network. If you do not have access to either of these, you may need to reach out to the network administrator or the person who manages the network for assistance.
What is an SSID?
Before delving into how to find the SSID for WiFi, let’s first understand what an SSID actually is. SSID stands for Service Set Identifier, and it is a unique identifier given to a wireless network. Think of it as the name of your WiFi network, allowing devices to identify and connect to it.
The SSID acts as a beacon that is constantly broadcasted by your router or access point. When your device scans for available WiFi networks, it picks up these beacons and displays the names of the networks it finds. This is why you often see a list of available WiFi networks when you search for nearby connections on your smartphones or laptops.
Each SSID is unique, ensuring that devices connect to the correct network. For example, if you have multiple WiFi networks in your home or workplace, each network will have its own SSID. This way, your devices can differentiate between them and know which network to join.
SSID names can be customized to make them more identifiable or personalized. Many people choose to use names like “HomeWiFi” or “OfficeNetwork” to easily recognize their respective networks. However, it’s important to note that while SSID names can be changed, they must still adhere to certain limitations, such as character length and supported characters.
It’s worth mentioning that SSID is different from a network’s password or security key. While the SSID allows devices to locate and connect to a network, the password ensures that only authorized users can gain access. Both the SSID and password are necessary when connecting a device to a wireless network.
Understanding the concept of SSID is essential when it comes to managing WiFi networks, troubleshooting connectivity issues, or adding new devices to your network. Now that we know what an SSID is, let’s explore the different methods you can use to find the SSID for WiFi.
Why do you need to find the SSID for WiFi?
Knowing how to find the SSID for WiFi is important for a variety of reasons. Whether you’re setting up a new device, troubleshooting network issues, or connecting to a public WiFi network, understanding the SSID is essential. Here are some key reasons why you may need to find the SSID:
Connecting new devices: When setting up a new smartphone, tablet, laptop, or any other WiFi-enabled device, you will need to know the SSID of your network. Without the SSID, the device won’t be able to locate and connect to the correct network. Having the SSID on hand ensures a smooth and hassle-free setup process.
Troubleshooting network issues: If you’re experiencing connectivity problems with your WiFi, finding the SSID can be helpful in diagnosing and resolving the issue. Knowing the correct name of your network allows you to verify if you’re connecting to the right one. It can also assist network administrators or technical support in troubleshooting specific issues related to your network configuration.
Selecting the correct network in public places: When you’re in a public place like a café, airport, or library, chances are there will be multiple WiFi networks available. Being able to identify the SSID of the network you want to connect to ensures that you join the correct one. This is particularly important in situations where the network names are not easily distinguishable or similar to each other.
Configuring advanced network settings: If you’re a network administrator or an advanced user, you may need to access your router’s configuration page to make changes to your network settings. In such cases, having the SSID is crucial to ensure you’re accessing the correct network’s configuration page.
Sharing network details: If you’re setting up a guest network or need to share your WiFi details with someone, providing the SSID is essential. It allows others to easily locate and connect to your network without confusion.
By understanding the importance of finding the SSID, you will be better equipped to handle various WiFi-related tasks and ensure a seamless connection experience. With that in mind, let’s explore the different methods you can use to find the SSID for WiFi.
Methods to Find the SSID for WiFi
There are several methods you can use to find the SSID for WiFi. Here, we will explore the most common and reliable methods that work across different devices and operating systems:
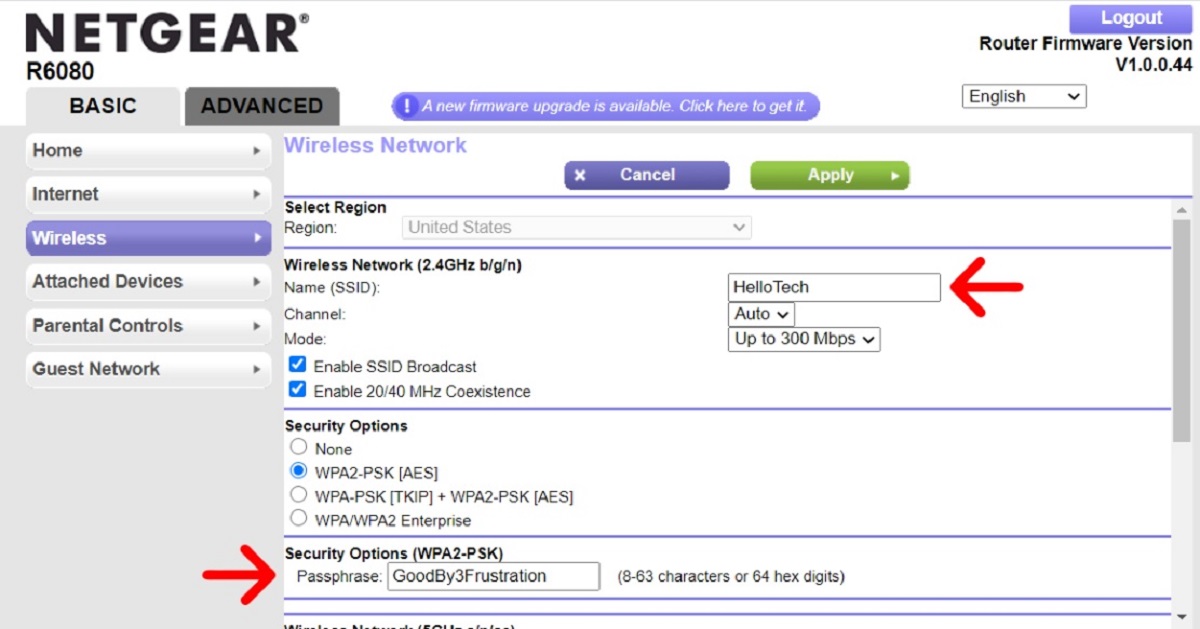
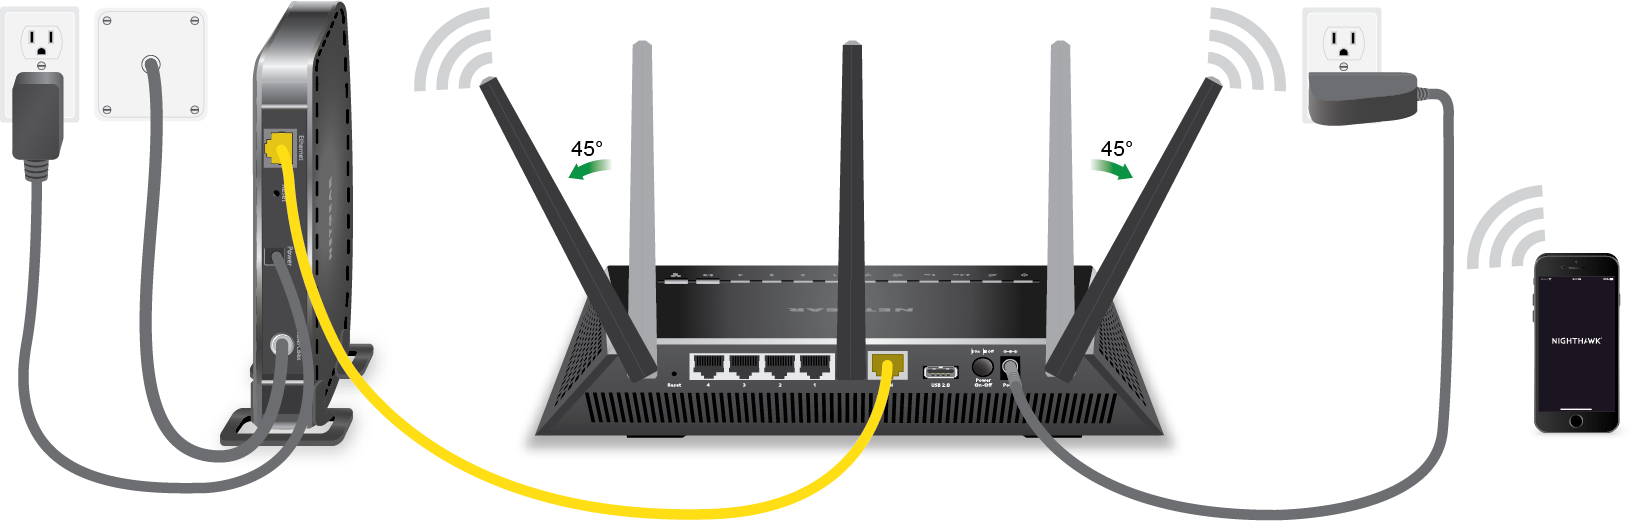
Method 1: Checking the Router: The easiest way to find the SSID is by checking the label on your WiFi router or access point. Manufacturers often print the SSID, along with other important information, on a sticker that is attached to the device. Look for a label on the back or bottom of the router and locate the field marked “SSID” or “Network Name.” The SSID should be clearly displayed there.
Method 2: Using a Device Connected to the WiFi Network: If you have a device that is already connected to the WiFi network, you can easily find the SSID through the device’s settings. On a Windows PC, go to the Network and Sharing Center, click on the connected network, and then select “Wireless Properties.” The SSID will be listed under the “Network Name” or “SSID” field. On a Mac, go to the Network Preferences, select the WiFi network, and view the “Network Name” or “SSID” field.
Method 3: Using Command Prompt (Windows): Another way to find the SSID on a Windows PC is by using the Command Prompt. Open the Command Prompt, and type the following command: netsh wlan show interfaces. Look for the line that says “SSID Name.” The value next to it will be your SSID.
Method 4: Using Terminal (Mac): Mac users can also find the SSID using the Terminal. Open the Terminal, and enter the following command: /System/Library/PrivateFrameworks/Apple80211.framework/Versions/Current/Resources/airport -I | grep SSID. The SSID will be displayed next to the “SSID” field.
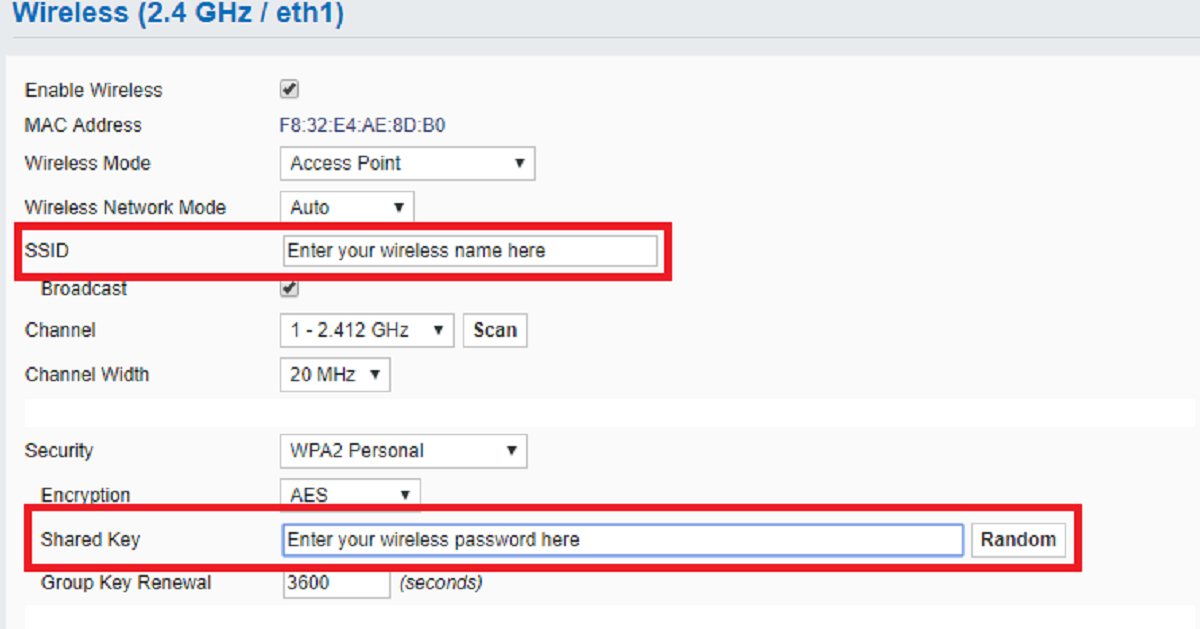
Method 5: Using the Router’s Configuration Page: This method requires access to the router’s configuration page. Open a web browser and enter the router’s IP address into the address bar. Log in to the router’s administration panel using the username and password. Once logged in, navigate to the wireless settings or network settings page. Look for the field indicating the SSID, which may be labeled as “Network Name” or “SSID.” The SSID will be listed there.
By using one of these methods, you can easily find the SSID for your WiFi network. Remember to keep the SSID information handy, as it will be required when connecting new devices or troubleshooting network issues. Understanding how to find the SSID is a valuable skill that empowers you to manage, troubleshoot, and secure your wireless network efficiently.
Method 1: Checking the Router
One of the easiest ways to find the SSID for your WiFi network is by checking the label on your WiFi router or access point. Manufacturers often include a sticker on the back or bottom of the device that contains important information, including the SSID or Network Name.
To locate the SSID using this method, follow these steps:
- Locate your WiFi router or access point.
- Check the back or bottom of the device for a label or sticker.
- Look for the field marked “SSID” or “Network Name” on the label.
- The SSID should be clearly displayed on the label.
By using this method, you can quickly find the SSID without the need for any additional tools or access to devices already connected to the network.
It’s essential to note that the location of the label may vary depending on the router model and manufacturer. While most labels are placed on the back or bottom of the device, some may be placed on the side or front. If you’re having trouble locating the label, refer to the router’s manual or manufacturer’s website for specific instructions.
This method is especially helpful for individuals who are setting up a new device and need to connect it to the WiFi network. By having the SSID readily available, you can easily select the correct network during the setup process.
Additionally, having the physical label with the SSID provides an extra layer of security. If you’re sharing your WiFi network details with others, you can verify the SSID by comparing it to the label on your router. This ensures that they are connecting to the correct network, avoiding any potential confusion or security risks.
Remember to keep the label on your router clean and legible over time. If the sticker becomes damaged or illegible, you may need to resort to other methods to find the SSID.
Now that you know how to find the SSID by checking the router, let’s move on to the next method.
Method 2: Using a Device Connected to the WiFi Network
If you have a device that is already connected to the WiFi network, you can easily find the SSID by accessing the device’s settings. This method works on various devices, including smartphones, tablets, laptops, and desktop computers.
Here’s how you can find the SSID using a device that is already connected to the WiFi network:
- Open the settings on your device.
- Navigate to the section related to network or WiFi settings.
- Find the list of available WiFi networks or the currently connected network.
- Locate the SSID or Network Name associated with your WiFi network.
On a Windows PC, you can follow these steps:
- Click on the network icon in the taskbar.
- Select “Network & Internet settings” or “Open Network & Internet settings”.
- Click on “WiFi” in the left menu.
- Under “WiFi”, click on “Manage known networks”.
- Select the connected network from the list.
- The SSID or Network Name will be displayed.
On a Mac, the steps are slightly different:
- Click on the WiFi icon in the top menu bar.
- Select “Open Network Preferences” or “Open Network Preferences…”.
- Click on the connected WiFi network in the list.
- The SSID or Network Name will be displayed.
By using this method, you can easily find the SSID without the need to access the router or use any additional tools. It is particularly useful when you have forgotten the SSID or need to connect a new device to the network without physically accessing the router.
Moreover, if you’re troubleshooting network issues, having access to a connected device that displays the SSID can be helpful. You can verify that the device is connecting to the correct network and ensure that the SSID matches the one you’re trying to connect to.
Keep in mind that the steps may vary slightly depending on the device and operating system you’re using. If you encounter any difficulties, refer to the device’s user manual or online documentation for specific instructions.
Now that you know how to find the SSID using a connected device, let’s proceed to the next method.
Method 3: Using Command Prompt (Windows)
If you’re using a Windows PC, you can find the SSID for your WiFi network by utilizing the Command Prompt. This method allows you to access network information directly through the command line. Here’s how you can do it:
- Open the Command Prompt by pressing the Windows key + R, typing “cmd” in the Run dialog, and pressing Enter.
- In the Command Prompt window, type the following command:
netsh wlan show interfacesand press Enter. - A list of network interfaces will be displayed. Look for the interface that represents your WiFi connection.
- Under the “SSID” section, you will find the name of your WiFi network.
The Command Prompt method provides a quick and straightforward way to find the SSID without the need for additional software or access to the router. It can be particularly useful when you want to retrieve the SSID for troubleshooting purposes or if you prefer using the command line interface.
With this method, you can easily obtain the SSID when you don’t have direct access to the router or need to find the network name without relying on the device’s settings.
It’s important to note that you need administrative privileges to access the Command Prompt. If prompted, make sure to grant the necessary permissions to the Command Prompt for it to display the network information accurately.
Keep in mind that the Command Prompt commands and interface may vary depending on the version of Windows you’re using. If you encounter any difficulties or the command doesn’t work as expected, refer to Microsoft’s official documentation or online resources specific to your Windows version.
Now that you know how to find the SSID using Command Prompt on a Windows PC, let’s move on to the next method.
Method 4: Using Terminal (Mac)
If you are using a Mac, you can find the SSID for your WiFi network by using the Terminal application. Terminal provides a command-line interface that allows you to access various system information and settings. Here’s how you can find the SSID using Terminal:
- Open the Terminal application on your Mac. You can find it in the Applications folder or by using Spotlight Search.
- In the Terminal window, type the following command:
/System/Library/PrivateFrameworks/Apple80211.framework/Versions/Current/Resources/airport -I | grep SSIDand press Enter. - The SSID of your WiFi network will be displayed in the Terminal window next to “SSID:”.
Using Terminal provides a convenient way to find the SSID without the need for additional software or accessing the router directly. It is especially useful if you prefer using the command-line interface or need to retrieve the SSID for troubleshooting purposes.
With this method, you can easily obtain the SSID even if you don’t have direct access to the router or prefer using Terminal over the graphical user interface.
Keep in mind that the Terminal commands and interface are specific to macOS. If you encounter any difficulties or the command doesn’t work as expected, you can refer to Apple’s official documentation or online resources for further guidance.
It’s worth noting that the commands provided in the Terminal are case-sensitive, so make sure to type the command exactly as shown to obtain the correct results.
Now that you know how to find the SSID using Terminal on a Mac, let’s proceed to the next method.
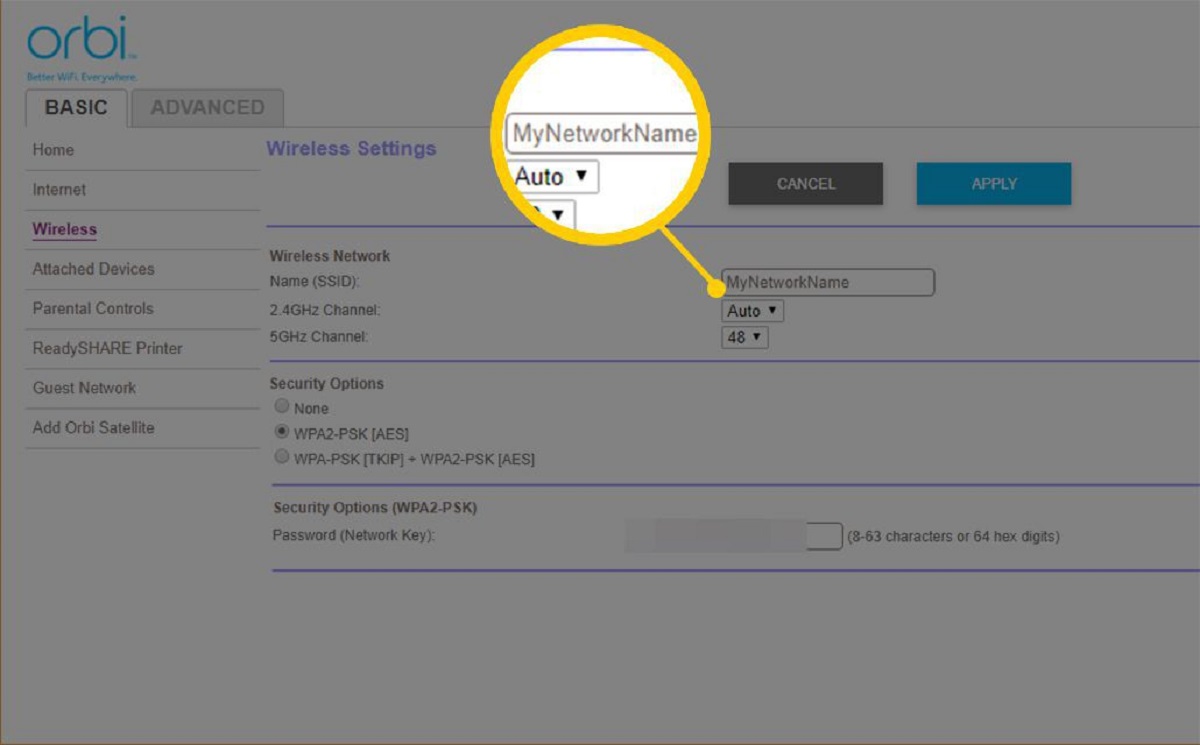
Method 5: Using the Router’s Configuration Page
If you have access to your router’s configuration page, you can easily find the SSID for your WiFi network. The router’s configuration page provides comprehensive settings and information about your network, including the SSID. Here’s how you can find the SSID using the router’s configuration page:
- Open a web browser on a device connected to the WiFi network.
- Type your router’s IP address into the address bar. Common IP addresses for routers include “192.168.0.1” or “192.168.1.1”.
- Press Enter to access the router’s login page.
- Enter your router’s login credentials. If you have not changed them, the default username and password can be found in the router’s manual or on the manufacturer’s website.
- Once logged in, navigate to the wireless settings or network settings section of the configuration page.
- Look for the field indicating the SSID, which may be labeled as “Network Name” or simply “SSID”. The SSID will be listed there.
The router’s configuration page allows you to view and modify various settings for your WiFi network. It provides a centralized location to access all the necessary information, including the SSID.
By using this method, you can easily find the SSID without the need for any additional tools or access to connected devices. It is particularly helpful when you require more advanced network settings or need to verify the SSID for troubleshooting purposes.
Remember to keep the router’s login credentials secure. If you have changed the default username and password, make sure to enter the updated credentials to access the configuration page.
It’s worth mentioning that the router’s configuration page may have a different interface depending on the router model and manufacturer. If you encounter any difficulties or can’t locate the wireless settings section, refer to the router’s manual or the manufacturer’s website for specific instructions pertaining to your device.
Now that you know how to find the SSID using the router’s configuration page, you have a variety of methods to choose from depending on your preferences and access to the necessary devices.
Conclusion
Finding the SSID for your WiFi network is an essential task that allows you to connect devices, troubleshoot network issues, and manage your network settings effectively. In this article, we explored various methods to help you find the SSID, giving you the flexibility to choose the method that suits your needs and available resources.
We started by understanding what an SSID is – a unique identifier for a WiFi network that enables devices to connect to the correct network. We then discussed why it’s important to find the SSID, including connecting new devices, troubleshooting network problems, selecting the correct network in public places, configuring advanced network settings, and sharing network details accurately.
We then explored five methods to find the SSID for WiFi:
- Checking the router: This method entails examining the label on your WiFi router or access point to locate the SSID.
- Using a device connected to the WiFi network: By accessing the device’s settings, you can easily find the SSID under the network or WiFi settings.
- Using Command Prompt (Windows): Windows users can utilize the Command Prompt to retrieve network information, including the SSID, through specific commands.
- Using Terminal (Mac): Mac users can find the SSID by executing commands in the Terminal application, obtaining the necessary details without relying on device settings.
- Using the router’s configuration page: Accessing the router’s configuration page through a web browser allows you to view the SSID and other network settings.
Each method provides a different approach, offering convenience and flexibility based on your specific requirements and available devices.
Now that you have a comprehensive understanding of how to find the SSID for WiFi, you can confidently connect new devices, troubleshoot network issues, and manage your network with ease.
Remember to use this knowledge responsibly and keep your network secure by regularly updating passwords and implementing appropriate security measures. By doing so, you can ensure a seamless and secure WiFi experience for all your devices.