Why Connect Your Android Phone to a Wifi Network
Connecting your Android phone to a wifi network offers numerous benefits and advantages. Whether you’re at home, work, or a public place, wifi connectivity allows you to access the internet, stream videos, download apps, and stay connected with friends and family. Here are some compelling reasons to connect your Android phone to a wifi network:
- Faster Internet Speeds: Wifi networks generally provide faster internet speeds compared to mobile data connections. This means you can browse websites, watch videos, and download content quickly and seamlessly.
- Cost Savings: Utilizing wifi for internet access can help you save on your mobile data expenses. Wifi connections are often available at no additional cost, especially at public places like cafes, libraries, and airports.
- Stable Connection: Wifi networks provide a stable and reliable connection, ensuring uninterrupted internet access. Unlike mobile data which can be affected by signal strength or network congestion, wifi offers a more consistent browsing experience.
- Large Data Transfer: With wifi, you can easily transfer large files, such as photos, videos, and documents, between your Android phone and other devices on the same network. This is especially useful when sharing files with family, colleagues, or friends.
- Multiple Device Connectivity: Wifi networks allow you to connect multiple devices simultaneously. You can connect your Android phone, laptop, tablet, and other smart devices to the same network, enabling seamless communication and data sharing between devices.
- Better Battery Life: Using wifi for internet access can help preserve your Android phone’s battery life. When connected to wifi, your phone relies less on mobile data, which can drain battery power more quickly.
By connecting your Android phone to a wifi network, you can take full advantage of the convenience and capabilities offered by the internet. So, whether you’re at home or on the go, don’t miss out on the benefits of wifi connectivity.
Step 1: Check Wifi Connection Availability
Before connecting your Android phone to a wifi network, it is important to check if a wifi connection is available. Follow these steps to determine wifi availability:
- Unlock your Android phone and navigate to the home screen.
- Swipe down from the top of the screen to access the notification panel.
- Look for the wifi icon, which typically resembles a signal strength symbol or the word “wifi.”
- If the wifi icon is present and not grayed out, it indicates that a wifi connection is available.
- If the wifi icon is not visible or is grayed out, it means that there is no wifi network within range or that wifi is disabled on your Android phone.
If you do not see the wifi icon, you can check the wifi settings on your Android phone. Here’s how:
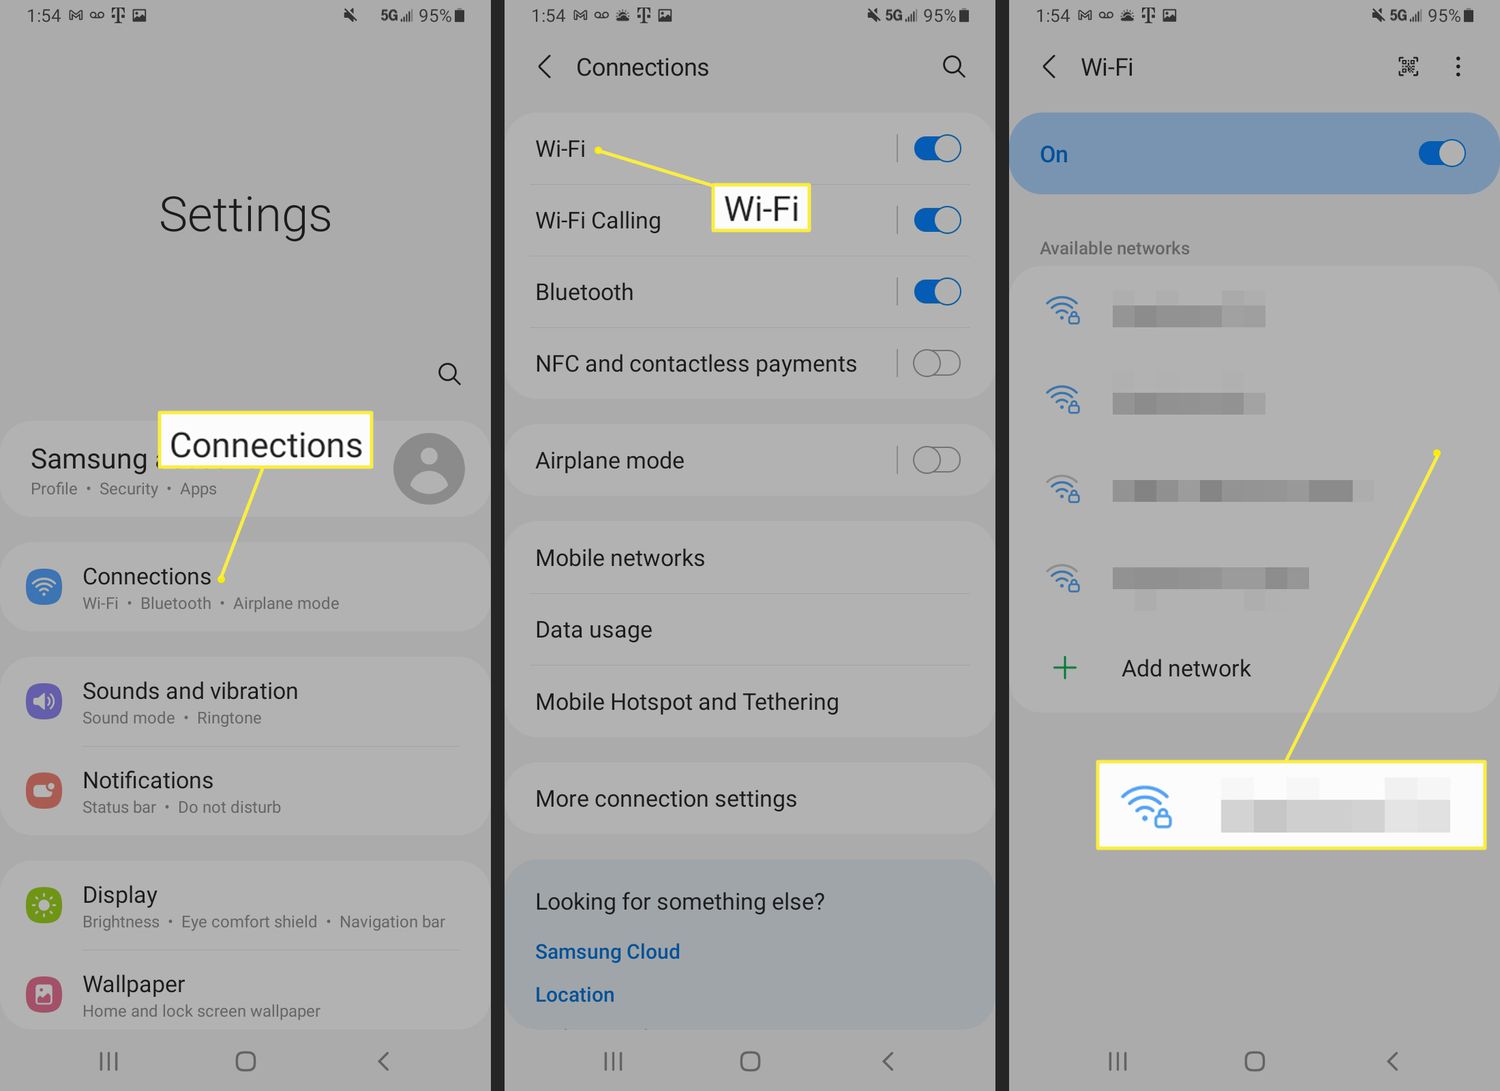
- Go to the “Settings” app on your Android phone. You can usually find it on the home screen or in the app drawer.
- Scroll down and tap on the “Network & internet” or “Connections” option.
- Look for the “Wifi” option and ensure that it is toggled on.
- If the wifi option is already enabled and you still do not see the wifi icon, it may be due to factors such as a hardware issue or software glitch. In such cases, you may need to seek assistance from a technician or contact your device manufacturer.
Checking wifi availability is the first step towards connecting your Android phone to a wifi network. Once you confirm that wifi is available and enabled on your device, you can proceed to the next steps to establish a connection and enjoy the benefits of wifi connectivity.
Step 2: Turn Wifi On
After confirming the availability of a wifi connection, the next step is to turn on the wifi feature on your Android phone. Follow these simple steps to enable wifi:
- Unlock your Android phone and go to the home screen.
- Swipe down from the top of the screen to access the notification panel.
- Look for the wifi icon, usually located in a row of quick settings icons.
- If the wifi icon is grayed out, it means that wifi is currently turned off.
- To turn on wifi, simply tap on the wifi icon. It should change from gray to a solid color, indicating that wifi is now enabled.
- You may also have the option to long-press the wifi icon to directly access the wifi settings.
Alternatively, you can enable wifi through the Android settings menu. Here’s how:
- Open the “Settings” app on your Android phone.
- Scroll down and tap on the “Network & internet” or “Connections” option.
- Look for the “Wifi” option and toggle the switch to the “On” position.
Once you have successfully turned on wifi, your Android phone will start scanning for available wifi networks in the vicinity. You will see a list of available networks, along with their signal strength and security information. Now you’re ready to proceed to the next step of choosing a wifi network to connect to.
Step 3: Choose a Wifi Network
With wifi turned on, it’s time to choose a wifi network that you want to connect your Android phone to. Follow these steps to select a wifi network:
- Unlock your Android phone and go to the home screen.
- Swipe down from the top of the screen to access the notification panel.
- Tap on the wifi icon to open the list of available wifi networks.
- You will see a list of detected wifi networks, along with their names (also known as SSIDs) and signal strength indicators.
- Select the wifi network you want to connect to by tapping on its name.
When choosing a wifi network, keep the following points in mind:
- Security: Look for wifi networks that are secured with encryption, such as WPA2, to protect your data and privacy.
- Signal Strength: A network with a stronger signal will typically provide better internet speeds and a more stable connection.
- Network Name: Ensure that you are selecting the correct network by verifying the name or SSID of the wifi network.
If the wifi network you want to connect to is not listed, make sure that you are within range of the network. Walls, distance, and other physical obstructions can affect the wifi signal strength and availability. You may need to move closer to the wifi router or wait for the network to become visible.
If the network you want to join is hidden, you can manually add it by selecting the “Add Network” or “Join Hidden Network” option and entering the network name and security settings manually. However, keep in mind that hidden networks may have additional security measures in place.
Once you have chosen the wifi network you want to connect to, you can proceed to enter the wifi password, if required, in the next step.
Step 4: Enter Wifi Password
If the wifi network you’ve chosen is password-protected, you will need to enter the wifi password to establish a connection. Follow these steps to enter the wifi password on your Android phone:
- On the wifi network selection screen, you will be prompted to enter the wifi password.
- Tap on the password field to bring up the on-screen keyboard.
- Type in the password for the selected wifi network. Make sure to enter it correctly, as passwords are case-sensitive.
- If you’re uncertain about the password, you can tap on the “Show password” option to reveal the characters you’re typing.
- Once you have entered the password, tap on the “Join” or “Connect” button to proceed.
It’s important to note that some wifi networks may have a captive portal or require additional authentication, such as accepting terms and conditions, before granting access. In such cases, you will be redirected to a browser window where you can complete the required steps.
If you’re having trouble entering the password or are unsure about the correct password, ensure that you have the correct information from the network owner. If you’re connecting to a public wifi network, such as at a cafe or airport, they usually provide the password for customers.
If you’re unable to connect to the wifi network even after entering the correct password, there may be other issues causing the connection problem. Refer to the next step on troubleshooting wifi connection issues for further assistance.
Step 5: Connect to the Wifi Network
After entering the wifi password, you are now ready to establish a connection to the chosen wifi network on your Android phone. Follow these steps to connect to the wifi network:
- Once you have entered the wifi password, your Android phone will attempt to connect to the network.
- You will see a message indicating that your phone is “Connecting to [Network Name].” This process may take a few seconds.
- If the entered password is correct and the network is within range, your Android phone will establish a successful connection to the wifi network.
- Once connected, you will see the wifi icon on the status bar at the top of the screen, indicating that you are now connected to the wifi network.
- You may also see a notification confirming the successful connection to the wifi network.
After connecting to the wifi network, you can start using the internet and enjoying the benefits of being connected. You can browse websites, stream videos, download apps, and engage in other online activities.
It’s important to note that some wifi networks may have a login page or require additional authentication even after connecting. If prompted, follow the instructions provided to complete the login process.
In the event that you’re unable to connect to the wifi network even after entering the correct password, or if you encounter any other connection issues, proceed to the next step on troubleshooting wifi connection problems.
Step 6: Troubleshooting Wifi Connection Issues
While connecting to a wifi network on your Android phone is typically straightforward, there can be instances where you encounter issues. Here are some troubleshooting steps to help resolve wifi connection problems:
- Restart Your Android Phone: Sometimes, a simple restart can fix connectivity issues. Turn off your phone, wait a few seconds, and then turn it back on.
- Toggle Wifi On and Off: Disable and re-enable wifi on your Android phone. Swipe down from the top of the screen to access the notification panel and tap on the wifi icon to toggle it off. Wait a few seconds, and then toggle it back on.
- Forget and Reconnect to the Network: If you’re having trouble connecting to a specific wifi network, you can try forgetting the network and then reconnecting to it. Go to the wifi settings on your Android phone, locate the network, tap and hold on it, and select “Forget” or “Remove network.” Then, go back to the network selection screen and choose the network again, entering the password if required.
- Reset Network Settings: Resetting the network settings on your Android phone can help resolve connection problems. Go to the “Settings” app, find the “System” or “System & updates” section, look for “Reset options” or “Reset,” and select “Reset Wi-Fi, mobile & Bluetooth” or similar.
- Check Router Settings: Make sure that your wifi router is properly set up and that it is broadcasting the wifi signal. Restarting the router or checking its settings can help resolve certain issues. Refer to your router’s documentation or contact your internet service provider for guidance.
- Connect to a Different Network: If you’re still unable to connect to the wifi network, try connecting to a different network, such as a public hotspot or a friend’s wifi, to determine if the issue is specific to the network or your device.
- Get Technical Support: If the above troubleshooting steps do not resolve the wifi connection issue, you may need to seek technical support. Contact your internet service provider, device manufacturer, or a qualified technician for further assistance.
By following these troubleshooting steps, you can increase the chances of resolving wifi connection issues on your Android phone and enjoy uninterrupted internet access.
Conclusion
Connecting your Android phone to a wifi network opens up a world of possibilities, offering faster internet speeds, cost savings, and stable connections. By following the steps outlined in this guide, you can easily connect your Android phone to a wifi network:
- Check for wifi connection availability to ensure that wifi is accessible in your area.
- Turn on the wifi feature on your Android phone.
- Choose a wifi network from the available options.
- Enter the wifi password, if required, to establish a secure connection.
- Connect to the wifi network and enjoy browsing the internet and accessing online services.
- Troubleshoot any connection issues to ensure a seamless wifi experience.
Remember, wifi networks offer advantages such as faster speeds, cost savings, and the ability to connect multiple devices. Additionally, connecting to wifi can help conserve your Android phone’s battery life. So, take advantage of wifi connectivity wherever possible!
If you encounter any difficulties during the wifi connection process, refer back to this guide or seek technical support. Enjoy the convenience and benefits of being connected to a wifi network on your Android phone!