Introduction:
Deleting files from an external hard drive on your Mac is a common task that you may need to perform to free up space or organize your data. Whether you have backups stored on an external drive or simply want to remove unnecessary files, knowing how to delete them efficiently is crucial. In this guide, we will walk you through the step-by-step process of deleting files from an external hard drive on your Mac.
External hard drives offer convenient storage solutions for Mac users, allowing you to keep your important files and data handy while also keeping your computer’s internal storage clutter-free. However, it’s important to know the proper procedure for deleting files from your external hard drive to avoid any potential data loss or mishaps.
In the following sections, we will outline the step-by-step instructions to delete files from your external hard drive on a Mac. Whether you’re a beginner or an advanced user, this guide will provide you with the necessary information to confidently manage and organize your files on your external storage device.
Before we proceed, it’s worth mentioning that the steps may vary slightly depending on the version of macOS you are using. However, the overall process remains relatively similar, and we’ll highlight any key differences along the way.
Now, let’s dive into the steps required to delete files from an external hard drive on your Mac!
Step 1: Connect the External Hard Drive
The first step in deleting files from an external hard drive on your Mac is to ensure that the drive is properly connected to your computer. Follow these simple instructions to connect your external hard drive:
- Locate the USB or Thunderbolt port on your Mac. These ports are usually located on the sides or at the back of your computer.
- Plug one end of the USB or Thunderbolt cable into the corresponding port on your Mac.
- Connect the other end of the cable to the external hard drive. Ensure that the cable is securely inserted into both the Mac and the drive.
- If your external hard drive requires external power, make sure it is plugged into a power source and turned on.
- Once you have successfully connected the external hard drive, you should see it appear on your Mac’s desktop or within the Finder window.
It’s important to note that some external hard drives may require additional setup or software installation before they can be used with your Mac. Refer to the manufacturer’s instructions or documentation for any specific requirements.
Now that your external hard drive is connected to your Mac, you’re ready to proceed to the next step: opening Finder and locating the external hard drive.
Step 2: Open Finder
Once your external hard drive is properly connected to your Mac, the next step is to open the Finder window. The Finder is the default file management application in macOS, and it allows you to browse and manage files and folders on your computer.
Follow these simple steps to open Finder:
- Click on the Finder icon located on the dock at the bottom of your screen. The Finder icon is usually a blue and white face-like symbol.
- If you don’t see the Finder icon on the dock, you can also open Finder by clicking on the Apple menu in the top-left corner of your screen and selecting “Finder” from the drop-down menu.
- Alternatively, you can use the keyboard shortcut “Command + N” to open a new Finder window.
Once you have opened the Finder window, you will be able to navigate through your Mac’s file system and find the external hard drive that you connected in the previous step.
In the next step, we will guide you on how to locate the external hard drive within the Finder window.
Step 3: Locate the External Hard Drive
After opening the Finder window, the next step is to locate the external hard drive that you want to delete files from. Located within the Finder window, you can navigate to the external hard drive using either the sidebar or the main window.
Follow these steps to locate the external hard drive:
- In the sidebar of the Finder window, look for the “Devices” section. Your external hard drive should be listed there with its assigned name or label.
- Click on the name of your external hard drive in the sidebar to open it.
- If you don’t see your external hard drive listed in the sidebar, you can also navigate to it using the main window. Click on “All My Files” or “Recents” in the sidebar to open the main window, and then scroll down until you find your external hard drive listed under the “Locations” section.
- Click on the name or icon of the external hard drive in the main window to open it.
Once you have successfully located and opened your external hard drive within the Finder window, you will have access to all the files and folders stored on it.
In the next step, we will guide you on how to select the files that you want to delete from your external hard drive.
Step 4: Select the Files to Delete
Now that you have successfully located your external hard drive within the Finder window, it’s time to select the files that you want to delete. Whether you want to delete individual files or entire folders, the process is straightforward.
Follow these steps to select the files to delete:
- Click on the external hard drive’s name or icon in the Finder window to open it.
- Navigate through the folders and subfolders within the external hard drive to find the files you want to delete.
- To select individual files, simply click on them one by one. You can hold down the Command key while clicking to select multiple non-consecutive files.
- To select multiple consecutive files, click on the first file you want to select, then hold down the Shift key and click on the last file. This will select all the files between the first and last clicked files.
- If you want to select all the files in a folder, press Command + A on your keyboard. This will highlight and select all the files in that specific folder.
- If you want to select an entire folder and its contents, simply click on the folder’s name or icon once.
After following these steps, you should have successfully selected the files that you want to delete from your external hard drive. The selected files will be highlighted or marked for deletion in preparation for the next step.
In the next step, we will guide you on how to move the selected files to the Trash.
Step 5: Move the Files to Trash
With the files you want to delete selected, the next step is to move them to the Trash. The Trash is a temporary storage location on your Mac where deleted files are stored until you permanently delete them.
Here’s how you can move the selected files to the Trash:
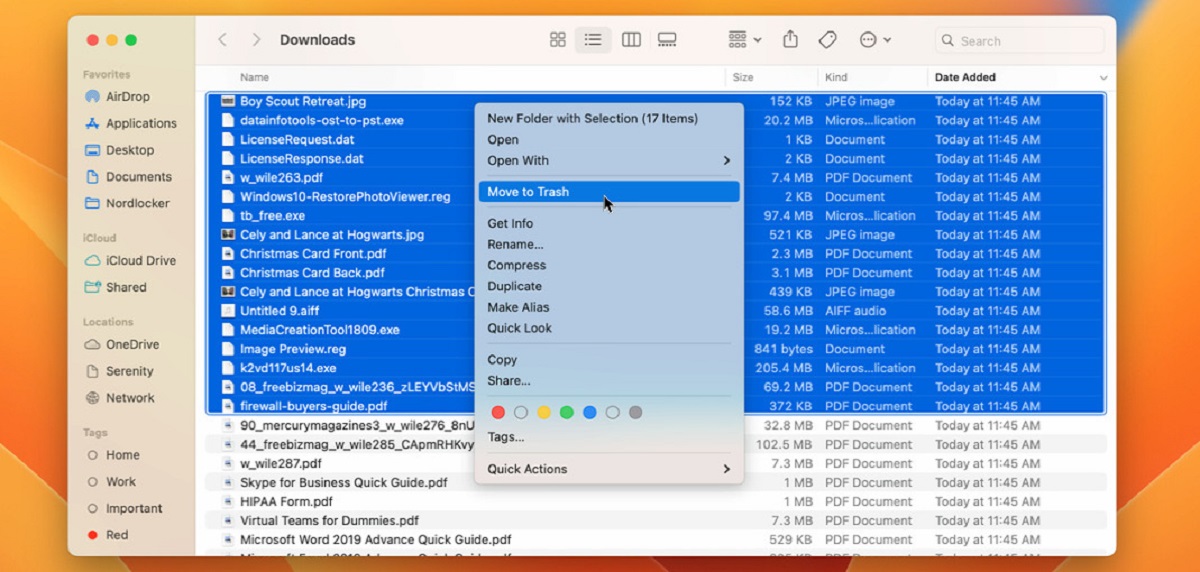
- Right-click (or Control-click) on one of the selected files. This will open a context menu.
- In the context menu, click on the “Move to Trash” option. Alternatively, you can also drag and drop the selected files onto the Trash icon located on the dock.
- The selected files will now be moved to the Trash, and you can confirm this by checking the Trash icon on the dock. It should display the number of items in the Trash.
Alternatively, if you want to move all the files in a folder or the entire external hard drive to the Trash, you can right-click (or Control-click) on the selected folder or drive icon and choose “Move to Trash” from the context menu.
It’s important to note that moving files to the Trash doesn’t permanently delete them from your external hard drive. They are only removed from their original location and stored in the Trash until you decide to empty it.
In the next step, we will guide you on how to empty the Trash and permanently delete the selected files from your external hard drive.
Step 6: Empty the Trash
After moving the selected files to the Trash, the final step is to empty the Trash and permanently delete the files from your external hard drive. Emptying the Trash ensures that the selected files are removed completely and cannot be recovered.
Follow these steps to empty the Trash and delete the files:
- Click on the Trash icon located on the dock at the bottom of your screen. This will open the Trash window, displaying the files that are stored in it.
- Once the Trash window is open, you can review the files inside it to ensure that you want to permanently delete them. If there are any files that you want to keep, you can right-click (or Control-click) on them and choose the “Put Back” option to restore them to their original location.
- To permanently delete all the files in the Trash, click on the “Empty” button in the top-right corner of the Trash window. A confirmation dialog will appear, warning you that the files will be permanently erased.
- Click on the “Empty Trash” option in the confirmation dialog to proceed with the deletion. Alternatively, you can also use the keyboard shortcut “Command + Shift + Delete” to instantly empty the Trash without needing to open the Trash window.
- After confirming the deletion, the selected files will be permanently removed from your external hard drive. You can verify this by checking the Trash icon on the dock, which should now display zero items.
It’s essential to exercise caution when emptying the Trash, as the deleted files cannot be recovered easily. Make sure you have reviewed the files and that you no longer need them before proceeding with the deletion.
With that, you have successfully deleted the selected files from your external hard drive on your Mac. You have now freed up space and organized your data on the external storage device.
Conclusion
Deleting files from your external hard drive on a Mac is a straightforward process that can help you free up space and keep your data organized. By following the steps outlined in this guide, you can confidently delete files from your external storage device without any hassle.
We began by ensuring that the external hard drive is properly connected to your Mac. Then, we opened the Finder window to locate the external hard drive and select the files you want to delete. Moving the selected files to the Trash was the next step, and we concluded by emptying the Trash to permanently delete the files from your external hard drive.
Remember to exercise caution when deleting files, as they cannot be easily recovered once they are permanently removed from the Trash. Ensure that you review the files you want to delete and double-check that you no longer need them before emptying the Trash.
By following these steps, you can effectively manage the files on your external hard drive and keep your storage organized. Whether you need to delete backups, unused files, or unnecessary data, this guide has provided you with the necessary instructions to do so.
Now that you have mastered the process of deleting files from an external hard drive on your Mac, you can confidently manage your storage space and keep your data organized. Put this knowledge into practice and enjoy a clutter-free external hard drive experience!