Introduction
Welcome to our guide on how to remove Time Machine from an external hard drive. Time Machine is an incredibly useful feature on macOS that allows you to back up and restore your data effortlessly. However, there may be instances where you want to remove Time Machine from your external hard drive. Whether you no longer need Time Machine backups or you want to repurpose the drive for other uses, this step-by-step guide will walk you through the process.
Time Machine creates incremental backups of your files, capturing changes over time and allowing you to restore previous versions of your documents or recover lost data. By removing Time Machine from your external hard drive, you can regain storage space and increase the flexibility of your drive.
It is important to note that removing Time Machine from your external hard drive will permanently delete all existing backups. Therefore, it is crucial to back up your data before proceeding with the removal process.
In this guide, we will explain the reasons why you may want to remove Time Machine, and provide you with detailed instructions on how to safely remove Time Machine from your external hard drive.
Background on Time Machine
Time Machine is a built-in backup utility in macOS that was introduced with the release of Mac OS X Leopard in 2007. It provides users with a simple and automated way to back up their Mac’s data, ensuring that important files and documents are protected from accidental deletion, hardware failures, or system crashes.
With Time Machine, users can set up regular backups to an external hard drive or a network storage device. The utility creates incremental backups, capturing changes made to files over time. This means that users can easily restore previous versions of documents or recover deleted files.
Time Machine uses a clever combination of hard links and a snapshot-based system that saves only the changed data, making subsequent backups faster and more efficient. It also employs a user-friendly interface, allowing users to easily navigate through their backups and search for specific files or folders.
One of the notable features of Time Machine is its ability to perform hourly backups for the past 24 hours, daily backups for the past month, and weekly backups for all previous months. This makes it easy to go back in time and retrieve a file or folder as it existed on a specific date and time.
By default, Time Machine creates backups of the entire Mac’s hard drive, but users have the flexibility to exclude certain files or folders if they wish. Time Machine also allows for easy restoration of the entire system or individual files, making it a powerful tool for data recovery.
Now that we have a basic understanding of Time Machine, let’s explore the reasons why you might want to remove it from your external hard drive.
Reasons for Removing Time Machine from an External Hard Drive
While Time Machine is a valuable tool for data backup and recovery, there are several reasons why you may want to remove it from your external hard drive:
- Storage space: Time Machine backups can consume a significant amount of storage space on your external hard drive. If you’re running low on disk space or have other uses in mind for the drive, removing Time Machine can free up valuable storage capacity.
- No longer need backups: If you have migrated to a new computer or have alternative backup solutions in place, you may no longer require Time Machine backups on your external drive. Removing Time Machine allows you to repurpose the drive for other uses.
- Data security concerns: If you are planning to sell or dispose of your external hard drive, you may want to remove all personal data, including Time Machine backups, to ensure the privacy and security of your information.
- Performance optimization: Some users may find that Time Machine backups running in the background impact system performance. Removing Time Machine can improve the speed and responsiveness of your Mac.
- Configuring alternative backup solutions: If you want to switch to a different backup solution or prefer manual backups, removing Time Machine will allow you to set up and configure your desired backup method.
It is important to note that before removing Time Machine from your external hard drive, you should ensure that you have alternative backup mechanisms in place to protect your important files and data. This can include using cloud-based storage, creating manual backups, or utilizing other backup software.
Now that we understand the reasons for removing Time Machine, let’s proceed with the step-by-step guide on how to remove Time Machine from an external hard drive.
Step-by-Step Guide on How to Remove Time Machine
Removing Time Machine from an external hard drive requires a few straightforward steps. Make sure to follow these instructions carefully:
- Step 1: Back up your data
- Step 2: Unmount the Time Machine drive
- Step 3: Turn off Time Machine
- Step 4: Delete the Time Machine backup
- Step 5: Erase the Time Machine drive
- Step 6: Format the drive for other uses
Before removing Time Machine, it is crucial to back up any important data stored on the external hard drive. This ensures that you have a copy of your files in case anything goes wrong during the removal process.
Open Finder and select the Time Machine drive from the sidebar. Right-click on the drive and choose “Eject” to unmount it safely. This ensures that there are no active processes or applications accessing the drive.
Open “System Preferences” on your Mac and select “Time Machine.” Click on the “On/Off” slider to turn off Time Machine for the external hard drive. This prevents any future backups from being created on the drive.
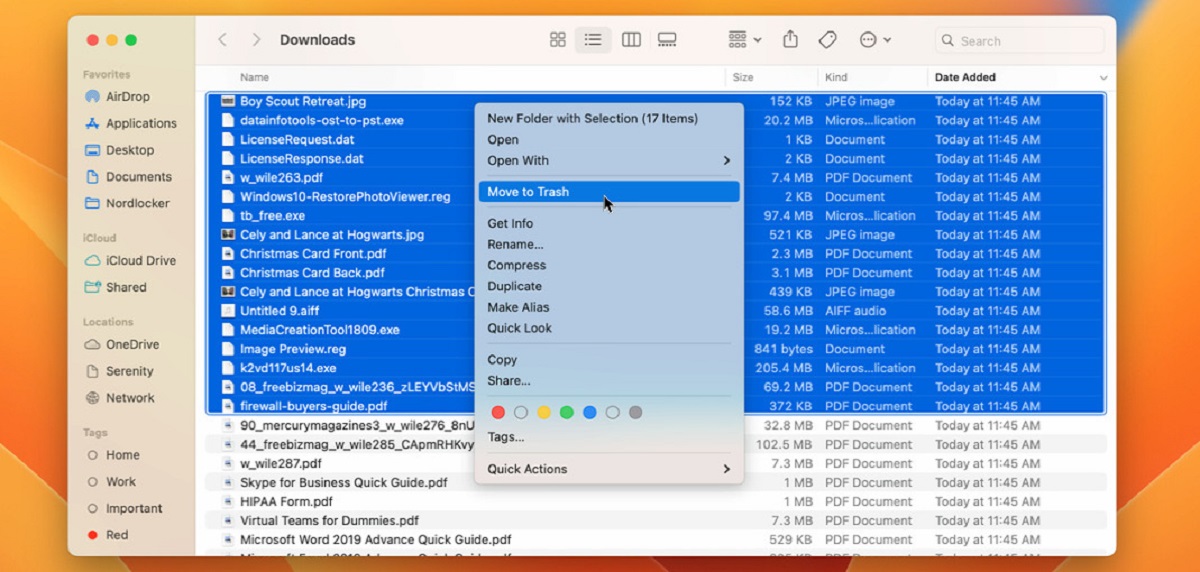
Navigate to the Time Machine drive in Finder and locate the folder named “Backups.backupdb”. Right-click on this folder and select “Move to Trash” to delete the entire Time Machine backup.
Open Disk Utility on your Mac. Select the Time Machine drive from the sidebar and click on the “Erase” button. Follow the on-screen prompts to format the drive and erase all existing data, including the Time Machine backup.
Once the drive is erased, you can format it for your desired use. In Disk Utility, select the drive and click on the “Partition” tab. Choose the desired partition layout, format, and name for the drive. Click “Apply” to complete the formatting process.
After completing these steps, you have successfully removed Time Machine from your external hard drive. The drive is now ready for other uses, such as storing files, installing applications, or using it as additional storage for your Mac.
Step 1: Back up Your Data
Before proceeding with the removal of Time Machine from your external hard drive, it is essential to back up any important data that is currently stored on the drive. This precautionary step ensures that you have a copy of your files in case anything goes wrong during the removal process. Losing data can be devastating, so it is better to be safe than sorry.
Backing up your data can be done in several ways:
- Manual Copy: You can manually copy the files and folders from your external hard drive to another storage device, such as another external drive, a USB flash drive, or your computer’s internal hard drive. Simply select the files and folders you want to back up and drag them to the destination location. This method is straightforward but can be time-consuming, especially if you have a large amount of data to back up.
- Time Machine Backup: If you have another external hard drive or a network storage device set up with Time Machine, you can initiate a backup of your external hard drive from your Mac. Connect the secondary backup drive, open Time Machine preferences, and select “Backup Now.” Time Machine will create a full backup of the external hard drive, ensuring that all your files are safely copied to the backup device. This method is automatic and efficient, especially if you already have Time Machine set up.
- Cloud Backup: Another option is to use a cloud-based backup service, such as iCloud, Google Drive, Dropbox, or OneDrive. These services allow you to upload your files to remote servers, keeping them secure and accessible from anywhere. Simply choose the files and folders you want to back up and upload them to the cloud service of your choice. This method provides an additional layer of protection as your data is stored off-site.
Whichever method you choose, ensure that your backup is complete and verified. Double-check that all the important files and folders have been successfully copied to the backup destination. Take the time to organize your backup to make it easier to retrieve files when needed.
Once you have confirmed that your data is safely backed up, you can proceed with the next steps to remove Time Machine from your external hard drive.
Step 2: Unmount the Time Machine Drive
Before you can remove Time Machine from your external hard drive, it is essential to unmount the drive to ensure that there are no active processes or applications accessing it. Here’s how you can unmount the Time Machine drive:
- Open Finder on your Mac by clicking on the Finder icon in the dock or by selecting it from the Applications folder in the sidebar.
- In the sidebar of the Finder window, you will see a list of devices and drives connected to your Mac. Locate and select the Time Machine drive that you want to remove from the list.
- Right-click on the Time Machine drive and select “Eject” from the context menu. Alternatively, you can also click and drag the drive icon to the trash can in the dock, and it will eject the drive.
Once you have successfully unmounted the Time Machine drive, it will disappear from the sidebar in Finder. This indicates that the drive is no longer actively connected or accessible by your Mac.
It is crucial to unmount the Time Machine drive properly before proceeding with the removal process to avoid any potential data loss or corruption. Unmounting the drive ensures that all read and write operations are completed and that there are no background processes accessing the drive.
With the Time Machine drive unmounted, you are ready to move on to the next step in removing Time Machine from your external hard drive.
Step 3: Turn off Time Machine
After unmounting the Time Machine drive, the next step in removing Time Machine from your external hard drive is to turn off the Time Machine feature to prevent any future backups from being created. Here’s how you can turn off Time Machine:
- Click on the Apple menu at the top left corner of your screen and select “System Preferences” from the drop-down menu.
- In the System Preferences window, locate and click on the “Time Machine” icon. This will open the Time Machine preferences.
- In the Time Machine preferences panel, you will see a toggle switch labeled “On/Off.” Click on the switch to turn off Time Machine for the external hard drive.
Once Time Machine is turned off, it will no longer create backups on the external hard drive. This step ensures that Time Machine no longer actively monitors the drive for changes and does not use it as a backup destination.
Disabling Time Machine for the external hard drive is an important step to ensure a smooth removal process. Be aware that turning off Time Machine does not delete existing backups on the drive. We will cover the removal of the Time Machine backup in a later step.
With Time Machine turned off for the external hard drive, you are now ready to proceed to the next step and delete the Time Machine backup from the drive.
Step 4: Delete the Time Machine Backup
Once Time Machine is turned off for the external hard drive, you can proceed to delete the Time Machine backup that is stored on the drive. The following steps outline how you can delete the Time Machine backup:
- Open Finder on your Mac by clicking on the Finder icon in the dock or by selecting it from the Applications folder in the sidebar.
- In the sidebar of the Finder window, locate and select the external hard drive that contains the Time Machine backup.
- Navigate to the folder named Backups.backupdb within the external hard drive. This folder contains all the Time Machine backups.
- Right-click on the Backups.backupdb folder and select “Move to Trash” from the context menu. Alternatively, you can drag the folder to the Trash icon in the dock.
- If prompted, enter your administrator password to provide permission for the deletion.
By deleting the Backups.backupdb folder, you are removing the entire Time Machine backup from the external hard drive. This action permanently eliminates all the incremental backup data, restoring the drive to its original state.
It is important to note that once the Time Machine backup is deleted, it cannot be recovered. Therefore, ensure that you have backed up any essential files or data from the Time Machine backup folder before proceeding with this step.
With the Time Machine backup successfully deleted, you can now move on to the next step and erase the external hard drive to prepare it for other uses.
Step 5: Erase the Time Machine Drive
After deleting the Time Machine backup from the external hard drive, the next step is to erase the drive entirely. This process will remove all the data on the drive, including any remaining Time Machine system files. Here’s how you can erase the Time Machine drive:
- Open Disk Utility on your Mac by navigating to “Applications” > “Utilities” > “Disk Utility”.
- In the Disk Utility window, you will see a sidebar listing all the connected drives. Select the external hard drive that you want to erase.
- Click on the “Erase” tab at the top of the Disk Utility window.
- Choose the desired options for the format, scheme, and name of the drive. It’s recommended to select a format that is compatible with both macOS and other operating systems, such as ExFAT.
- Double-check that you have selected the correct drive, as the erase operation is irreversible and will delete all data on the drive.
- Click on the “Erase” button to initiate the erasing process. You may be prompted to enter your administrator password to authorize the erase operation.
- Wait for Disk Utility to complete the erasing process. The time it takes may vary depending on the size and speed of the drive.
Once the erasing process is complete, the Time Machine drive will be completely wiped clean, and it will appear as a fresh, empty drive ready for new use. Ensure that you have selected the appropriate erasing options and have backed up any essential data before proceeding.
Now that the Time Machine drive has been erased, you can move on to the final step and format the drive for your desired purpose.
Step 6: Format the Drive for Other Uses
After erasing the Time Machine drive, the final step is to format the drive for your intended use. Formatting the drive will prepare it for a specific file system and optimize it for compatibility and performance. Here’s how to format the drive for other uses:
- Open Disk Utility on your Mac by going to “Applications” > “Utilities” > “Disk Utility”.
- In the Disk Utility window, select the erased Time Machine drive from the sidebar.
- Click on the “Partition” tab at the top of the Disk Utility window.
- Choose the desired partition layout, which determines how the drive is divided into sections. You can choose to have a single partition spanning the entire drive or create multiple partitions if necessary.
- Select the desired format for the drive. The format will depend on your intended use and the compatibility required. For macOS and Windows compatibility, you can choose the ExFAT or FAT32 format. For macOS-specific use, you can choose Mac OS Extended (Journaled) or APFS.
- Give the drive a name that is descriptive and easily recognizable.
- Click on the “Apply” button to confirm the formatting process. Note that formatting will erase all data on the drive.
- Wait for Disk Utility to complete the formatting process. The time it takes may vary depending on the size of the drive.
Once the formatting process is complete, the Time Machine drive will be ready for its new purpose. It will be formatted with the selected file system and named according to your preference.
Now, you can use the newly formatted drive for tasks such as storing files, installing applications, or using it as additional storage for your Mac or other devices.
Congratulations! You have successfully removed Time Machine from your external hard drive and formatted it for other uses.
Conclusion
Removing Time Machine from an external hard drive can be a beneficial step if you no longer need the backups, want to repurpose the drive, or have other data security concerns. By following the step-by-step guide outlined in this article, you can safely remove Time Machine and prepare the drive for other uses.
We started by understanding the background of Time Machine and its purpose as a reliable backup utility for macOS. We then explored the reasons why you might want to remove Time Machine from an external hard drive, ranging from freeing up storage space to optimizing system performance.
The step-by-step guide provided detailed instructions on how to remove Time Machine, including backing up your data, unmounting the Time Machine drive, turning off Time Machine, deleting the Time Machine backup, erasing the drive, and formatting it for other uses.
It is crucial to remember that removing Time Machine and deleting the Time Machine backup will permanently delete your data. Therefore, it is essential to back up your files before proceeding and double-check that you have selected the correct drive during the erasure process.
By following these steps, you can successfully remove Time Machine from your external hard drive and repurpose it for other tasks, such as storing files or using it as additional storage.
We hope this guide has been helpful in assisting you with the process of removing Time Machine from your external hard drive. Remember to always take precautions and maintain backups of your important data to safeguard against any potential loss.