Introduction
Welcome to our guide on how to backup Time Machine to an external hard drive. Time Machine is a powerful built-in backup feature for macOS that automatically creates backups of your important files and folders. While Time Machine typically stores these backups on your Mac’s internal hard drive, it’s always a smart idea to have an additional backup on an external hard drive. This provides an extra layer of protection for your valuable data, ensuring that it is safe in case of any hardware failure or other unforeseen circumstances.
Why is it necessary to backup Time Machine to an external hard drive? The main reason is simple: redundancy. Having multiple copies of your data ensures that if one backup fails or becomes inaccessible, you still have another copy to rely on. This is especially crucial in the event of a catastrophic failure of your Mac’s internal hard drive. By backing up Time Machine to an external hard drive, you are safeguarding your files and ensuring they remain intact and easily recoverable.
In this guide, we will walk you through the process of choosing the right external hard drive for your Time Machine backups, preparing the drive for use, connecting it to your Mac, and configuring Time Machine to backup to the external drive. We will also cover how to initiate and monitor the backup process, as well as how to restore files from your Time Machine backup when needed.
Whether you’re a business professional with sensitive data or a casual user with cherished memories, taking the time to backup Time Machine to an external hard drive is a simple yet effective way to protect your digital life. Let’s get started!
Why Backup Time Machine to an External Hard Drive?
Backing up your Time Machine to an external hard drive offers several important benefits and is considered a best practice for data protection. Let’s explore why it’s crucial to have an additional backup on an external drive.
Redundancy and Data Security: The primary reason for backing up Time Machine to an external hard drive is redundancy. By having multiple copies of your data, you significantly reduce the risk of losing it. If your Mac’s internal hard drive fails or gets damaged, having an external backup ensures that your important files and folders remain safe and easily recoverable.
Protection against Accidental Deletions: We’ve all been there – accidentally deleting a crucial file or folder. With Time Machine backups on an external hard drive, you can easily restore deleted files without any hassle. Time Machine allows you to navigate through earlier versions of files, making it a breeze to retrieve mistakenly deleted data.
Extended Storage Space: Macs often come with limited internal storage capacity. As you accumulate more data over time, your internal hard drive may fill up quickly. By backing up Time Machine to an external hard drive, you free up valuable space on your Mac, ensuring smooth system performance and avoiding potential storage issues.
Portability and Disaster Recovery: External hard drives are portable, allowing you to easily carry them with you wherever you go. This is particularly useful in case of emergencies or when you need access to your backed-up data on a different computer. In the event of a disaster like a fire or flood, having your Time Machine backup stored on an external drive safeguards your data against physical damage to your Mac.
Flexible Storage Options: External hard drives offer various storage capacities, ensuring that you have ample space to accommodate your growing backup needs. You can choose a drive with a storage capacity that suits your requirements, whether it’s a few terabytes for personal use or multiple terabytes for businesses with extensive data.
Additional Security Measures: Some external hard drives come with built-in encryption features, enhancing the security of your Time Machine backups. Encrypting your backup ensures that even if your external hard drive falls into the wrong hands, your data remains protected.
By understanding the importance of backing up Time Machine to an external hard drive, you can take proactive steps to safeguard your valuable data. In the next sections, we’ll guide you through choosing the right external hard drive and preparing it for backup.
Choosing the Right External Hard Drive
When it comes to choosing an external hard drive for your Time Machine backup, there are a few key factors to consider. Let’s explore the criteria that will help you make an informed decision.
Storage Capacity: The storage capacity of the external hard drive is one of the most crucial factors to consider. It depends on the amount of data you need to back up and how much data you expect to generate in the future. Consider factors such as the size of your important files, the frequency of backups, and any potential future expansion needs. It’s generally recommended to choose a drive with a higher capacity than your current needs to allow room for future growth.
Connectivity: External hard drives come with various connectivity options, such as USB, Thunderbolt, or FireWire. Ensure that the drive you choose is compatible with your Mac’s available ports. USB 3.0 or later is a popular choice due to its widespread compatibility and faster data transfer speeds.
Reliability: Reliability is crucial when it comes to storing your valuable data. Look for reputable brands known for producing reliable and durable external hard drives. Reading customer reviews and researching the reliability of different models can help you make an informed decision.
Compatibility: Ensure that the external hard drive you choose is compatible with your Mac’s operating system version. Check the specifications of the drive and ensure that it supports macOS to avoid any compatibility issues.
Form Factor: External hard drives are available in different form factors, including portable and desktop models. Portable drives are lightweight and compact, making them ideal for on-the-go use. Desktop drives, on the other hand, typically offer larger storage capacities and may require a separate power source. Consider your needs and preferences when choosing between the two.
Encryption and Security: If data security is a concern, consider choosing an external hard drive with built-in encryption capabilities. This allows you to encrypt your Time Machine backups for an extra layer of protection.
Price: External hard drives are available at various price points, so consider your budget when making a selection. Determine how much you are willing to spend while keeping in mind the storage capacity, brand reputation, and features offered by the drive.
By considering these factors and conducting thorough research, you can choose an external hard drive that meets your needs for Time Machine backup. Once you’ve selected the right drive, it’s time to prepare it for backup, which we’ll cover in the next section.
Preparing Your External Hard Drive for Backup
Before using your external hard drive for Time Machine backup, there are a few essential steps to ensure that it is properly prepared and optimized for the task at hand. Follow these guidelines to get your external drive ready:
1. Formatting the Drive: Most external hard drives come pre-formatted with the FAT or ExFAT file system, which is compatible with both Windows and Mac. However, for Time Machine backups, it’s recommended to format the drive with the Mac OS Extended (Journaled) file system. This format is specifically designed for macOS, ensuring optimal performance and compatibility. To format the drive, go to Disk Utility, select your external drive, and choose the “Erase” option. Follow the prompts to format the drive with the appropriate file system.
2. Giving the Drive a Meaningful Name: It’s helpful to provide a descriptive name for your external hard drive. This will make it easier to identify and select the drive in Time Machine settings. To rename the drive, simply right-click on its icon and choose the “Rename” option. Enter a meaningful name that reflects its purpose.
3. Checking for Firmware Updates: Visit the manufacturer’s website to check for any available firmware updates for your external hard drive. Updating the firmware can improve performance, bug fixes, and overall reliability. Follow the provided instructions to update the drive’s firmware if necessary.
4. Verifying Drive Health: Use disk utility software to perform a health check on your external hard drive. This will detect and repair any disk errors and ensure that the drive is in optimal condition for backup. Running routine health checks will help identify any potential issues before they affect your backups.
5. Organizing Space for Time Machine Backup: Allocate a specific portion of the external hard drive exclusively for Time Machine backups. It’s recommended to reserve at least twice the capacity of your Mac’s internal hard drive for backups. This provides ample space for versioning and ensures older backups are not automatically deleted to make room for new ones.
6. Enabling Time Machine Encryption (Optional): If you want to add an extra layer of security to your Time Machine backups, consider enabling encryption. With encryption enabled, your backup data will be protected by a password, ensuring that only authorized individuals can access it. You can enable Time Machine encryption in the Time Machine settings on your Mac.
By following these steps, you will ensure that your external hard drive is properly prepared and optimized for Time Machine backups. Now that your drive is ready, it’s time to connect it to your Mac, which we’ll cover in the next section.
Connecting Your External Hard Drive to Your Mac
Connecting your external hard drive to your Mac is a straightforward process. Follow these steps to ensure a successful connection:
1. Check the Cable and Port: Ensure that you have the appropriate cable for connecting your external hard drive to your Mac. Most modern external hard drives use USB cables, so make sure you have a USB cable that matches the port on your Mac. Additionally, verify that the USB port on your Mac is functioning properly.
2. Power On the External Hard Drive: If your external hard drive requires a separate power source, ensure that it is connected and powered on before connecting it to your Mac.
3. Connect the Cable: Plug one end of the cable into the USB port on your Mac and the other end into the corresponding port on your external hard drive.
4. Wait for Recognition: Once the cable is connected, your Mac should recognize the external hard drive automatically. In some cases, you may need to wait a few moments for the drive to appear on your desktop or in the Finder.
5. Verify the Connection: To ensure that your Mac recognizes the external hard drive, click on the Finder icon in your dock or press Command + Space to open Spotlight, then search for “Finder.” In the Finder, you should see your external hard drive listed in the sidebar under “Devices.” Click on the drive to open it and verify that it is accessible.
6. Eject the Drive (Optional): Before disconnecting your external hard drive from your Mac, it is important to properly eject it. This ensures that any ongoing read or write operations are completed and prevents data corruption. To eject the drive, either right-click on its icon on the desktop or in the Finder sidebar and select “Eject” or drag its icon to the trash bin in your dock.
Note: If your external hard drive does not appear or is not recognized by your Mac, try disconnecting and reconnecting the cable, restarting your Mac, or checking for any software updates that may be needed for compatibility.
You’ve successfully connected your external hard drive to your Mac, and it’s now ready to be utilized as a backup destination for Time Machine. In the next section, we’ll guide you through configuring Time Machine for backup.
Configuring Time Machine for Backup
Once you have your external hard drive connected to your Mac, it’s time to configure Time Machine for backup. Follow these steps to set up Time Machine:
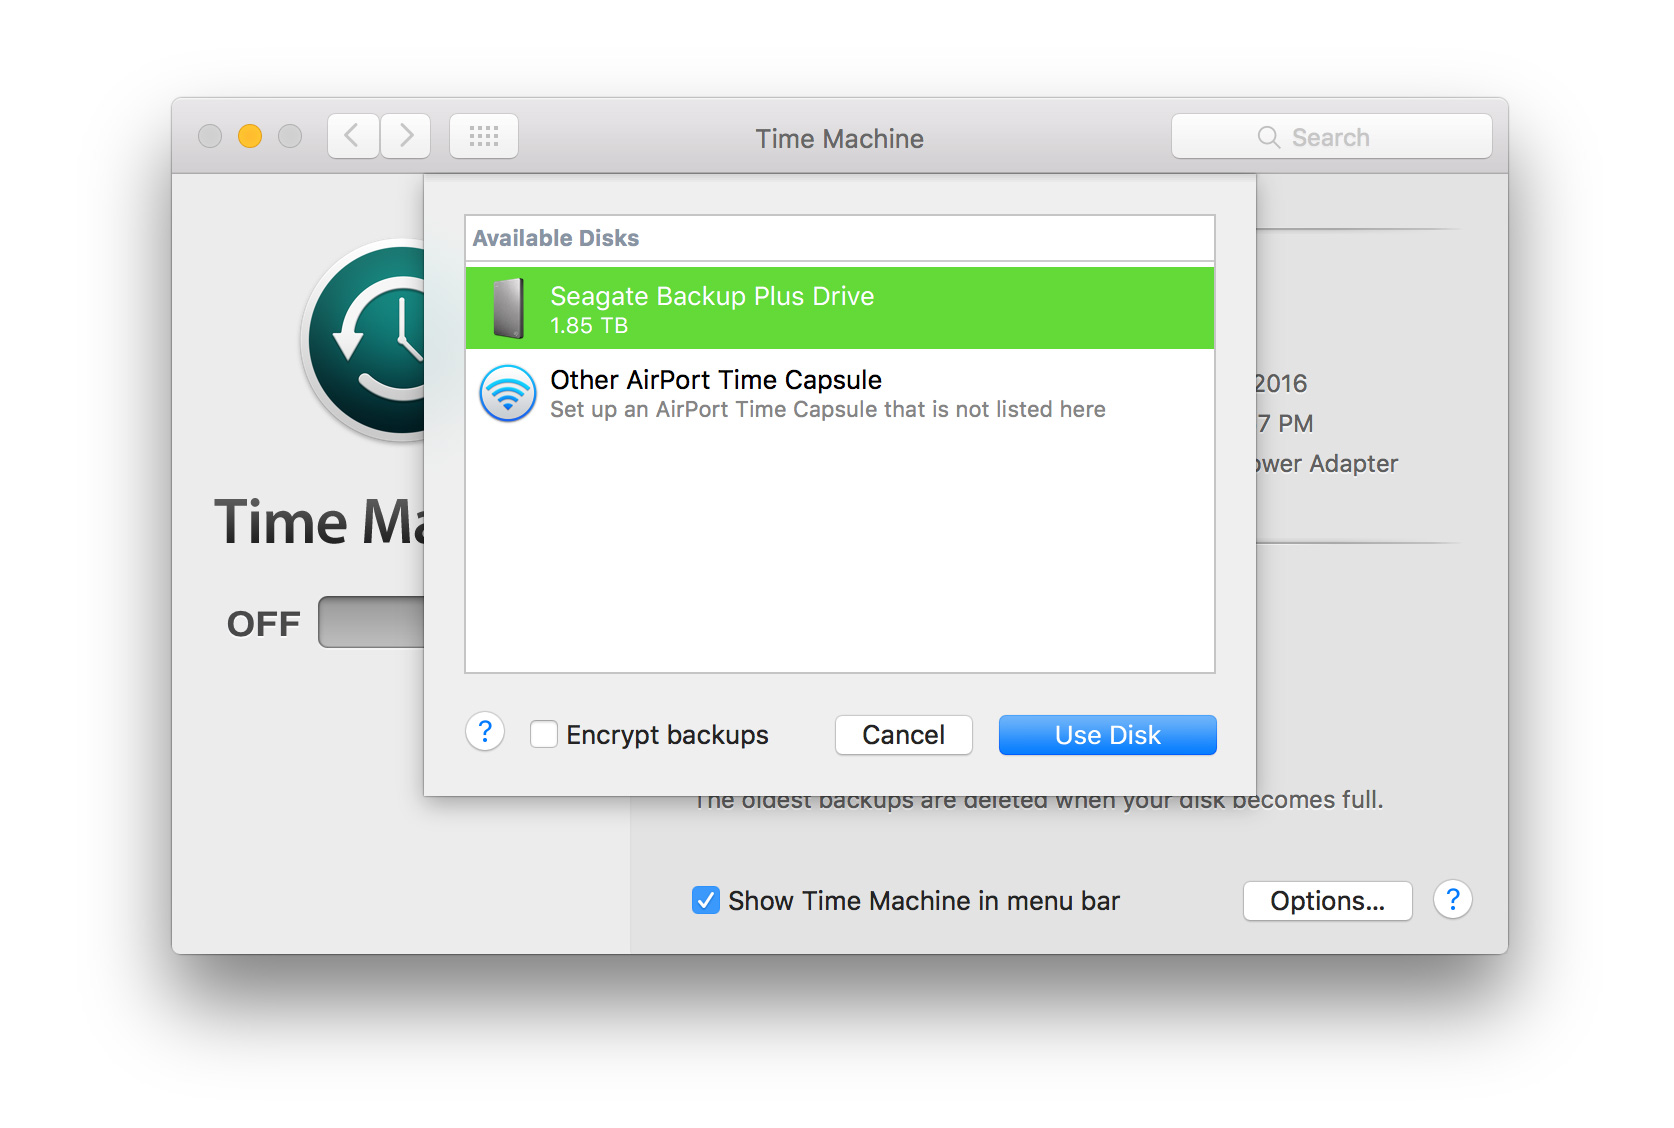
1. Open Time Machine Preferences: Click on the Apple menu in the top-left corner of your screen and select “System Preferences.” In the System Preferences window, click on “Time Machine.”
2. Select the Backup Disk: In the Time Machine preferences panel, you will see a list of available backup disks. Select the connected external hard drive that you want to use as your Time Machine backup destination.
3. Customize Options (Optional): Time Machine provides various options to customize your backup preferences. Click on the “Options” button to access advanced settings. Here, you can choose to exclude specific files, folders, or entire drives from being backed up, helping you manage your backup space more efficiently.
4. Enable Backup Encryption (Optional): If you want to encrypt your Time Machine backups for added security, check the “Encrypt backups” option. You will be prompted to set a password for accessing your encrypted backup data. Remember to choose a strong password and keep it in a secure location.
5. Enable Time Machine: Once you’ve selected the backup disk and customized the options to your preference, click the “On” button to enable Time Machine. Your Mac will start the initial backup process, which may take some time depending on the amount of data to be backed up.
6. Monitor Backup Progress: You can keep an eye on the backup progress by accessing the Time Machine menu icon in the menu bar at the top right of your screen. It will show the status of the backup and the time of the last successful backup. You can also click on the menu icon to access additional options, such as “Backup Now” to manually start a backup or “Enter Time Machine” to browse your backups.
7. Regularly Check Backup Status: It’s important to periodically check the status of your Time Machine backups. Ensure that backups are occurring regularly and without any errors. If you encounter any issues, consult the Time Machine preferences or the Time Machine section of System Preferences for troubleshooting options.
By following these steps, you will have successfully configured Time Machine to backup your data to the connected external hard drive. In the next section, we’ll explain how to initiate and check the progress of your Time Machine backups.
Initiating the Backup Process
After configuring Time Machine for backup, you may wish to initiate the backup process manually or wait for Time Machine to perform automatic backups. Here’s how to initiate the backup process:
Automatic Backups: By default, Time Machine is set to perform automatic backups every hour. As long as your Mac is powered on and the external hard drive is connected, Time Machine will automatically back up your data at the scheduled intervals. It will only capture the changes made since the previous backup, minimizing the time required for subsequent backups.
Manual Backups: If you want to trigger a backup manually, follow these steps:
- Click on the Time Machine menu icon in the menu bar at the top right of your screen.
- Select “Back Up Now” from the dropdown menu.
- Time Machine will begin the backup process, preserving a snapshot of your Mac’s current state, including all selected files and folders.
During the backup process, Time Machine will display a progress bar indicating the status and estimated time remaining for the backup. You can continue working on your Mac during the backup, although it may slightly impact the overall performance of your system.
Note: It’s crucial to keep your Mac connected to the external hard drive during the backup process to ensure the smooth and uninterrupted transfer of data.
By following these steps, you can initiate the Time Machine backup process and ensure that your valuable data is regularly backed up. In the next section, we’ll discuss how to check the progress and status of your Time Machine backups.
Checking the Progress of Your Time Machine Backup
Monitoring the progress and status of your Time Machine backup is essential to ensure that your data is being backed up successfully. There are a few ways you can check the progress of your backups:
Time Machine Menu: The Time Machine menu icon in the menu bar at the top right of your screen provides quick access to information about the status of your backups. Click on the Time Machine menu icon to display the backup status, the time of the last successful backup, and the estimated time for the next backup.
Time Machine Preferences: You can also check the progress and information about your Time Machine backups in the Time Machine preferences. To access it:
- Click on the Apple menu in the top-left corner of your screen and select “System Preferences.”
- In the System Preferences window, click on “Time Machine.”
- In the Time Machine preferences panel, you will see the progress of the current backup, the time of the last successful backup, and the size of the next backup.
Time Machine Window: You can get a more detailed view of your Time Machine backups by entering the Time Machine interface:
- Click on the Time Machine menu icon in the menu bar at the top right of your screen.
- Select “Enter Time Machine” from the dropdown menu.
- The Time Machine window will open, displaying a timeline on the right side, allowing you to navigate through different versions of your files and folders.
- At the top of the Time Machine window, you will see the progress bar indicating the current backup progress and the estimated time remaining.
These methods allow you to keep track of the progress and status of your Time Machine backups. If you notice any issues or errors during the backup process, consult the Time Machine preferences or the Time Machine section of System Preferences for troubleshooting options.
Regularly checking the progress of your Time Machine backups ensures that your important data is being backed up successfully and provides peace of mind knowing that your files and folders are protected.
In the next section, we’ll explore how to restore files from your Time Machine backup if needed.
Restoring Files from Your Time Machine Backup
Time Machine not only allows you to back up your files and folders but also makes it easy to restore them when needed. Here’s how you can restore files from your Time Machine backup:
1. Access the Time Machine Interface: Click on the Time Machine menu icon in the menu bar at the top right of your screen and select “Enter Time Machine.” Alternatively, you can open a Finder window and navigate to the desired folder or location where the files were originally stored.
2. Navigate the Timeline: In the Time Machine window, you will see a timeline on the right side of the screen. Move your cursor over the timeline to browse through snapshots of your backups. As you move along the timeline, you will see a preview of your files and folders at each specific backup point in time.
3. Locate the Files to Restore: Once you’ve located the specific backup snapshot containing the files or folders you want to restore, select them by clicking on them.
4. Restore Files: After selecting the files or folders you want to restore, click on the “Restore” button. Time Machine will begin the restoration process, copying the selected files from the backup and placing them back in their original location on your Mac.
5. Restoring to a Different Location: If you prefer to restore the files to a different location, hold down the Option key on your keyboard while clicking on the “Restore” button. This will allow you to choose a specific destination for the restored files.
Note: If you’ve accidentally deleted a file and need to restore it, you can use the Spotlight search feature to locate the file. Press Command + Space to open Spotlight and start typing the name of the file. Spotlight will display search results including the file’s location in your Time Machine backups. Select the file and click on the “Restore” button to bring it back.
By following these steps, you can easily restore files and folders from your Time Machine backup. Whether you’ve accidentally deleted a crucial document or need to retrieve an earlier version of a file, Time Machine simplifies the process of file restoration, ensuring that your important data is always recoverable.
In the next section, we’ll cover some common troubleshooting tips for issues that may arise during the Time Machine backup and restore process.
Troubleshooting Common Issues
While Time Machine is generally a reliable backup solution, you may encounter some common issues along the way. Here are a few troubleshooting tips for addressing these issues:
1. External Hard Drive Not Recognized: If your external hard drive is not being recognized by Time Machine, try disconnecting and reconnecting the cable. Ensure that the drive is powered on and functioning properly. Also, check if there are any software updates available for your Mac or the external hard drive that may resolve compatibility issues.
2. Slow Backup Speed: If you are experiencing slow backup speeds, ensure that both your Mac and the external hard drive are connected to USB 3.0 or later ports for faster data transfer. Also, check if any other applications or processes are running in the background and consuming system resources. It may be helpful to limit resource-intensive tasks during the backup process.
3. Insufficient Storage Space: If your backup drive is running out of space, consider excluding unnecessary files or folders from the Time Machine backup. Open Time Machine preferences, click on the “Options” button, and add any files or folders that you want to exclude from the backup. This will free up space for more critical data.
4. Backup Errors: If Time Machine encounters an error during the backup process, first ensure that your external hard drive is functioning properly and has enough storage space. Additionally, try repairing disk errors on the external drive using Disk Utility. Reformatting the drive and starting fresh as a Time Machine backup destination may also resolve persistent backup errors.
5. Backup Interrupted or Incomplete: If a backup is interrupted or incomplete, verify that the external hard drive is consistently connected to your Mac during the backup process. Interruptions, such as sudden power loss or disconnecting the drive, can cause backups to be incomplete or corrupt. In such cases, Time Machine should automatically resume the backup when the connection is reestablished.
6. Restoring Specific Files: If you’re having trouble finding specific files to restore, try using the search functionality in the Time Machine interface. Enter keywords in the search bar or use the timeline to navigate to the specific date or time period when the file was last backed up. Remember that the file may be located in different folders within the backup snapshot.
7. Time Machine Not Responding: If Time Machine becomes unresponsive or seems stuck, you can try restarting your Mac. Additionally, check for any macOS updates and install them if available. In some cases, resetting the Time Machine preferences by removing the backup disk and reselecting it may resolve issues with the application.
If you continue to experience issues with Time Machine, it may be helpful to consult the Apple Support website or reach out to their customer support for further assistance. Remember to regularly test and verify your backups to ensure that your data is properly protected.
In the final section, we’ll provide a brief summary of the key points discussed in this guide.
Conclusion
Backing up your Time Machine to an external hard drive is a crucial step in safeguarding your valuable data. By following the steps outlined in this guide, you can ensure that your files and folders are protected against hardware failures, accidental deletions, and other unforeseen events.
We discussed the importance of backing up Time Machine to an external hard drive for redundancy, data security, extended storage space, portability, and flexible storage options. Choosing the right external hard drive based on storage capacity, reliability, compatibility, and security features is essential for a successful backup experience.
We also covered the steps to prepare your external hard drive for backup, connecting it to your Mac, and configuring Time Machine for backup. Initiating the backup process and monitoring the progress of your backups ensure that your data is backed up regularly and successfully. In the event you need to restore files, Time Machine simplifies the process, allowing you to retrieve specific files or entire snapshots easily.
Additionally, we provided troubleshooting tips for common issues that may arise during the Time Machine backup and restore process. By following these tips, you can address issues such as unrecognized external hard drives, slow backup speeds, insufficient storage space, backup errors, and incomplete backups.
In summary, taking the time to backup Time Machine to an external hard drive is a proactive and effective way to protect your digital life. With redundant and secure backups, you can have peace of mind knowing that your valuable data is safe and easily recoverable.
If you encounter any challenges or have further questions, consult the appropriate documentation or reach out to the manufacturer’s support team or Apple Support for additional assistance.