Introduction
Connecting a soundbar to your Roku TV can greatly enhance your entertainment experience by delivering high-quality audio and immersive sound. Whether you’re watching your favorite movies, playing games, or streaming music, a soundbar can take your audio to the next level.
In this guide, we will walk you through the step-by-step process of connecting a soundbar to your Roku TV. We will cover everything from checking soundbar compatibility to troubleshooting common issues, ensuring that you can enjoy incredible audio quality without any hassle.
Before you begin, it’s important to note that not all soundbars are compatible with Roku TVs. Therefore, the first step is to check the compatibility of your soundbar with your Roku TV model. Some soundbars utilize different connection methods, such as HDMI, optical, or ARC (Audio Return Channel). Make sure your soundbar has the appropriate ports or wireless capabilities to connect to your Roku TV.
Once you have confirmed compatibility, you can proceed with connecting the soundbar to your Roku TV using an HDMI cable. This is the most common and preferred method as it supports high-quality audio transfer.
After connecting the soundbar, you will need to set it up as your default audio device. This ensures that all sound output from your Roku TV is directed to the soundbar. Lastly, we will explore how to adjust the sound settings on your Roku TV to optimize your audio experience.
If you encounter any issues during the setup process or face problems with sound output, we’ve also included a troubleshooting section to help you resolve common problems.
Now, let’s get started and learn how to connect your soundbar to your Roku TV, so you can enjoy enhanced audio and take your entertainment to new heights!
Step 1: Check the Soundbar Compatibility
Before you begin connecting your soundbar to your Roku TV, it’s crucial to check the compatibility between the two devices. This ensures that they can work seamlessly together and provide you with the best audio experience.
The first thing you need to do is determine the compatibility of your soundbar with your specific Roku TV model. Check the soundbar’s user manual or visit the manufacturer’s website to confirm if it supports Roku TVs. Look for any specific requirements or recommendations mentioned by the manufacturer.
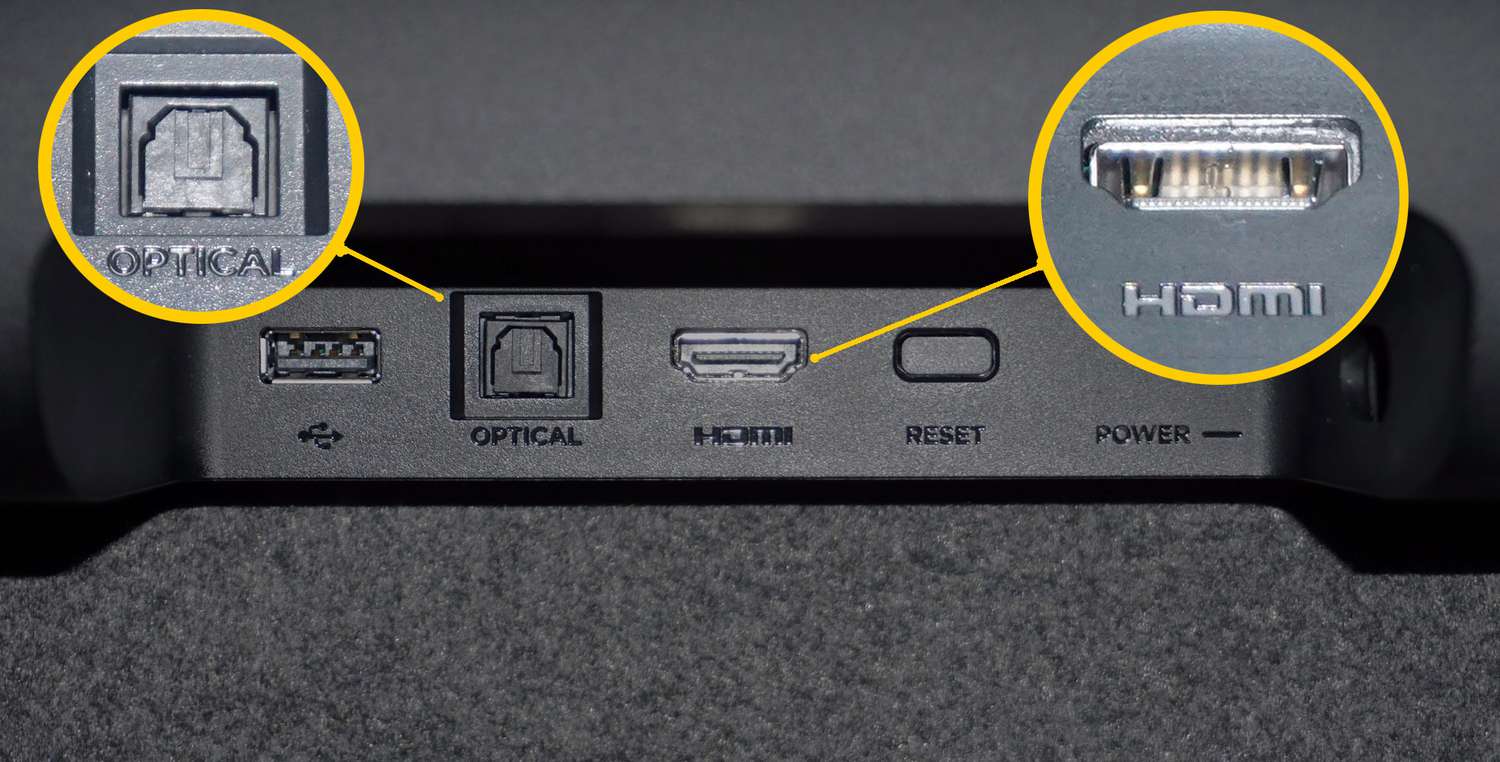
Additionally, consider the type of connection your soundbar and Roku TV support. Most soundbars offer multiple connectivity options, such as HDMI, optical, or ARC (Audio Return Channel). However, it’s essential to ensure that your soundbar has the necessary ports or wireless capabilities to connect to your Roku TV.
If your Roku TV supports HDMI-ARC (Audio Return Channel), it’s recommended to use this method for the best audio quality and convenience. HDMI-ARC allows you to control the volume of your soundbar using the Roku TV remote, eliminating the need for an additional remote.
If your soundbar does not have HDMI-ARC or if your Roku TV doesn’t support it, you can still use HDMI or optical connections. HDMI provides better audio quality, while optical connections are reliable and widely compatible. Choose the connection method that suits your setup and preferences.
It is also important to consider the soundbar’s power requirements. Some soundbars are powered by batteries or require a separate power source, while others can be powered through an HDMI connection. Make sure to check the power requirements of your soundbar and ensure that it aligns with your setup.
If you are unsure or have any questions about the compatibility of your soundbar with your Roku TV, you can reach out to the soundbar manufacturer’s customer support or consult a professional.
By checking the compatibility of your soundbar with your Roku TV and considering the connection options, you can ensure a successful setup and avoid any compatibility issues. Once you have confirmed compatibility, you can proceed to the next step of connecting your soundbar to your Roku TV.
Step 2: Connect the Soundbar to Roku TV using HDMI Cable
Connecting your soundbar to your Roku TV using an HDMI cable is the most common and preferred method, as it provides high-quality audio transfer. Follow the steps below to establish a connection:
- Locate the HDMI ports on both your soundbar and your Roku TV. Typically, you will find them on the back or side panels of the devices.
- Connect one end of the HDMI cable to the HDMI OUT or HDMI ARC port on your soundbar. If your soundbar has multiple HDMI ports, use the one labeled “ARC” for Audio Return Channel.
- Take the other end of the HDMI cable and plug it into an available HDMI IN port on your Roku TV. Most Roku TVs have multiple HDMI inputs, so use any unused port for the connection.
- Once the HDMI cable is securely connected to both devices, power on your soundbar and Roku TV.
- Using your Roku TV remote, access the settings menu and navigate to the audio settings.
- In the audio settings, look for an option to set the sound output to the external audio device or soundbar. Select this option to direct the audio output to your soundbar.
- If your Roku TV has HDMI-ARC support, enable the HDMI-ARC feature in the settings. This allows you to control the soundbar’s volume using the Roku TV remote.
- Adjust the sound settings on your soundbar and Roku TV according to your preferences. You can fine-tune the bass, treble, and other audio settings to optimize your listening experience.
Once the soundbar is connected to your Roku TV via HDMI, you should start hearing audio through the soundbar. Test it by playing a movie, music, or any other content on your Roku TV. If you hear sound coming from the soundbar, the connection is successful.
It’s important to note that if you have any other external devices connected to your Roku TV, such as a gaming console or Blu-ray player, you can also connect them to the soundbar using HDMI for a streamlined audio experience.
Now that you have successfully connected your soundbar to your Roku TV using an HDMI cable, you can move on to the next step of setting up the soundbar as your default audio device.
Step 3: Set up the Soundbar as Your Default Audio Device
Once you have connected your soundbar to your Roku TV, it’s important to set it up as your default audio device. This ensures that all audio output from your Roku TV is directed to the soundbar, providing you with the best audio experience. Follow these steps to set up your soundbar as the default audio device:
- Using your Roku TV remote, navigate to the settings menu.
- In the settings menu, look for the “Audio” or “Sound” settings. The location of this option may vary depending on your Roku TV model.
- Select the “Audio” or “Sound” settings to access the audio options.
- Within the audio settings, find the option for selecting the audio output device. This may be labeled as “Audio Output,” “Sound Output,” or similar.
- Choose the soundbar from the list of available audio devices. The name of your soundbar should be displayed in the list.
- Save the settings and exit the menu.
By setting the soundbar as the default audio device, your Roku TV will automatically route the audio output to the soundbar whenever it is connected. This eliminates the need to manually switch audio sources or adjust settings each time you want to use the soundbar.
It’s important to note that if you have multiple audio devices connected to your Roku TV, such as headphones or external speakers, you may need to adjust the audio settings accordingly. You can select the desired audio device based on your preference and set it as the default device.
Now that you have set up your soundbar as the default audio device, you can enjoy a seamless audio experience every time you use your Roku TV.
In the next step, we will explore how to adjust the sound settings on your Roku TV to further enhance your audio experience.
Step 4: Adjust the Sound Settings on Roku TV
After connecting your soundbar to your Roku TV and setting it up as the default audio device, you may want to adjust the sound settings to optimize your audio experience. Roku TVs offer various sound settings that allow you to customize the audio output to your liking. Follow these steps to adjust the sound settings:
- Using your Roku TV remote, go to the settings menu.
- In the settings menu, locate the “Audio” or “Sound” settings. The exact location may vary depending on your Roku TV model.
- Select the “Audio” or “Sound” settings to access the available sound options.
- Within the sound settings, you will find a range of options to adjust the audio output. Here are some common settings you can modify:
- Equalizer: Some Roku TVs offer an equalizer feature, allowing you to individually adjust the bass, treble, and other audio frequencies. Use this setting to fine-tune the sound and customize it according to your preferences.
- Sound Mode: Roku TVs typically offer different sound modes, such as Standard, Movie, Music, and Sports. Each mode is optimized for specific types of content. Experiment with different modes to find the one that enhances your viewing experience.
- Volume Leveling: This setting helps to even out the volume levels between different sources or channels, preventing sudden volume fluctuations.
- Night Mode: If you prefer watching movies or shows at night without disturbing others, the night mode feature reduces the dynamic range of audio, making soft sounds more audible while keeping louder sounds at a lower volume.
- Adjust the desired sound settings and experiment with different options to find the combination that suits your preferences.
- Save the settings and exit the menu.
By adjusting the sound settings on your Roku TV, you can enhance the audio quality and tailor it to your personal preferences. Whether you enjoy rich bass in movies, crisp vocals in music, or balanced sound overall, the sound settings allow you to customize the audio output accordingly.
If your soundbar has its own set of sound settings, such as an equalizer or audio modes, you may also want to adjust those settings to complement the changes made on the Roku TV.
Now that you have adjusted the sound settings on your Roku TV, you can enjoy an enhanced audio experience, making your favorite shows, movies, and music even more enjoyable.
Step 5: Troubleshooting Common Issues
While connecting a soundbar to your Roku TV is usually a straightforward process, you may encounter some common issues along the way. Here are a few troubleshooting tips to help you overcome these challenges:
- No Sound: If you’re not hearing any sound from the soundbar, ensure that it is properly connected to your Roku TV. Check the HDMI cable connections and confirm that the soundbar is set as the default audio device in the Roku TV settings.
- Poor Audio Quality: If you experience poor audio quality, first check the sound settings on both your soundbar and Roku TV. Adjust the equalizer settings to optimize the sound output. Additionally, ensure that your soundbar is positioned correctly and not obstructed by any objects that may affect the sound quality.
- Volume Control Issues: If you’re unable to control the volume of the soundbar using the Roku TV remote, make sure that both your soundbar and Roku TV support HDMI-ARC. If they do, enable the HDMI-ARC feature in the settings of your Roku TV. If the issue persists, try using a different HDMI cable or consult the user manual for further instructions.
- No HDMI-ARC Port: If your soundbar and Roku TV do not have HDMI-ARC support, you can still use the HDMI or optical connection. However, keep in mind that you may need to use a separate remote to control the volume of the soundbar if it does not have HDMI-CEC compatibility.
- Audio Delay: If you notice a delay between the video and audio, check if your soundbar has a built-in audio delay feature. Adjusting this setting can help synchronize the audio with the video playback.
If you encounter any other issues or difficulties during the setup process, consult the user manuals for both your soundbar and Roku TV to troubleshoot specific problems. You can also reach out to the customer support of the respective manufacturers for further assistance.
Remember, troubleshooting common issues while connecting a soundbar to your Roku TV may require some patience and experimentation. By following these troubleshooting tips and carefully reviewing the instructions, you should be able to overcome any obstacles and enjoy the enhanced audio experience offered by your soundbar.
With the soundbar successfully connected to your Roku TV and any issues resolved, you can now sit back, relax, and immerse yourself in the high-quality audio that accompanies your favorite movies, shows, and music.
Conclusion
Connecting a soundbar to your Roku TV can significantly enhance your entertainment experience by delivering immersive and high-quality audio. By following the steps outlined in this guide, you can easily connect your soundbar to your Roku TV and enjoy an enhanced audio experience.
In Step 1, we emphasized the importance of checking the compatibility of your soundbar with your Roku TV. By ensuring that both devices are compatible and have the necessary ports or wireless capabilities, you can proceed with confidence.
Step 2 walked you through the process of connecting your soundbar to your Roku TV using an HDMI cable, the most common and preferred method. This connection provides optimal audio quality and simplifies the setup process.
Setting up your soundbar as the default audio device, as discussed in Step 3, ensures that all audio output from your Roku TV is directed to the soundbar. This allows for a seamless audio experience without the need to manually switch audio sources.
In Step 4, we explored adjusting the sound settings on your Roku TV to further enhance your audio experience. By customizing the equalizer, sound mode, and other settings, you can tailor the audio output to your preferences.
Lastly, Step 5 provided troubleshooting tips to help you overcome common issues that may arise during the setup process. By following these tips and consulting the user manuals, you can resolve any issues and enjoy uninterrupted audio playback.
Remember, the key to successful soundbar integration with your Roku TV lies in careful setup and configuring the audio settings to suit your preferences. By following the steps and troubleshooting tips provided in this guide, you can enjoy an immersive audio experience that complements your favorite movies, shows, and music.
Now that you have completed the setup process, sit back, relax, and immerse yourself in the rich and captivating audio that accompanies your Roku TV. Enjoy every moment of your entertainment journey, now enhanced by the impressive sound delivered by your connected soundbar.