Introduction
Connecting a soundbar to your TCL Roku TV can greatly enhance your audio experience and take your entertainment to the next level. Whether you want to enjoy immersive surround sound while watching movies or elevate the quality of your favorite TV shows, connecting a soundbar is a simple yet effective solution.
A soundbar is a sleek and compact speaker system that can be easily connected to your TCL Roku TV to provide better audio output than the built-in speakers. With its ability to deliver clear dialogue, enhanced bass, and immersive sound, a soundbar can transform your living room into a mini home theater.
Before diving into the connection process, it’s important to check the requirements. Ensure that you have all the necessary cables and accessories, including an HDMI cable, optical cable, or AUX cable, depending on the available ports on your TCL Roku TV and soundbar.
In this guide, we will walk you through the step-by-step process of connecting a soundbar to your TCL Roku TV. Whether you have a TCL Roku TV with HDMI ARC (Audio Return Channel) support or optical and auxiliary ports, we have you covered.
By following these instructions, you’ll be able to enjoy enhanced audio quality and a more immersive viewing experience in no time.
Step 1: Check the requirements
Before you begin the process of connecting your soundbar to your TCL Roku TV, it’s essential to ensure that you have all the necessary requirements. This will ensure a smooth and hassle-free setup. Here’s what you’ll need:
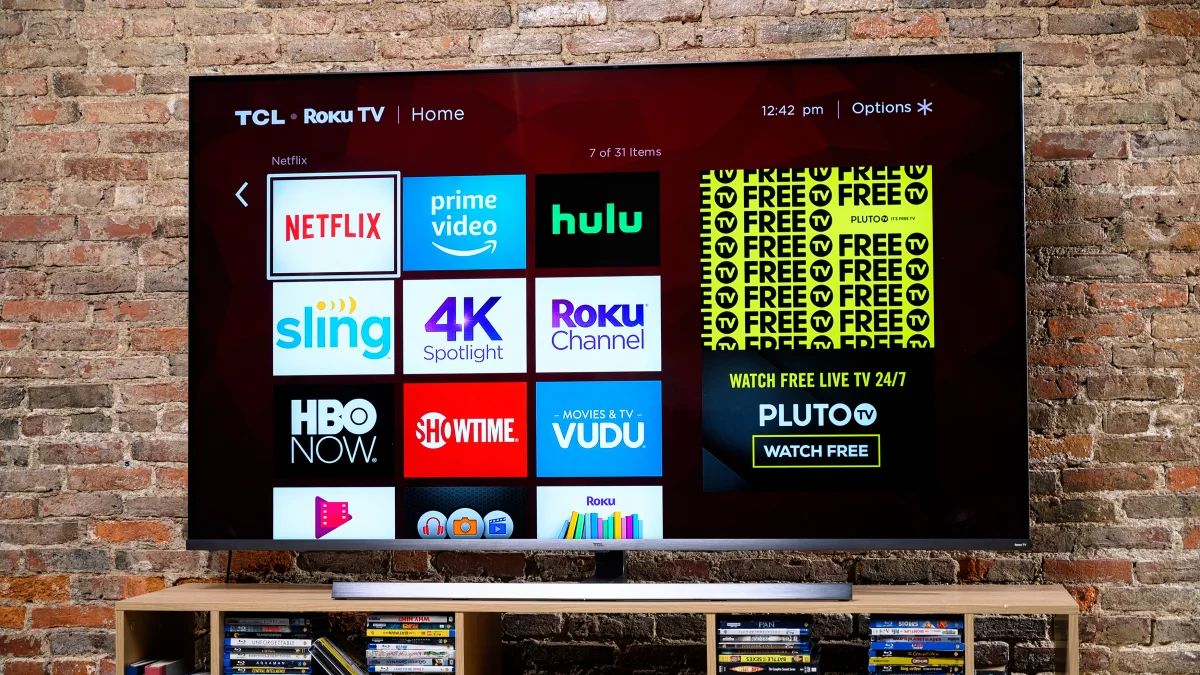
- TCL Roku TV: Make sure you have a TCL Roku TV. This guide specifically focuses on connecting a soundbar to a TCL Roku TV.
- Soundbar: You will need a soundbar that is compatible with your TCL Roku TV. Check the soundbar’s documentation to verify if it can be connected to your TV.
- HDMI Cable: If your TCL Roku TV has an HDMI ARC (Audio Return Channel) port, you will need an HDMI cable to connect the TV to the soundbar. Ensure that the cable is of good quality and supports the necessary bandwidth for audio transmission.
- Optical Cable: If your TCL Roku TV and soundbar don’t have HDMI ARC support, you may need an optical cable to establish the audio connection. Check if your soundbar and TV have optical ports, and purchase an optical cable if necessary.
- AUX Cable: Some soundbars and TCL Roku TVs offer an AUX (auxiliary) port for connectivity. If your TV and soundbar have this option, you’ll need an AUX cable to establish the audio connection.
- Power Cables: Make sure you have the necessary power cables for both your TCL Roku TV and the soundbar. Ensure that they are functioning properly.
- User Manuals: Keep the user manuals of both your TCL Roku TV and the soundbar handy. These will provide specific instructions and troubleshooting tips specific to your devices.
By checking these requirements beforehand, you can ensure that you have all the necessary components to successfully connect your soundbar to your TCL Roku TV. This will save you time and prevent any frustrations that may arise from missing cables or incompatible devices.
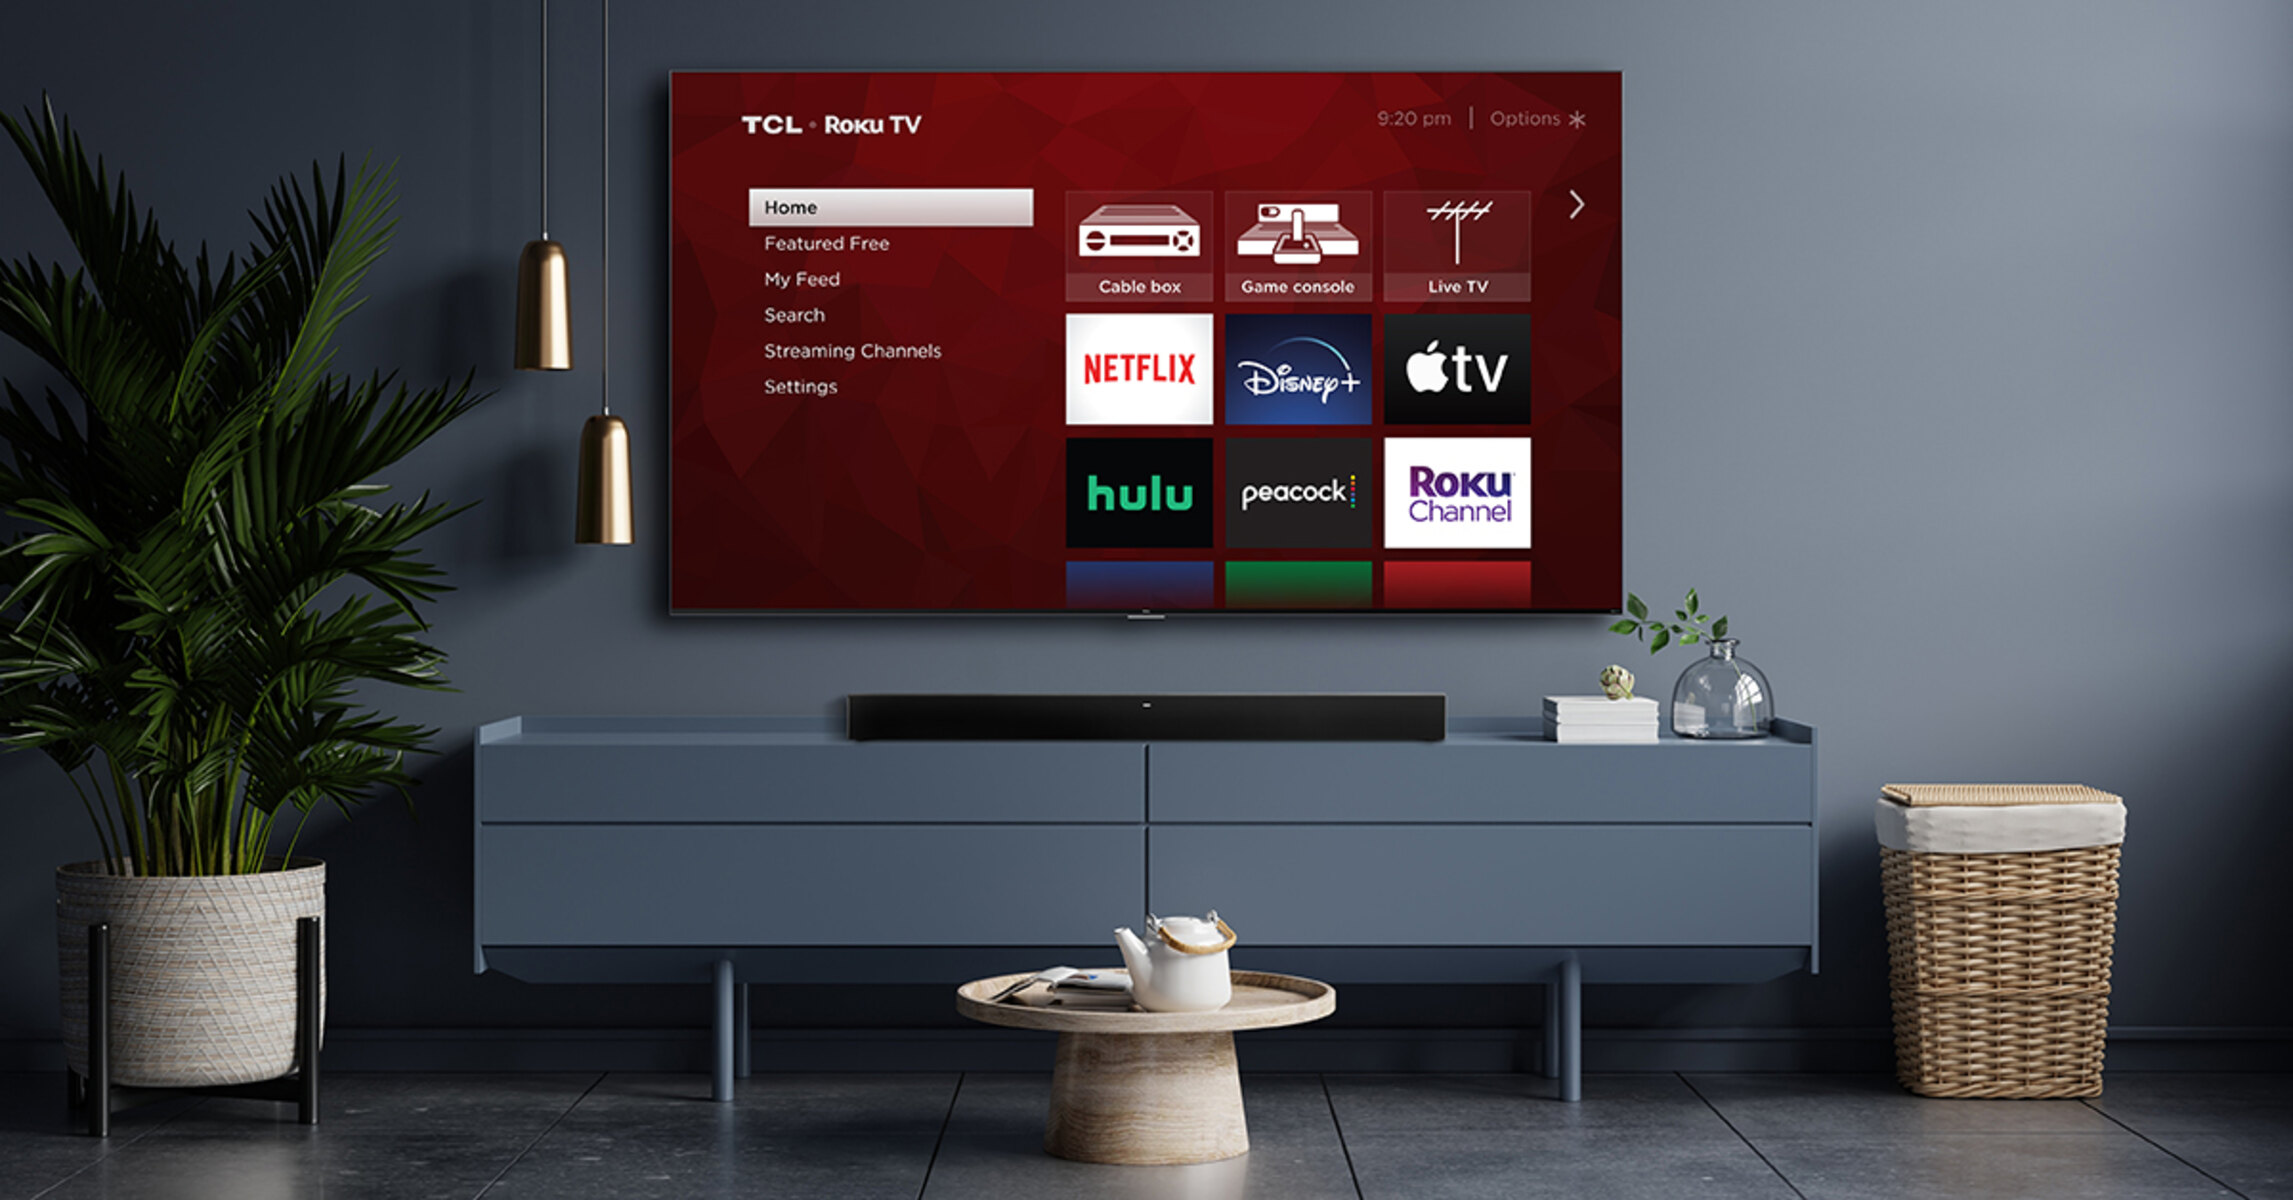
Step 2: Identify available ports on your TCL Roku TV
Once you have gathered all the necessary requirements, the next step is to identify the available ports on your TCL Roku TV. Different TCL Roku TV models may have different types and numbers of ports, so it’s essential to locate the appropriate ports for connecting your soundbar. Here’s what to look for:
- HDMI ARC (Audio Return Channel) port: Look for the HDMI ARC port on the back or side of your TCL Roku TV. This port allows for two-way communication between your TV and soundbar, enabling audio to be sent from the TV to the soundbar and vice versa through a single HDMI cable.
- Optical port: If your TCL Roku TV doesn’t have an HDMI ARC port, you may have an optical port. It is typically labeled as “Optical” or “TOSLINK” and is used to transmit digital audio signals. The optical port resembles a small square-shaped opening with a flap.
- AUX (auxiliary) port: Some TCL Roku TVs and soundbars offer an auxiliary port for audio connectivity. The AUX port is a 3.5mm audio jack, similar to the one found on headphones or smartphones. It is typically labeled as “AUX” or “Audio In.”
Once you have located these ports, take note of their specific location and label them for reference during the connection process. Double-check your TV’s user manual to confirm the exact location and functionality of each port.
In some cases, you may have multiple options for connecting your soundbar to your TCL Roku TV. It’s important to prioritize the available ports based on the desired audio quality and compatibility with your soundbar. HDMI ARC is generally the preferred option as it provides better audio signal quality and allows you to control the soundbar using your TV remote. However, if your TV doesn’t have an HDMI ARC port, the optical or AUX port can still provide satisfactory audio performance.
Identifying the available ports on your TCL Roku TV is a crucial step in the setup process. Once you have identified the appropriate ports, you can move on to the next steps to connect your soundbar and enjoy enhanced audio quality.
Step 3: Connect your soundbar using an HDMI cable
If your TCL Roku TV has an HDMI ARC (Audio Return Channel) port and your soundbar supports HDMI ARC, you can easily establish a high-quality audio connection using an HDMI cable. Follow these steps to connect your soundbar to your TCL Roku TV using an HDMI cable:
- Ensure that both your TCL Roku TV and soundbar are powered off.
- Locate the HDMI ARC port on your TCL Roku TV. It is usually labeled “HDMI ARC” or “ARC” and is separate from the regular HDMI ports.
- Connect one end of the HDMI cable to the HDMI ARC port on your TCL Roku TV.
- Locate the HDMI ARC port or HDMI input on your soundbar. It may be labeled “HDMI ARC” or “ARC.” If your soundbar doesn’t have a specific HDMI ARC port, any regular HDMI input should work.
- Connect the other end of the HDMI cable to the HDMI ARC port or HDMI input on your soundbar.
- Power on both your TCL Roku TV and soundbar.
- On your TCL Roku TV, go to the settings menu by pressing the home button on your Roku remote.
- Navigate to “Settings” and select “System,” then choose “Control other devices (CEC)” and make sure it is enabled.
- Next, navigate to “Settings” again, select “Audio,” and make sure “Audio mode” is set to “Auto” or “HDMI ARC.”
- Your TCL Roku TV should now detect the soundbar and switch the audio output to the soundbar automatically. If not, use your TV remote to select the appropriate audio output in the settings menu.
- Test the sound by playing some content on your TCL Roku TV. You should hear the audio coming from the soundbar.
By connecting your soundbar to your TCL Roku TV using an HDMI cable, you can enjoy high-quality audio and a seamless setup. The HDMI ARC functionality allows for easy control of the soundbar using your TV remote and eliminates the need for additional cables. If you encounter any issues, refer to the user manuals of your TCL Roku TV and soundbar for troubleshooting steps specific to your devices.
Step 4: Connect your soundbar using an optical cable
If your TCL Roku TV doesn’t have an HDMI ARC (Audio Return Channel) port or if your soundbar doesn’t support HDMI ARC, you can still establish a reliable audio connection using an optical cable. Follow these steps to connect your soundbar to your TCL Roku TV using an optical cable:
- Power off both your TCL Roku TV and soundbar.
- Locate the optical port on your TCL Roku TV. It is typically labeled “Optical” or “TOSLINK” and resembles a small square-shaped opening with a flap.
- Connect one end of the optical cable to the optical port on your TCL Roku TV.
- Locate the optical port on your soundbar. It may also be labeled “Optical” or “TOSLINK.”
- Connect the other end of the optical cable to the optical port on your soundbar.
- Power on both your TCL Roku TV and soundbar.
- On your TCL Roku TV, go to the settings menu by pressing the home button on your Roku remote.
- Navigate to “Settings” and select “Audio.”
- Select “Audio mode” and choose “Dolby Digital” or “Bitstream” to ensure that the audio format is compatible with your soundbar.
- Test the sound by playing some content on your TCL Roku TV. You should hear the audio coming from the soundbar.
Connecting your soundbar to your TCL Roku TV using an optical cable is a reliable option for transmitting digital audio signals. Even though it doesn’t provide the same convenience as HDMI ARC in terms of control and two-way communication, it can still deliver high-quality sound performance. Refer to the user manuals of your TCL Roku TV and soundbar if you encounter any issues or need further guidance on optimizing the audio settings.
Step 5: Connect your soundbar using an auxiliary (AUX) cable
If your TCL Roku TV and soundbar have an auxiliary (AUX) port, you can establish an audio connection using an AUX cable. Follow these steps to connect your soundbar to your TCL Roku TV using an AUX cable:
- Make sure that both your TCL Roku TV and soundbar are powered off.
- Locate the AUX (auxiliary) port on your TCL Roku TV. It is a 3.5mm audio jack, similar to the one found on headphones or smartphones. It is typically labeled as “AUX” or “Audio In.”
- Connect one end of the AUX cable to the AUX port on your TCL Roku TV.
- Locate the AUX (auxiliary) port on your soundbar. It is similar to the one on your TV and may also be labeled as “AUX” or “Audio In.”
- Connect the other end of the AUX cable to the AUX port on your soundbar.
- Power on both your TCL Roku TV and soundbar.
- On your TCL Roku TV, go to the settings menu by pressing the home button on your Roku remote.
- Navigate to “Settings” and select “Audio.”
- Select “Audio mode” and choose “External speakers” or “External audio” to ensure the soundbar is set as the audio output device.
- Test the sound by playing some content on your TCL Roku TV. You should hear the audio coming from the soundbar.
Connecting your soundbar to your TCL Roku TV using an AUX cable is a simple and straightforward method. While it may not offer the same advanced features as HDMI ARC or optical connections, it can still provide satisfactory audio performance. Ensure that the AUX cable is securely connected to both the TV and soundbar ports to avoid any audio disruptions. Refer to the user manuals of your TCL Roku TV and soundbar for further troubleshooting or optimization options.
Step 6: Set up the soundbar through the TCL Roku TV settings
Once you have successfully connected your soundbar to your TCL Roku TV, the next step is to configure the audio settings to optimize the sound output and ensure a seamless integration. Follow these steps to set up the soundbar through the TCL Roku TV settings:
- Power on your TCL Roku TV and soundbar.
- Using your Roku remote, navigate to the home screen and select “Settings.”
- Within the settings menu, scroll down and choose “Audio.”
- Depending on your TCL Roku TV model, you may see different options related to audio settings. Look for options such as “Audio mode,” “Sound output,” or “Speaker settings.”
- Select the appropriate audio mode that corresponds to the connected soundbar. This may include “HDMI ARC,” “Optical,” or “External speakers.” Choose the mode that matches the type of connection you have made in previous steps.
- You may also have additional audio settings, such as equalizer or sound enhancements. Adjust these settings according to your preferences to further fine-tune the sound output from the soundbar.
- Once you have completed the audio settings configuration, save the changes and exit the settings menu.
By setting up the soundbar through the TCL Roku TV settings, you can ensure that the audio output is optimized for the connected soundbar. This step allows you to take full advantage of the soundbar’s features and capabilities, enhancing your overall audio experience.
If you encounter any issues during the setup process or need further assistance with the audio settings, refer to the user manuals of your TCL Roku TV and soundbar for specific instructions and troubleshooting steps.
Step 7: Test the soundbar with your TCL Roku TV
After completing the setup and configuration process, it’s important to test the soundbar to ensure that it’s working correctly with your TCL Roku TV. Follow these steps to test the soundbar:
- Turn on your TCL Roku TV and soundbar.
- Choose a piece of content such as a movie, TV show, or music that you want to test.
- Play the selected content on your TCL Roku TV. This can be done through a streaming service, cable/satellite box, or any other connected device.
- Listen to the sound coming from your soundbar. Make sure that the audio is clear, balanced, and coming from the appropriate channels (left, right, center, surround, etc.) if your soundbar supports it.
- If the sound is not satisfactory, check the connections and audio settings on both your TCL Roku TV and soundbar, and make any necessary adjustments.
- Continue testing the soundbar with different types of content to ensure its performance is consistent across various audio sources.
During the testing phase, pay attention to any potential audio issues such as distorted sound, low volume, or imbalanced audio. If you encounter any issues, review the troubleshooting steps in the user manuals of your TCL Roku TV and soundbar or seek assistance from the manufacturer’s support team.
By testing the soundbar with your TCL Roku TV, you can confirm that the setup is successful and that you are enjoying improved audio quality. If everything sounds great, sit back, relax, and indulge in an immersive audio experience that complements your favorite movies, shows, and music.
Conclusion
Connecting a soundbar to your TCL Roku TV can greatly enhance your audio experience and bring your entertainment to life. Whether you choose to connect your soundbar using an HDMI cable, optical cable, or AUX cable, the process is straightforward and can be completed with ease.
In this guide, we walked through the step-by-step process of connecting a soundbar to your TCL Roku TV. We covered the importance of checking the requirements, identifying the available ports on your TV, and provided detailed instructions for connecting the soundbar using different cables. Additionally, we discussed the process of setting up the soundbar through the TCL Roku TV settings and testing the audio to ensure optimal performance.
By following these steps, you can enjoy enhanced audio quality, immersive sound, and a more immersive entertainment experience with your TCL Roku TV. Whether you’re watching your favorite movies, binging on TV shows, or listening to music, connecting a soundbar will elevate the audio and make your viewing or listening experience more enjoyable.
If you encounter any difficulties during the setup process, be sure to refer to the user manuals of your TCL Roku TV and soundbar for step-by-step instructions and troubleshooting tips specific to your devices. Additionally, reach out to the manufacturer’s support team for further assistance if needed.
Now that you have successfully connected your soundbar to your TCL Roku TV, sit back, relax, and immerse yourself in a world of stunning audio quality and heightened entertainment.