Introduction
Welcome to this guide on how to accept all changes in Grammarly. Grammarly is a widely used online grammar checking tool that helps writers improve their writing skills by correcting grammar, spelling, punctuation, and other language errors. It’s a valuable tool that provides suggestions to enhance the clarity and effectiveness of your writing.
When using Grammarly, you may come across various suggestions or corrections that appear in your text. These suggestions can be in the form of underlined text, comments, or highlighted sections. While Grammarly’s recommendations are usually helpful, there may be instances where you want to accept all the suggested changes at once instead of individually going through each correction.
In this guide, we will walk you through the step-by-step process of accepting all changes in Grammarly, allowing you to apply the suggested corrections effortlessly. By using this feature, you can save time and ensure that the necessary changes are made consistently throughout your document.
Whether you’re a student working on an assignment, a professional editing a business report, or a blogger crafting engaging content, accepting all changes in Grammarly can streamline the editing process and help you produce error-free writing. By following the steps outlined in this guide, you’ll become proficient in accepting all changes in Grammarly and effectively use this powerful tool to elevate the quality of your work.
Now, let’s dive into the process of accepting all changes in Grammarly and discover how it can make your writing experience more efficient and polished.
Step 1: Open Grammarly
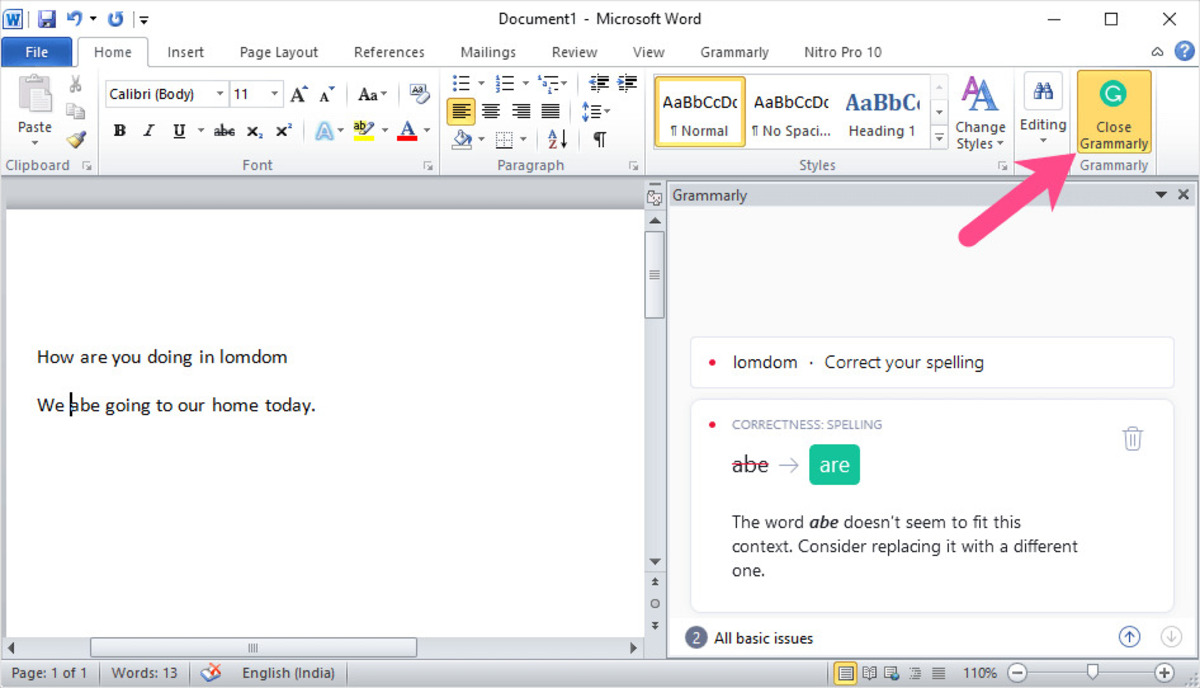
The first step in accepting all changes in Grammarly is to open the application or website. If you haven’t already installed Grammarly, you can do so by visiting the official website and following the instructions for your desired platform.
Once Grammarly is installed, open the application or log in to the website using your credentials. If you’re using the web version, make sure you have a stable internet connection for seamless operation.
Grammarly offers a free version with basic features and a premium version with advanced functionalities. Both versions allow you to accept all changes, but keep in mind that the premium version may offer additional benefits such as more detailed suggestions and access to a plagiarism checker.
After opening Grammarly, you will be greeted with the main interface, which typically consists of a text editor or a space to upload your document. Take a moment to familiarize yourself with the layout and various options available.
If you’re using the Grammarly desktop application, it may automatically sync with your existing documents, allowing you to make edits directly. If you prefer working in a specific document editor such as Microsoft Word or Google Docs, you can also use the Grammarly add-in to integrate the tool seamlessly into your writing process.
No matter which version or platform you choose, make sure you are logged in and ready to begin accepting the changes in your document. Now, let’s move on to the next step to access the document and initiate the change acceptance process in Grammarly.
Step 2: Access the Document
Once you have Grammarly open and are ready to accept all changes, the next step is to access the document you want to edit. Depending on the platform you are using, there are different ways to access your document in Grammarly.
If you are using the Grammarly web version, you can simply click on the “Upload” button or “New” button, depending on whether you want to upload an existing document or start a new one. If you choose to upload a document, browse the file system on your computer and select the file you wish to edit.
Alternatively, if you are using the Grammarly desktop application, you may see a list of recently edited documents or the option to open a document from your file system. Select the document you want to edit, or browse your file system to locate it.
If you are using the Grammarly add-in for a specific document editor, such as Microsoft Word or Google Docs, you can access your document by opening the editor and navigating to the specific document you wish to edit. The Grammarly add-in should integrate seamlessly into the editor’s interface.
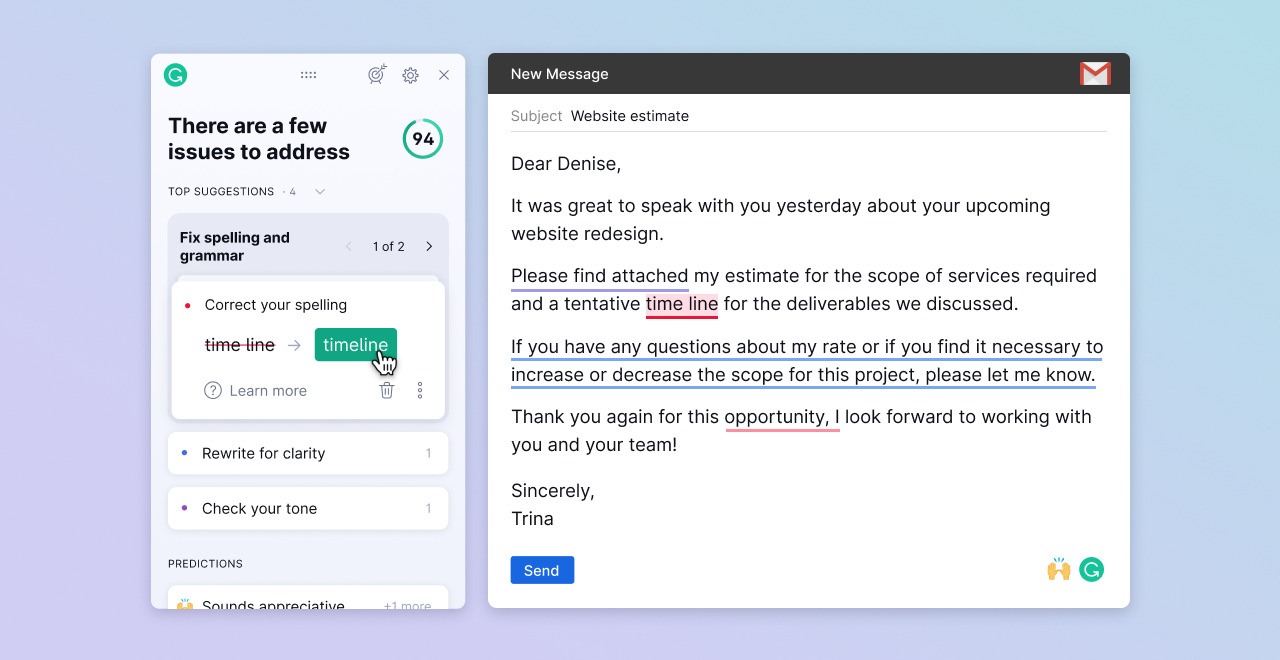
Once you have accessed your document in Grammarly, it will be displayed in the text editor interface, ready for you to make changes and accept the suggestions. Take a moment to review the document and familiarize yourself with the suggested changes or corrections provided by Grammarly.
Note that Grammarly may highlight various types of errors, including grammar mistakes, spelling errors, punctuation issues, style suggestions, and more. These suggestions are meant to help you refine your writing and improve its clarity and correctness.
Now that you have successfully accessed your document in Grammarly, it’s time to learn how to accept all the changes made by Grammarly effortlessly. Let’s move on to the next step.
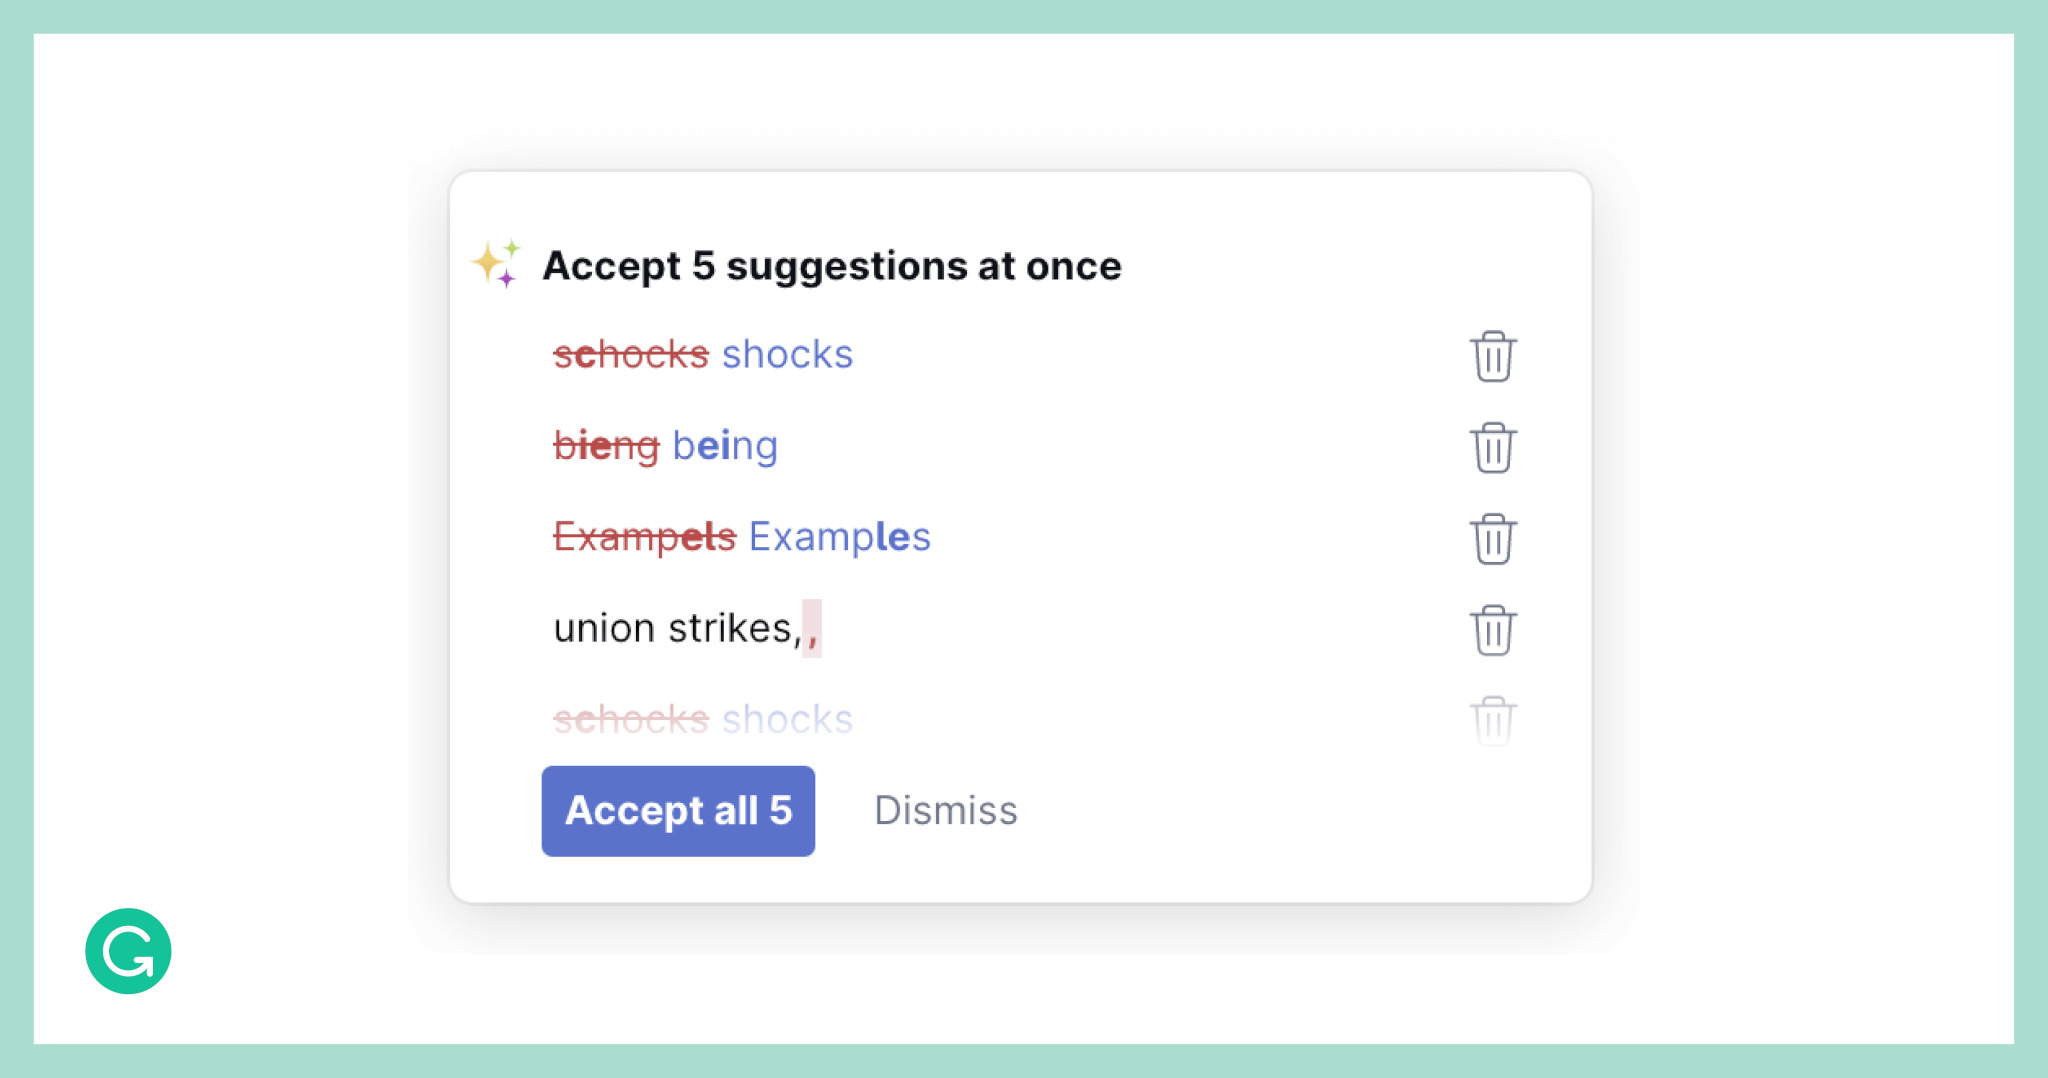
Step 3: Click on “Accept All”
Once you have accessed your document in Grammarly and reviewed the suggested changes, it’s time to proceed with accepting all the changes. Grammarly provides an easy and convenient way to accept all the suggestions in your document with just a few clicks.
To begin, look for the option to accept all changes in the Grammarly interface. In most cases, this option is located at the top or bottom of the editing interface, labeled as “Accept All” or a similar phrase.
Click on the “Accept All” button, and Grammarly will automatically apply all the suggested changes to your document. This feature is particularly useful if you have a large document with numerous corrections that you want to accept without manually reviewing each one.
By accepting all the changes, you can quickly incorporate Grammarly’s suggestions into your writing, ensuring that your document is error-free and polished.
It’s important to note that accepting all changes in Grammarly is irreversible. Once you click on the “Accept All” button, Grammarly will apply all the suggested corrections to your document, and you won’t be able to undo this action.
Therefore, it’s essential to carefully review your document before clicking on “Accept All” to ensure that the suggested changes align with your intended meaning and writing style.
If you prefer to review each suggestion individually instead of accepting all changes, you can manually go through your document and click on the “Accept” button next to each suggestion.
Now that you know how to click on “Accept All” and apply all the suggested changes in Grammarly, let’s move on to the next step to confirm the changes and make necessary revisions.
Step 4: Confirm the Changes
After clicking on “Accept All” and applying all the suggested changes in Grammarly, it’s important to take a moment to confirm the changes and ensure that they align with your intentions and writing style.
Grammarly does its best to provide accurate suggestions, but it’s always a good idea to review the changes and make any necessary revisions before finalizing your document.
Start by scanning your document to spot any changes that may have been automatically applied. Look for corrected grammar errors, rewritten sentences, improved word choices, fixed punctuation, and other modifications.
If you come across any changes that don’t fit the context or alter your intended meaning, you can manually revert them back to your original text. Grammarly allows you to undo individual changes by clicking on the corresponding “Reject” or “Undo” button next to each suggestion.
Additionally, if you notice any new errors introduced by Grammarly’s suggestions or if you disagree with a specific change, you can use the comments feature to provide feedback or clarification. Grammarly allows you to add comments to your document, either to highlight a specific area for further review or to engage in a conversation about a particular suggestion.
Remember that Grammarly is a tool, and it’s essential to use your judgment and expertise as a writer to determine the final version of your document. Confirming and refining the changes made by Grammarly is crucial to ensure that your document maintains its intended meaning and style.
By carefully reviewing and confirming the changes, you can ensure that your document is in its best possible form, free from grammar and spelling errors, and aligned with your writing goals.
Now that you have confirmed the changes, let’s move on to the next step to review your document and make any final adjustments if necessary.
Step 5: Review the Document
Once you have accepted the changes in Grammarly and confirmed their accuracy, it’s time to review your document as a whole. This step allows you to ensure that the changes made by Grammarly have improved the overall quality and readability of your writing.
Start by reading through your document from beginning to end, paying attention to the flow and coherence of your ideas. Look for any remaining errors or areas that may still need improvement.
While Grammarly is a powerful tool, it’s important to remember that it primarily focuses on grammar, spelling, and punctuation. It may not catch every stylistic or structural issue in your writing, such as awkward sentence constructions or logical inconsistencies.
As you review your document, consider the following questions:
- Does the document convey your intended message clearly and effectively?
- Are the paragraphs and sentences well-structured and logically organized?
- Are there any repetitive words or phrases that can be replaced for variety?
- Are there any points or arguments that need further explanation or clarification?
- Does the overall tone and style of the document suit your intended audience?
Take your time during the review process and make any necessary revisions or edits to enhance the overall quality of your writing. Consider seeking feedback from a trusted colleague, friend, or mentor, as a fresh set of eyes can often provide valuable insights and suggestions.
Remember, the goal is to create a polished and compelling piece of writing that effectively communicates your ideas. Grammarly is just one tool in your arsenal, and your own judgment and creativity play a crucial role in shaping the final version of your document.
Once you are satisfied with the reviewed document, you can confidently proceed to share, submit, or publish it, knowing that you have made substantial improvements with the help of Grammarly.
In the final section, we will summarize the key points and conclude our guide on how to accept all changes in Grammarly.
Conclusion
Accepting all changes in Grammarly can be a time-saving and efficient way to incorporate suggested corrections into your writing. By following the steps outlined in this guide, you can quickly accept all the changes and ensure that your documents are error-free and polished.
Remember to start by opening Grammarly and accessing your document. Click on the “Accept All” button to apply all the suggested changes automatically. Take the time to review the changes and confirm their accuracy. Review your document as a whole, making any necessary revisions to enhance clarity and coherence.
While Grammarly is an incredibly useful tool, it’s important to remember that it can’t replace your own judgment and expertise as a writer. Use the suggestions provided by Grammarly as a guide, but always consider the context, tone, and style of your writing.
By using Grammarly effectively and accepting all changes when appropriate, you can improve the quality of your writing and produce error-free and polished documents.
So, whether you’re a student, professional, or blogger, utilizing Grammarly’s “Accept All” feature can streamline your editing process and help you create compelling and error-free content.
Remember, practice makes perfect, and with time, you’ll become more proficient at using Grammarly to enhance your writing skills and produce high-quality work.
Thank you for reading this guide on how to accept all changes in Grammarly. We hope it has been helpful to you in improving your writing and making the most of this powerful editing tool. Happy writing!