Introduction
Welcome to the digital age, where being connected to the internet is an essential part of our daily lives. Whether you’re streaming your favorite movies, catching up on work emails, or simply browsing the web, having a reliable and secure Wi-Fi connection is crucial. But have you ever thought about changing the name of your Wi-Fi network?
While the default Wi-Fi network name, also known as the Service Set Identifier (SSID), assigned by your Internet Service Provider (ISP) might be functional, it’s often a generic and uninspiring name that lacks personalization. Changing the name of your Wi-Fi network not only adds a touch of individuality but also offers a practical function. With a unique and memorable name, you can easily identify your network among others in a crowded space, avoid confusion when connecting to devices, and enhance your overall Wi-Fi experience.
But how exactly do you change the name of your Wi-Fi network? In this article, we will guide you through a step-by-step process to alter your Wi-Fi network name and provide important considerations to keep in mind. By the end, you’ll be equipped with the knowledge to personalize your Wi-Fi network and enjoy a more customized browsing experience.
Why change the name of your Wi-Fi?
Changing the name of your Wi-Fi network might seem like a small and insignificant task, but there are several compelling reasons why you should consider doing so:
- Personalization: One of the main reasons to change the name of your Wi-Fi network is to add a personal touch. By choosing a unique and creative name, you can reflect your personality, interests, or even show off your sense of humor. It’s a simple way to make your Wi-Fi network stand out.
- Easy identification: Default Wi-Fi network names provided by ISPs are often generic and identical among multiple households in your area. This can lead to confusion when connecting devices to your network. By giving your Wi-Fi network a distinct name, you can easily identify and connect to it without any confusion.
- Enhanced security: Changing the default name of your Wi-Fi network can actually improve its security. Many hackers and potential intruders identify vulnerable networks by their default names and exploit security loopholes. By customizing your Wi-Fi name, you make it more difficult for them to identify and target your network.
- Guest network differentiation: If you have a guest network set up on your Wi-Fi, changing the name can help differentiate between your main network and the guest network. This way, you can manage access and bandwidth more effectively, ensuring that your guests are connected to the appropriate network.
- Improved organization: If you live in an area with multiple Wi-Fi networks nearby, the default names can create confusion. By changing the name of your Wi-Fi network, you can keep things organized and easily identify your network among the sea of other networks.
Overall, changing the name of your Wi-Fi network brings a sense of personalization, ease of use, enhanced security, and improved organization. It’s a small but effective step towards customizing your internet experience and ensuring a seamless connection for yourself and your devices.
How to change the name of your Wi-Fi
Now that you understand the benefits of changing the name of your Wi-Fi network, let’s dive into the step-by-step process:
- Step 1: Accessing your router settings
- Step 2: Locating the Wi-Fi name settings
- Step 3: Changing the Wi-Fi name
- Step 4: Applying the new Wi-Fi name
- Step 5: Reconnecting devices to the updated Wi-Fi name
To change the name of your Wi-Fi network, you need to access your router settings. Open a web browser on a device connected to your Wi-Fi and enter the default IP address of your router in the address bar. The IP address is typically mentioned in the user manual or labeled on the router itself.
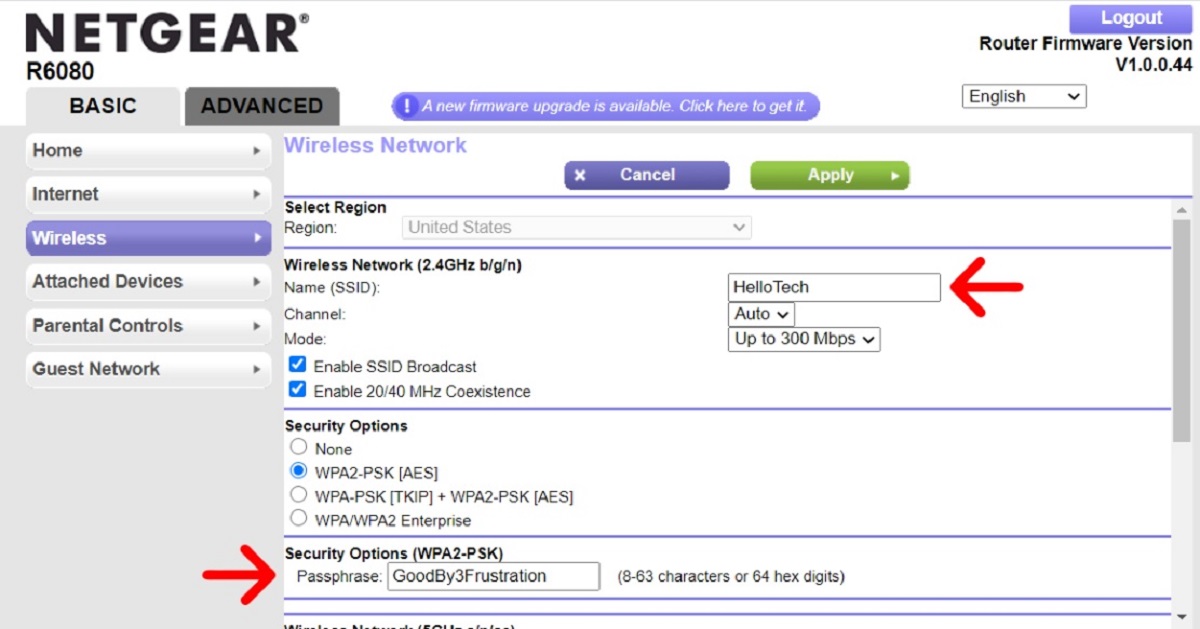
Once you have accessed the router settings, navigate to the wireless settings or network settings section. Here, you will find the option to change the SSID or Wi-Fi network name. Different router models have varying interfaces, so look for terms like “Wireless,” “Network,” or “SSID” to find the appropriate settings.
Once you locate the Wi-Fi name settings, you will see the current network name displayed. Simply delete the existing name and enter your desired name for your Wi-Fi network. Ensure that your chosen name is unique, easy to remember, and preferably does not contain any personally identifiable information.
After entering the new Wi-Fi name, look for a “Save,” “Apply,” or “Confirm” button. Click on it to save and apply the changes to your router settings. This step may take a moment as the router restarts and updates the Wi-Fi name.
Once the router has restarted, you will need to reconnect your devices to the newly named Wi-Fi network. On each device, search for available Wi-Fi networks and select the name you just changed. Enter the Wi-Fi password if prompted, and you should be connected to the updated network.
Remember, each router model may have a slightly different interface, so the exact steps might vary. If you encounter any difficulties, refer to your router’s user manual or contact your ISP for assistance. Additionally, it’s always a good idea to write down the new Wi-Fi name and password for future reference.
By following these steps, you can easily change the name of your Wi-Fi network and enjoy a more personalized and easily identifiable browsing experience.
Step 1: Accessing your router settings
To change the name of your Wi-Fi network, the first step is to access your router settings. Here’s how you can do it:
- Connect to your Wi-Fi network: Ensure that you are connected to your Wi-Fi network before proceeding. You can do this by connecting your device (e.g., computer, laptop, or smartphone) to the Wi-Fi network using the default network name and password provided by your internet service provider (ISP).
- Open a web browser: Once you are connected to your Wi-Fi network, open a web browser on the device you are using.
- Enter the IP address: In the address bar of your web browser, type in the IP address of your router. The IP address is typically a series of numbers (e.g., 192.168.0.1) or a combination of numbers and letters (e.g., 10.0.0.1). The specific IP address for your router can usually be found in the user manual or by checking the label on the router itself.
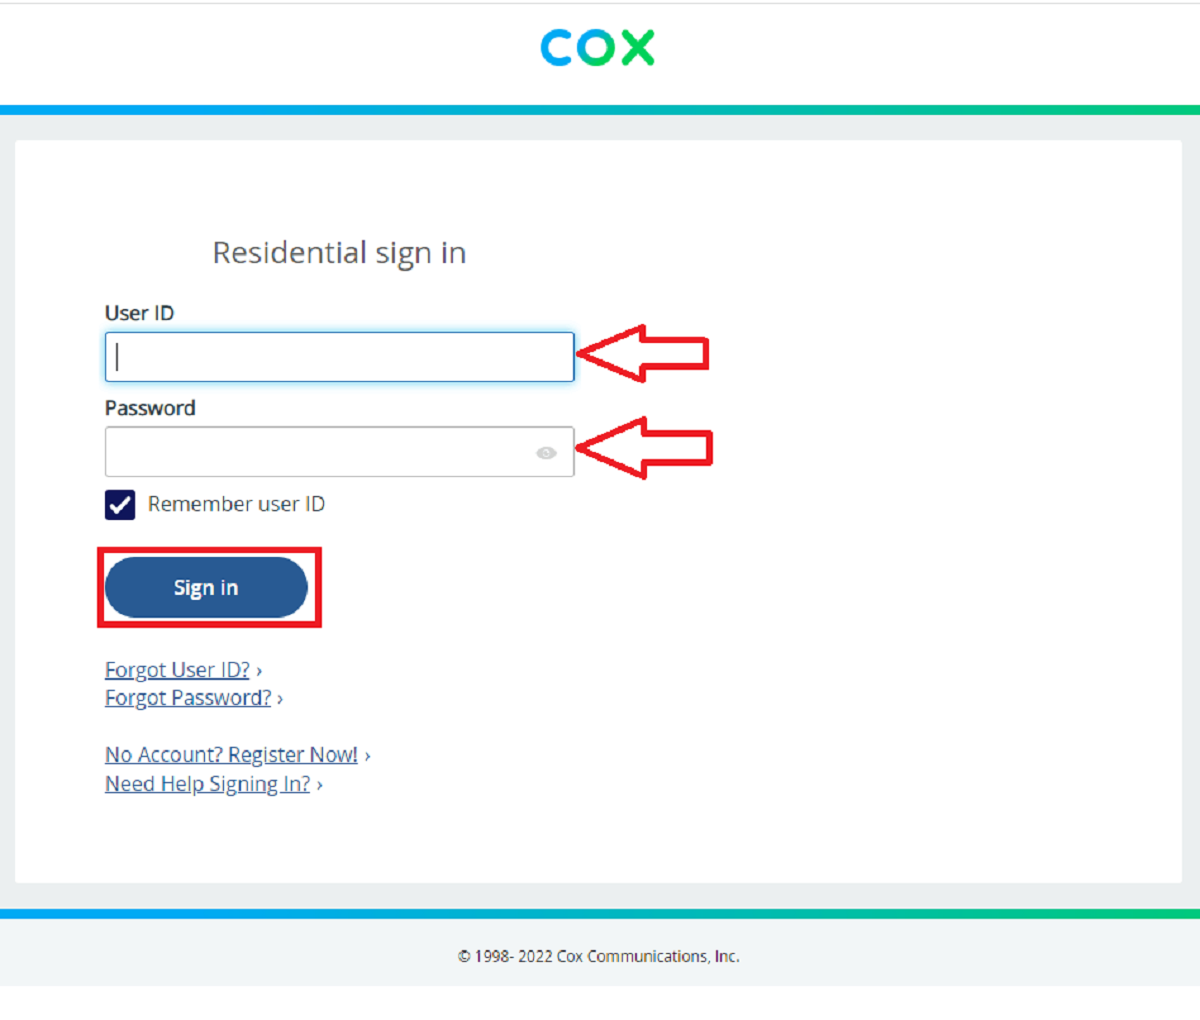
- Press Enter: After entering the IP address, press the Enter key on your keyboard. This will load the login page for your router settings.
- Enter the login credentials: On the login page, you will be prompted to enter your router’s username and password. These credentials are different from the network name and password you use to connect your devices to the Wi-Fi network. If you have not changed the default login credentials, you can find them in the user manual or by searching for your router model online.
- Login to the router settings: Once you have entered the correct login credentials, click on the login or submit button to access the router settings.
Once you have successfully logged into your router settings, you are now ready to proceed to the next step of changing the name of your Wi-Fi network. It’s important to note that the steps to access router settings may vary slightly depending on the router make and model. If you are unsure about the specific steps for your router, consult the user manual or contact your ISP for assistance.
Step 2: Locating the Wi-Fi name settings
Once you have successfully accessed your router settings, the next step is to locate the Wi-Fi name settings. Follow these steps to find the appropriate settings:
- Explore the router settings menu: Look for a menu or section labeled “Wireless,” “Network,” or “Wi-Fi” in your router settings. The exact label may vary depending on the make and model of your router.
- Click on the Wi-Fi settings: Once you have found the relevant menu or section, click on it to access the Wi-Fi settings.
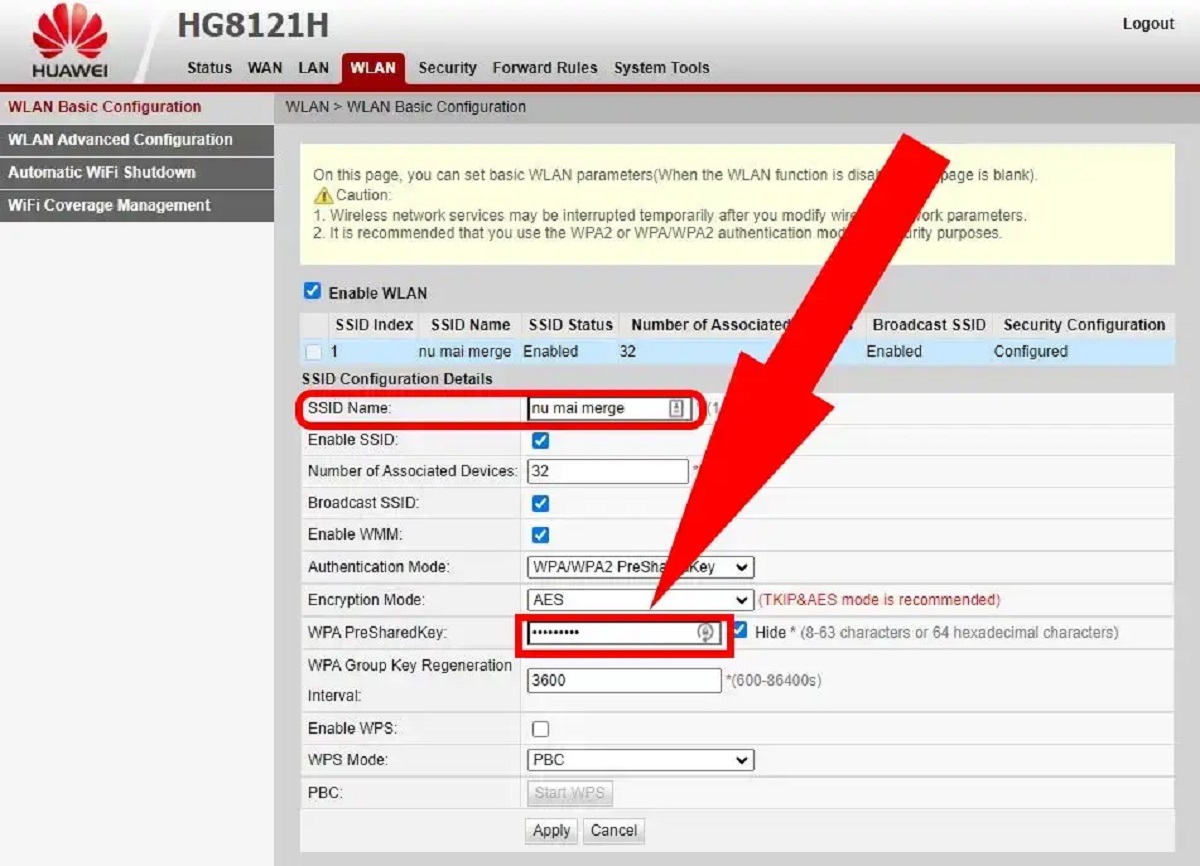
- Look for the SSID or Wi-Fi name option: Within the Wi-Fi settings, you will typically find an option labeled “SSID,” “Wi-Fi name,” or “Network name.” This is the setting that allows you to change the name of your Wi-Fi network.
- Take note of any limitations: In some cases, there may be limitations on the length or character types allowed for the Wi-Fi name. Pay attention to any restrictions mentioned in the router settings, as exceeding these limitations may prevent you from successfully updating the Wi-Fi name.
- Make any other necessary changes: While in the Wi-Fi settings, you may also have the option to adjust other network settings such as the security type, encryption, or channel. However, exercise caution when making changes to these settings, as incorrect configurations could result in connectivity issues.
- Save any changes made: After locating the Wi-Fi name settings and making any desired changes, be sure to click on the “Save,” “Apply,” or “Update” button to save the new settings. This will ensure that the updated Wi-Fi name is applied to your network.
Remember that these instructions may vary slightly depending on the router model and firmware version. If you are unable to locate the Wi-Fi name settings or encounter any difficulties, refer to the router’s user manual or contact your ISP for further assistance.
With the Wi-Fi name settings successfully located, you are now ready to proceed to the next step of actually changing the name of your Wi-Fi network. Stay tuned for Step 3!
Step 3: Changing the Wi-Fi name
Now that you have located the Wi-Fi name settings in your router’s configuration, it’s time to proceed with changing the name of your Wi-Fi network. Follow these simple steps:
- Access the Wi-Fi name settings: Navigate to the section in your router settings where you found the SSID or Wi-Fi name option.
- Edit the current Wi-Fi name: Within the Wi-Fi name settings, you will see the current name of your Wi-Fi network displayed. Delete the existing name and enter your desired name for the network. Ensure that the new name is unique, easy to remember, and preferably does not contain any personally identifiable information.
- Consider including personal touches: If you want to add a personal touch to your Wi-Fi name, you can get creative and incorporate elements that reflect your personality, interests, or sense of humor. Just remember to keep it appropriate and avoid using any offensive or sensitive terms.
- Check for character limitations: Some routers may have limitations on the length or character types allowed for the Wi-Fi name. Ensure that you stay within the specified character limit and avoid using special characters or spaces if they are not supported.
- Review the changes: Before proceeding, take a moment to review the new Wi-Fi name you have entered. Double-check for any typos or mistakes to ensure that the name is accurately reflected.
- Save the new Wi-Fi name: Once you are satisfied with the new Wi-Fi name, look for a “Save,” “Apply,” or “Confirm” button. Click on it to save the changes and update the Wi-Fi network name.
After saving the new Wi-Fi name, your router will apply the changes, and you will now have a fresh, personalized Wi-Fi network name for your connected devices to discover and connect to. It’s worth noting that it may take a few moments for the router to apply the changes, so be patient during this process.
Remember to keep a record of the new Wi-Fi name in a safe place, as you will need to reconnect your devices using the updated name in the next step. Stay tuned for Step 4!
Step 4: Applying the new Wi-Fi name
Now that you have successfully changed the name of your Wi-Fi network in your router settings, the next step is to apply the new name. Follow these steps to ensure that the updated Wi-Fi name is applied to your network:
- Save the changes: After entering the new Wi-Fi name, click the “Save,” “Apply,” or “Update” button in your router settings. This action will save the changes and update the Wi-Fi network name.
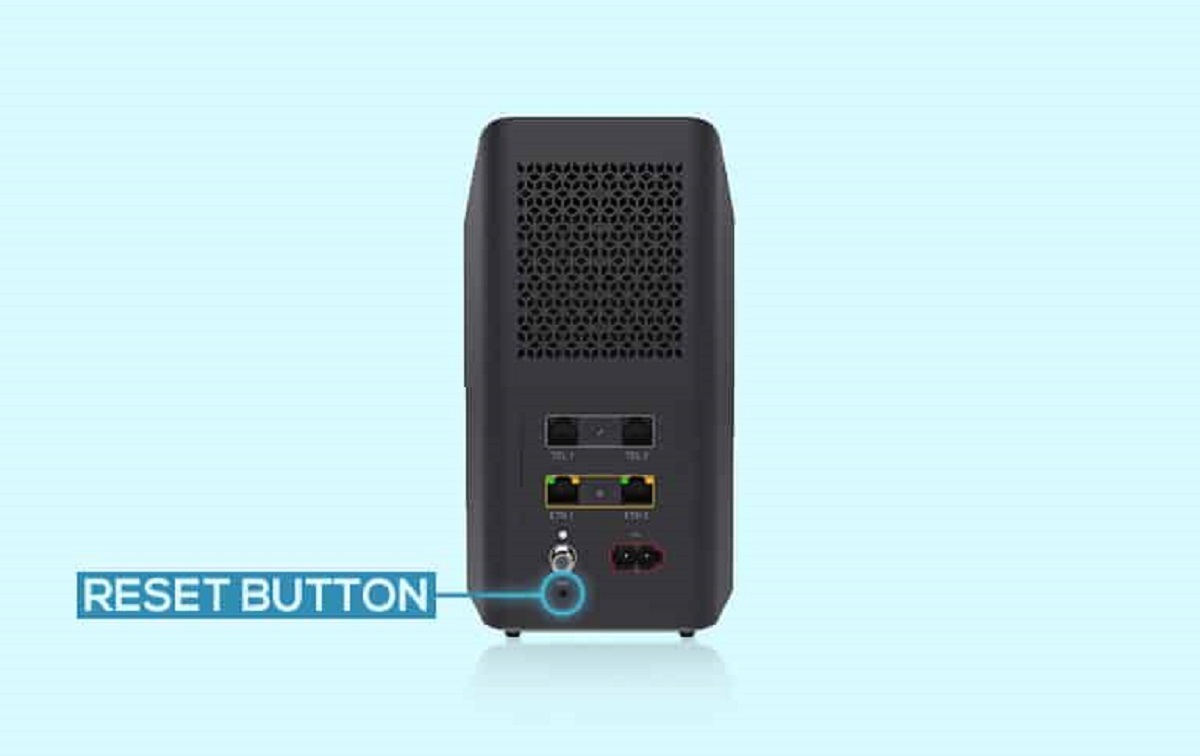
- Reboot your router (if required): In some cases, your router might require a restart to apply the new Wi-Fi name. Look for any instructions or prompts in your router settings indicating the need to reboot. If necessary, follow the instructions provided to reboot your router.
- Wait for the router to apply the changes: After saving the new Wi-Fi name and, if applicable, rebooting your router, you will need to allow the router a few moments to apply the changes. The router will restart and update the Wi-Fi network name during this process.
- Reconnect your devices: Once the router has completed the process of applying the changes, you will need to reconnect your devices to the updated Wi-Fi network. On each device, navigate to the Wi-Fi settings and select the new network name you just changed.
- Enter the Wi-Fi password (if prompted): After selecting the updated network name, you may be prompted to enter the Wi-Fi password. This is the same password you previously used to connect to your Wi-Fi network. Enter the password and proceed to connect your device to the network.
- Confirm a successful connection: Once your device successfully connects to the Wi-Fi network with the new name, confirm that you have internet connectivity and that everything is functioning as expected.
It’s important to note that the time taken for the changes to propagate and for devices to reconnect to the updated Wi-Fi network may vary. Give it a few minutes and, if necessary, restart any devices that are having trouble connecting to the updated network.
By following these steps, you have now successfully applied the new Wi-Fi name to your network. Enjoy your newly personalized and easily identifiable Wi-Fi network!
Step 5: Reconnecting devices to the updated Wi-Fi name
Now that you have changed the name of your Wi-Fi network and applied the new name to your router settings, the final step is to reconnect your devices to the updated Wi-Fi network. Follow these steps to ensure a smooth reconnection process:
- Access the Wi-Fi settings on your devices: On each device that was previously connected to your Wi-Fi network, navigate to the Wi-Fi settings.
- Search for available Wi-Fi networks: Within the Wi-Fi settings, your device will display a list of available Wi-Fi networks. Allow the device a few moments to scan and display the updated Wi-Fi network name.
- Select the updated Wi-Fi network: Look for the new Wi-Fi network name that you recently changed in the list of available networks. Tap or click on the new network name to select it.
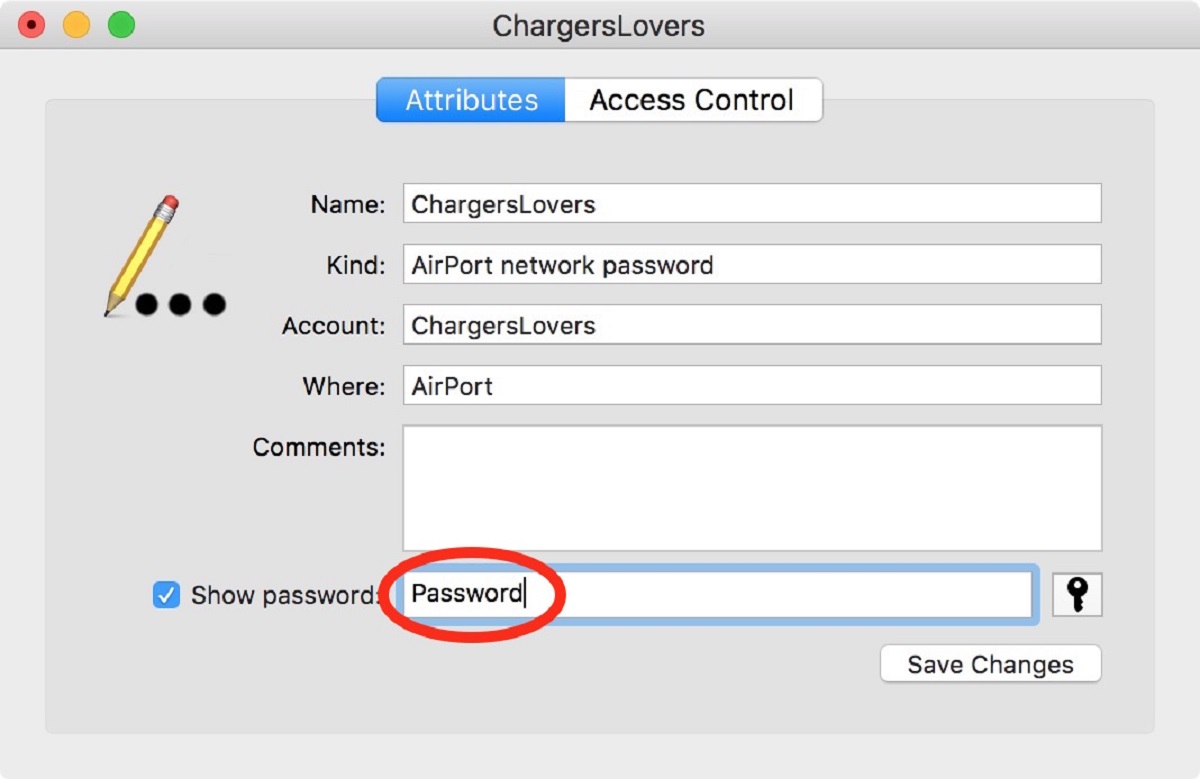
- Enter the Wi-Fi password (if prompted): If prompted, enter the Wi-Fi password for the updated network. This is the same password you previously used to connect to your Wi-Fi network. Ensure that you enter the password correctly to establish a successful connection.
- Connect to the updated Wi-Fi network: Once you have entered the correct Wi-Fi password, click the “Connect” or “Join” button on your device. This will initiate the connection process between your device and the updated Wi-Fi network.
- Ensure successful connection: After connecting to the updated Wi-Fi network, ensure that your device displays a successful connection and that you have internet access. Test the connection by opening a web browser or accessing other internet-dependent applications.
It’s normal for devices to take a few moments to reconnect and establish a stable connection to the updated Wi-Fi network. If you encounter any issues with the connection, try restarting the device or double-checking the Wi-Fi password.
Repeat these steps on all your devices, ensuring that each device is connected to the updated Wi-Fi network using the new name. This step is crucial to ensure that all your devices have seamless connectivity and can make the most of the personalized Wi-Fi network.
By completing this final step, you have successfully reconnected your devices to the updated Wi-Fi network with the new name. Enjoy the personalized browsing experience and easily identifiable Wi-Fi network!
Important considerations when changing Wi-Fi name
While changing the name of your Wi-Fi network can be an exciting and personalizing process, it’s important to keep in mind a few considerations to ensure a smooth transition and optimal performance. Here are some key factors to consider when changing your Wi-Fi name:
- Compatibility with devices: Before finalizing the new Wi-Fi name, ensure that it is compatible with all your devices. Some devices may have limitations on the characters or length of the network name they can connect to. Testing the new name on multiple devices can help you avoid any potential connectivity issues.
- Security implications: While changing the Wi-Fi name itself does not directly enhance the security of your network, it can help in preventing targeted attacks. However, it’s essential to remember that changing the name alone may not be sufficient to protect your network. Implementing strong security measures, such as a unique, strong password and encryption protocols, is crucial for maintaining network security.
- Updating network information: Once you have changed the Wi-Fi name, it’s important to update the network information on all your devices, including smart home devices, printers, and other connected devices. Failure to update the network information may result in these devices being unable to connect to the new network name.
- Notifying guests and others: If you have guests or others who regularly connect to your Wi-Fi network, it’s important to inform them about the change in the network name. This will ensure that they can update the network information on their devices and continue to access your network seamlessly.
- Keeping a record: It is highly recommended to keep a record of the new Wi-Fi name and password in a safe place. This will help you easily refer to the information when reconnecting devices or in case you need to troubleshoot any future connectivity issues.
- Reconfiguring additional network settings: While changing the Wi-Fi name, you may also have the option to adjust other network settings, such as security type, encryption, or channel. Making changes to these settings should only be done if you have a good understanding of the implications and are confident in the adjustments you are making.
By carefully considering these factors and taking the necessary precautions, you can ensure a smooth transition when changing the Wi-Fi name, avoid any connectivity issues, and maintain the security and functionality of your network.
Conclusion
Changing the name of your Wi-Fi network can bring a sense of personalization, ease of use, enhanced security, and improved organization to your internet experience. It allows you to showcase your uniqueness, easily identify your network, and ensure a seamless connection for yourself and your devices.
In this article, we have provided a step-by-step guide to help you change the name of your Wi-Fi network. From accessing your router settings to locating the Wi-Fi name settings, changing the name, and reconfiguring your devices, we have covered everything you need to know to ensure a successful transition.
It’s important to consider several factors, such as device compatibility, network security, updating network information, notifying others, and keeping a record of the new Wi-Fi name and password. By taking these considerations into account, you can avoid potential issues and enjoy a hassle-free Wi-Fi experience.
Remember to consult your router’s user manual or contact your internet service provider (ISP) if you encounter any difficulties or have questions specific to your router model.
With the name of your Wi-Fi network personalized to your liking, you can now enjoy a more unique and easily identifiable Wi-Fi experience. So go ahead, get creative, and make your mark on your Wi-Fi network!