Discord has been a bastion for gaming and other related things since its creation, but with the platform’s popularity, many servers have a lot of people. With each person having different interests in what they want to do in the platform, and the malleability that the platform gives to users, these same users created bots.
What Is Discord?
Discord is primarily a chat application similar to TeamSpeak, Skype, or other professional platforms like Slack. It’s made specifically for gamers and allows them to organize their thoughts, make strategies, and interact with one another. It has voice chat, video calls, and text, allowing the users of the platform to get in and keep in touch however they want.
Discord is useful if you’re playing PC games. Discord makes interactions easier and faster. It also has a search function that allows users to find and follow one another. But, Discord is not just for video game enthusiasts since it can also be used as a social interaction tool for other platforms.
Thanks to this much in terms of functionality, many users have also turned Discord into a forum-style community platform: groups of players with common interests, such as fans of a game or game studio (or even other things like TV shows and series), can join or create “servers,” either public and private, where groups of people can meet each other online and hang out, talking through text, video, or voice.
While many servers in the platform are related to gaming in general, you can also see public servers that focus on a wide variety of topics and discussions, these include things like anime, TV series, movies, self-improvement, role-playing, and last but not the least, making friends and hanging out online. There’s also nothing in their rules that require servers to be made for gaming, so if you want to make a server in Discord to talk about a particular topic, you can make one if you want. Oh, Discord is free to use as well.
What Are Discord Bots?
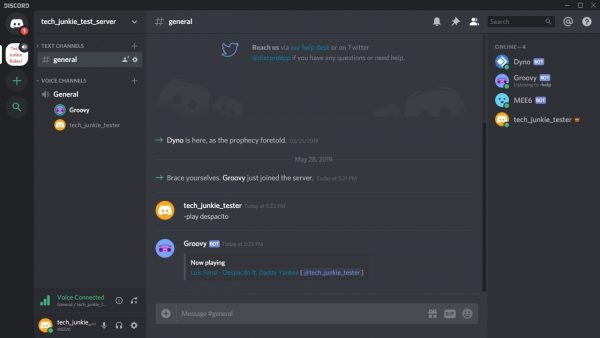
Discord bots join a created server and respond to events in an automated way. You’ll usually see them pop up in various servers like any regular Discord user would, with the only thing separating them from a normal user being their blue “bot” tag after their name.
A Discord bot is usually accompanied by a code that allows it to respond to actions in a server. Whenever a certain occurrence happens in a Discord channel with a bot, it will get notified by the Discord API (Application Programming Interface), and if the bot in question has the code to handle said occurrence, then it’ll go through that bit of code that the coder associated with the said occurrence.
Discord bots provide users with a bit more functionality and make everyone’s life easier when it comes to certain tasks in the server. The best part about it is if you know how, you can code and create your Discord bot and make it do whatever you wish.
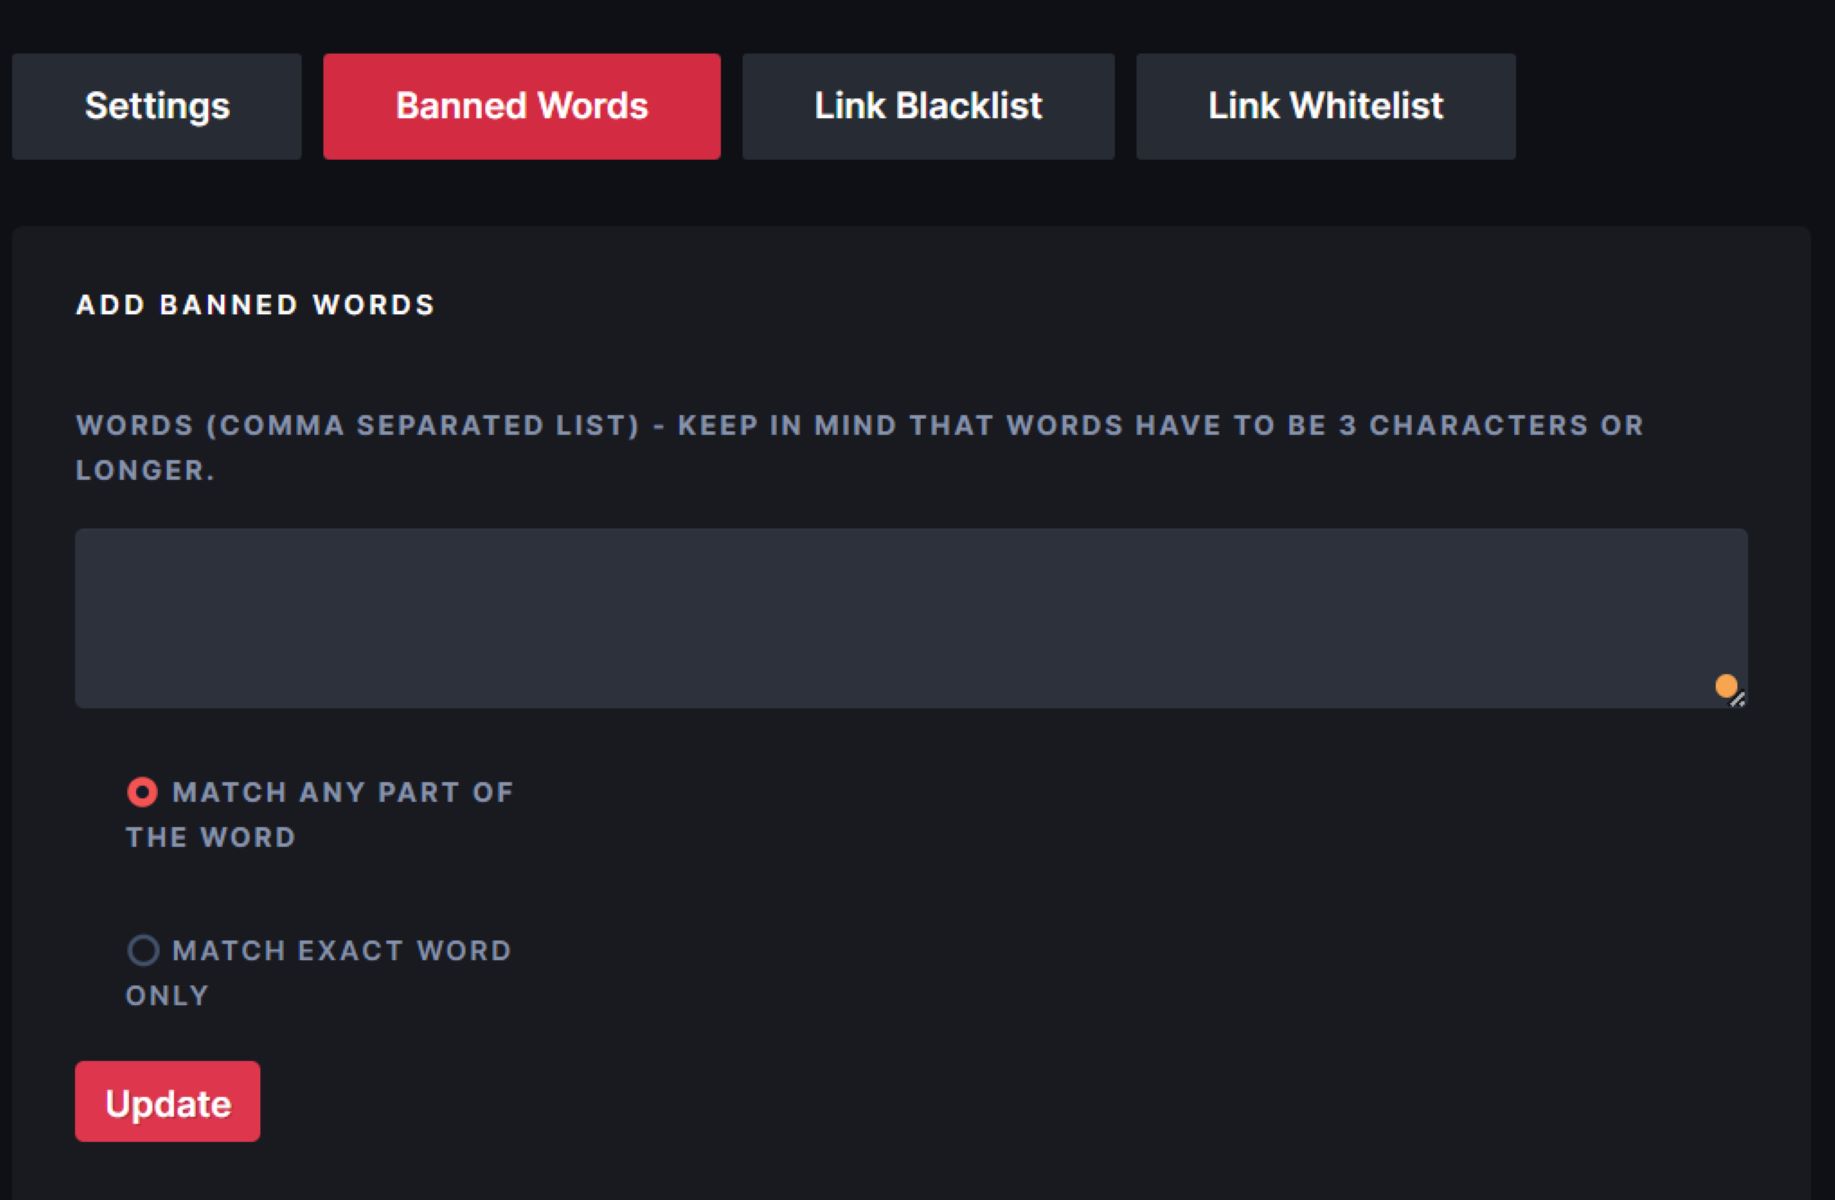
- Chat Bot – Chats and behaves like a human in the server
- Moderation Bot – Will automatically moderate and keep watch over your server; will kick, mute or ban members if they try to spam, disrupt the server in general, or anything of that nature
- Music Bot – Can play music in your Discord server from any website with music like YouTube or Spotify
If you want to know more, here is our list of the top 15 Discord bots to include in your server.
How to Make a Discord Bot?
Whether you’re looking to organize your guild or looking to talk to workmates and colleagues, Discord is a great platform to do so. Discord servers have bots that can help you maintain the community without watching it 24/7.
The good news is that creating your Discord bot is very easy even if you don’t have a programming background. All you need is a relative understanding of computer programming. Follow the steps below to find out how you can create your Discord bot. But before that, we’re going to introduce some things you need to be familiar with.
It would be helpful to know what “libraries” are and how they can make your life easier. There’s some good news when it comes to making bots; there have already been dozens of packages that were created for the Discord API making it a lot easier for people to use. A library will handle tedious tasks, which will allow the server owner to focus on other things.
To put it in much simpler terms, libraries are a package of commands. This chain or package commands is what you’ll use with Discord bots. This also allows the task to be easier and more efficient. Using a library is highly recommended and will save you a whole lot of time.
How to Make Discord Bots Using Python?
Let’s begin this discussion by using Python. Python is a programming language that is used to read and create codes. Python codes tend to have more white space, which allows easier writing and reading for users.
Python for Discord Bots
If you wish to download Python, you can go to Python’s official website to do so.
After you’ve downloaded it, follow the easy installation guide that comes with the download, and you’ll then be ready for the next step of the guide — setting up the discord.py library on your bot.
Setting Up and Using the Discord.py Library
Like we’ve mentioned earlier, using a library whenever possible is key if you want to avoid writing tedious and repetitive low-level code around the Discord API.
The best library to make use of if you’re using Python to create Discord bots is discord.py, available on GitHub for download. Luckily for us, discord.py is very detailed and helpful if you wish to create and program your bot.
Requirement
Discord.py is compatible with Python version 3.5.3 or higher.
Installation
You can get the library directly from PyPI
- python3 -m pip install -U discord.py
If you’re using Windows, then the code below should be used instead:
- py -3 -m pip install -U discord.py
To have voice support, the user should use discord.py[voice] instead of discord.py, e.g.:
- python3 -m pip install -U discord.py[voice]
On Linux, installing voice for the bot needs to have the following dependencies:
- libffi
- libnacl
- Python3-dev
If you’re using a Debian-based system, the following command will get these dependencies:
- $ apt install libffi-dev libnacl-dev python3-dev
Virtual Environments
Libraries keep your discord servers neat and proper. However, you might not have system-wide permissions for this to happen. Python 3.3 came with the virtual environments feature that maintains different versions of libraries.
Here is an in-depth tutorial that you can check out. However, if you’re looking for a quicker fix, you can follow these steps.
Go to the project’s working directory
- $ cd your-bot-source
- $ python3 -m venv bot-env
Start the virtual environment:
- $ source bot-env/bin/activate
On Windows, you start it through:
- $ bot-env\Scripts\activate.bat
Use pip as per usual:
- $ pip install -U discord.py
Now, you’ve set up your Virtual Environments.
Quickstart Page
This page introduces the library feature. If you haven’t gotten them yet, then check the installation section.
Sample Bot
Here’s an example of how to teach bots to act on instructions.
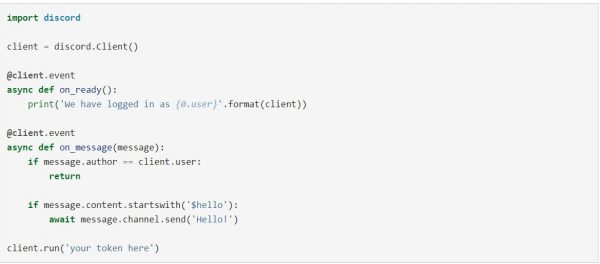
Don’t forget to not name this as Discord.py to avoid any conflict.
Step-by-Step Instructions
- The first line of code is to import the library. If you run into problems, properly install the library by going to the Installing section.
- Next, create a new Client. This client is the connection we’re going to have to Discord.
- We will then use the Client.event() decorator to register a specific event. The discord.py library has many events inside. Since the library is asynchronous, it is better to do things as a callback.
- The on_message() event will trigger once messages have been received. Make sure that the event does not trigger when you send a message. Check if the Message.author is the same as Client.user.
- Then, inspect if the Message.content opens up with “$hello”. If yes, reply to the channel by using Hello!.
- Lastly, run the bot by using your login token.
For Windows OS
- $ py -3 example_bot.py
For Other OS
- $ python3 example_bot.py
How to Make Discord Bots Using Java?
Java is a widely-used programming language that’s trusted by programmers worldwide. Up to this day, Java is still widely used by different companies for different purposes.
If you’re more familiar with Java, Discord bot development is a good way of testing out your skill.
Here, we will discuss two Java Discord wrappers, JavaCord, and Discord4J. Each of these two wrappers has its pros/cons and a slightly different event handler syntax, so it’s up to you to compare the two in question and pick which of these you think fits your coding style. Either way, they’re both great libraries that are gonna get the job done.
First, let us configure your environment, then, we proceed to selecting the IDE, and finally obtaining a library set up for the Discord bot.
Configuring Java for Discord Bot Development
If you’re a beginner programmer or haven’t made code in a language like Java or C#, you’ll immediately see that setting up the environment of your code is a wee bit different in comparison to using node.js/Javascript.
Java development is usually possible through an IDE that’s present on your system. Before you start writing code, you will need to select an IDE, which you have to download and install. Only then can you continue with the task at hand.
We shall now proceed to configure your IDE and library.
The Best Java IDEs to Use
IntelliJ IDEA and Eclipse are two IDEs that you can use to create Discord bots. Both of these two IDEs are stable and trusted by many programmers.
IntelliJ IDEA has an open-source version that you can get for free. It is capable of supporting developments from different operating systems.
Eclipse is another Java IDE that’s around for a long time now. Originally made by IBM back in 2001, it is a stable and very robust development environment that many developers all over continue to use. Eclipse can also run on multiple platforms.
How to Make a Discord Bot Without Coding?
There are several methods available that allow you to create your bots without code.
Zapier
If you’re not a coder or don’t have the time to create your bot but need one for a server, Zapier can help you. You can connect your Discord server to multiple premade apps with the use of Zapier.
Here’s a simple example that can help you out when trying out Zapier.
Let’s say that you run a Discord server and want to have a bot that tells you when it’s gonna rain in a specific area. All you need to do is build a Zap. Then, for your trigger app, choose Weather by Zapier. Next, choose “Will It Rain Today?” as the trigger. After that, remember to save your configuration.
Zapier will then ask for your location via longitude and latitude. Also, it’ll ask you if you prefer to use either Celsius or Fahrenheit.
- Select Continue, to proceed and go to Discord.
- You will then need to choose “Send Channel Message.” Then finally, all you need to do is click on Save and Continue.
Then, you have to link your Discord account to Zapier. You’ll be able to place the bot on the server of your liking.
After that, the next thing to do is to prepare your template. Select which channel the post should go to, and then customize the message sent.
You can also pull in the information from the trigger step by selecting the fields button, which will open a pull-down menu.
Select anything on this menu to add that info into your message. You’re almost done. You can then enable text to speech optionally, change the name of the bot, and give a custom icon, before selecting Continue.
Testing the Bot
Now, we can begin to test the bot.
- Select “Send Test to Discord,” and you’ll eventually see a success message.
- You’ve now set up a simple bot for use in a server.
Discord Bot Maker
Discord Bot Maker is a program that allows users to create bots without needing to use a large amount of code. This bot building software is tailored for newbies who wish to add bots to their server.
Many of the things that Discord Bot Maker can do is pretty simple. However, with a tiny bit of coding know-how and some pretty simple scripts, you can make some pretty sophisticated bots for any purpose.
Developers Application
To use the Discord Bot Creator, go to the “Create Applications” page and set up your bot.
App Name
This is used when you are going to invite a bot to your server.
App Description
Additional information about your bot can be found here. All the necessary information can be placed here. This is also helpful when looking for a bot to connect to your server.
To link, select “Create Bot User” to create a bot with the information you’ve placed.
Linking a Bot Account
If you want to link to a Discord bot maker, all you need to do is go to Settings. However, you will need two things, which are the “Bot Token” and “client ID.” Both can be acquired from the developer’s website.
For this part, we are going to set up a bot entirely from scratch. However, please remember to choose a template before proceeding.
Creating an event
Time to start having fun and create your bot. The example below will talk about a server join event.
To check if the bot is working, it will need to send a message upon joining the server. Then, we’ll know that if this message doesn’t show up in the server, we’ve forgotten to do something, or forgot to add in some code, et cetera.
Setting up an Event
First things first, select the “Events” tab on Discord Bot Maker.
You will first need to create an event and name it. This is to allow the bot to recognize the event and name it correctly. It is better to make it simple in case you want to edit it in the future.
Then, you’ll have to select “bot join Server” from the Event Trigger list. This is to inform the bot of its task after it joins a server.
Adding Actions for Your Bots
Now, let’s give your bot an action to perform. The default action will be “Send Message.” What you need to do is define a specific channel to be the default one. Then you will need to insert a message for the bot to reply with.
Connecting a Bot to Your Discord Server
First off, we need to start a bot before having it join a specific server. This is a pretty simple process. Simply go to the “project” tab and choose “run project.”
Once the project has begun to run, the window will immediately change color to a blue background, if this doesn’t happen, wait a few moments. It’ll start eventually.
To link a bot to a server, simply go to the settings tab. Underneath the settings tab, you can find links, the invite link, and a generator for you to create a custom link. The preset invite link will be used to give the bot permissions to the server.
Select the preset link, and let the bot hop into your server.
Sample Commands
Here is the code for a command that kicks out selected subscribers.
{“name”:”Kick”,”permissions”:”KICK_MEMBERS”,”restriction”:”1″,”actions”:[{“condition”:”1″,”comparison”:”0″,”value”:”1″,”iftrue”:”3″,”iftrueVal”:”2″,”iffalse”:”0″,”iffalseVal”:””,”name”:”Check Parameters”},{“channel”:”0″,”varName”:””,”message”:”“`\nPlease mention one user in order to kick them!\n!Kick [@user] [reason]\n“`”,”storage”:”0″,”varName2″:””,”name”:”Send Message”},{“name”:”End Action Sequence”},{“info”:”1″,”infoIndex”:”2″,”storage”:”1″,”varName”:”reason”,”name”:”Store Command Params”},{“member”:”0″,”varName”:””,”reason”:”${tempVars(\”reason\”) || \”\”}”,”name”:”Kick Member”}]}
To make a kick command, first, select “Create New Command.”
Put “kick” as the command’s name and to restrict your bot to the server, select “Server only.”
Next, to prevent the users from abusing this command, we’ll have to set which permissions the user would need, Typically, it would be set to “Kick Members.”
Actions
Before starting, you need to check the parameters of the command and to at least mention one person.
To check that you have one person mentioned, choose under the condition: “number of Members Mentioned are” and then set the comparison to “=” with the number 1.
Since we don’t have any more actions, for now, leave the other two fields empty.
Then, the next step to make is to compose a message in case the command does not work. You can try putting in a message like “Mention a user to kick !Kick [@user] [reason]”.
Then, you should add an End Action Sequence. This is located when you navigate to “other stuff.” The End Action sequence will inform the bot that part of the sequence has been completed. Also, that sequence doesn’t need to be continued.
For the “Reason” command, this is where you put your command parameters. The Reason command can also be found in the other stuff tab. We need it to store all the info after the user in question has been kicked.
You can try out this example:
Source Info: Multiple Parameters Starting from parameter number: 2 Store in: Temp Variable Variable Name: reason
Lastly, select “kick Member” from the Member Control Panel.
On the kick member options, choose “mentioned user as the Member” and the reason for this will be set as ${tempVars(“reason”) || “”}
This is just one of the many things that you can create here so check other sites if you want to know more.
BotGhost
BotGhost is a Discord bot creation site that has a huge range of different functions that you can enable and disable.
Examples include:
- Server Announcements
- Automoderator
- Custom Commands
- Music Bot
- Fortnite Stats Bot
- Basic Moderation
- Trivia Bot
To activate these, choose the function on your left and click on “Module Enabled” underneath the header. Remember: whenever you create changes on the bot you need to first save them by selecting “Save Bot” and then restart the bot by selecting “Stop Bot” and then “Start Bot” again.
How to Place Your Bot on Discord?
Step 1: Create a Test Server
You will need a test server to test out your bot. Create a new server by clicking on the plus icon on your screen.
A pop-up will appear and will ask if you want to create a new server or join an existing one.
Choose to create a new server and then don’t forget to name it. If you want a better ping, an option to change server location is also available.
If everything goes well, you should be able to see the newly made server.
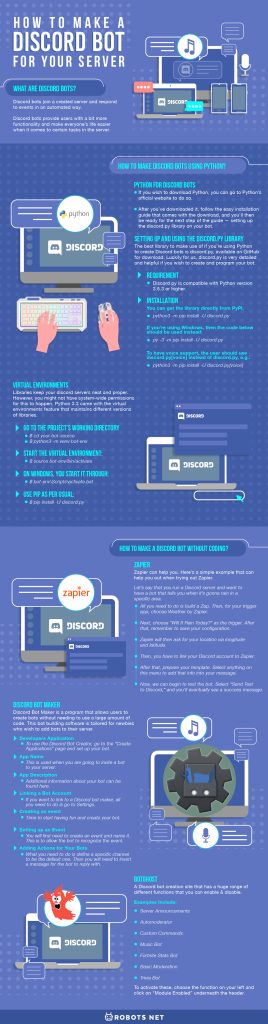
Step 2: Generate an Authentication Token
For you to take command of your bot, you’ll need to register it to your account. To register your bot, go to Discord Developers Portal and log in using your account credentials.
After you get in, the bot dashboard will be visible. Choose the New Application option. Then, a pop-up prompt will appear and ask you to name your bot. Select the Create option and let Discord generate an API application.
When the app is created, you’ll see an overview of the newly made bot application. You’ll even get to see info regarding the client. The Client ID and Client Secret will both be used as an authorization token.
Choose the Bot menu option on Settings to create a bot application and add a bot user. After generating the bot, you’ll receive an overview of your bot. Peek at the bot’s Token section and paste the authorization token.
Step 3: Add the Bot to Server and Set Permissions
Check the settings menu and look for the OAuth2 section. It’s here that we can define the scope and breadth of the bot’s permissions. As we just wish to enable a bot, select the bot option. Then, take a peek at the authorization URL and see that the permissions=0 part is indicated. This means that there are no permissions set.
To change this, go to the bot permissions section. For the bot to have the ability to perform actions, select an option like Send Messages and Read Message History. After selecting the actions you want, the number on the permissions in the authorization URL has been updated.
Last but not the least, copy the URL of the bot and paste it on your web browser. You will then be asked to what server would you like to add the bot in. Lastly, click the Authorize button and the bot is now in the server of your choosing.