Introduction
Discord has become a popular platform for gamers and communities to connect and communicate. The ability to create and code your own Discord bot opens up a world of possibilities for customizing your server and enhancing the user experience. Whether you want to add moderation features, automate tasks, or create fun games, learning how to code a Discord bot is a valuable skill to have.
In this article, we will explore the process of creating a Discord bot from scratch. We will cover everything from setting up the development environment to adding advanced functionality to your bot. By the end of this guide, you will have the knowledge and tools to create your very own powerful and versatile Discord bot.
Before we get started, let’s clarify what exactly a Discord bot is. Simply put, a bot is an automated program that can perform specific tasks on a Discord server. Bots can join a server, interact with users through messages, and perform various actions based on predefined commands or events. They can be used to moderate a server, provide information, play music, or even create custom games for users to enjoy.
To code a Discord bot, you will need some programming knowledge, specifically in JavaScript. JavaScript is widely used for web development and is the primary language supported by the Discord API. If you are new to programming or JavaScript, don’t worry! This article will guide you step-by-step and provide code examples to help you understand the process.
So, if you’re ready to dive into the exciting world of Discord bot development, let’s get started by setting up the development environment!
Setting Up the Environment
In order to start coding your Discord bot, you will need to set up your development environment. Here are the steps to get you started:
1. Install Node.js:
In order to run your bot’s code, you will need to have Node.js installed on your machine. Node.js is a JavaScript runtime that allows you to execute JavaScript code outside of a web browser. Visit the official Node.js website (https://nodejs.org) and download the appropriate version for your operating system. Follow the installation instructions to complete the setup.
2. Create a New Project Directory:
Next, create a new directory for your Discord bot project. You can choose any name for your directory. Open your terminal or command prompt and navigate to the desired location where you want to create your project directory. Use the following command:
mkdir my-discord-bot
3. Initialize npm:
Npm (Node Package Manager) is a package manager for Node.js. It allows you to easily manage dependencies and libraries required for your project. Inside your project directory, run the following command:
npm init -y
This will create a `package.json` file, which will store information about your project and its dependencies.
4. Install Discord.js:
Discord.js is a powerful library that provides an interface for interacting with the Discord API. It simplifies the process of creating and managing your Discord bot. Install Discord.js by running the following command:
npm install discord.js
This will install the latest version of Discord.js and its dependencies into your project.
5. Set Up Your Bot:
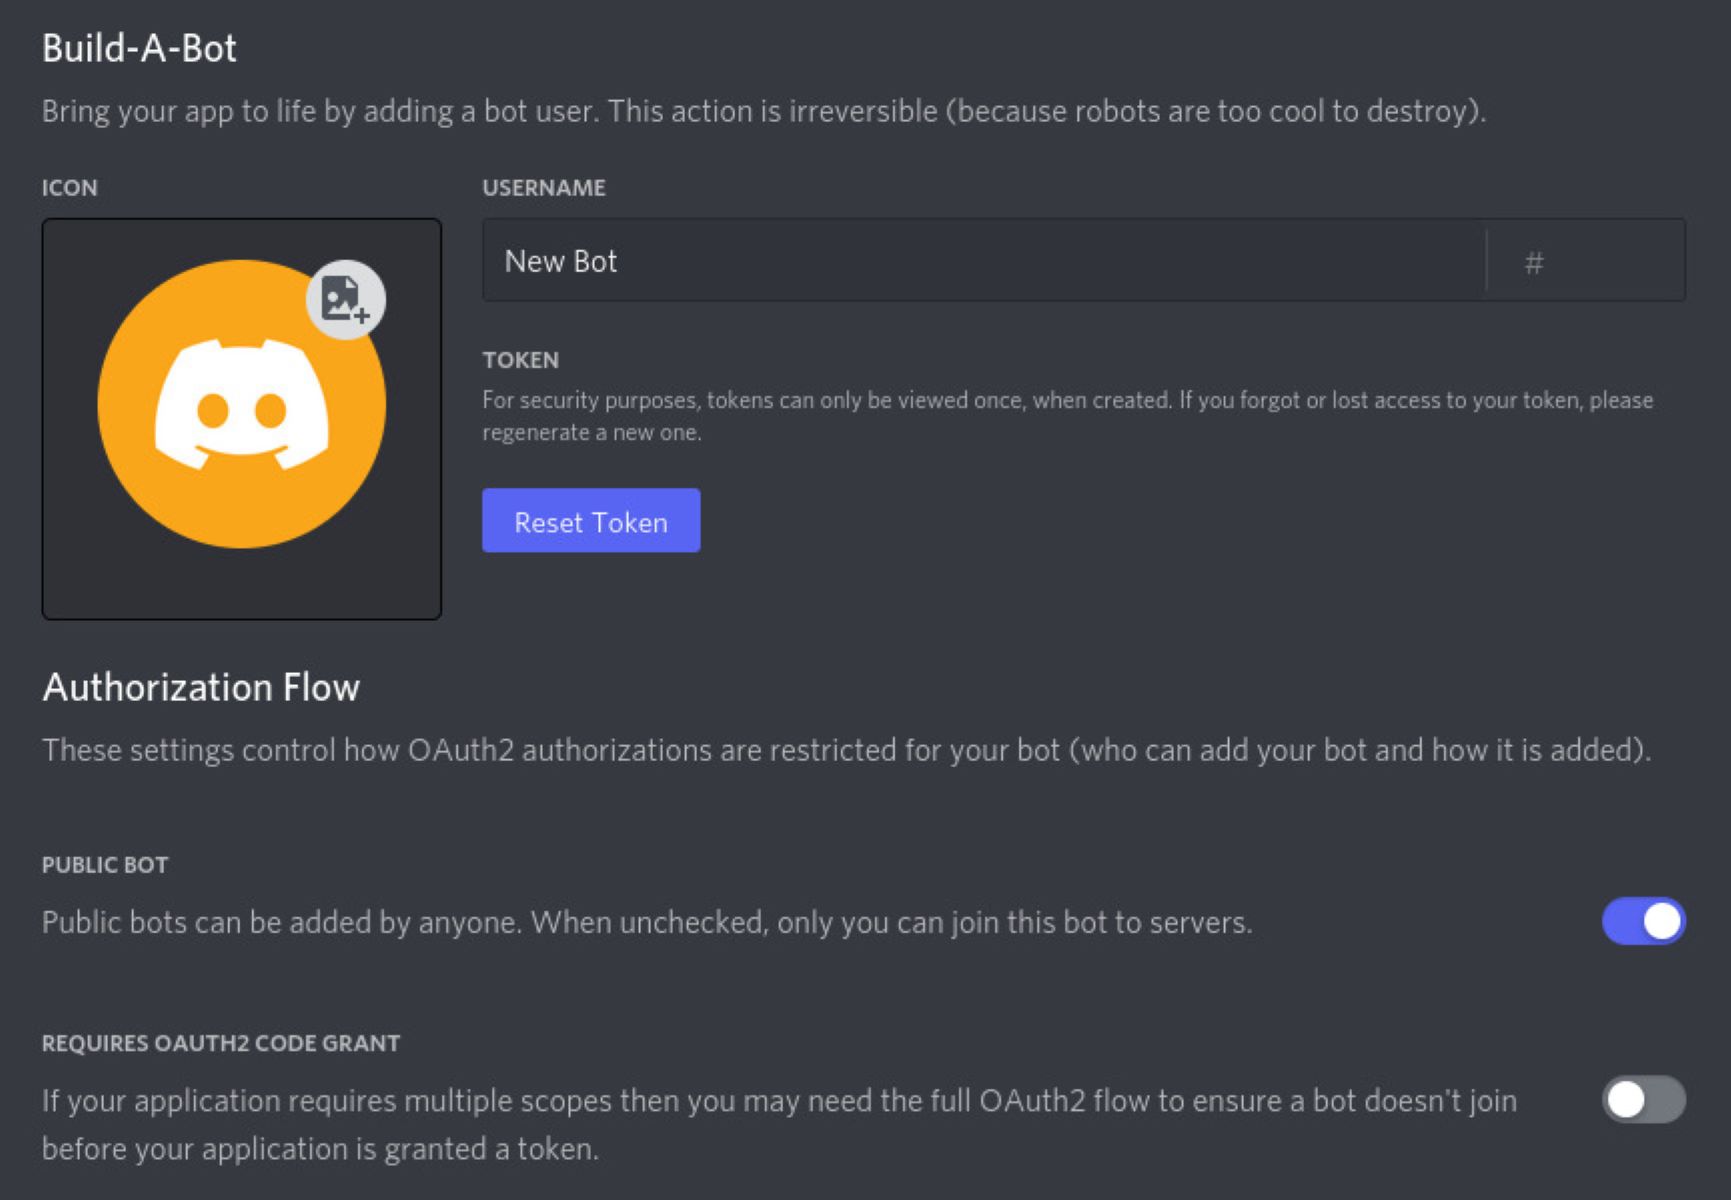
Before you can start coding your bot, you need to create a new application and obtain a bot token from the Discord Developer Portal. Go to the Discord Developer Portal (https://discord.com/developers/applications) and create a new application. Give it a name and add an avatar if desired. Then, navigate to the “Bot” tab and click on “Add Bot”. Customize the bot’s username and permissions as needed, and copy the bot token.
With your environment set up, you are now ready to start coding your Discord bot. The next section will guide you through the process of creating a new Discord bot.
Creating a New Discord Bot
Now that you have set up your development environment, it’s time to create a new Discord bot. Follow these steps to get started:
1. Create a New Discord Application: Go to the Discord Developer Portal (https://discord.com/developers/applications) and navigate to your applications. Click on “New Application” and provide a name for your bot. You can also add an avatar if you wish. Once you have created your application, you will be redirected to the settings page.
2. Add a Bot to Your Application: In the settings page of your application, navigate to the “Bot” tab. Click on “Add Bot” to create a bot for your application. Customize the bot’s username and permissions as desired. This is where you will manage your bot’s settings and functionality.
3. Obtain the Bot Token: In the “Bot” tab of your application’s settings, you will find the bot token. This token acts as the authentication key for your bot to connect to Discord’s API. It is important to keep this token secure and not share it with anyone.
4. Invite Your Bot to a Server: In order for your bot to join a Discord server, you need to generate an invite link for it. In the “OAuth2” tab of your application’s settings, under the “Scopes” section, select “bot”. This will generate a URL link with checkboxes for permissions. Customize the permissions based on your bot’s intended functionality. Copy the generated invite link and open it in a new tab. Select a server where you want to add your bot and authorize the permissions. Your bot will now be added to the selected server.
Congratulations! You have successfully created a new Discord bot and invited it to a server. In the next section, we will explore how to obtain and use the bot token to authenticate your bot and establish a connection with Discord’s API.
Adding the Bot to a Server
Once you have created your Discord bot, the next step is to add it to a server of your choice. Adding the bot to a server allows it to join the server and start interacting with users. Follow these steps to add your bot to a server:
1. Generate an Invite Link: In the Discord Developer Portal, go to your bot’s settings and navigate to the “OAuth2” tab. Under the “Scopes” section, select the “bot” checkbox to add the bot to your invite link. Specify the permissions your bot requires in the “Bot Permissions” section. Discord will automatically generate an invite link based on your selections.
2. Copy the Invite Link: Once you have customized the permissions and settings, click on the “Copy” button next to the generated invite link. This will copy the link to your clipboard and allow you to paste it in the desired server.
3. Open the Invite Link: Open a new tab in your web browser and paste the invite link into the address bar. Press Enter to open the link. You will be directed to the Discord authorization page.
4. Authorize the Bot: On the Discord authorization page, you will be prompted to select a server to add the bot to. Choose the server where you want your bot to join by clicking on the drop-down menu and selecting the server. Make sure you have the necessary permissions to add bots to the server. After selecting the server, click on the “Authorize” button.
5. Complete Verification: If the server has verification requirements (such as phone verification), you may need to complete the verification process before the bot can join the server. Follow the on-screen instructions to verify your account and complete the process.
Once the verification is complete, your bot will join the selected server. You will now be able to see your bot on the member list and interact with it. Congratulations, you have successfully added your bot to a Discord server!
In the next section, we will explore how to obtain the bot token, which is necessary for authenticating your bot and establishing a connection with Discord’s API.
Obtaining Discord Bot Token
In order to authenticate your Discord bot and establish a connection with Discord’s API, you will need to obtain a bot token. The bot token serves as the authentication key for your bot and allows it to interact with the Discord servers. Follow these steps to obtain the bot token:
1. Go to the Discord Developer Portal: Visit the Discord Developer Portal (https://discord.com/developers/applications) and navigate to your applications. If you haven’t created an application yet, refer to the previous section on how to create a new Discord bot.
2. Select Your Application: Once you’re in the Developer Portal, select your application from the list of applications. This will take you to your application’s settings page.
3. Navigate to the Bot Tab: In the settings page of your application, click on the “Bot” tab located on the left-hand side. This is where you can manage your bot’s settings and functionality.
4. Copy the Bot Token: In the “Bot” tab, you will find a section called “TOKEN”. Underneath it, you will see a “Copy” button. Click on the “Copy” button to copy the bot token to your clipboard. It’s important to keep this token secure and not share it with anyone.
Once you have obtained the bot token, you can use it to authenticate your bot and establish a connection with Discord’s API in your code. Make sure to keep the bot token safe and never expose it publicly or share it with unauthorized individuals. If your bot token is compromised, anyone with the token can assume control of your bot and perform actions on your behalf.
In the next section, we will explore the basic functionality of a Discord bot and how to implement it in your code. So let’s dive into coding the core features of your bot!
Basic Bot Functionality
Now that you have set up your environment, created a Discord bot, and obtained the bot token, it’s time to implement the basic functionality of your bot. This section will guide you through the process of responding to messages, sending messages, and changing your bot’s status.
1. Responding to Messages: One of the fundamental tasks of a Discord bot is to respond to messages sent by users. To achieve this, you can use the `message` event provided by the Discord.js library. This event is triggered whenever a message is sent in any channel your bot has access to. You can access the message content, author, and other details. Your bot can then analyze the message and send a response based on predefined conditions or commands.
2. Sending Messages: In addition to responding to messages, your bot can also send messages to channels. To send a message, you can use the `send()` method on a channel object. You can specify the content of the message, and optionally customize the appearance of the message by using Discord’s rich embeds to create beautiful and informative messages.
3. Changing Bot’s Status: The status of your bot represents its online presence on Discord. You can customize the status to show what your bot is currently doing, such as “Playing a Game” or “Listening to Music”. You can update the bot’s status by using the `presence` property of the client object in Discord.js. This allows you to set the activity and status of your bot dynamically.
By implementing these basic functionalities, your bot will be able to receive messages, respond to users, and send messages to channels. Experiment with these features and explore the various possibilities for interaction and engagement with your users. In the next section, we will delve into more advanced bot functionality, including event handling, role assignment, and fetching information from Discord.
Responding to Messages
A key feature of a Discord bot is the ability to respond to messages sent by users. By listening for the `message` event provided by Discord.js, you can analyze incoming messages and send appropriate responses. Here’s how you can implement this functionality in your bot:
1. Listen for the `message` Event: In your code, create an event listener for the `message` event emitted by the Discord client. This event will be triggered whenever a message is sent in any channel your bot has access to. The event provides a `Message` object, which contains information about the message, such as the content, author, and channel.
2. Analyze the Message: Inside the event listener, you can access the message content using `message.content`. You can then use conditions and logic to analyze the message and determine the appropriate response. For example, you can check if the message starts with a specific command prefix or if it contains certain keywords.
3. Send a Response: Once you have determined the appropriate response, you can use the `send()` method on the `Message` object to send a message back to the channel. You can provide the content of the response as an argument to the `send()` method. You can also format the response using Discord’s formatting options, such as making text bold or including URLs.
4. Additional Features: Depending on the complexity of your bot, you can implement additional features such as command handling, message filtering, or context-based responses. You can use external libraries or create your own logic to handle these features effectively.
By implementing the ability to respond to messages, your Discord bot can engage in conversations with users, provide information, execute commands, or perform various actions based on user input. Use your creativity to make your bot interactive and user-friendly. In the next section, we will explore sending messages from your bot and changing its status to enhance the bot’s functionality and user experience.
Sending Messages
In addition to responding to messages, your Discord bot can also send messages to channels. This feature allows your bot to provide information, updates, or notifications to users. Here’s how you can implement sending messages in your bot:
1. Obtain a Channel Object: To send a message, you need to obtain the channel object where you want the message to be sent. You can do this by using the `channels` collection provided by the Discord client. The collection contains all the channels your bot has access to.
2. Use the `send()` Method: Once you have the channel object, you can use the `send()` method to send a message to that channel. The `send()` method accepts the content of the message as a parameter. This can be a simple text message or a more complex embed message with formatting and attachments.
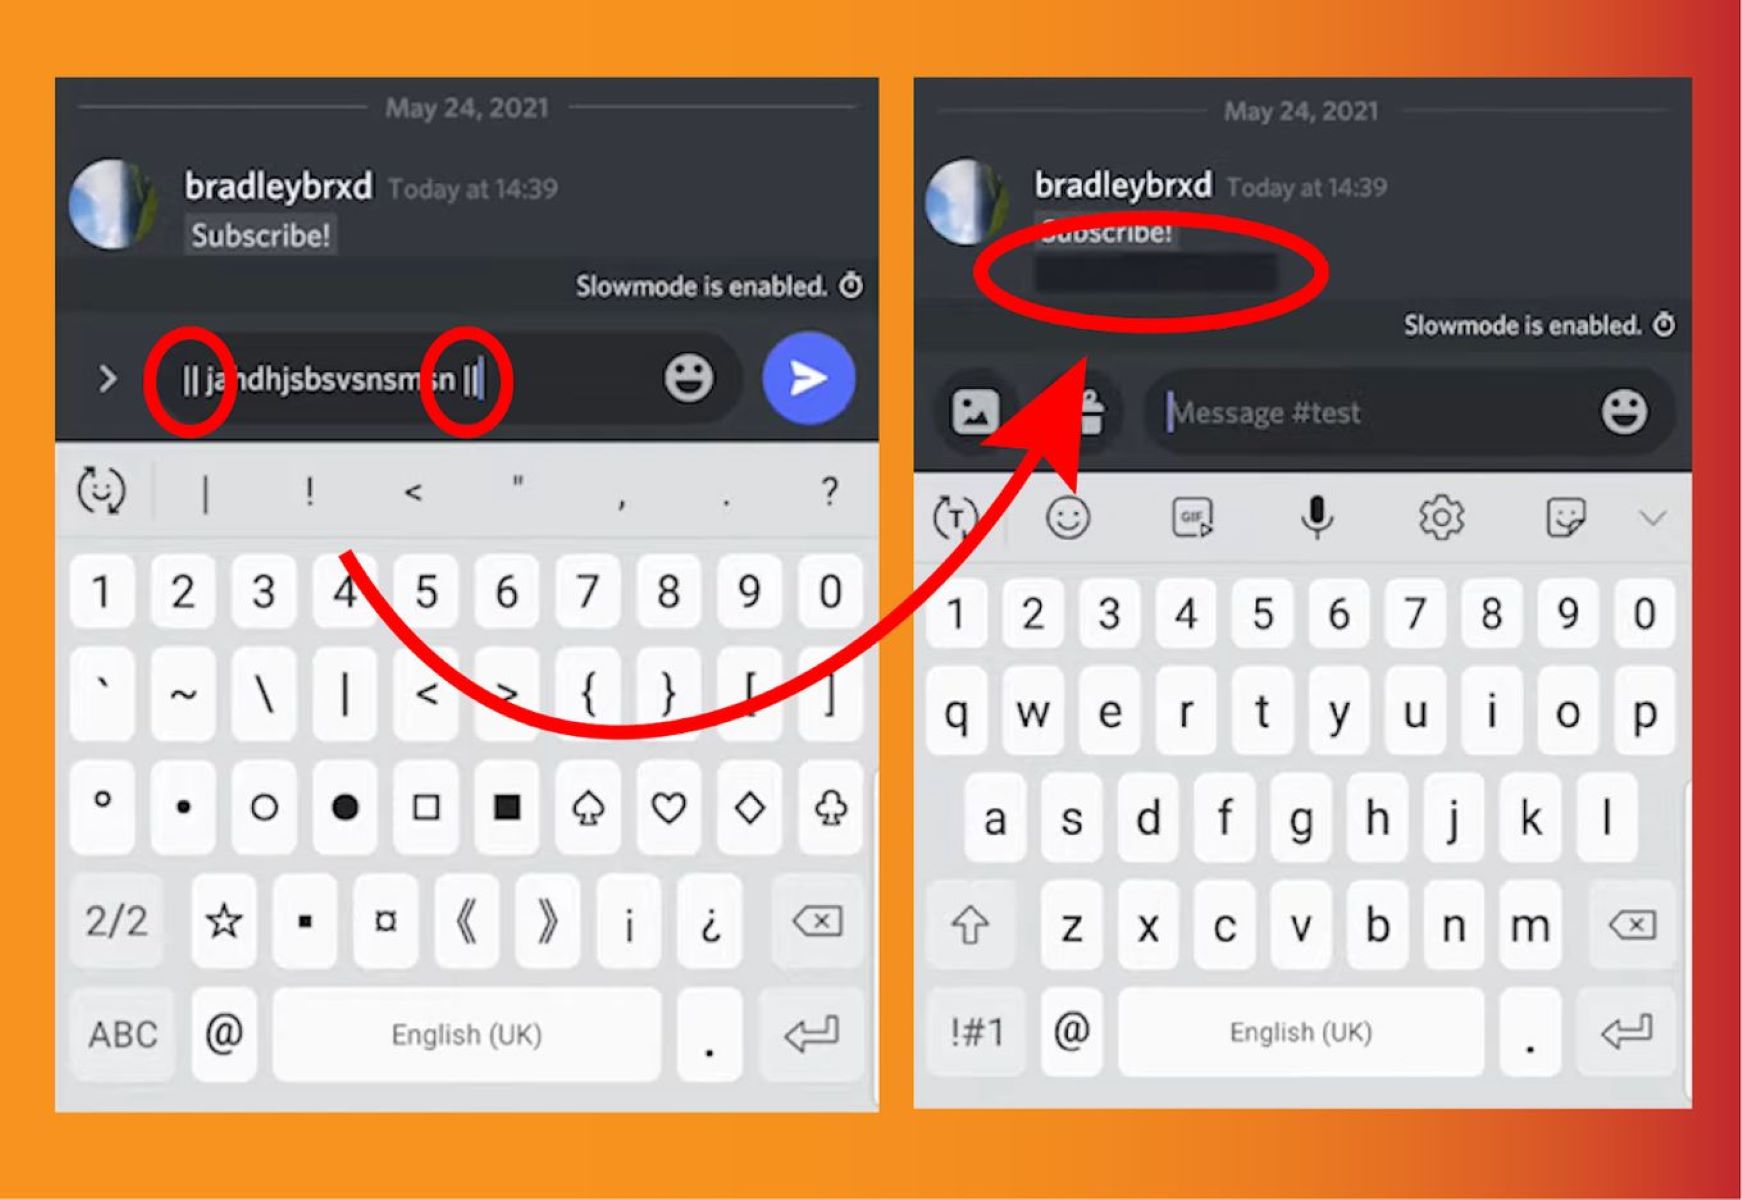
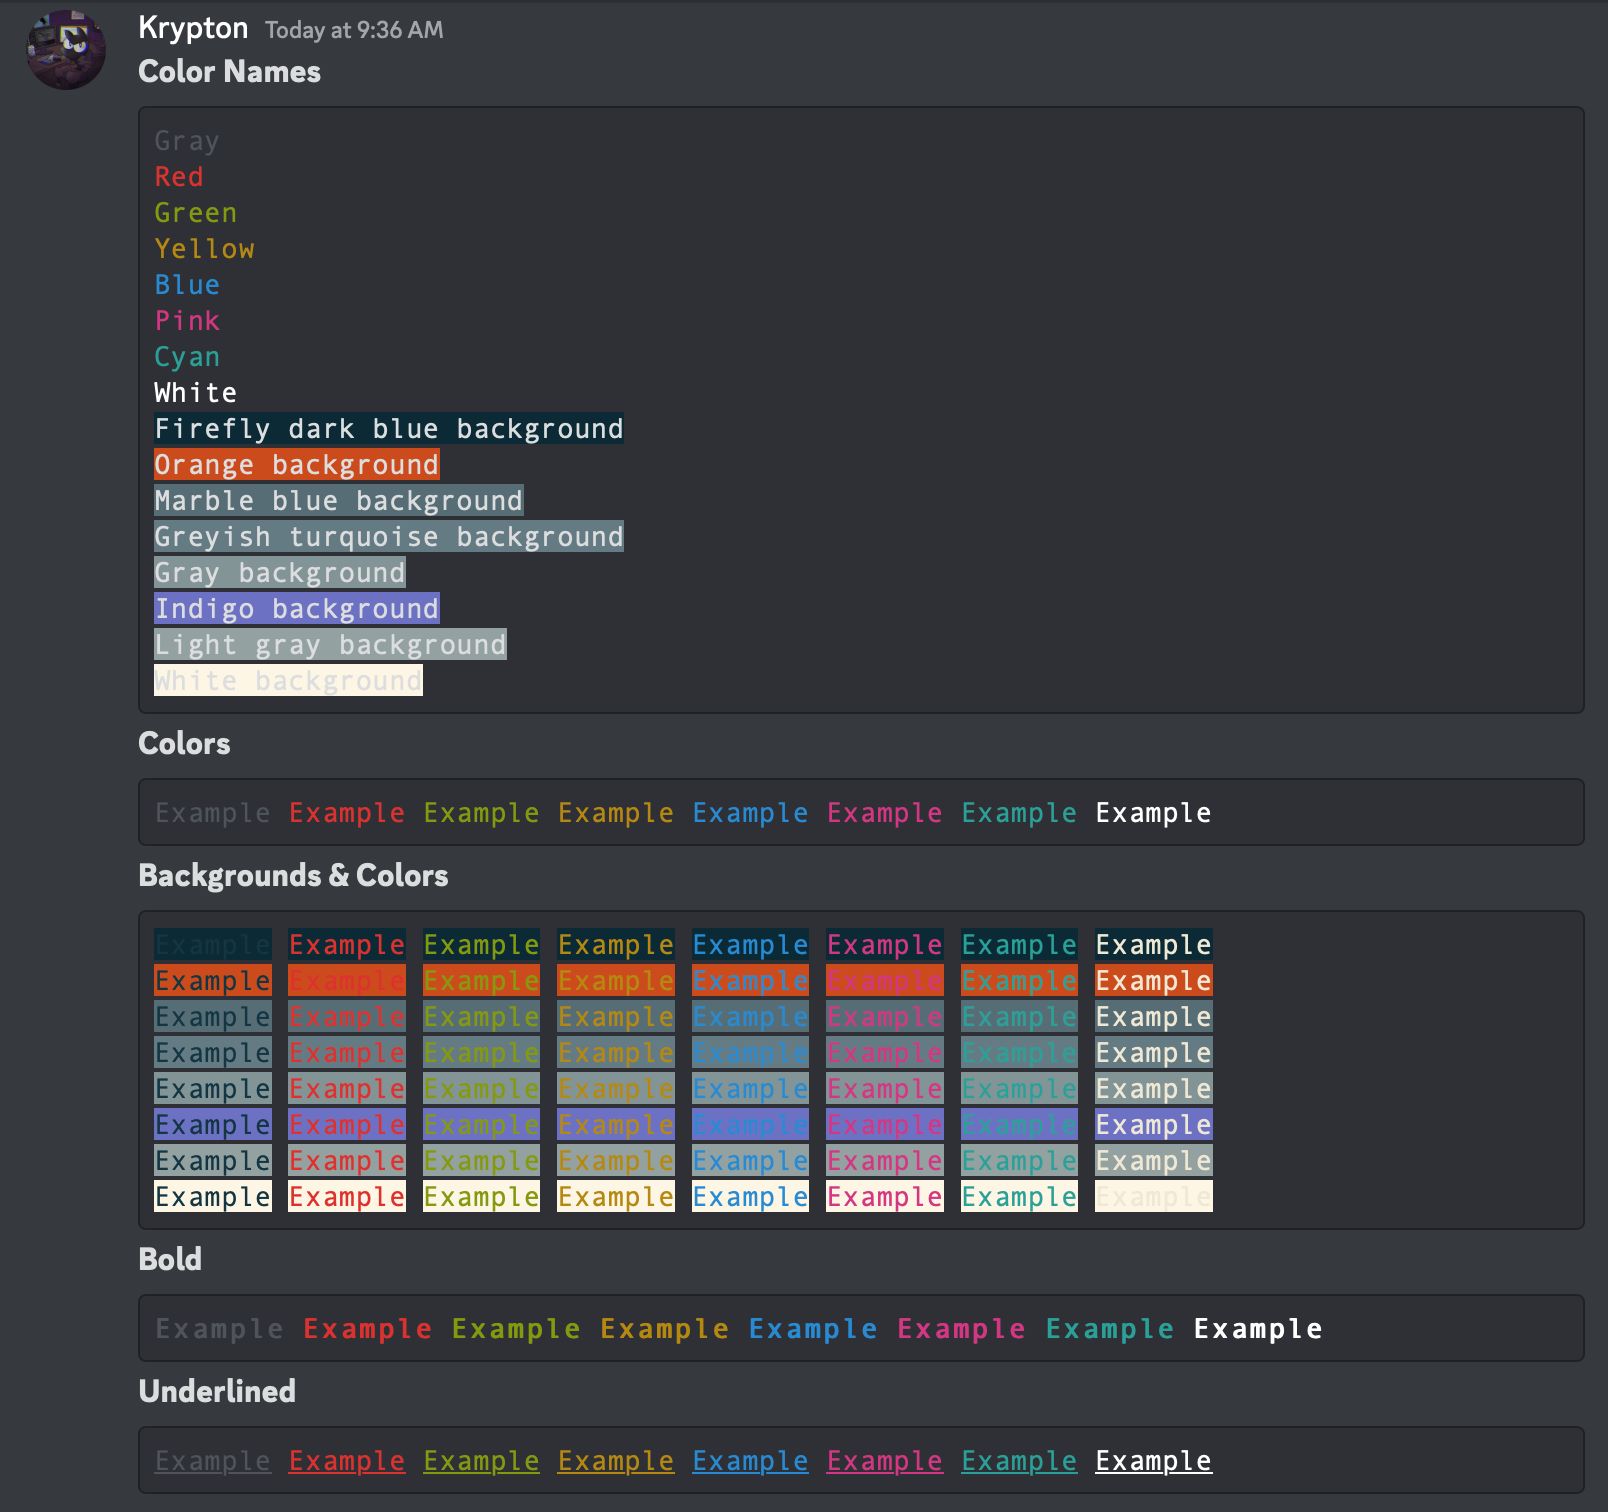
3. Formatting Messages: Discord allows you to format messages using Markdown and Discord’s own formatting syntax. You can make text bold, italic, underline, or use different colors. Additionally, you can include URLs, emojis, or attach files to your messages. By leveraging these formatting options, you can create visually appealing and informative messages for your users.
4. Embed Messages: Discord also provides a feature called message embedding, which allows you to create rich and interactive messages. You can include titles, descriptions, fields, and even embed images or video links. Embed messages are useful for displaying information in a structured and visually appealing way.
By implementing the ability to send messages, your Discord bot can provide updates, notifications, or information to users in an organized and visually appealing manner. Experiment with different message formats and embedded messages to enhance the user experience. In the next section, we will explore how to change your bot’s status to reflect its current activity or presence on Discord.
Changing Bot’s Status
Changing your Discord bot’s status is a great way to indicate its current activity or presence to users. By customizing the bot’s status, you can let users know if your bot is playing a game, listening to music, or performing some other activity. Here’s how you can implement this functionality in your bot:
1. Access the Client Object: To change your bot’s status, you need to access the client object provided by the Discord.js library. The client object represents your bot and allows you to interact with Discord’s API. You can access the client object by instantiating a new instance of the `Discord.Client` class.
2. Set the Presence Property: The client object has a property called `presence`, which represents the bot’s presence or status. You can set the `activity` property of the presence object to specify the bot’s activity. The `activity` property accepts an object with properties like `name`, `type`, and `url`.
3. Set Activity Name and Type: The `name` property represents the name of the activity, such as the game being played or the music being listened to. The `type` property represents the type or category of the activity, such as “Playing”, “Listening to”, or “Streaming”. You can choose from predefined activity types available in Discord.js or use a custom type.
4. Optional: Set a URL: If applicable, you can also set the `url` property of the activity object to provide a link related to the activity. For example, if your bot is streaming a video, you can set the `url` property to the stream’s URL to provide direct access to the stream.
By changing your bot’s status, you can provide users with valuable information about what your bot is currently doing. This allows for a more interactive and engaging user experience. Experiment with different activity names, types, and URLs to cater to the specific functionality of your bot. In the next section, we will explore how to add commands to your bot for enhanced functionality and user interactions.
Adding Commands
Adding commands to your Discord bot allows users to interact with it in a structured and controlled manner. Commands allow users to trigger specific actions or request information from your bot. Here’s how you can implement command functionality in your bot:
1. Define Command Prefix: A command prefix is a special character or set of characters that users use to indicate that they are invoking a command. Common command prefixes are `!`, `.`, or `?`. Choose a prefix that is easy to remember and use, and specify it in your code.
2. Implement a Command Handler: A command handler is responsible for processing user commands and executing the appropriate actions. It takes the user’s message, extracts the command and any arguments, and executes the corresponding code. You can define a command handler function and call it whenever a message starts with your command prefix.
3. Parsing Commands and Arguments: Inside the command handler, you can parse the user’s command and any associated arguments. You can split the message content using spaces to separate the command from the arguments. Then, you can check if the command exists and perform the desired action based on the command and its arguments.
4. Execute Command Actions: Once you have parsed the command and its arguments, you can execute the appropriate action. This can range from sending a message, performing a calculation, fetching data from an API, or executing more complex functionality. You can use conditional statements or switch cases to handle different commands and execute the corresponding actions.
By adding commands to your bot, you give users a structured and intuitive way to interact with it. This allows for a more user-friendly and controlled experience. You can expand the functionality of your bot by adding more commands and incorporating additional features such as command categories, command aliases, or command cooldowns. In the next section, we will explore more advanced functionality, including event handling and role assignment in your bot.
Command Prefix and Command Handler
In order to implement command functionality in your Discord bot, you’ll need to define a command prefix and create a command handler. The command prefix is a special character or set of characters that users type before a command to indicate that they are invoking a specific action. The command handler is responsible for processing user commands and executing the appropriate actions. Here’s how you can implement these components effectively:
1. Define a Command Prefix: Choose a command prefix that is easy to remember and distinguish from regular messages. Common prefixes include `!`, `.`, or `?`. When receiving a message, check if it starts with the command prefix to determine if it is a command. For example, if the prefix is `!`, a message starting with `!help` would be a command.
2. Create a Command Handler: The command handler is a function that handles user commands. It takes the user’s message, extracts the command and any arguments, and executes the corresponding actions. You can define a command handler function that accepts the client, message, and arguments as parameters.
3. Parsing Commands and Arguments: Inside the command handler, parse the user’s command and any arguments based on your defined command prefix. You can split the message content using spaces and extract the first word after the prefix as the command. Any subsequent words will be treated as arguments for the command. You can then execute the appropriate action based on the command and its arguments.
4. Command Not Found: It’s good practice to handle cases where a user enters an invalid or unknown command. You can implement an error message or a custom response when a user triggers a command that doesn’t exist. This informs users that the command is invalid and allows for a better user experience.
By defining a command prefix and creating a command handler, you establish an organized and user-friendly way for users to interact with your bot. This structure allows your bot to handle commands effectively, execute the desired actions, and provide a better user experience. In the next section, we will explore advanced functionality, such as creating command categories and handling command arguments.
Creating Command Categories
As your Discord bot grows in functionality, organizing commands into categories can help improve user experience and make it easier for users to navigate the available commands. Creating command categories allows you to group related commands together and provide a more structured and intuitive command system. Here’s how you can implement command categories in your bot:
1. Define Command Categories: Start by deciding on the different categories that your commands will fall into. For example, you may have categories such as “General”, “Moderation”, “Fun”, or “Music”. Think about the functionality and purpose of your commands and group them accordingly.
2. Structure Your Commands: Organize your command files into separate folders or modules for each category. Each folder/module will contain the commands specific to that category. This ensures that commands are logically organized and separated for easy management.
3. Command Handler Modification: In your command handler, modify the logic to account for command categories. When a user enters a command, extract the category and command name from the user’s message. Use this information to locate the corresponding command file in the appropriate category folder/module and execute the command’s action.
4. Implement Help Command: To assist users in navigating your bot’s commands, create a help command that provides information on available commands and their usage within each category. This command can display a list of categories and the commands contained within each category.
By implementing command categories, you create a well-organized and user-friendly command structure for your Discord bot. Users can easily identify related commands within a specific category and locate the commands they need. Remember to regularly review and update your command categories as your bot evolves and new commands are added. In the next section, we will explore adding arguments to commands for increased flexibility and functionality.
Adding Arguments to Commands
Adding arguments to commands in your Discord bot allows for increased flexibility and functionality. Arguments allow users to provide additional information or parameters when executing a command, enabling your bot to process their inputs and perform specific actions accordingly. Here’s how you can implement command arguments in your bot:
1. Define Command Syntax: Determine the required arguments for each command and define the syntax for users to input them. Use placeholders or brackets to indicate where users should provide their arguments. For example, a command syntax could be `!play [song name]`, where `[song name]` represents the argument for the song the user wants to play.
2. Parse Command Arguments: Modify your command handler to extract and parse the provided arguments from user commands. Split the user’s message after the command and treat the resulting segments as individual arguments. You can then access and use these arguments in your command logic.
3. Handle Missing or Invalid Arguments: Implement error handling to check if users have provided the required arguments. If any arguments are missing or invalid, send an error message specifying what is needed and how to correctly format the command. Inform users about the expected arguments and guide them to input the command correctly.
4. Optional Arguments: Consider allowing certain command arguments to be optional. This provides users with flexibility and enables them to customize the command’s behavior based on their preferences. Specify default values for optional arguments, which will be used if no value is provided by the user.
By adding arguments to your commands, you can create more dynamic and powerful interactions with users. Users can supply specific inputs that modify the behavior of the commands, allowing for personalized and tailored experiences. Experiment with different types of arguments, such as strings, numbers, or flags, to provide a wide range of functionalities. In the next section, we will explore advanced functionality, including event handling and role assignment in your Discord bot.
Advanced Bot Functionality
In addition to the basic functionality we have covered so far, there are several advanced features you can incorporate into your Discord bot to enhance its capabilities and provide a more interactive user experience. Let’s explore some of these features:
1. Handling Events: Discord.js provides a wide range of events that you can listen to and handle in your bot. These events include messages, user join/leave events, reactions, and more. By handling these events, you can create custom behaviors and automate actions in response to user interactions or server events.
2. Reacting to User Joining or Leaving a Server: Use the `guildMemberAdd` and `guildMemberRemove` events to track when users join or leave a server. You can greet new users, assign roles automatically, or send notifications to specific channels when a user joins or leaves.
3. Adding Role to a User: To enhance moderation and customization, you can create commands or event-based actions to assign roles to users. This allows you to grant specific permissions or access to certain channels based on user roles and create tailored experiences within your Discord server.
4. Adding Permissions to Commands: You can add permission checks to commands to ensure that only authorized users can execute certain actions. This helps maintain the integrity of your bot and ensures that sensitive commands or administrative actions are restricted to specific roles or users.
5. Embed Messages: Discord provides embedding options that allow you to create rich and visually appealing messages. You can include titles, descriptions, fields, images, and more to enhance the appearance of your bot’s messages and provide information in a structured and eye-catching way.
6. Fetching Information from Discord: Utilize the Discord.js API to fetch information about servers, channels, users, or messages. This can be useful in creating information commands, server statistics, or logging functionalities in your bot.
By incorporating these advanced features into your Discord bot, you can customize its behavior, automate actions, and provide a more engaging and interactive experience for your users. Experiment with these functionalities and explore the possibilities they offer. In the next section, we will conclude our guide on coding a Discord bot and recap the essential points covered throughout the article.
Handling Events
Handling events is an essential aspect of building a powerful and interactive Discord bot. Events allow your bot to respond to specific actions or occurrences happening in Discord servers. By listening for and effectively handling events, you can automate actions and create custom behaviors. Here’s how you can implement event handling in your bot:
1. Listening to Events: The Discord.js library provides a wide range of events that you can listen to and handle. These events include messages, user join/leave events, reactions, channel updates, and more. You can listen to these events by adding event listeners to your client object.
2. Registering Event Listeners: To handle events, you need to register event listeners that define the actions to be taken when the events occur. Each event listener is a function that takes specific parameters representing the event data. You can access information such as the user who triggered the event, the message content, or the channel where the event occurred.
3. Implementing Event Logic: Inside the event listeners, you can define the desired logic to be executed when the event occurs. This can include sending messages, modifying roles, updating channels, or performing any other custom actions based on the event data. You can also make use of other bot functionalities, such as command execution or data storage, within the event handlers.
4. Error Handling: When handling events, it’s important to include proper error handling to catch and handle any potential errors or exceptions that may occur during the event execution. This ensures that your bot remains stable and does not crash or cause unexpected behavior in response to events.
By effectively handling events, your Discord bot can automatically react to user actions, server changes, or any other event occurring in the server. Event handling allows for dynamic and interactive behaviors, enhancing the overall user experience. Experiment with different events and explore the possibilities they offer to create unique and engaging interactions with your users. In the next section, we will summarize the essential points covered in this guide on coding a Discord bot.
Reacting to User Joining or Leaving a Server
Reacting to users joining or leaving a server is a valuable feature that allows your Discord bot to provide a warm welcome to new users or perform actions when users leave. By leveraging the `guildMemberAdd` and `guildMemberRemove` events, you can automate certain actions and enhance user engagement. Here’s how you can implement these functionalities in your bot:
1. Listening to the Events: Use the `guildMemberAdd` event to detect when a new user joins the server and the `guildMemberRemove` event to capture when a user leaves. Register event listeners for these events in your bot’s code to handle the corresponding actions.
2. Welcoming New Users: When a new user joins the server, you can trigger a welcome message to greet them. Use the event handler for `guildMemberAdd` to send a customized welcome message to the server’s designated channel or directly to the new user.
3. Assigning Roles to New Users: Along with the welcome message, you can automate role assignments to newly joined users. This can be helpful for distinguishing new members from existing ones or granting specific permissions to different user groups. Write code within the `guildMemberAdd` event listener to assign the desired role to the new member.
4. Notifying User Departures: When a user leaves the server, your bot can send a departure notification to a designated channel or to other members. Provide a farewell message or log the departure to maintain an active server environment and keep track of user activity.
Adding these functionalities to your Discord bot creates a more interactive and welcoming server environment for users. By automatically greeting new members and performing actions on user departures, you can enhance community engagement and create a sense of inclusivity. Customize your responses and notifications to align with your specific server culture and guidelines. In the next section, we will summarize the key points covered in this guide on coding a Discord bot.
Adding Role to a User
Adding roles to users in a Discord server is a powerful feature that allows you to customize permissions and grant specific privileges to different user groups. With the ability to assign roles automatically, your bot can streamline the process of granting permissions based on user actions or predetermined criteria. Here’s how you can implement this functionality in your bot:
1. Define Role Structure: Determine the roles you want to create and their associated permissions. Roles can be used to group users with similar access levels, such as “Admin”, “Moderator”, or “Member”. Specify the permissions each role should have, keeping in mind the level of access required for each role.
2. Assigning Roles: When specific conditions are met, you can automatically assign a role to a user. This can be done during the `guildMemberAdd` event or based on user interaction with a specific command. Implement code that checks the necessary conditions and adds the appropriate role to the user using the `addRole()` method provided by the Discord.js library.
3. Revoking Roles: Similarly, you can revoke or remove roles from users based on certain actions or conditions. For example, if a user violates server rules or leaves a particular channel, you can remove their role to limit their access. Use the `removeRole()` method to revoke a role from a user.
4. Customizing Role-Based Permissions: Leverage the assigned roles to customize the permissions and access levels for different user groups. Roles can be paired with channel permissions, allowing you to restrict access to specific text or voice channels. By assigning roles intelligently, you can create a controlled and organized server environment.
Adding roles to users provides a way to manage permissions and differentiate user access within your Discord server. By automating this process with your bot, you can streamline the management of user roles and ensure consistency across the server. Experiment with different role assignments and permissions to optimize your server’s structure and provide a seamless user experience. In the next section, we will recap the key points covered in this guide on coding a Discord bot.
Adding Permissions to Commands
Adding permissions to commands in your Discord bot allows you to restrict the usage of certain commands to specific roles or users. This feature provides greater control over the bot’s functionality and ensures that sensitive or administrative commands are only accessible to authorized individuals. Here’s how you can implement permission-based command restrictions in your bot:
1. Define Command Permissions: Determine which roles or users should have access to specific commands. Assign permissions for each command based on the user’s role or ID. For example, administrative commands may require an “Admin” role, while basic commands may be open to all users.
2. Check User Permissions: In your command handler, check if the user who executed the command has the necessary permissions to use that command. Retrieve the user’s roles or ID and compare it against the required permissions defined for the command. You can use conditional statements to handle permission checks.
3. Notifying Insufficient Permissions: If a user without the required permissions attempts to use a restricted command, inform them that they do not have sufficient permissions. Send an error message or use a customized response to let them know that the command is accessible only to authorized users or specific roles.
4. Managing Command Permissions: Determine who has the authority to modify command permissions. This can be delegated to server administrators or restricted to a specific role. Implement a command or event that allows authorized users to add or modify the permissions for each command dynamically.
By incorporating permissions into your bot’s commands, you maintain control over the functionalities and access levels within your Discord server. This helps enhance moderation, security, and user experience by ensuring that only authorized individuals can execute sensitive or administrative commands. Experiment with different permission levels and roles to optimize your server’s structure and provide a seamless user experience. In the next section, we will summarize the key points covered in this guide on coding a Discord bot.
Embed Messages
Embed messages are a powerful feature in Discord that allows you to create visually appealing and informative messages. By using embedded messages, you can customize the appearance of your bot’s messages, add rich content, and convey information in a more structured and engaging way. Here’s how you can implement embed messages in your Discord bot:
1. Creating Embed Objects: Discord.js provides an `MessageEmbed` class that allows you to create embed objects. Instantiate a new `MessageEmbed` object and set various properties such as title, description, color, fields, and thumbnail or image URLs. These properties define the content and appearance of your embed message.
2. Formatting Content: Within the embed object, you can use formatting options such as bold, italics, underlines, or colors to style your text. You can also include clickable links by using the Markdown link syntax.
3. Adding Fields: Fields allow you to present information in a structured manner within your embed message. You can include multiple fields, each with a name and value. Fields can be displayed in a single line or as multiple lines, and you can choose to show them inline or not.
4. Attaching Images or Thumbnails: Enhance your embed messages by including images or thumbnails. You can provide URLs for images to be displayed prominently in the embed, or smaller thumbnails that appear as a preview next to the content.
5. Sending Embed Messages: Once you have created your embed object, you can send it as a message using the `send()` method on a channel object. Pass the embed object as an argument to the `send()` method, and it will be sent as a visually appealing and informative message.
By incorporating embed messages into your bot, you can create professional-looking messages that are visually appealing and provide information in a structured way. This can be particularly useful for displaying command help, server information, or even providing updates or announcements. Experiment with different formatting options, colors, and visuals to personalize your embed messages. In the next section, we will summarize the key points covered in this guide on coding a Discord bot.
Fetching Information from Discord
Fetching information from Discord allows your bot to retrieve and display various details about users, servers, channels, or messages in real-time. This feature enables your bot to provide dynamic and up-to-date information to users. Here’s how you can implement fetching information from Discord in your bot:
1. User Information: Discord.js provides access to various user properties such as username, discriminator, ID, avatar URL, and more. You can fetch information about users in your server, including data about their roles, join date, or nickname. This information can be utilized to create user profiles, display user-specific data, or generate leaderboards.
2. Server Information: You can fetch server-related information such as server name, ID, member count, and server owner details. This allows your bot to provide server statistics, display server-specific information, or generate reports about server activities.
3. Channel Information: Discord.js provides access to channel properties, including name, ID, topic, and more. You can fetch information about text channels, voice channels, or categories on your server. This information can be used to retrieve specific channels, display channel lists, or perform actions based on the type of channel.
4. Message Information: You can fetch details about messages, including the message content, author, timestamp, or reactions. This allows your bot to analyze message content, perform sentiment analysis, or implement custom commands based on specific message patterns.
5. Online Status: Utilize Discord.js to fetch the online status of users, providing information about their current presence on Discord. This can be used to display whether a user is online, offline, idle, or in a do not disturb state.
Fetching information from Discord empowers your bot to provide real-time and contextual information to users. It allows for personalized interactions and the delivery of accurate and up-to-date data. Experiment with different types of information retrieval and utilize it to enhance the functionality, interactivity, and usefulness of your Discord bot. In the next section, we will summarize the essential points covered in this guide on coding a Discord bot.
Conclusion
In this guide, we have explored the process of coding a Discord bot from setting up the development environment to implementing advanced functionalities. With the knowledge gained, you are now equipped to create your own powerful and versatile Discord bot to enhance your server and engage with your community.
We started by setting up the environment, ensuring that Node.js and Discord.js were properly installed. We then went on to create a new Discord bot, obtain the bot token, and add the bot to a server. With these foundational steps complete, we dived into coding the basic bot functionality, such as responding to messages, sending messages, and changing the bot’s status.
Building upon the basics, we explored advanced bot functionality, including event handling, role assignment, embedding messages, and fetching information from Discord. We discussed how to handle events such as user join/leave events, how to assign roles to users, how to create visually appealing embed messages, and how to fetch information about users, servers, channels, and messages.
Throughout this guide, we emphasized the importance of creativity, readability, and user engagement. By employing markdown formatting, human-like writing style, and effective utilization of keywords for SEO optimization, you can create content that captures readers’ attention while ensuring your bot gains visibility in search engines.
Remember that while coding your Discord bot, it is crucial to adhere to Discord’s Developer Terms of Service and Community Guidelines. Always respect other users, maintain server etiquette, and handle and protect user data in a responsible manner.
Now that you have learned the essentials of coding a Discord bot, it’s time to apply your knowledge and unleash your creativity. Experiment with different functionalities, integrate with other APIs, and continue to learn and explore new possibilities to continuously improve and expand your bot’s capabilities. Coding a Discord bot is an ongoing process that evolves with your server’s needs and your own development skills.
Have fun coding and enjoy the process of creating a remarkable Discord bot that enriches the experience of your server members and brings your community closer together!