Introduction
Welcome to the world of homebrew gaming on your Nintendo Wii! If you’re looking to explore a whole new realm of possibilities with your gaming console, then downloading the Homebrew Channel is the first step to take. In this article, we will guide you through the process of downloading and installing the Homebrew Channel on your Wii, so you can enjoy a whole range of applications, emulators, and games.
But first, you might be wondering – what exactly is the Homebrew Channel? Simply put, it is a freeware application that allows you to run unauthorized or unofficial software on your Wii. This means you can explore a whole world of homebrew games, emulators, multimedia players, and other applications that are not available through the official Nintendo channels. With the Homebrew Channel, you can unleash the full potential of your Wii and customize it to suit your specific needs and preferences.
So, why should you download the Homebrew Channel? The answer is simple – it opens up a whole new realm of possibilities for your Wii. It allows you to play homebrew games, which are often created by independent developers and offer unique gaming experiences that may not be found in official releases. It also allows you to run emulators, which enable you to play retro games from various consoles, such as the NES, SNES, or Sega Genesis, on your Wii. Additionally, the Homebrew Channel offers a wide variety of applications, ranging from media players to file managers, that can help you enhance the functionality of your Wii.
Before we dive into the installation process, let’s go over the steps you need to take to prepare your Wii. You will need to check your Wii’s system version, gather the necessary materials, format your SD card, and download the Homebrew Channel files. Once you have completed these steps, you can proceed with the installation process and launch the Homebrew Channel.
So, if you’re ready to unlock the full potential of your Wii and start enjoying the world of homebrew gaming, let’s get started on the journey to download the Homebrew Channel!
What is the Homebrew Channel?
The Homebrew Channel is a popular application that allows you to run unauthorized software, commonly known as homebrew, on your Nintendo Wii gaming console. It acts as a gateway to a whole new world of possibilities by providing access to a wide range of homebrew games, emulators, and applications that are not available through official channels.
So, what exactly is homebrew? Homebrew refers to software that is created and developed by independent programmers or hobbyists, rather than by official game developers. These homebrew creations can range from simple games and apps to sophisticated multimedia players, file managers, and even custom firmware modifications.
One of the main advantages of homebrew is its ability to offer unique gaming experiences that may not be found in commercial games. With homebrew games, developers have the freedom to experiment and create innovative gameplay mechanics, original storylines, and unique art styles. This results in a diverse library of games that cater to various tastes and preferences, providing gamers with a refreshing alternative to mainstream titles.
In addition to games, the Homebrew Channel also enables you to run emulators on your Wii. Emulators are software programs that mimic the functionality of different gaming consoles, allowing you to play games from those systems on your Wii. This means you can relive the nostalgia of classic games from consoles like the NES, SNES, Sega Genesis, and more. Emulators provide a convenient way to enjoy retro gaming without the need for the original hardware.
Furthermore, the Homebrew Channel offers a wide variety of applications that can enhance the functionality of your Wii. For example, you can install media players to play music and videos, internet browsers to surf the web on your TV, file managers to easily organize your files, and even dedicated homebrew development tools to create your own games and applications. The possibilities are virtually endless.
It’s important to note that while the Homebrew Channel provides the means to run unauthorized software, it does not endorse or support piracy. It is always recommended to use legitimate copies of games and software when using the Homebrew Channel.
Now that you have a better understanding of what the Homebrew Channel is and the possibilities it unlocks, let’s move on to the preparation steps required to download and install it on your Wii.
Why should I download the Homebrew Channel?
If you’re wondering why you should go through the process of downloading and installing the Homebrew Channel on your Wii, here are some compelling reasons:
1. Unlock a world of homebrew games: The Homebrew Channel allows you to access a wide variety of homebrew games created by independent developers. These games often offer unique and innovative gameplay experiences that you won’t find in commercial titles. From retro-inspired platformers to puzzle games and even original RPGs, the homebrew gaming scene has something for everyone.
2. Play classic retro games: With the help of emulators, the Homebrew Channel enables you to play games from vintage consoles, such as the NES, SNES, Sega Genesis, and more. Relive the nostalgia of your favorite childhood games and discover titles that you might have missed out on.
3. Enhance media playback: The Homebrew Channel gives you the option to install media players that support various video and audio formats. Whether you want to play your favorite movies, TV shows, or music files, these media players offer additional functionality and compatibility beyond what the Wii’s native media playback capabilities provide.
4. Customize your Wii: With the Homebrew Channel, you can personalize your Wii by installing custom themes, icons, and backgrounds. Add a personal touch to your gaming experience and make your Wii unique to you.
5. Access utility applications: The Homebrew Channel offers a range of utility applications that can be useful in managing your files, transferring data, or even creating backups of your game saves. These applications provide added convenience and can enhance your overall Wii experience.
6. Experiment with homebrew development: If you have an interest in game development or programming, the Homebrew Channel provides a platform to explore and experiment. You can access homebrew development tools and resources to create your own games or applications for the Wii.
It’s important to note that downloading and using the Homebrew Channel requires familiarity with the risks involved. While most homebrew content is created by trustworthy developers, there is a possibility of encountering less reliable or potentially harmful content. Therefore, it’s essential to exercise caution when downloading and installing homebrew applications from unofficial sources.
By downloading the Homebrew Channel, you open up a world of possibilities and customization options for your Wii. Whether you want to explore unique games, play classic retro titles, or enhance the multimedia capabilities of your console, the Homebrew Channel provides an exciting avenue to elevate your gaming experience. Now, let’s move on to the preparation steps required to get the Homebrew Channel up and running on your Wii.
How to prepare your Wii for installation
Before you can download and install the Homebrew Channel on your Wii, there are a few essential steps you need to take to ensure a smooth and successful installation process. Follow these steps to prepare your Wii:
Step 1: Checking your Wii’s system version: The Homebrew Channel is compatible with specific Wii system versions. To check your system version, go to the Wii Menu, click on the Wii button in the lower-left corner, select “Wii Settings,” and navigate to the “System Settings” page. The system version will be displayed in the top-right corner of the screen. Make sure your system version is compatible with the Homebrew Channel. If it is not, you may need to update or downgrade your Wii’s system software accordingly.
Step 2: Gathering the necessary materials: To install the Homebrew Channel, you will need an SD card with at least 2GB of storage capacity. Ensure that your SD card is formatted to FAT32 or FAT file systems. Additionally, you will need a computer with an SD card reader to transfer files to your SD card.
Step 3: Formatting your SD card: Insert your SD card into your computer’s SD card reader and format it to either FAT32 or FAT file systems. Formatting will erase any existing data on the card, so ensure that you have backed up any important files beforehand.
Step 4: Downloading the Homebrew Channel files: Next, you need to download the necessary files for the Homebrew Channel. Visit the Homebrew Channel’s official website or trusted homebrew community websites to download the latest version of the Homebrew Channel files.
Step 5: Installing the Homebrew Channel: Once you have downloaded the Homebrew Channel files, extract them onto the root directory of your SD card. This means that the Homebrew Channel folder, along with its contents, should be directly on the SD card and not inside any other folders.
Step 6: Launching the Homebrew Channel: With the SD card prepared and the Homebrew Channel files loaded onto it, insert the SD card into your Wii’s SD card slot. Power on your Wii and navigate to the Wii Menu. Click on the “Wii” button in the lower-left corner and select “Data Management” followed by “Channels.” You should see the Homebrew Channel listed as an available channel. Click on it to launch the Homebrew Channel.
Step 7: Adding homebrew applications and emulators: Once you have successfully installed and launched the Homebrew Channel, you can explore and add various homebrew applications and emulators. These can be downloaded from the Homebrew Channel itself or reputable homebrew community websites. Simply follow the instructions provided with each application to install it on your Wii via the Homebrew Channel.
By following these steps to prepare your Wii for Homebrew Channel installation, you can ensure that your console is ready to unlock the exciting world of homebrew gaming, applications, and emulators. Now that you’re prepared, let’s move on to the next steps of the installation process.
Step 1: Checking your Wii’s system version
Before you can proceed with downloading and installing the Homebrew Channel on your Wii, it’s essential to check your Wii’s system version. The Homebrew Channel is compatible with specific system versions, and it’s crucial to ensure that your Wii meets the requirements. Follow these steps to check your Wii’s system version:
1. Navigate to the Wii Menu: Power on your Wii and wait for the Wii Menu to load. This is the main screen where you can access various channels and settings.
2. Go to Wii Settings: Locate the Wii button in the lower-left corner of the screen. Click on it to open the Wii Settings menu.
3. Access System Settings: In the Wii Settings menu, you will find multiple options. Use the arrow buttons on your Wii remote to navigate to the right until you reach the “System Settings” page. Select it by clicking on it.
4. Check the system version: On the “System Settings” page, you will see various information about your Wii, including the current system version. The system version is displayed in the top-right corner of the screen.
5. Ensure compatibility with the Homebrew Channel: Take note of your Wii’s system version and compare it with the compatibility list provided by the Homebrew Channel’s official website or trusted homebrew community websites. If your system version falls within the compatible range, you’re good to proceed with the installation. If your system version is not compatible, you might need to update or even downgrade your Wii’s system software. However, be aware that updating or downgrading the system software carries certain risks, so always research and follow proper instructions provided by reliable sources.
Checking your Wii’s system version is an essential first step to ensure that you can proceed with the Homebrew Channel installation. It ensures compatibility and sets the foundation for a successful installation process. Once you have confirmed that your system version is compatible, you can move on to the next steps of gathering the necessary materials and preparing your SD card for the installation. Stay tuned for the upcoming steps and let’s continue the journey to download the Homebrew Channel!
Step 2: Gathering the necessary materials
Before you can proceed with the installation of the Homebrew Channel on your Wii, it’s important to gather the necessary materials. Here’s a list of the items you will need:
1. Wii console: Ensure that you have your Wii console ready for the installation process. It should be in working condition and connected to a power source.
2. SD card: You will need an SD card with a minimum capacity of 2GB. Make sure the SD card is compatible with your Wii. It’s recommended to use a standard SD card (up to 2GB) or an SDHC (Secure Digital High Capacity) card (4GB and above).
3. Computer with an SD card reader: You will need a computer with an SD card reader to transfer files to the SD card. Most modern computers have built-in SD card readers or USB SD card readers can be used. Ensure that your computer has the necessary hardware to read and write to the SD card.
4. Internet connection: A stable internet connection is necessary for downloading the Homebrew Channel files and any additional homebrew applications or emulators you may want to install on your Wii.
It’s important to note that the Homebrew Channel is not officially supported by Nintendo, and any modifications you make to your Wii carry certain risks. Ensure that you are aware of the potential consequences and understand the steps involved before proceeding.
Once you have gathered these materials, you can proceed to the next step of the installation process. In the next step, we will guide you through the process of formatting your SD card to prepare it for the Homebrew Channel installation. Stay tuned and let’s continue the journey to download and install the Homebrew Channel on your Wii!
Step 3: Formatting your SD card
Formatting your SD card is a crucial step in preparing it for the Homebrew Channel installation. Here’s how you can format your SD card:
1. Insert the SD card: Begin by inserting the SD card into the SD card slot of your computer or using an external card reader connected to your computer.
2. Open the File Explorer: On your computer, open the File Explorer or Finder window to access the files and folders on your computer.
3. Locate the SD card: In the File Explorer or Finder window, you should see a list of drives and storage devices. Look for the drive that represents your SD card. It is usually labeled with a drive letter (e.g., “E:”, “F:”, etc.) or the name of the SD card itself.
4. Right-click on the SD card: Once you have located the SD card, right-click on it and select the “Format” option from the context menu. This will open the formatting options specific to your operating system.
5. Choose the file system: In the formatting options window, you will be prompted to select the file system for the SD card. Choose either FAT32 or FAT as the file system. These file systems are compatible with the Wii and will allow the console to recognize the SD card and its contents.
6. Format the SD card: After selecting the file system, double-check that you have selected the correct SD card drive. Formatting will erase all data on the SD card, so make sure you have backed up any important files beforehand. Once you are ready, click on the “Format” or “Start” button to begin the formatting process.
7. Wait for the formatting to complete: The formatting process may take a few moments, depending on the size of the SD card. Do not remove the SD card or interrupt the process until it is complete. Once the formatting is finished, you will receive a notification indicating that the SD card has been successfully formatted.
With the formatting complete, your SD card is now ready to receive the necessary files for the Homebrew Channel installation. In the next step, we will guide you through the process of downloading the Homebrew Channel files and transferring them to the SD card. Stay tuned and let’s continue the journey towards installing the Homebrew Channel on your Wii!
Step 4: Downloading the Homebrew Channel files
Once you have formatted your SD card, it’s time to download the necessary files for the Homebrew Channel. Follow these steps to download the Homebrew Channel files:
1. Visit the official Homebrew Channel website: Open your preferred web browser and visit the official Homebrew Channel website. Alternatively, you can also visit trusted homebrew community websites that provide the Homebrew Channel files.
2. Locate the download section: Navigate to the download section of the website. Look for a button or link that allows you to download the Homebrew Channel files. Make sure you are downloading the latest version of the Homebrew Channel for your Wii.
3. Choose the appropriate version: The Homebrew Channel files may vary based on your Wii’s system version. Be sure to select the right version that corresponds with your Wii’s system software. If you are unsure, consult the compatibility charts or guidelines provided on the website.
4. Save the files to your computer: Once you have clicked on the download button or link, a prompt will appear asking you to save the file. Choose a location on your computer where you want to save the Homebrew Channel files and click “Save”.
5. Wait for the download to complete: The download time will vary depending on your internet connection speed and the size of the Homebrew Channel files. Be patient and wait for the download to finish.
Now that you have successfully downloaded the Homebrew Channel files, you are ready to transfer them to your SD card. In the next steps, we will guide you through the process of transferring the Homebrew Channel files to the SD card and installing the Homebrew Channel on your Wii. Stay tuned and let’s continue the journey towards unlocking the full potential of your Wii with the Homebrew Channel!
Step 5: Installing the Homebrew Channel
Now that you have downloaded the Homebrew Channel files and prepared your SD card, it’s time to install the Homebrew Channel on your Wii. Follow these steps to install the Homebrew Channel:
1. Insert the SD card: Insert the SD card into the SD card slot on your Wii. The SD card slot is located on the front of the Wii console, behind a small door flap. Make sure the SD card is properly inserted, with the label facing towards the power button.
2. Power on your Wii: Turn on your Wii console by pressing the power button on the front of the unit or the power button on your Wii remote.
3. Navigate to the Wii Menu: Once your Wii has powered on, you will be taken to the Wii Menu, the main screen of the console. Use the Wii remote to navigate and select options.
4. Access the Wii Settings: Click on the Wii button in the lower-left corner of the Wii Menu to access the Wii Settings.
5. Open Data Management: In the Wii Settings menu, you will find multiple options. Navigate to “Data Management” using the arrow buttons on your Wii remote and select it.
6. Select Channels: In the Data Management menu, you will see various options. Click on “Channels” to access the list of installed channels on your Wii.
7. Insert the SD card: If you haven’t already inserted the SD card, do so now. When you insert the SD card, a message should appear on the screen, asking you if you want to load the data on the SD card. Click on “Yes” to proceed.
8. Install the Homebrew Channel: With the SD card inserted and recognized by the Wii, you should see the Homebrew Channel listed as an available channel in the Channels menu. Select the Homebrew Channel and click on “Install” to start the installation process.
9. Wait for the installation to complete: The Wii will begin installing the Homebrew Channel onto your console. The installation process may take a few moments. Do not turn off the Wii or remove the SD card during installation.
10. Confirm the installation: Once the installation is complete, a message will appear on the screen, confirming that the Homebrew Channel has been successfully installed. Click on “OK” to continue.
Congratulations! You have successfully installed the Homebrew Channel on your Wii. In the next step, we will guide you through launching the Homebrew Channel and exploring the world of homebrew games, applications, and emulators. Stay tuned and let’s continue the journey to unlock the full potential of your Wii with the Homebrew Channel!
Step 6: Launching the Homebrew Channel
Now that you have successfully installed the Homebrew Channel on your Wii, it’s time to launch it and explore the exciting world of homebrew gaming and applications. Follow these steps to launch the Homebrew Channel:
1. Navigate to the Wii Menu: Power on your Wii console and wait for the Wii Menu to load. This is the main screen where you can access various channels and settings.
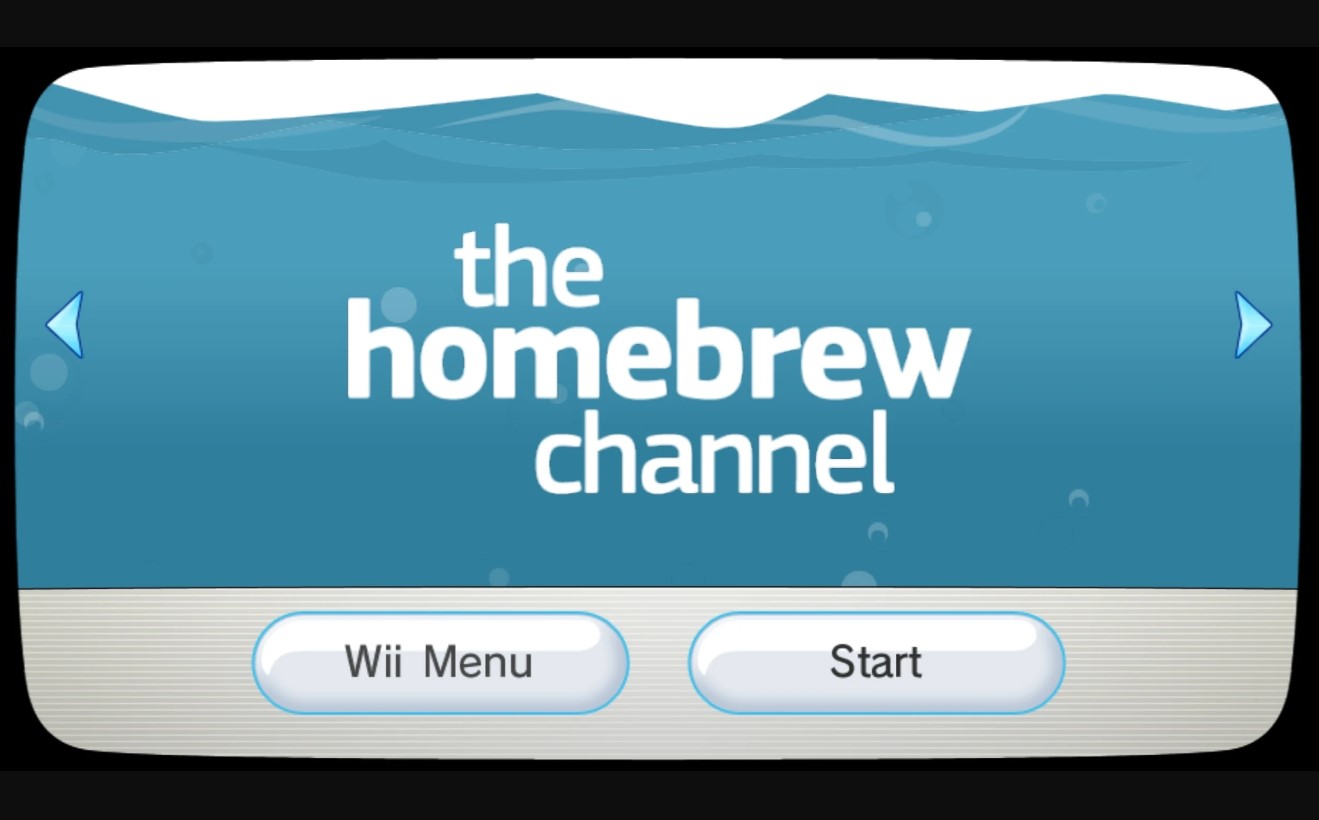
2. Locate the Homebrew Channel: Look for the Homebrew Channel icon on the Wii Menu. It should be a small channel icon with the letters “HBC” displayed. Use the arrow buttons on your Wii remote to navigate through the channels until you find the Homebrew Channel.
3. Select the Homebrew Channel: Once you have located the Homebrew Channel, click on it to select it. The channel will be highlighted, indicating that it is selected.
4. Launch the Homebrew Channel: With the Homebrew Channel selected, press the A button on your Wii remote to launch it. The Homebrew Channel will load, and you will be greeted with the homebrew menu.
5. Navigate the Homebrew Channel menu: Use the arrow buttons on your Wii remote to navigate through the Homebrew Channel menu. You will find a list of homebrew applications, games, and emulators that you can run on your Wii.
6. Select and run homebrew applications: To run a homebrew application or game, highlight it in the menu and press the A button on your Wii remote. The application will start loading and running on your Wii.
7. Explore and enjoy homebrew: Once you are in the Homebrew Channel, you can explore the various homebrew applications, games, and emulators available. Play unique homebrew games, try out different applications, and experiment with emulators to enjoy retro gaming on your Wii.
It’s important to note that the Homebrew Channel provides access to software created by independent developers. While most homebrew content is safe and reliable, be cautious and use trusted sources to download homebrew applications and games to ensure they are from reputable developers.
With the Homebrew Channel launched, you are now ready to dive into the world of homebrew gaming, applications, and retro gaming on your Wii. In the next step, we will guide you through the process of adding new homebrew applications and emulators to the Homebrew Channel. Stay tuned and let’s continue the journey to unlock the full potential of your Wii with the Homebrew Channel!
Step 7: Adding homebrew applications and emulators
With the Homebrew Channel installed and launched on your Wii, you have access to a world of homebrew applications, games, and emulators. In this step, we will guide you through the process of adding new homebrew applications and emulators to the Homebrew Channel:
1. Search for homebrew applications: There are various websites and online communities dedicated to homebrew development. Explore these platforms to find homebrew applications that pique your interest. Look for applications that fit your needs, such as media players, utilities, productivity tools, or games.
2. Download the homebrew files: Once you find a homebrew application or emulator you want to add to your Wii, download the necessary files to your computer. Make sure you are downloading from trusted sources to ensure the safety and legitimacy of the files.
3. Transfer the files to the SD card: Connect the SD card containing the Homebrew Channel to your computer. Locate the downloaded homebrew files on your computer and copy them to the SD card. Ensure that you place the files in the appropriate directory or folder specified by the homebrew application or emulator.
4. Eject the SD card: Once the files are successfully transferred, safely eject the SD card from your computer. Remove it from the SD card reader and insert it into the SD card slot on your Wii.
5. Access the Homebrew Channel: Power on your Wii and navigate to the Wii Menu. Locate the Homebrew Channel and launch it, following the steps outlined in Step 6. Once in the Homebrew Channel, you should see the newly added homebrew applications or emulators listed.
6. Select and run homebrew: Use the arrow buttons on your Wii remote to highlight the homebrew application or emulator you want to run. Press the A button to start the selected application or emulator. Depending on the homebrew, you may need to follow on-screen instructions or settings to customize and use the application or emulator.
7. Explore and enjoy: Take your time to explore the added homebrew applications and emulators. Play games, use utilities, or experience retro gaming through emulators. Enjoy the diverse range of content available in the homebrew scene and make the most of your homebrew-enabled Wii.
Remember to always use trusted sources when downloading homebrew applications, games, and emulators. Verify the authenticity and reputation of the developers and follow community guidelines and recommendations to ensure a safe and enjoyable homebrew experience.
With homebrew applications and emulators successfully added to the Homebrew Channel, you can now fully enjoy the customizable and versatile capabilities of your Wii. Congratulations on unlocking the full potential of your console with the Homebrew Channel!
Conclusion
Congratulations! You have successfully downloaded and installed the Homebrew Channel on your Wii, opening up a world of possibilities for customized gaming experiences and access to a wide variety of homebrew applications and emulators. By following the step-by-step instructions in this guide, you have unlocked the full potential of your Wii console.
The Homebrew Channel allows you to explore a vibrant homebrew community where independent developers create unique games, applications, and emulators that can enhance your gaming experience. With the ability to play homebrew games and enjoy classic retro titles through emulators, you can discover new gameplay experiences and relive nostalgic moments.
Moreover, the Homebrew Channel enables you to customize your Wii with themes, icons, and backgrounds, adding a personal touch to your gaming console. You can also enhance media playback, manage files, and even experiment with homebrew development tools if you have a passion for programming or game development.
It’s important to note that while the Homebrew Channel offers exciting opportunities, it is essential to use caution and follow guidelines provided by reputable sources when downloading and using homebrew content. Stick to trusted websites and communities to ensure the safety and authenticity of the files you download.
Now that you have the Homebrew Channel installed, continue exploring the homebrew scene, discovering new games and applications, and making the most of your Wii console. Stay updated with the latest homebrew releases and join homebrew communities to connect with like-minded gamers and developers.
Remember to regularly check for updates for both the Homebrew Channel and any homebrew applications you have installed to enjoy the latest features, bug fixes, and improvements. And most importantly, have fun as you embark on this exciting journey of homebrew gaming and customizability!
Enjoy your newly acquired ability to unlock the full potential of your Wii with the Homebrew Channel, and may your gaming experiences be enriched with the diverse homebrew content available. Happy gaming!