Introduction
Welcome to the world of gaming enthusiasts! If you are a proud owner of a Nintendo Wii, you may be wondering how to expand your gaming library beyond the traditional Wii games. Thankfully, with the help of homebrew software, you can download and play GameCube games on your Wii console. This opens up a whole new world of gaming possibilities, allowing you to enjoy classics like Super Mario Sunshine, The Legend of Zelda: The Wind Waker, and Super Smash Bros. Melee.
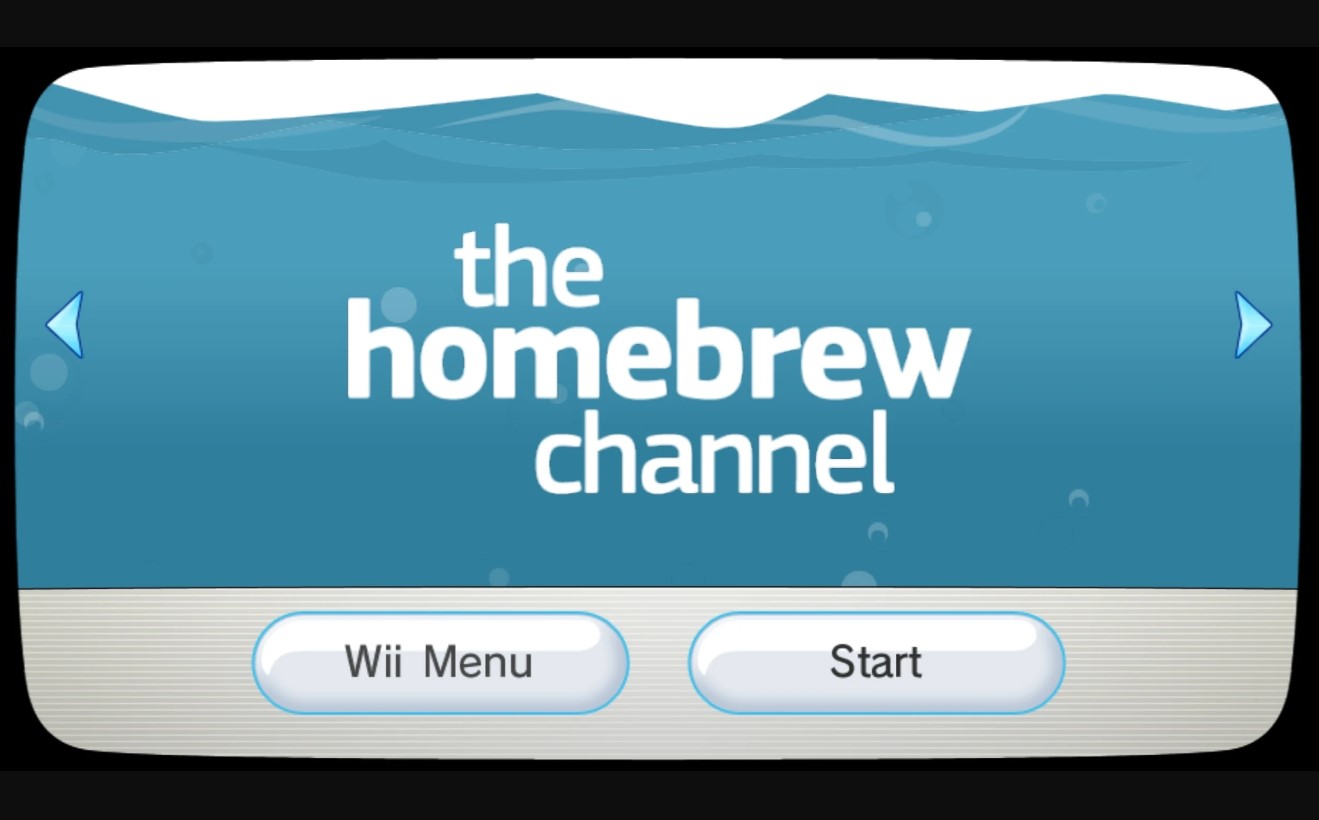
Homebrew is a term used to describe unofficial software developed by a community of passionate programmers and gamers. These programs allow you to run customized applications and games on your console, giving you the freedom to explore an extensive library of retro games. By following a few simple steps, you can easily install the Homebrew Channel on your Wii and unlock the ability to play GameCube games.
In this guide, we will walk you through the process of downloading and playing GameCube games on your Wii using the Homebrew Channel. Before we begin, it is important to note that modifying your console in this way may void your warranty and could potentially have risks associated with it. However, if you are confident in your technical skills and willing to explore the world of homebrew, let’s get started!
Step 1: Install Homebrew Channel on your Wii
The first step in downloading and playing GameCube games on your Wii is to install the Homebrew Channel. This channel acts as a gateway for running unofficial software on your console. Here’s how you can do it:
- Prepare an SD card: Start by formatting an SD card to FAT32 format to ensure compatibility with your Wii. Make sure it has sufficient space to hold the necessary files.
- Download the Homebrew Channel installer: Visit the official Homebrew Channel website and download the installer to your computer. This installer is necessary to install the channel onto your Wii.
- Copy the installer to the SD card: Insert your SD card into your computer and copy the installer file (usually named “boot.dol” or “boot.elf”) to the root of the SD card.
- Insert the SD card into your Wii: Power off your Wii console and insert the SD card into the SD card slot on the front of the console.
- Boot up the Wii: Turn on your Wii console and navigate to the Wii Menu.
- Launch the Homebrew Channel installer: Navigate to the Wii Options menu, select “Data Management,” and then choose “Channels.” Find the SD card and select the Homebrew Channel installer.
- Follow the on-screen instructions: The installer will guide you through the installation process. Follow the prompts and allow the installation to complete.
- Exit the installer and launch the Homebrew Channel: After the installation is finished, exit the installer and you should see the newly installed Homebrew Channel icon on your Wii Menu. Select it to launch the channel.
- Test the Homebrew Channel: Once the Homebrew Channel is running, test it by running a few homebrew applications. This will ensure that the channel is functioning correctly and ready for the next steps.
Once you have successfully installed the Homebrew Channel on your Wii, you have paved the way for downloading and playing GameCube games on your console. Move on to the next step to get started with installing a GameCube emulator.
Step 2: Install a Gamecube emulator
To play GameCube games on your Wii, you will need to install a GameCube emulator. A GameCube emulator is a software application that replicates the functionality of the original GameCube console, allowing you to run GameCube games on your Wii. Here’s how you can install a GameCube emulator:
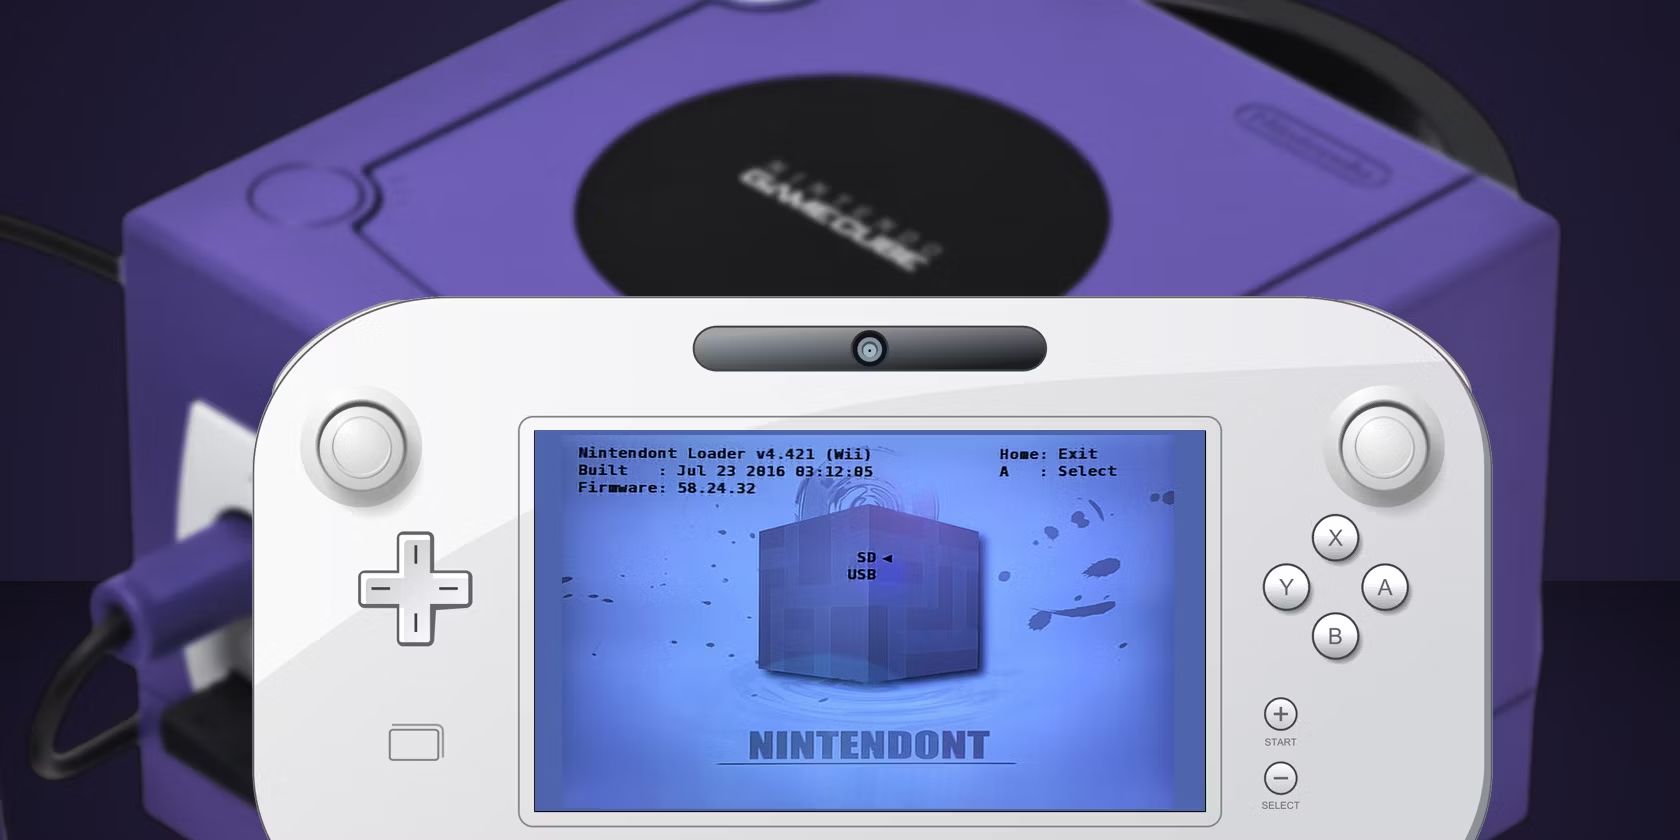
- Research GameCube emulators: Before you begin, it’s essential to research and find a reliable GameCube emulator that is compatible with the Wii. Popular options include Dolphin, Nintendont, and Dios Mios.
- Download the emulator: Once you have chosen an emulator, visit the official website and download the emulator files. Ensure that you download the version compatible with the Homebrew Channel and the Wii system.
- Prepare your SD card: Insert the SD card into your computer and create a new folder named “emulators” on the root of the SD card.
- Transfer the emulator files: Extract the downloaded emulator files and transfer them to the “emulators” folder on your SD card.
- Eject the SD card: Safely remove the SD card from your computer and insert it into the SD card slot on your Wii console.
- Navigate to the Homebrew Channel: Turn on your Wii and navigate to the Homebrew Channel by selecting it from the Wii Menu.
- Launch the emulator: Once you are in the Homebrew Channel, you should see the emulator icon. Select it to launch the emulator.
- Configure the emulator settings: Follow the on-screen prompts to configure the emulator settings, such as control mapping, graphics settings, and audio settings. These settings may vary depending on the emulator you are using.
- Test the emulator: After configuring the settings, test the emulator by loading a GameCube game file. If the game successfully loads and runs without any glitches, you have successfully installed and set up the GameCube emulator.
With the GameCube emulator installed on your Wii, you are now ready to move on to the next step and prepare your SD card for downloading GameCube ROMs.
Step 3: Prepare your SD card
Before you can download and play GameCube games on your Wii, you need to prepare your SD card to store the necessary files and game ROMs. Here’s how to prepare your SD card for this purpose:
- Format your SD card: Insert your SD card into your computer and format it to FAT32 file system. This ensures compatibility with your Wii console and allows for smooth functioning.
- Create a folder structure: On the root of your SD card, create a new folder named “games” to store your downloaded GameCube game ROMs. Additionally, create a folder named “saves” to store your game save files.
- Organize your games: Within the “games” folder, create separate folders for each GameCube game that you plan to download. This will help keep your game library organized and make it easier to locate specific games.
- Download and install a file manager for Wii: To easily manage and transfer files on your Wii, download and install a file manager such as WiiXplorer or WiiXplorer Lite. This will facilitate the process of transferring ROMs to your SD card.
- Transfer the file manager to your SD card: After downloading the file manager, transfer the corresponding files to the appropriate folder on your SD card. Follow the instructions provided with the file manager to ensure proper installation.
- Eject the SD card: Safely remove the SD card from your computer and insert it into the SD card slot on your Wii console.
- Navigate to the Homebrew Channel: Turn on your Wii console and navigate to the Homebrew Channel by selecting it from the Wii Menu.
- Launch the file manager: Once in the Homebrew Channel, locate the file manager application and select it to launch the program.
- Manage and transfer files: Use the file manager to navigate through your SD card’s directory and manage the files effectively. You can copy GameCube game ROMs from your computer and paste them into the respective game folders you created earlier.
By properly preparing your SD card, you ensure that you have an organized storage system for your GameCube game ROMs and saves. This sets the stage for downloading and transferring the ROMs in the next step.
Step 4: Download GameCube ROMs
Now that your SD card is prepared, it’s time to download GameCube ROMs. ROMs are digital copies of the original game discs and are necessary to play GameCube games on your Wii using an emulator. Follow these steps to download GameCube ROMs:
- Research reputable ROM websites: Before downloading ROMs, it’s important to find trustworthy websites that offer GameCube ROMs. Some popular options include Emuparadise, CoolROM, and Rom Hustler. Ensure that the website you choose has a wide selection of ROMs and positive user reviews.
- Select a GameCube game: Once you’ve found a reputable website, browse through their library and select the GameCube game you want to download. It’s important to consider factors like game popularity, user ratings, and personal preferences when choosing a game.
- Download the ROM file: On the ROM website, locate the download link for the chosen GameCube game ROM. Click on the link to start the download process. Make sure to choose the appropriate version of the ROM compatible with your emulator.
- Save the ROM file to your computer: Once the download is complete, save the ROM file to a location on your computer where you can easily find it.
- Transfer the ROM file to your SD card: Insert the SD card back into your computer and transfer the downloaded ROM file to the respective folder in the “games” directory on your SD card. Ensure that the ROM file has the correct file extension, usually .iso or .gcm.
- Eject the SD card: Safely remove the SD card from your computer and insert it into the SD card slot on your Wii console.
It’s important to note that downloading ROMs for games you do not own the original copy of is illegal. Make sure to only download and play GameCube ROMs for games that you legally own. Now that you have downloaded the GameCube ROMs, you can proceed to the next step and transfer them to your SD card.
Step 5: Transfer ROMs to your SD card
Now that you have downloaded GameCube ROMs, it’s time to transfer them to your SD card so you can play them on your Wii. Follow these steps to transfer ROMs to your SD card:
- Insert the SD card into your computer: Remove the SD card from your Wii console and insert it into your computer’s SD card slot or use a card reader.
- Access the “games” folder: Open the SD card drive on your computer and navigate to the “games” folder you created earlier.
- Locate the GameCube ROM file: Find the GameCube ROM file you downloaded and saved on your computer. It should have the appropriate file extension, such as .iso or .gcm.
- Copy the ROM file: Right-click on the ROM file and select “Copy” from the context menu.
- Paste the ROM file into the appropriate game folder: Go back to the “games” folder on your SD card and navigate to the folder corresponding to the GameCube game you downloaded. Right-click inside the folder and select “Paste” to transfer the ROM file into the folder.
- Repeat for additional ROMs: If you have downloaded multiple GameCube ROMs, repeat the previous steps to transfer each ROM file into its respective game folder.
- Eject the SD card: Once you have transferred all the ROM files, safely remove the SD card from your computer.
- Insert the SD card into your Wii: Place the SD card back into the SD card slot on your Wii console.
With the ROMs successfully transferred to your SD card, you are one step closer to playing GameCube games on your Wii. Proceed to the next step to launch the emulator on your Wii.
Step 6: Launch the emulator on your Wii
With the GameCube emulator and ROMs set up on your SD card, it’s time to launch the emulator on your Wii console. Follow these steps to get started:
- Ensure your SD card is inserted: Make sure your SD card, containing the GameCube emulator and ROMs, is inserted into the SD card slot on your Wii.
- Turn on your Wii: Power on your Wii console and navigate to the Wii Menu.
- Navigate to the Homebrew Channel: Locate the Homebrew Channel icon on your Wii Menu and select it to enter the channel.
- Select the GameCube emulator: Once inside the Homebrew Channel, you should see the icon for the GameCube emulator you installed in a previous step. Use your Wii remote to highlight the emulator and press the A button to launch it.
- Browse for GameCube games: Within the GameCube emulator, you will be presented with a directory of the games available on your SD card. Use the navigation buttons on your Wii remote to browse through the list.
- Select a game to play: Highlight the GameCube game you want to play and press the A button to select it. This will launch the game within the emulator.
- Configure emulator settings (if needed): Depending on the emulator you are using, you may need to configure additional settings such as controller mappings, display settings, or audio preferences. Follow the prompts on the screen to adjust the settings according to your preference.
- Enjoy playing GameCube games on your Wii: Once the game is launched, grab your Wii remote or GameCube controller and immerse yourself in the world of GameCube gaming on your Wii!
By following these steps, you can now easily launch the GameCube emulator on your Wii and start playing your favorite GameCube games using the ROMs you transferred to your SD card. It’s time to relive the nostalgia and enjoy the classic gaming experience on your Wii console!
Step 7: Select and play GameCube games
After launching the GameCube emulator on your Wii, it’s time to select and play the GameCube games you have downloaded. Follow these steps to enjoy your favorite GameCube titles:
- Browse the game list: Within the GameCube emulator, you will see a list of games available on your SD card. Use the navigation buttons on your Wii remote or GameCube controller to scroll through the list.
- Select a game: Highlight the GameCube game you wish to play and press the A button on your Wii remote or GameCube controller to select it. This will load the game into the emulator.
- Configure game settings (optional): Depending on the emulator you are using, you may have the option to adjust game-specific settings such as graphics, controls, or performance. Consult the emulator’s documentation or on-screen prompts to make any desired adjustments.
- Start playing: Once you have selected your desired game and made any necessary adjustments to the settings, press the Start button on your Wii remote or GameCube controller to begin playing the GameCube game.
- Enjoy the GameCube gaming experience: Immerse yourself in the world of GameCube gaming as you relive the classics and experience the joy of playing your favorite titles on your Wii console.
- Save your game progress: During gameplay, make sure to take advantage of the emulator’s save state feature, which allows you to save your progress at any point. This ensures that you can pick up where you left off in the game.
- Exit the game: When you are finished playing the GameCube game, you can exit back to the game list by pressing the appropriate button on your Wii remote or GameCube controller. From there, you can choose to select and play a different game or return to the emulator’s main menu.
- Repeat the process: You can repeat the process of selecting and playing GameCube games as many times as you like, enjoying a wide variety of titles available for the GameCube platform.
By following these steps, you can easily navigate through the GameCube emulator on your Wii and select and play the GameCube games you have downloaded. Enjoy the nostalgia, excitement, and endless hours of gaming fun on your Wii console!
Conclusion
Congratulations! You have successfully learned how to download and play GameCube games on your Wii using homebrew software and emulators. By following the steps outlined in this guide, you have gained the ability to expand your gaming library and enjoy the classics of the GameCube era on your Wii console.
Remember, modifying your Wii console and downloading ROMs may void your warranty and could potentially have risks associated with it. It is essential to exercise caution and ensure that you only use legal methods to obtain and play GameCube games for which you own the original copy.
The Homebrew Channel has provided you with the gateway to explore a wide range of games and experiences beyond the traditional Wii titles. With the GameCube emulator installed and ROMs transferred to your SD card, you can now relive the nostalgia and embark on exciting gaming adventures.
As you dive into the world of GameCube gaming on your Wii, make sure to experiment with different games, customize your emulator settings, and immerse yourself in the rich gameplay experiences that the GameCube era has to offer.
Always remember to save your game progress regularly and enjoy the convenience of playing your favorite GameCube titles on the Wii platform.
Now that you have discovered the joy of playing GameCube games on your Wii, let your gaming adventure begin!