Introduction
Welcome to the world of Project M, a fan-made modification for the Nintendo Wii, that aims to enhance the gameplay experience of Super Smash Bros. Brawl. If you’re a fan of the classic Super Smash Bros. franchise and want to take it to the next level, then Project M is the perfect choice for you.
Created by a passionate community of dedicated Super Smash Bros. players, Project M introduces new characters, stages, and gameplay mechanics to the original Super Smash Bros. Brawl. By downloading and installing Project M on your Wii, you’ll unlock a world of exciting possibilities and expand your Smash Bros. adventure.
But before we jump into the steps of downloading Project M on your Wii, let’s quickly go over the requirements to ensure a smooth installation process. To proceed, you’ll need a Nintendo Wii console that is capable of running homebrew software, an SD card with sufficient storage capacity, and of course, a copy of Super Smash Bros. Brawl.
Now that we have everything we need, let’s dive into the step-by-step process of downloading and installing Project M on your beloved Wii console. With just a few simple steps, you’ll be ready to experience the enhanced gameplay and excitement that Project M has to offer.
What is Project M?
Project M is a mod, short for modification, that transforms the gameplay of Super Smash Bros. Brawl on the Nintendo Wii. Developed by a passionate community of Super Smash Bros. enthusiasts, Project M aims to deliver a more competitive and balanced experience for players.
This fan-made mod incorporates elements from previous Super Smash Bros. titles, such as Super Smash Bros. Melee, to create a unique and fast-paced gameplay experience. The modifications made to Super Smash Bros. Brawl include changes to character movesets, physics, and overall game mechanics.
One of the main goals of Project M is to enhance the competitive aspect of Super Smash Bros. Brawl. The mod aims to provide a level playing field for all characters, increasing the viability of less frequently used fighters and reducing character imbalances. This allows players to truly explore the full potential of each character and engage in intense, skill-based battles.
In addition to gameplay changes, Project M also introduces new stages and costumes. These additions add a fresh layer of excitement to the game, giving players more options to customize their battles and explore new environments.
One of the standout features of Project M is its attention to detail and commitment to the Super Smash Bros. community. The developers regularly release balance updates and patches based on player feedback, ensuring that the mod remains dynamic and responsive to the evolving needs of the player base.
Project M has gained a dedicated following within the Super Smash Bros. community, with tournaments and competitive events often featuring the mod as a preferred choice for players seeking an enriched gameplay experience. Whether you’re a casual player looking for some new thrills or a competitive player looking to take your skills to the next level, Project M offers something for everyone.
Now that you have an understanding of what Project M is and its purpose, let’s move on to the next section to explore the requirements for downloading Project M onto your Wii console.
Requirements for Downloading Project M
Before diving into the process of downloading and installing Project M on your Nintendo Wii, it’s important to make sure you have all the necessary requirements. Ensuring you meet these requirements will help to ensure a smooth and successful installation.
1. Nintendo Wii Console: To download and play Project M, you’ll need a Nintendo Wii console. Keep in mind that not all Wii consoles are capable of running homebrew software, which is necessary for installing Project M. Check if your Wii model is compatible with homebrew by referring to the official Project M website or various online forums and communities.
2. Super Smash Bros. Brawl: Project M is a modification for Super Smash Bros. Brawl, so you’ll need a copy of the original game. Make sure you have the physical game disc or a digital version of Super Smash Bros. Brawl installed on your Wii console.
3. SD Card: An SD card is necessary to store and install the Project M files. Ensure that you have an SD card with enough free space to accommodate the mod files. The recommended size is at least 2GB, but a 1GB card may suffice depending on the specific release version of Project M.
4. USB Loader: If you plan to play Project M using a USB loader, make sure you have a compatible USB loader installed on your Wii. This allows you to load Project M from a USB storage device, such as an external hard drive or a flash drive.
5. Homebrew Channel: To install Project M, you’ll need to have the Homebrew Channel installed on your Wii. The Homebrew Channel is a custom software that allows you to run homebrew applications and mods on your console. Make sure you have the latest version of the Homebrew Channel installed before proceeding.
Always remember to conduct thorough research and refer to official sources to ensure you have the most up-to-date information on the specific requirements and compatibility for downloading Project M onto your Wii.
Now that you have gathered all the necessary requirements, let’s move on to the step-by-step process of downloading and installing Project M on your Wii console.
Step 1: Prepare Your Wii
Before diving into the process of downloading Project M on your Nintendo Wii, it’s important to prepare your console to ensure a smooth installation process. Follow these steps to get started:
1. Check Wii Compatibility: Confirm that your Wii console is compatible with homebrew software and can run Project M. Refer to the official Project M website or reliable online sources to determine if your Wii model is compatible. This is crucial for a successful installation.
2. Update Your Wii: Ensure that your Wii console is updated to the latest system version. You can do this by selecting the “Wii Settings” option on the main menu, then navigating to “Wii System Update.” Follow the on-screen instructions to update your console if needed.
3. Install the Homebrew Channel: The Homebrew Channel is essential for installing Project M. Using the internet browser on your Wii, navigate to the official Homebrew Channel website and follow the instructions to download and install the channel on your console. Be sure to follow the instructions carefully to avoid any issues.
4. Format Your SD Card: Insert the SD card into your computer and back up any important files. Then, format the SD card to ensure it is ready for the installation process. To format the SD card, right-click on it in “My Computer” (Windows) or “Finder” (Mac), select “Format,” and follow the prompts.
5. Set Up the SD Card: Once your SD card is formatted, create a new folder on the card and name it “private.” Within the “private” folder, create another folder named “wii” (both folder names should be in lowercase). This folder structure is necessary for the proper installation of Project M.
That’s it for preparing your Wii for the installation of Project M. Following these steps will ensure that your console is ready and set up correctly to proceed with the download and installation process. In the next section, we will discuss how to download the Project M files onto your system.
Step 2: Download the Project M Files
Now that your Wii is prepared, it’s time to download the Project M files. Follow these steps to get started:
1. Visit the Project M Website: Open your internet browser on your computer and visit the official Project M website. Look for the “Download” section or a link that leads you to the latest version of Project M. Ensure that you are downloading from a reliable source to avoid any potential risks.
2. Download the Project M Files: Once you have located the download section, click on the link to start downloading the necessary files. The files will typically be in the form of a compressed folder (e.g., .zip or .rar). Save the files to a designated location on your computer where you can easily find them.
3. Extract the Compressed Folder: After the download is complete, locate the downloaded compressed folder and extract its contents. Right-click on the folder and select “Extract All” or use a file extraction software like WinRAR or 7-Zip. Choose a destination folder for the extracted files.
4. Copy the Project M Files to the SD Card: With the Project M files extracted, open the folder where you saved them. Select all the files and folders within, then right-click and choose “Copy.” Navigate to your SD card, open the “private” folder, and paste the Project M files into the “private” folder on the SD card.
5. Eject the SD Card: Once the file transfer is complete, safely eject the SD card from your computer. This ensures that the files are properly saved and ready to be installed on your Wii console.
That’s it for downloading the Project M files onto your computer and transferring them to the SD card. In the next section, we will explore the process of creating a Project M SD card to prepare for installation.
Step 3: Create a Project M SD Card
With the Project M files downloaded and transferred to your SD card, it’s time to create a Project M SD card to prepare for installation. Follow these steps to create the SD card:
1. Insert the SD Card: Insert the SD card into the SD card slot on your Wii console. Make sure it is properly inserted and locked into place.
2. Power On Your Wii: Turn on your Wii console and wait for the main menu to load.
3. Launch the Homebrew Channel: Using your Wii Remote, navigate to the Homebrew Channel icon and select it to launch the channel. This will allow you to access and install Project M.
4. Install the Project M Launcher: Once in the Homebrew Channel, locate the Project M Launcher application. The application may be named “Project M” or “Project M Launcher,” depending on the version you downloaded. Select the application to start the installation process.
5. Follow the On-Screen Prompts: The Project M Launcher will guide you through the installation process. Follow the on-screen prompts and instructions to install the necessary files onto your SD card. This includes installing the Project M files that you transferred earlier.
6. Complete the Installation: Once the installation is complete, you will see a confirmation message on the screen indicating that Project M has been successfully installed on your SD card. At this point, you can exit the Project M Launcher and return to the Homebrew Channel.
7. Eject the SD Card: Safely eject the SD card from your Wii console to ensure that the installation is saved and ready to be used.
Congratulations! You have successfully created a Project M SD card, containing all the necessary files for installation. In the next section, we will discuss how to install Project M on your Wii console and start playing.
Step 4: Install Project M on the Wii
Now that you have created the Project M SD card, it’s time to install the mod onto your Wii console. Follow these steps to install Project M on your Wii:
1. Insert the Project M SD Card: Insert the Project M SD card that you created earlier into the SD card slot on your Wii console. Make sure it is properly inserted and locked into place.
2. Power On Your Wii: Turn on your Wii console and wait for the main menu to load.
3. Launch the Homebrew Channel: Using your Wii Remote, navigate to the Homebrew Channel icon and select it to launch the channel.
4. Select the Project M Application: Within the Homebrew Channel, you should see the Project M application listed. Select the Project M icon to start the installation process.
5. Follow the On-Screen Prompts: The Project M installation process will guide you through the necessary steps. Follow the on-screen prompts and instructions to install Project M on your Wii console. This will involve copying the necessary files from the SD card to your Wii’s internal storage.
6. Complete the Installation: Once the installation is finished, you will see a confirmation message indicating that Project M has been successfully installed on your Wii console. At this point, you can exit the installation process and return to the Homebrew Channel.
7. Test Project M: To ensure that Project M is working correctly, navigate to the Homebrew Channel and select the Project M application again. This time, it will load the modded version of Super Smash Bros. Brawl.
That’s it! You have successfully installed Project M on your Wii console. Now, it’s time to start playing and enjoy the enhanced gameplay experience provided by this fan-made mod. In the next section, we will discuss how to play Project M on your Wii.
Step 5: Play Project M on the Wii
With Project M successfully installed on your Wii console, it’s time to jump into the action and start playing. Follow these steps to begin your Project M experience:
1. Launch Project M: Turn on your Wii console and navigate to the Homebrew Channel using your Wii Remote. Select the Project M application to launch the modded version of Super Smash Bros. Brawl.
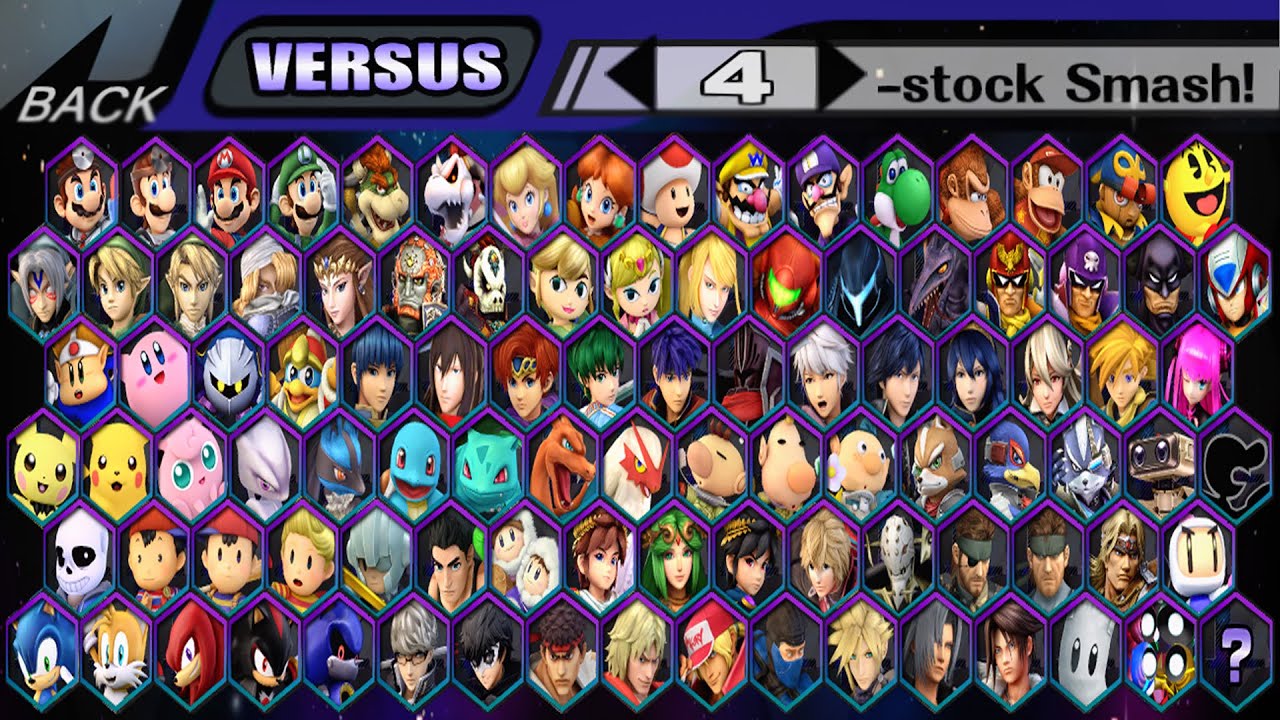
2. Select Characters and Stages: Once the game starts, you’ll be able to select your desired characters and stages. Project M introduces new characters and rebalances the existing cast, allowing for more variety and strategic gameplay. Choose your favorite character and stage to begin your battle.
3. Explore Enhanced Gameplay: As you play Project M, you will notice the enhanced gameplay mechanics, faster-paced battles, and more balanced character abilities. Take the time to explore the new movesets, strategies, and combos available to you. Engage in epic battles against friends or computer-controlled opponents.
4. Customize and Experiment: Project M offers a wide range of customization options and features. Take advantage of these options to personalize your gameplay experience. Customize the controls, adjust the game settings, or experiment with different character skins and alternate costumes.
5. Participate in Tournaments and Online Play: Project M has a passionate community of players who organize tournaments and competitive events. Join these events to test your skills against other players and engage in the thrill of high-level Project M gameplay. Additionally, you can explore online play options to connect with other Project M enthusiasts and engage in matches online.
Get ready to experience the excitement, depth, and competitiveness of Project M on your Wii console. Enjoy the enhanced gameplay, new features, and endless possibilities that this fan-made mod has to offer.
Congratulations! You are now ready to fully immerse yourself in the world of Project M. Take your Smash Bros. experience to new heights and enjoy countless hours of fun with friends or fellow enthusiasts. Remember to continue exploring and practicing to truly master the intricacies of this amazing modification.
Conclusion
Congratulations! You have successfully downloaded, installed, and started playing Project M on your Nintendo Wii. By following the step-by-step process outlined in this guide, you have unlocked a whole new level of gameplay and excitement for Super Smash Bros. Brawl.
Project M, developed by a passionate community of fans, offers a wealth of enhancements to the original game. From rebalanced character movesets to new stages and gameplay mechanics, Project M breathes fresh life into Super Smash Bros. Brawl, providing an enhanced and competitive experience for players of all skill levels.
Throughout this guide, you learned about the requirements for downloading Project M, the steps involved in preparing your Wii, downloading the Project M files, creating an SD card for installation, and finally, installing and playing Project M on your Wii console.
Now, it’s time to venture forth and explore the endless possibilities that Project M has to offer. Engage in epic battles with your favorite characters, participate in tournaments, and connect with the vibrant Project M community to fully immerse yourself in this modded gaming experience.
Remember to stay connected with the Project M community for updates, patches, and new releases. This ensures that you continue to enjoy the latest features and improvements as the mod evolves.
Thank you for following this guide and embracing the excitement of Project M on your Nintendo Wii. We hope you have a fantastic time playing and discovering all the amazing features that this fan-made modification has to offer. Get ready to unleash your skills, challenge your friends, and embark on an unforgettable journey in the world of Project M!