Introduction
Welcome to the world of Project M on the Wii U! If you’re a fan of Super Smash Bros. Brawl and want to unleash a whole new level of excitement and gameplay, then Project M is the perfect choice for you. In this comprehensive guide, we will walk you through the step-by-step process of downloading and installing Project M on your Wii U console.
Developed as a mod for Super Smash Bros. Brawl, Project M offers a thrilling experience by merging the best elements from both Super Smash Bros. Melee and Brawl. It introduces new characters, stages, movesets, and gameplay mechanics, creating a fresh and exhilarating experience for players.
Before we begin, it’s important to note that installing Project M on your Wii U requires certain prerequisites and modifications to your console. Don’t worry, though; we’ll guide you through each step to ensure a smooth and successful installation process.
From installing the Homebrew Channel to setting up an SD card, backing up your Wii U’s vWii, and finally, downloading and installing Project M, we’ve got you covered. So, let’s dive right in and unlock the full potential of your Wii U with Project M!
Now, without further ado, let’s get started with Step 1: Installing the Homebrew Channel.
What is Project M?
Project M is a fan-made modification (mod) for the game Super Smash Bros. Brawl on the Wii U console. Created by a dedicated community of players, this mod aims to provide a more competitive and fast-paced gameplay experience reminiscent of Super Smash Bros. Melee, while still retaining the characters and stages from Super Smash Bros. Brawl.
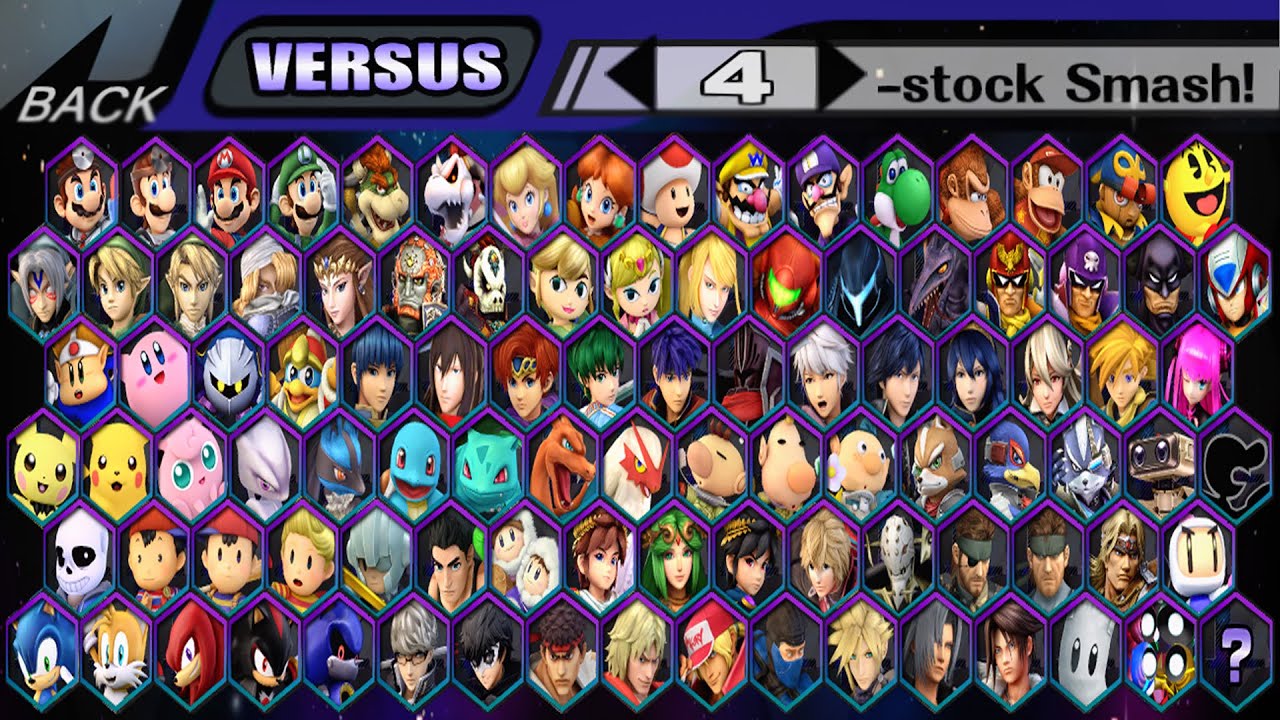
One of the highlights of Project M is its roster expansion. The mod includes characters that were not originally in Super Smash Bros. Brawl, such as Roy from Fire Emblem and Mewtwo from the Pokémon franchise. These additional characters bring new movesets, strategies, and excitement to the game, appealing to both casual and competitive players.
Not only does Project M enhance the character roster, but it also introduces revamped stages. The mod offers various stages from different games in the Super Smash Bros. series, including classic stages from Super Smash Bros. Melee. These stages feature unique layouts, hazards, and interactive elements, adding another layer of depth and strategy to battles.
Furthermore, Project M modifies the gameplay mechanics to provide a faster and more responsive experience. The overall speed of the game is increased, allowing for quicker movement, attacks, and combos. The physics engine is fine-tuned to resemble the mechanics of Super Smash Bros. Melee, resulting in tighter and more technical gameplay.
Project M also caters to the competitive community by offering features and customization options. The mod introduces various tournament-friendly features, such as the ability to disable stage hazards and customize rulesets. This allows players to tailor the game to their preferences and create a fair and balanced competitive environment.
Overall, Project M breathes new life into Super Smash Bros. Brawl, providing an alternative and exciting gameplay experience for both casual and competitive players. It allows fans to enjoy the best aspects of both Super Smash Bros. Brawl and Super Smash Bros. Melee while introducing fresh content and enhanced mechanics.
Now that we understand what Project M is, let’s move on to the prerequisites you’ll need to install this amazing mod on your Wii U console. Step 1: Installing the Homebrew Channel awaits!
Prerequisites
Before diving into the world of Project M on your Wii U console, there are a few prerequisites you need to have in place. These requirements ensure a smooth and successful installation process. So, let’s take a look at what you’ll need:
- A Wii U console: You will need a Wii U console to install and play Project M. Make sure you have a compatible version of the Wii U that supports the necessary modifications.
- A copy of Super Smash Bros. Brawl: Project M is a modification for Super Smash Bros. Brawl, so you will need to have a physical or digital copy of the game to proceed with the installation.
- An SD card: You will require an SD card with a minimum capacity of 2GB to store the necessary files for the installation process. Ensure that the SD card is formatted to FAT32 to ensure compatibility.
- A computer or laptop: You will need a computer or laptop to download the required files and prepare your SD card for the installation process.
- An internet connection: A stable internet connection is essential, as you will need to download various files and resources to install Project M on your Wii U.
- Patience and attention to detail: Installing Project M requires following a specific set of steps carefully. Make sure you have the time and patience to go through each step without rushing to ensure a successful installation.
By ensuring that you have these prerequisites in place, you are ready to proceed with the installation process. Don’t worry; we’ll guide you through each step, ensuring that you have a seamless and enjoyable experience.
Now that you have all the necessary prerequisites at hand, let’s move on to Step 1: Installing the Homebrew Channel. This is the first step towards unlocking the full potential of your Wii U with Project M!
Step 1: Installing the Homebrew Channel
The Homebrew Channel is a custom software that allows you to run unofficial applications, such as Project M, on your Wii U console. In this step, we will guide you through the process of installing the Homebrew Channel:
- Firstly, ensure that your Wii U console is powered off.
- Insert an SD card into your computer or laptop.
- Download the Homebrew Launcher files from the official website. These files include the necessary software to install the Homebrew Channel.
- Extract the downloaded files and copy the contents to the root of your SD card.
- Eject the SD card from your computer and insert it into your Wii U console.
- Power on your Wii U console and navigate to the Wii U Menu.
- Launch the Wii Mode by selecting the Wii Menu icon.
- On the Wii Menu, click on the SD Card icon located at the bottom-right corner of the screen.
- You will see a list of available files on the SD Card. Select the option that says “homebrew_browser.dol” and click on “Load”.
- The Homebrew Channel installer will launch. Follow the on-screen instructions to install the Homebrew Channel on your Wii U.
- Once the installation is complete, you will see the Homebrew Channel listed on the Wii Menu.
Congratulations! You have successfully installed the Homebrew Channel on your Wii U console. This paves the way for installing Project M and exploring a whole new world of gaming possibilities.
Now that you have the Homebrew Channel installed, it’s time to move on to Step 2: Setting up an SD Card. This step will ensure that your SD card is properly prepared to handle the installation process. So, let’s dive in!
Step 2: Setting up an SD Card
Setting up an SD card properly is crucial to ensure a smooth installation process for Project M on your Wii U console. In this step, we will guide you through the process of setting up your SD card:
- Insert the SD card into your computer or laptop.
- Ensure that the SD card is formatted correctly. To do this, right-click on the SD card drive and select “Format”. Choose the FAT32 file system and click on “Start” to initiate the formatting process.
- Once the formatting is complete, create a new folder on the root of the SD card and name it “apps”. This folder will be used to store the necessary files for Project M.
- Now, visit the official Project M website and download the latest version of Project M.
- Open the downloaded Project M file and extract its contents.
- Copy the extracted files to the “apps” folder on your SD card. Make sure to maintain the proper file structure.
- After copying the Project M files, create another folder on the root of the SD card and name it “codes”.
- Visit the “Codes” section of the Project M website and download the necessary codes file. Extract the contents of the codes file.
- Copy the extracted codes to the “codes” folder on your SD card.
- Eject the SD card from your computer and insert it back into your Wii U console.
Great job! You have successfully set up your SD card for the installation of Project M on your Wii U console. Now, your SD card is ready to handle the necessary files and resources required to bring the exciting world of Project M to your gaming experience.
Now that your SD card is appropriately prepared, let’s move on to Step 3: Backing up your Wii U’s vWii. This step ensures that you have a backup of your console’s virtual Wii mode and allows you to proceed with installing Project M confidently. So, let’s continue our journey!
Step 3: Backing up Wii U’s vWii
Before proceeding with the installation of Project M, it is essential to back up your Wii U’s vWii (virtual Wii) to ensure that you have a copy of your existing Wii data. Follow these steps to back up your Wii U’s vWii:
- Launch the Homebrew Channel on your Wii U console by selecting it from the Wii Menu.
- Inside the Homebrew Channel, look for and select the “Backup Launcher” application.
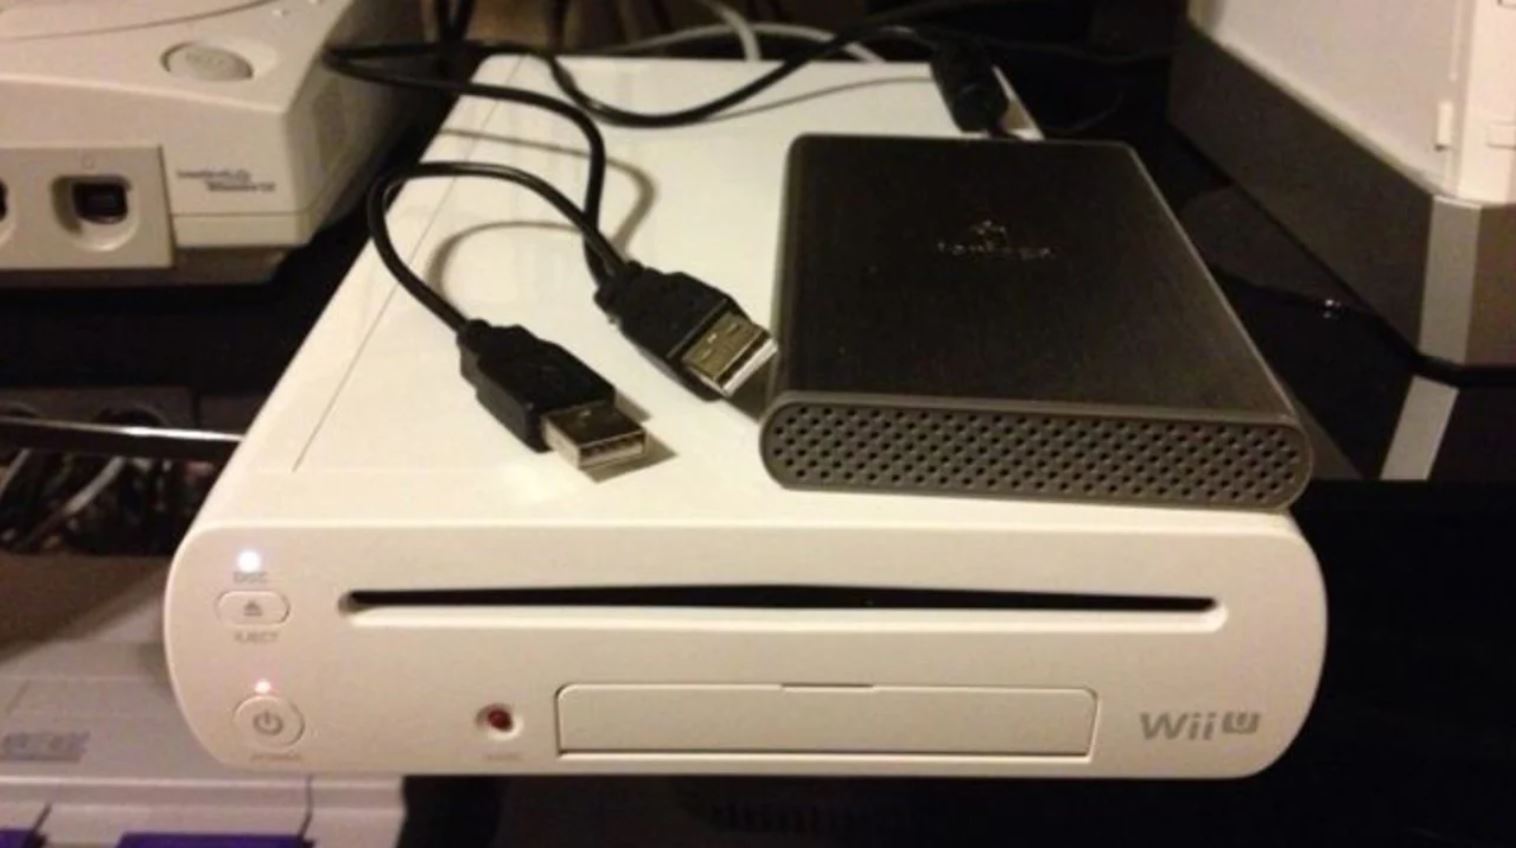
- Once the Backup Launcher is open, insert an SD card into your Wii U console.
- On the Backup Launcher screen, choose the option to create a backup of your vWii system.
- Follow the on-screen instructions to start the backup process. This might take a few minutes to complete.
- Once the backup is finished, you will receive a notification on the screen.
- Remove the SD card from your Wii U console and insert it into your computer.
- Copy the backup files from the SD card to a safe location on your computer. These files serve as a backup of your Wii U’s vWii system.
- Eject the SD card from your computer and insert it back into the Wii U console.
Congratulations! You have successfully backed up your Wii U’s vWii system. This backup ensures that your existing Wii data is safeguarded, allowing you to proceed with confidence in the installation of Project M.
Now that you have created a backup of your Wii U’s vWii, it’s time to move on to the exciting part—Step 4: Downloading Project M. In the next step, we will guide you through the process of obtaining the Project M files to bring this fantastic mod to your Wii U console. So, let’s continue our journey!
Step 4: Downloading Project M
Now that you have set up your SD card and backed up your Wii U’s vWii, it’s time to download the Project M files that will bring this exciting mod to your Wii U console. Follow these steps to download Project M:
- Open your web browser on your computer or laptop.
- Visit the official Project M website to access the latest version of the mod.
- Look for the download link on the website and click on it to begin the download process.
- Choose the location on your computer where you want to save the downloaded Project M files.
- Wait for the download to complete. The time taken will depend on the size of the Project M files and the speed of your internet connection.
- Once the download is finished, locate the downloaded Project M files on your computer.
- Extract the contents of the downloaded Project M files. This will create a folder containing all the necessary files for installation.
- Insert the SD card (prepared in Step 2) into your computer or laptop.
- Copy the extracted Project M files to the “apps” folder on your SD card. Make sure to maintain the proper file structure.
- Eject the SD card from your computer and insert it back into your Wii U console.
Great job! You have successfully downloaded the Project M files and transferred them to your SD card. This brings you one step closer to experiencing the excitement of Project M on your Wii U console.
Now that you have the Project M files ready on your SD card, it’s time to move on to Step 5: Installing Project M. In the next step, we will guide you through the process of installing Project M onto your Wii U console. So, let’s dive in!
Step 5: Installing Project M
With the Project M files ready on your SD card, it’s time to proceed with the installation process and bring this thrilling mod to your Wii U console. Follow these steps to install Project M:
- Insert the SD card with the Project M files into your Wii U console.
- Power on your Wii U console and navigate to the Wii Menu.
- Launch the Homebrew Channel by selecting it from the Wii Menu.
- Inside the Homebrew Channel, locate the Project M application and select it.
- Follow the on-screen instructions to begin the installation process.
- During the installation, you may be prompted to confirm certain actions or settings. Make sure to carefully read and follow the instructions displayed on the screen.
- Once the installation is complete, you will receive a notification indicating that Project M has been successfully installed.
Congratulations! You have successfully installed Project M on your Wii U console. Now, get ready to experience the exciting gameplay and new features that Project M brings to Super Smash Bros. Brawl.
Now that Project M is installed on your Wii U, it’s time for the moment you’ve been waiting for – Step 6: Launching Project M. In the next step, we will guide you through launching Project M and getting started with this incredible mod. So, let’s not keep you waiting any longer!
Step 6: Launching Project M
With Project M installed on your Wii U console, it’s time to take it for a spin and dive into the exciting world of this incredible mod. Follow these steps to launch Project M:
- Ensure that your SD card with the Project M files is inserted into your Wii U console.
- Power on your Wii U console and navigate to the Wii Menu.
- Launch the Homebrew Channel by selecting it from the Wii Menu.
- Inside the Homebrew Channel, locate the Project M application and select it.
- Project M will launch, and you will be greeted with the main menu.
- Use your Wii U controller to navigate through the menu and select your desired options.
- Choose your characters, select a stage, and customize the game settings to your preference.
- Once you have made your selections, press the “Start” button to begin playing Project M.
Congratulations! You have successfully launched Project M on your Wii U console. Get ready for an extraordinary gaming experience as you explore the new characters, stages, and gameplay mechanics that Project M brings to Super Smash Bros. Brawl.
Enjoy hours of intense battles and exciting matches as you immerse yourself in the enhanced gameplay and features of Project M. Whether you’re a casual player looking for fresh content or a competitive gamer seeking a more competitive experience, Project M will not disappoint.
Now that you’re all set, it’s time to grab your Wii U controller, gather some friends, and start enjoying the world of Project M. Have fun!
Conclusion
Congratulations on successfully downloading and installing Project M on your Wii U console! You’ve now unlocked a whole new level of excitement and gameplay in Super Smash Bros. Brawl. Project M introduces new characters, stages, movesets, and gameplay mechanics, offering a fresh and exhilarating experience for players.
Throughout this guide, we walked you through the step-by-step process of installing Project M, starting from installing the Homebrew Channel and setting up an SD card to backing up your Wii U’s vWii, downloading Project M, and finally, launching the mod. By following these steps, you have gained access to a fantastic fan-made modification that brings together the best elements of Super Smash Bros. Melee and Brawl.
Now, it’s time to enjoy all the features and customization options that Project M offers. Whether you’re a casual player looking for new characters and stages or a competitive gamer seeking a more vibrant and technical gameplay experience, Project M caters to your needs.
Remember to explore the various characters, experiment with different stages, and customize the game settings to your liking. Project M opens up new possibilities for fun and intense battles with friends or online opponents. With its expanded roster and enhanced mechanics, you’ll have countless hours of enjoyment ahead of you.
Don’t forget to visit the official Project M website for updates and additional resources. The Project M community is filled with passionate players, and you can discover new strategies, join tournaments, and engage in discussion forums to enhance your experience.
Thank you for following this guide, and we hope that Project M brings endless hours of entertainment and excitement to your Wii U gaming sessions. Get ready to unleash your skills, discover new techniques, and enjoy the thrilling world of Project M!