Introduction
Welcome to the world of Lightroom, a powerful photo editing software widely used by photographers and enthusiasts to enhance their images. One of the greatest features of Lightroom is its ability to use presets, which are pre-configured settings that allow you to apply specific editing effects to your photos with just a click of a button.
Lightroom presets offer a quick and efficient way to achieve consistent and professional-looking edits on your images. Whether you’re aiming for a vintage film look, a moody black and white style, or vibrant and colorful tones, Lightroom presets can help you achieve the desired effect without spending hours tweaking individual settings.
But where do you find these magical presets? Fear not, as I will guide you through the various resources and methods to download and import presets to your Lightroom application. Whether you’re using Lightroom on your desktop or the mobile app, you’ll be able to elevate your editing game and bring your photos to life.
So, grab your camera and let’s dive into the exciting world of Lightroom presets!
What are Lightroom Presets?
If you’re new to Lightroom, you might be wondering what exactly presets are and how they can revolutionize your photo editing workflow. In simple terms, Lightroom presets are predefined settings that you can apply to your photos to achieve specific looks or effects. Think of them as a one-click shortcut to applying a set of adjustments to your images.
Each preset contains a combination of settings such as exposure, contrast, saturation, white balance, and more. These settings are carefully curated by professional photographers and editing experts to create visually stunning effects that can transform your images with ease.
Presets come in a variety of styles, allowing you to experiment with different looks and moods. Whether you’re looking for a vintage, cinematic, modern, or matte effect, there’s a preset out there to suit your creative vision.
Using Lightroom presets not only saves you time but also provides consistency in your editing process. Instead of manually adjusting each individual setting for every photo, presets enable you to apply a consistent look across multiple images, maintaining a cohesive style throughout your portfolio.
Lightroom presets are compatible with both Lightroom Classic CC, the desktop version of Lightroom, and Lightroom Mobile, the mobile app. This means that regardless of whether you’re editing on your computer or on-the-go with your smartphone, you can take advantage of the power of presets to enhance your images.
Now that we know what presets are, let’s explore where you can find them and how to download them, so you can start elevating your photo editing game!
Where to Find Lightroom Presets
Now that you’re familiar with what Lightroom presets are, the next step is to find the perfect presets for your editing needs. There are several sources where you can discover and download high-quality presets, both free and paid. Let’s explore some of the best places to find Lightroom presets:
- Official Adobe Lightroom Presets: Adobe offers a collection of pre-installed presets within the Lightroom application. These presets cover a wide range of styles and effects and can be a great starting point for your editing journey.
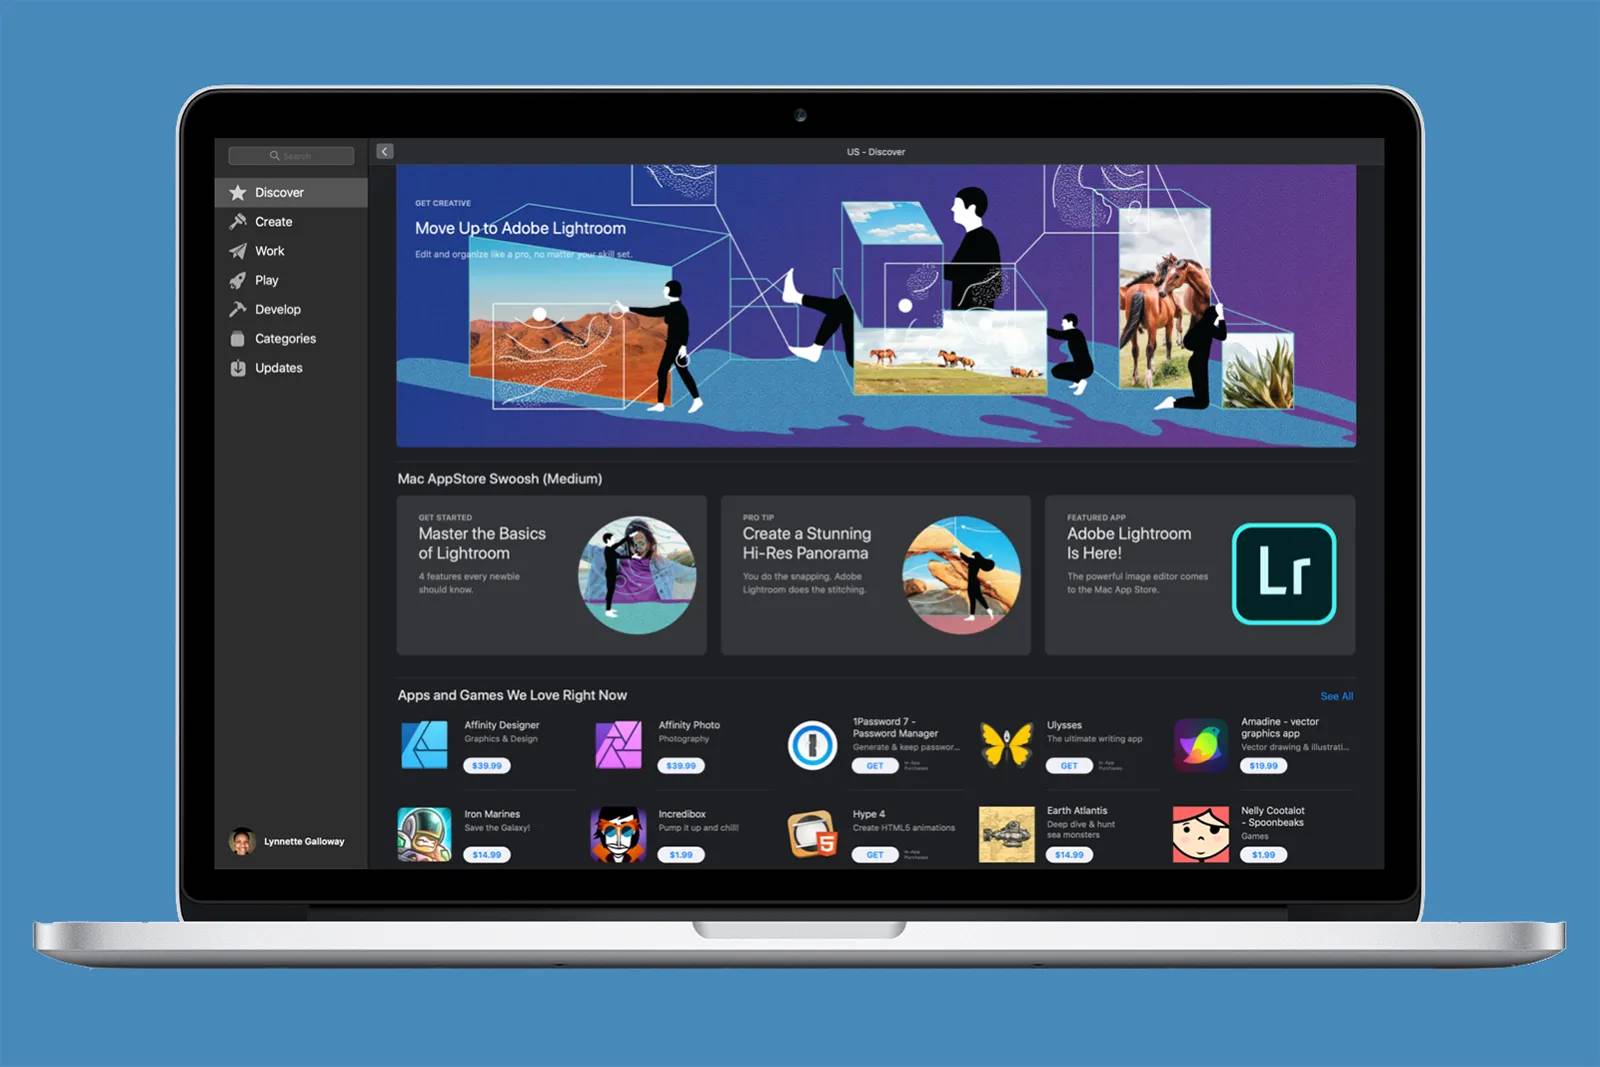
- Adobe Creative Cloud: If you’re subscribed to Adobe Creative Cloud, you gain access to a vast library of Lightroom presets, including those created by industry-leading photographers. Simply sync your Creative Cloud account with Lightroom to unlock this extensive selection of presets.
- Photography Websites and Blogs: Many websites and blogs dedicated to photography offer free presets as a way to engage with their audience or promote their work. These presets are oftentimes created by professional photographers and can provide unique and stunning effects for your images.
- Online Marketplaces: Platforms like Adobe Stock, Etsy, and Creative Market offer a wide range of Lightroom presets created by photographers and preset developers. You can find both free and premium presets on these marketplaces, giving you a diverse selection to choose from.
- Social Media Communities: Social media platforms like Instagram and Facebook are home to numerous communities of photographers who share their presets for others to use. By following photographers and participating in these communities, you can discover and access a wealth of presets.
When searching for presets, it’s important to consider the style and look you want to achieve. Take the time to explore different sources and experiment with various presets to find the ones that align with your artistic vision. Remember, presets can be customized and adjusted to suit your preferences, so don’t be afraid to make tweaks and modifications to make them truly yours.
Now that you know where to find Lightroom presets, let’s delve into how you can download and import them into your Lightroom application.
How to Download Presets from Websites
Downloading Lightroom presets from websites is a straightforward process that allows you to access an extensive variety of presets created by photographers and preset developers. Follow these steps to download presets from websites:
- Select a Reliable Website: Begin by finding a reputable website that offers Lightroom presets. Look for websites that have positive reviews, a wide selection of presets, and a good reputation within the photography community.
- Browse and Choose Presets: Once you’ve found a suitable website, browse through their preset collections. Most websites categorize presets by style, mood, or genre, making it easier for you to find the desired preset. Take your time to explore different options and choose the presets that resonate with your creative vision.
- Download the Presets: Once you’ve selected the presets you want, look for the download button or link on the website. Click on it to begin the download process. The presets may be in a compressed file format, such as ZIP or RAR. Make sure to save the file to a location on your computer where you can easily access it later.
- Extract the Presets: If the presets are in a compressed file format, you’ll need to extract them before using them in Lightroom. Right-click on the file and select “Extract” or use a file extraction software like WinRAR or 7-Zip. Once extracted, you should see the individual preset files with the extension “.lrtemplate” or “.xmp”.
- Import the Presets to Lightroom: Open Lightroom on your computer and navigate to the Develop module. In the left-hand panel, locate the Presets panel. Right-click on it and choose “Import…”. Browse for the extracted preset files and select them. Lightroom will then import the presets, and they will appear in the Presets panel for you to use.
That’s it! You have successfully downloaded and imported Lightroom presets from a website. Now you can apply these presets to your images and experiment with different looks and styles. Remember to explore various websites and presets to expand your editing options and unleash your creativity.
Next, let’s discover how to download presets directly to your Lightroom Mobile app.
How to Download Presets from Lightroom Mobile
Lightroom Mobile allows you to edit your photos on the go using your smartphone or tablet. If you prefer editing on your mobile device, you’ll be pleased to know that you can easily download and apply presets directly within the Lightroom Mobile app. Here’s how:
- Open Lightroom Mobile: Launch the Lightroom Mobile app on your device. If you haven’t already done so, sign in with your Adobe ID or create a new account.
- Access the Presets Panel: Once you’re in the Lightroom Mobile app, open a photo and tap on the Edit icon at the bottom of the screen. This will take you to the editing interface. Scroll along the bottom panel and tap on the Presets icon.
- Browse the Preset Library: Lightroom Mobile offers a library of built-in presets to get you started. Swipe horizontally to view the available preset categories. Tap on a category to see the presets within it.
- Download Additional Presets: To expand your preset options, tap on the three-dot icon in the top-right corner of the screen and select “Manage Presets”. This will take you to the Adobe Creative Cloud where you’ll find an extensive collection of additional presets available for download.
- Choose and Download Presets: Browse through the available preset collections and tap on the ones you want to download. After selecting a preset, tap on the download icon to initiate the download process. The preset will be automatically added to your Lightroom Mobile app.
- Apply Presets to Your Photos: Once you’ve downloaded the presets, go back to the editing interface and tap on the Presets icon. The downloaded presets will now appear alongside the built-in presets. Tap on a preset to apply it to your photo. You can further adjust the preset settings to fine-tune the effect to your liking.
With Lightroom Mobile, you have the convenience and flexibility of editing your photos anywhere, anytime, and with the added benefit of easily downloading and applying presets to enhance your images. Take advantage of the vast array of presets available and experiment with different styles and effects to achieve stunning results.
Now that you know how to download presets on Lightroom Mobile, let’s move on to the process of importing presets to Lightroom Desktop.
How to Import Presets to Lightroom Desktop
Importing presets to Lightroom Desktop is a simple process that allows you to expand your editing options and apply a wide range of creative effects to your photos. Follow these steps to import presets into your Lightroom Desktop application:
- Locate the Preset Files: Before importing presets, make sure you have the preset files in the appropriate format. Lightroom Desktop supports two types of preset files: “.lrtemplate” for older versions and “.xmp” for newer versions. Ensure that your preset files are saved in one of these formats.
- Open Lightroom Desktop: Launch the Lightroom Desktop application on your computer. If you haven’t already done so, sign in with your Adobe ID.
- Access the Presets Panel: Once you’re in Lightroom Desktop, go to the Develop module by clicking on the “Develop” tab at the top of the screen. On the left-hand side of the interface, you’ll find the Presets panel. Click on the “+” icon to the right of the Presets panel to create a new preset folder.
- Import Presets: Right-click on the newly created preset folder and select “Import…”. Locate the preset files on your computer and select the files you want to import. You can select multiple preset files at once by holding down the Ctrl (Windows) or Command (Mac) key while clicking on the files.
- Apply Presets to Your Photos: Once the presets are imported, they will appear in the Presets panel under the new folder. To apply a preset to a photo, navigate to the photo in the Library module or the Develop module, and click on the preset in the Presets panel. The preset’s settings will be applied to the photo.
By importing presets into Lightroom Desktop, you have the freedom to use a wide range of creative effects and styles in your photo editing workflow. Don’t limit yourself to the default presets – explore and experiment with different preset collections to find the ones that suit your unique style and vision.
Now that you know how to import presets to Lightroom Desktop, let’s explore the process of importing presets to Lightroom Mobile.
How to Import Presets to Lightroom Mobile
Importing presets to Lightroom Mobile allows you to access a wide range of creative options and apply unique looks and styles to your photos on the go. Follow these steps to import presets into your Lightroom Mobile app:
- Prepare Presets: Before importing presets, make sure you have the preset files in the appropriate format. Lightroom Mobile uses preset files in the “.dng” format. If your presets are in a different format (such as “.xmp” or “.lrtemplate”), you’ll need to convert them to “.dng” files using the Adobe DNG Converter or a similar tool.
- Transfer Presets to Your Mobile Device: Once you have the presets in the “.dng” format, transfer them to your mobile device. You can use various methods such as emailing the presets to yourself, using cloud storage services like Dropbox or Google Drive, or connecting your device to your computer and transferring the files directly.
- Open Lightroom Mobile: Launch the Lightroom Mobile app on your device and navigate to the library section.
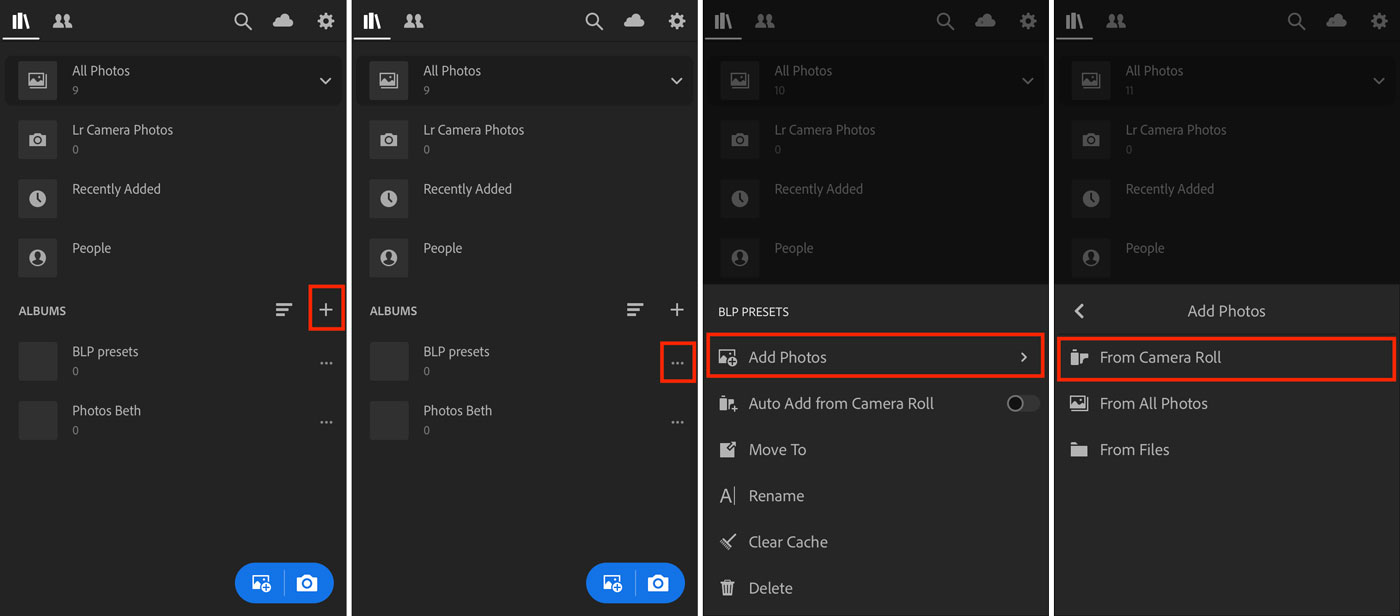
- Import the Presets: Tap on the “+” icon at the top-right corner of the screen to create a new album. Give the album a name and tap “Create” to proceed. Inside the newly created album, tap on the three-dot icon at the top-right corner, and then select “Add Photos”. Navigate to the folder where you transferred the “.dng” preset files and select them to import them into the album.
- Create Preset from the DNG Files: To create a usable preset from the imported “.dng” files, you need to apply the preset settings to a photo. Open one of the imported “.dng” files, tap on the Edit icon at the bottom of the screen, and adjust the settings to your preference. Once you’re satisfied with the adjustments, tap on the three-dot icon and select “Create Preset”. Give your preset a name and adjust any additional settings. Tap on the checkmark icon to save the preset.
- Apply Presets to Your Photos: Now that your presets are imported and saved, you can easily apply them to your photos. Open a photo in Lightroom Mobile, tap on the Edit icon, and navigate to the Presets section. Your imported presets, along with the default presets, will be available for you to select and apply to the photo.
By importing presets into Lightroom Mobile, you can elevate your mobile editing workflow and achieve stunning results even while on the go. Take advantage of the ability to import and apply presets to transform your photos with just a few taps.
Now that you know how to import presets to Lightroom Mobile, you’re ready to explore the endless creative possibilities and enhance your mobile photo editing experience.
Conclusion
Lightroom presets are a game-changer in the world of photo editing, offering a quick and efficient way to apply professional-looking effects to your images with just a click. Whether you’re using Lightroom on your desktop or the mobile app, you now have the knowledge and tools to download and import presets into your Lightroom application.
From official Adobe presets to websites, online marketplaces, and social media communities, there are numerous sources where you can find a vast array of presets to suit your artistic vision. Take the time to explore different styles and effects to discover the ones that resonate with your unique style.
Downloading presets from websites is a simple process that allows you to access presets created by photographers and preset developers. By following the steps to import presets to Lightroom Desktop or Lightroom Mobile, you can expand your editing options and unleash your creativity. Whether you prefer the convenience of editing on your computer or the flexibility of editing on your mobile device, Lightroom presets have got you covered.
Remember, presets serve as a starting point for your edits. Feel free to modify and customize them to achieve your desired look. Experiment with different presets, apply them to your photos, and refine them further to create your own signature editing style.
Now that you have the tools and knowledge, it’s time to dive into the exciting world of Lightroom presets and take your photo editing skills to new heights. Enjoy the journey of transforming your images and watch as your creative vision comes to life!