Why Move Your Lightroom Catalog to an External Hard Drive
Using Adobe Lightroom for editing and organizing your photos is a great way to streamline your workflow and keep your images organized. However, as your collection grows, you may find that your computer’s internal storage is running out of space.
That’s where an external hard drive comes in handy. By moving your Lightroom catalog to an external hard drive, you can free up valuable space on your computer while still having access to your entire photo collection.
One of the main advantages of storing your Lightroom catalog on an external hard drive is the increased storage capacity. External hard drives can provide terabytes of storage, allowing you to store and manage a vast number of photos without worrying about limited space.
Additionally, moving your Lightroom catalog to an external hard drive can improve performance and speed up your editing process. When your catalog is stored on your computer’s internal drive, Lightroom has to constantly access and read the catalog files, which can slow down the program. By moving the catalog to an external hard drive, Lightroom can run more efficiently, resulting in smoother editing and faster search and retrieval of photos.
An external hard drive also offers the advantage of portability. You can easily disconnect the external hard drive from your computer and take it with you wherever you go. This is particularly useful for photographers who work on multiple devices or need to access their photos while on the move.
Another benefit of storing your Lightroom catalog on an external hard drive is the added layer of security. If your computer crashes or if you accidentally delete or corrupt your catalog files, having a backup on an external hard drive ensures that your photos and edits are safe.
Lastly, using an external hard drive allows you to easily share your Lightroom catalog with others. Whether you’re collaborating with other photographers or simply want to showcase your work, you can transfer the catalog to another computer or provide it to someone else without having to move the actual photo files.
Moving your Lightroom catalog to an external hard drive not only solves the problem of limited storage space but also offers enhanced performance, portability, security, and sharing capabilities. In the following sections, we will guide you through the process of moving your Lightroom catalog to an external hard drive.
What You Will Need
Before you begin the process of moving your Lightroom catalog to an external hard drive, you will need a few essential items. Here’s a list of what you will need:
- External Hard Drive: Choose an external hard drive with sufficient storage capacity to accommodate your Lightroom catalog and photo library. Make sure it is compatible with your computer’s operating system.
- Backup Solution: It’s crucial to have a reliable backup solution in place before transferring your catalog. This can be an external hard drive, cloud storage, or a combination of both.
- USB Cable or Thunderbolt Cable: Depending on the type of external hard drive you have, you may need a USB cable or Thunderbolt cable to connect it to your computer.
- Lightroom Software: Ensure that you have the latest version of Adobe Lightroom installed on your computer. If not, download and install the software from Adobe’s official website.
- Computer with Sufficient Storage: While the purpose of moving your catalog to an external hard drive is to free up space on your computer, you still need enough internal storage to run Lightroom smoothly.
It’s important to gather all these items before proceeding with the process. Having everything ready will help streamline the transfer and ensure a hassle-free experience.
Now that you know what you need, let’s move on to the step-by-step guide on how to move your Lightroom catalog to an external hard drive and start enjoying the benefits of increased storage space and improved performance.
Step 1: Backup Your Catalog
Before making any changes to your Lightroom catalog, it’s crucial to create a backup to ensure that your precious photos and edits are safe. Here’s how you can back up your Lightroom catalog:
- Launch Lightroom: Open Adobe Lightroom on your computer to access your catalog.
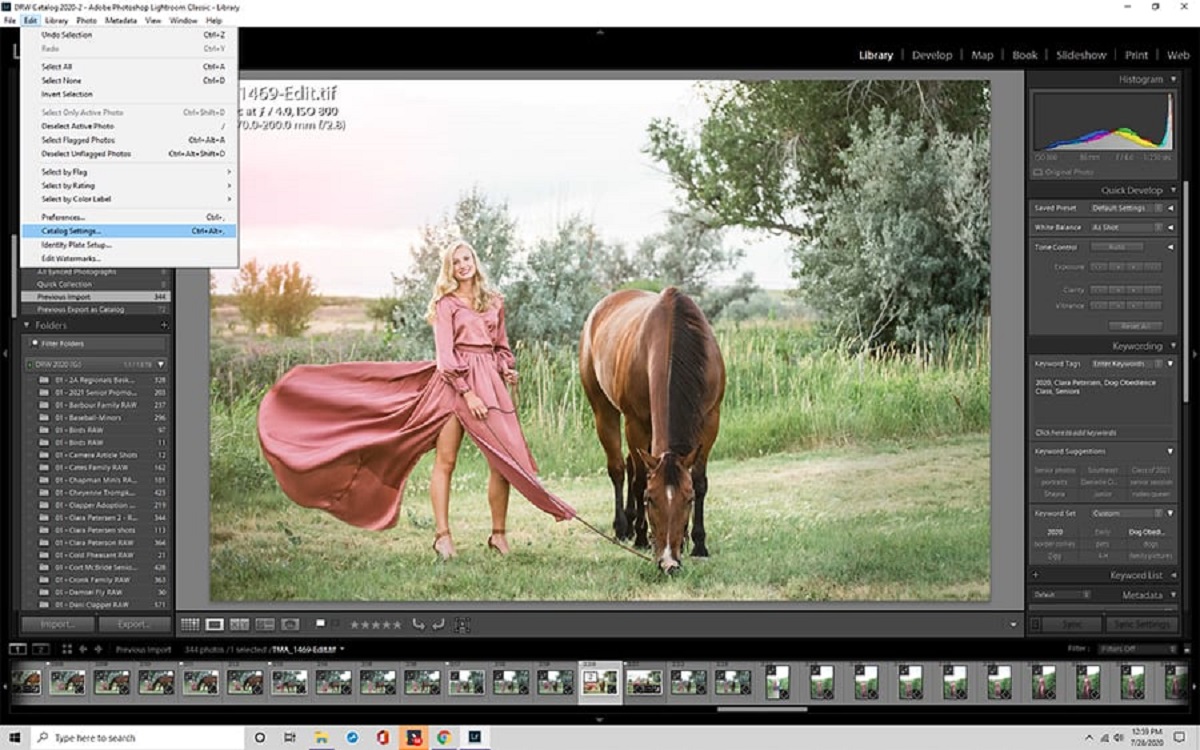
- Select “Catalog Settings”: Go to the “Edit” (Windows) or “Lightroom” (Mac) menu and select “Catalog Settings.”
- Go to the “General” tab: In the Catalog Settings dialog box, click on the “General” tab.
- Note Your Current Catalog Location: Take note of the current location where your Lightroom catalog is stored. This information will be useful for the later steps.
- Click on “Show” in the “Location” section: Click on the “Show” button next to the current catalog location to reveal the file in your file explorer or Finder.
- Create a Backup Folder: In the file explorer or Finder window, create a new folder in a safe location on your computer or an external hard drive. Give it a clear and identifiable name, such as “Lightroom Catalog Backup.”
- Copy the Catalog Files: Now, go back to the file explorer or Finder window displaying your Lightroom catalog file. Select all the files related to your Lightroom catalog (usually with the .lrcat extension) and copy them to the backup folder you created in the previous step.
- Paste the Files: Once the copying process is complete, navigate to the backup folder and paste the copied files into it.
- Verify the Backup: After pasting the files, double-check that all the catalog files are present in the backup folder.
By following these steps, you have successfully created a backup of your Lightroom catalog. It’s essential to keep this backup in a secure location as a precautionary measure in case anything goes wrong during the catalog transfer process.
In the next step, we will guide you on how to format your external hard drive to ensure compatibility and optimal performance.
Step 2: Format Your External Hard Drive
Formatting your external hard drive is an important step to ensure compatibility with your computer and optimal performance for storing your Lightroom catalog. Follow these steps to format your external hard drive:
- Connect Your External Hard Drive: Plug your external hard drive into a USB or Thunderbolt port on your computer. Ensure that the drive is properly connected and recognized by your operating system.
- Backup Your Existing Data: If your external hard drive contains any important files or data, make sure to back them up before proceeding. The formatting process will erase all existing data on the drive.
- Open Disk Utility (Mac) or Disk Management (Windows): On a Mac, go to “Applications” > “Utilities” > “Disk Utility”. On Windows, right-click on the Start button and select “Disk Management” from the menu.
- Select Your External Hard Drive: In Disk Utility or Disk Management, locate your external hard drive from the list of available drives. Be careful to choose the correct drive to format.
- Format the Drive: In Disk Utility (Mac), click on the “Erase” tab, choose a file system format (such as ExFAT or FAT32), give the drive a name, and click “Erase” to start the formatting process. In Disk Management (Windows), right-click on the drive, select “Format”, choose a file system format and allocation unit size, give the drive a name, and click “OK”.
- Confirm the Format: A warning message will appear notifying you that formatting will erase all data on the drive. Double-check that you have backed up any important data, then proceed by clicking “Erase” or “Format”.
- Wait for the Format to Complete: The formatting process may take a few minutes to complete, depending on the size of your external hard drive.
- Eject the Drive: Once the formatting process is finished, safely eject your external hard drive from your computer. This will ensure that no data is being transferred to or from the drive.
Now, your external hard drive is formatted and ready to be used for storing your Lightroom catalog. In the next step, we will guide you on how to copy your catalog files to the newly formatted external hard drive.
Step 3: Copy Your Catalog Files
Now that you have a properly formatted external hard drive, it’s time to transfer your Lightroom catalog files. Follow these steps to copy your catalog files to the external hard drive:
- Locate Your Lightroom Catalog Files: Open the file explorer (Windows) or Finder (Mac) on your computer.
- Navigate to Your Current Catalog Location: Remember the location you noted down in Step 1? Go to that location in the file explorer or Finder.
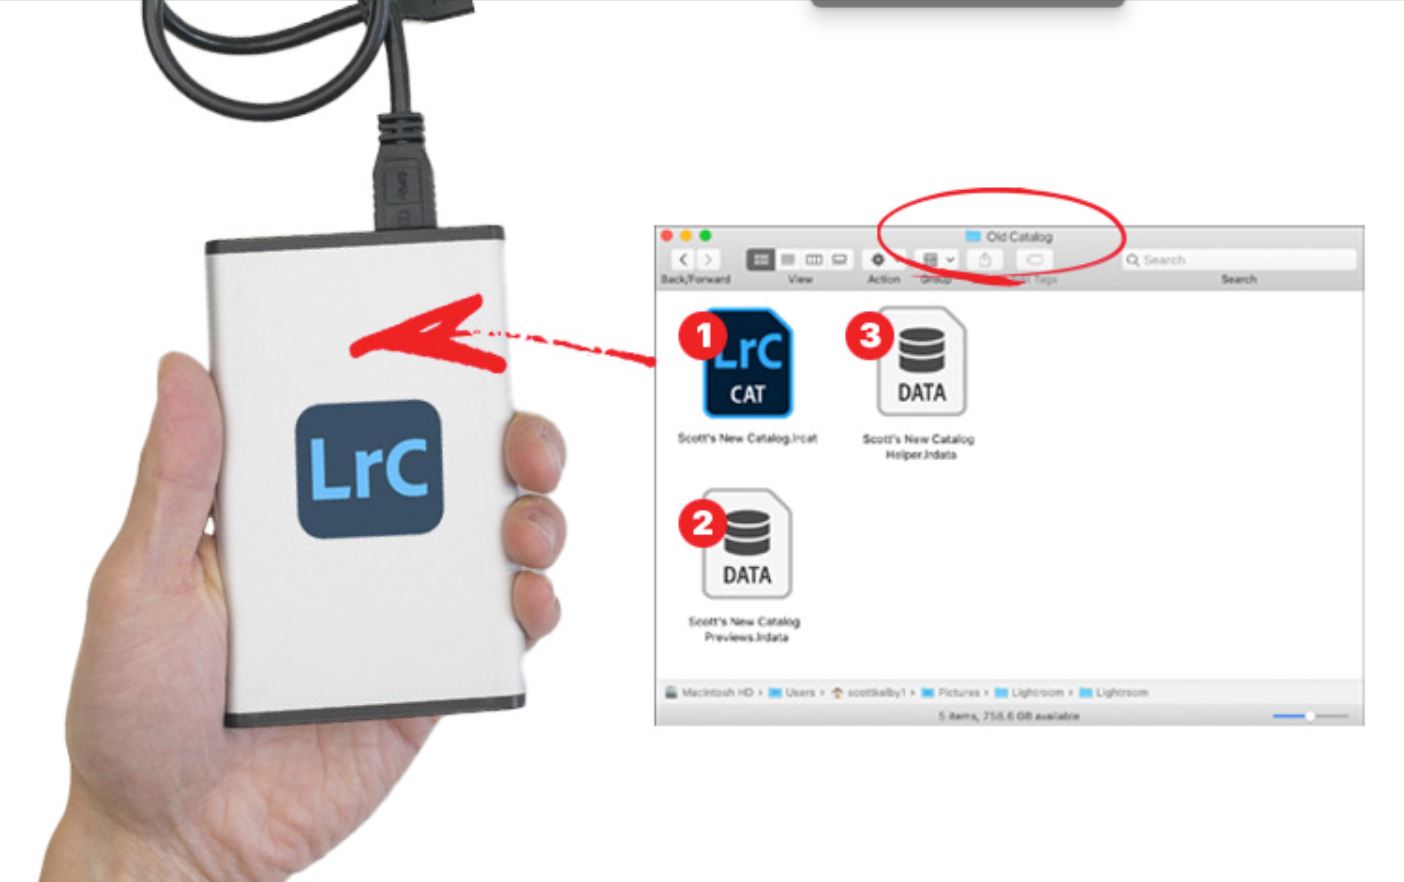
- Copy Your Lightroom Catalog Files: Select all the files related to your Lightroom catalog (e.g., .lrcat, .lrdata, .lock). Right-click on the selection and choose “Copy” from the context menu.
- Go to Your External Hard Drive: In the file explorer or Finder, navigate to the external hard drive where you want to store your Lightroom catalog.
- Create a Folder: Right-click on an empty space in the external hard drive’s directory and choose “New Folder” from the context menu. Give the folder an appropriate name, such as “Lightroom Catalog”.
- Paste Your Lightroom Catalog Files: Open the newly created folder and right-click inside it. Select “Paste” from the context menu to copy the catalog files into the folder.
- Wait for the Files to Copy: The copying process may take a few moments, depending on the size of your catalog files. Ensure that the copying is complete before proceeding.
Once the copying process is finished, you have successfully transferred your Lightroom catalog files to the external hard drive. In the next step, we will guide you through updating Lightroom preferences to reflect the new catalog location.
Step 4: Update Lightroom Preferences
Now that you have copied your Lightroom catalog files to the external hard drive, it’s important to update Lightroom’s preferences to reflect the new catalog location. Follow these steps to update Lightroom preferences:
- Launch Adobe Lightroom: Open Lightroom on your computer.
- Go to Lightroom Preferences: On a Mac, click on the “Lightroom” menu and select “Preferences”. On Windows, go to the “Edit” menu and choose “Preferences”.
- Select the “General” Tab: In the Preferences dialog box, click on the “General” tab.
- Click the “Show Lightroom Presets Folder” Button: Look for the button labeled “Show Lightroom Presets Folder” and click on it.
- Locate the Lightroom Catalog Folder: In the file explorer or Finder window that opens, navigate to the external hard drive where you copied your catalog files. Open the folder that contains your Lightroom catalog.
- Select the Catalog File: Inside the catalog folder, select the catalog file (ends with the .lrcat extension) and click “Choose” or “Select Folder” (depending on your operating system).
- Restart Lightroom: Close and reopen Lightroom for the changes to take effect. Lightroom will now use the new catalog location on the external hard drive.
By updating Lightroom’s preferences, you have successfully pointed Lightroom to the new catalog location on your external hard drive. In the next step, we will guide you on how to open Lightroom with the new catalog location.
Step 5: Open Lightroom with the New Catalog Location
After updating Lightroom preferences, you need to open Lightroom with the new catalog location on your external hard drive. Follow these steps to open Lightroom with the new catalog:
- Connect Your External Hard Drive: Ensure that your external hard drive is properly connected to your computer.
- Launch Adobe Lightroom: Open Lightroom on your computer.
- Choose the Correct Catalog: Lightroom will open with the previously used catalog location. To switch to the new catalog location on your external hard drive, click on “File” (Windows) or “Lightroom” (Mac) in the menu bar, and select “Open Catalog”.
- Navigate to the External Hard Drive: In the dialog box that appears, navigate to your external hard drive using the file explorer (Windows) or Finder (Mac).
- Select the Catalog File: Locate the folder you created on the external hard drive and select the catalog file (.lrcat).
- Click “Choose” or “Open”: After selecting the catalog file, click “Choose” (Windows) or “Open” (Mac).
Lightroom will now open with the new catalog location on your external hard drive. You will be able to access your entire photo library and continue working on your images as usual.
It’s important to note that any changes or edits you make to your photos or catalog will now be saved on the external hard drive. Make sure to properly disconnect the hard drive after using Lightroom to ensure all changes are saved and the catalog is not damaged.
In the next step, we will guide you on how to test and verify your catalog to ensure that the transfer was successful.
Step 6: Test and Verify Your Catalog
After completing the previous steps to move your Lightroom catalog to an external hard drive, it’s essential to test and verify the catalog to ensure a successful transfer. Here’s how you can test and verify your catalog:
- Open Lightroom: Launch Adobe Lightroom on your computer.
- Ensure the Catalog Opens: When Lightroom opens, check that it opens with the correct catalog from the external hard drive. You should see your folders, collections, and edited photos in the Library module.
- Navigate through Your Photos: Browse through your photos to ensure that all of them are visible and accessible. Check that the edits, metadata, and keywords associated with each photo are intact.
- Make Edits and Adjustments: Select a few photos and make edits or adjustments to test if the changes are properly saved and applied to the photos in your catalog.
- Switch Backups: If you have an automatic backup system in place, make sure it’s configured to back up the new location of your Lightroom catalog on the external hard drive.
- Test Performance: Pay attention to the performance of Lightroom with the catalog on the external hard drive. Check if the program runs smoothly, if searches are fast, and if there are any noticeable delays when accessing photos or applying edits.
- Verify Backups: Double-check that your backup system is functioning correctly by verifying that backups of your catalog files on the external hard drive are being created.
By following these steps, you can ensure that your Lightroom catalog has been successfully transferred to the external hard drive and that everything is functioning as expected. If you encounter any issues or notice any discrepancies, refer back to the previous steps to troubleshoot the problem.
Congratulations! You have successfully moved your Lightroom catalog to an external hard drive, freeing up valuable space on your computer while still having access to your entire photo library. Enjoy the increased storage capacity and improved performance that this setup offers!
Conclusion
Moving your Lightroom catalog to an external hard drive is a practical solution for freeing up space on your computer, improving performance, and ensuring the safety of your photo collection. By following the step-by-step guide provided in this article, you can successfully transfer your Lightroom catalog to an external hard drive and enjoy the benefits it offers.
By storing your Lightroom catalog on an external hard drive, you gain access to increased storage capacity, allowing you to manage a larger photo collection without worrying about running out of space. Additionally, transferring your catalog to the external hard drive can enhance performance as Lightroom runs more efficiently, resulting in smoother editing and quicker search and retrieval of photos.
The portability of an external hard drive is another advantage of this setup. You can easily disconnect the external hard drive and take it with you, ensuring access to your photo collection across multiple devices or while on the go.
Furthermore, storing your Lightroom catalog on an external hard drive provides an added layer of security. With a backup on the external hard drive, you can safeguard your photos and edits from unexpected computer crashes or accidental deletion of catalog files.
Sharing your Lightroom catalog becomes simpler when it’s stored on an external hard drive. By transferring the catalog to another computer or providing it to someone else, you can collaborate with fellow photographers or showcase your work without the need to move the actual photo files.
Remember to follow each step carefully when transferring your Lightroom catalog to an external hard drive. Start by backing up your catalog, formatting the external hard drive, copying the files, updating Lightroom preferences, opening Lightroom with the new catalog location, and finally testing and verifying the catalog to ensure a successful transfer.
Once you have successfully moved your Lightroom catalog to an external hard drive, you can enjoy working on your photos with the convenience of increased storage space, improved performance, and the peace of mind that your catalog is securely backed up.