What are Lightroom Presets?
Lightroom presets are pre-saved settings that can be applied to your photos in Adobe Lightroom, a powerful software used by photographers and image editors. These presets contain a combination of adjustments, such as exposure, contrast, saturation, white balance, and more, that give your photos a desired look and feel.
Think of Lightroom presets as filters or templates for your photos. They allow you to quickly and easily enhance the appearance of your images, giving them a professional and consistent look. Whether you want to achieve a dreamy, vintage, cinematic, or moody effect, there are presets available that can help you achieve your desired aesthetic.
Presets make the editing process in Lightroom more efficient, saving you time and effort. Instead of manually adjusting every setting for each photo, you can simply apply a preset with a single click and make minor adjustments as needed. This is particularly useful when working with a large number of photos from a single shoot or event.
Another advantage of Lightroom presets is their versatility. They can be used on various types of photos, including portraits, landscapes, architecture, and more. Whether you’re a professional photographer, an amateur enthusiast, or a social media influencer, Lightroom presets can help you transform your photos and make them stand out.
Lightroom presets can be created by photographers or obtained from various sources, including Adobe’s official preset library, the Adobe Creative Cloud, or third-party websites. With the growing popularity of Lightroom, there is a wide selection of presets available, catering to different styles and preferences.
Now that you understand what Lightroom presets are, let’s explore the different ways you can download presets in Lightroom to enhance your photo editing workflow.
Different Ways to Download Presets in Lightroom
There are multiple ways to download presets in Lightroom, depending on your preference and the source of the presets. Let’s explore three common methods:
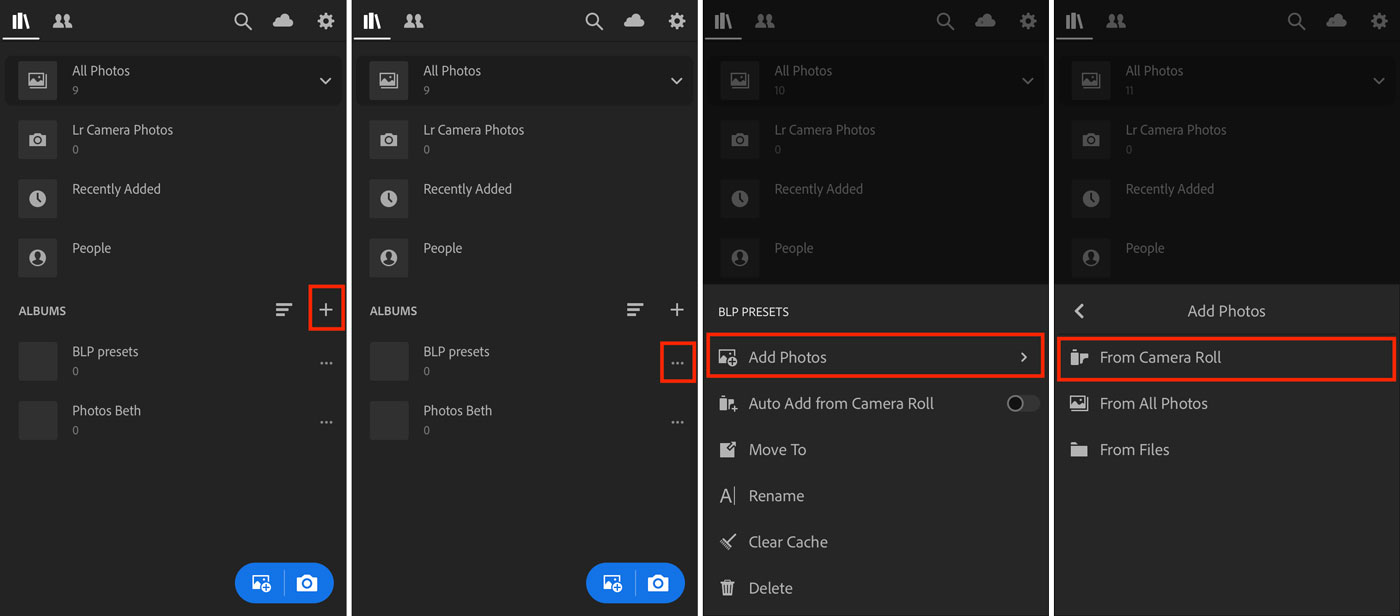
- Directly from Lightroom: If you’re an Adobe Creative Cloud subscriber, you can access a wide range of presets directly from the Lightroom app. Simply open the app and navigate to the Develop module. On the left-hand side, you’ll find the Presets panel. Click the “+” icon to access the Preset Browser, where you can browse and install various preset packs provided by Adobe.
- From the Adobe Creative Cloud: If you have an active Adobe Creative Cloud subscription, you can download additional preset packs from the Adobe Creative Cloud website. Simply log in to your account, navigate to the Apps section, and download the desired preset packs. Once downloaded, open Lightroom, go to the Develop module, and click the “+” icon in the Presets panel. Choose “Import Presets” and locate the downloaded preset files on your computer.
- From third-party websites: Many photographers and editing enthusiasts share their preset collections on third-party websites, allowing you to explore a wide range of styles and effects. These presets can often be downloaded for free or purchased. To download presets from a third-party website, visit the website and locate the preset pack you wish to download. Follow the instructions provided to download the preset files. Once downloaded, open Lightroom, go to the Develop module, and click the “+” icon in the Presets panel. Choose “Import Presets” and navigate to the downloaded preset files on your computer to install them.
With these options available, you can easily expand your library of Lightroom presets and experiment with different styles and effects.
How to Download Presets Directly from Lightroom
If you’re an Adobe Creative Cloud subscriber, downloading presets directly from Lightroom is a simple and convenient process. Here’s a step-by-step guide:
- Launch Adobe Lightroom on your computer and ensure you have a stable internet connection.
- Open the Lightroom app and navigate to the Develop module, where you can make adjustments to your photos.
- On the left-hand side of the screen, you’ll find the Presets panel. Click the “+” icon next to the “Presets” heading to access the Preset Browser.
- In the Preset Browser, you’ll see a list of available preset packs provided by Adobe. You can browse through the different categories or use the search bar to find specific presets.
- Select the preset pack you want to download by clicking on it. You can preview the effect of each preset by hovering over it.
- Click the “Download” button to start the download process. The preset pack will be added to your Lightroom library.
- Once the download is complete, you can access the newly downloaded presets by expanding the preset pack in the Preset Browser.
- To apply a preset to your photo, simply click on the preset name in the Preset Browser. Lightroom will automatically apply the preset’s settings to your photo.
- You can further customize the preset’s effect by adjusting the individual sliders in the Develop module.
Downloading presets directly from Lightroom is a convenient way to quickly expand your collection and experiment with different looks and styles. Remember, these presets are part of your Adobe Creative Cloud subscription, so you have access to them as long as your subscription is active.
How to Download Presets from the Adobe Creative Cloud
If you’re an Adobe Creative Cloud subscriber, you have access to a wide range of preset packs that can be downloaded from the Adobe Creative Cloud website. Here’s how you can download presets from the Adobe Creative Cloud:
- Ensure that you have an active Adobe Creative Cloud subscription and a stable internet connection.
- Visit the Adobe Creative Cloud website and log in with your Adobe ID and password.
- Navigate to the “Apps” section of the website, where you can find various resources and downloads.
- In the Apps section, look for the presets available for download. These may be categorized under Lightroom presets or in a more general category like photography or design resources.
- Once you’ve found the preset pack you’re interested in, click on it to access the download page.
- On the download page, review the information about the preset pack, including the file format and any specific instructions provided by the creator.
- Click the “Download” button to start the download process. The preset pack will be downloaded to your computer.
- Open Adobe Lightroom on your computer and navigate to the Develop module, where you can apply presets to your photos.
- In the Presets panel on the left-hand side, click the “+” icon next to the “Presets” heading to access the Preset Browser.
- Click the “Import Presets” option and locate the downloaded preset file on your computer.
- Select the preset file and click “Import” to add the presets to your Lightroom library.
Once the presets are imported into Lightroom, you can apply them to your photos by simply clicking on the preset name in the Preset Browser. Customize the effect further by adjusting the sliders in the Develop module to suit your preference.
Downloading presets from the Adobe Creative Cloud gives you access to professionally created preset packs that can enhance your photo editing workflow and help you achieve different styles and effects with ease.
How to Download Presets from Third-Party Websites
In addition to the preset packs available directly from Adobe, there are numerous third-party websites that offer a wide selection of Lightroom presets. Here’s a step-by-step guide on how to download presets from third-party websites:
- Start by searching for reputable third-party websites that offer Lightroom presets. You can use search engines or browse through photography forums and communities for recommendations.
- Once you’ve found a website that offers presets you’re interested in, navigate to the page where the preset pack is available for download.
- Read the description and preview the sample images to get an idea of the preset’s style and effects.
- Look for a download button or a link to download the preset pack. Some websites may require you to provide your email address or create an account before downloading.
- Click the download button or link to initiate the download process.
- Depending on the website and the preset pack, you may receive a ZIP file containing the preset files or download the presets directly.
- Once the download is complete, open Adobe Lightroom on your computer and navigate to the Develop module.
- Expand the Presets panel on the left-hand side and click the “+” icon next to the “Presets” heading to access the Preset Browser.
- Choose the “Import Presets” option and locate the downloaded preset files on your computer. This may include individual preset files or a folder containing multiple presets.
- Select the preset files and click “Import” to add them to your Lightroom library.
Once the presets are imported, you can apply them to your photos by selecting the preset name in the Preset Browser. Remember to adjust the sliders in the Develop module if needed to achieve the desired effect.
Downloading presets from reputable third-party websites expands your options for creative effects and styles. It allows you to explore the work of other photographers and find presets that match your personal preferences and artistic vision.
How to Install Lightroom Presets After Downloading
After downloading Lightroom presets, whether they are obtained directly from Lightroom, the Adobe Creative Cloud, or third-party websites, you need to install them before you can use them in your editing workflow. Here’s a step-by-step guide on how to install Lightroom presets:
- First, locate the downloaded preset files on your computer. They may be in a specific folder or in a compressed ZIP file.
- If the preset files are in a ZIP file, extract the contents to a folder on your computer. This can usually be done by right-clicking on the ZIP file and selecting “Extract” or by using a file compression program.
- Open Adobe Lightroom on your computer and navigate to the Develop module where you can apply presets to your photos.
- In the Presets panel on the left-hand side of the screen, click the “+” icon next to the “Presets” heading. This will open the Preset Browser.
- In the Preset Browser, right-click on any preset folder or simply click on an existing preset folder and choose “Import” from the drop-down menu. Alternatively, you can select the “Import Presets” option from the “+” icon in the Presets panel.
- A file explorer or finder window will appear. Navigate to the folder where you saved or extracted the downloaded preset files.
- Select the preset files you want to install. You can select multiple preset files at once by holding down the control key (Windows) or command key (Mac) while clicking.
- Click the “Import” button to import the selected preset files into Lightroom.
- Lightroom will automatically install the presets and add them to the applicable preset folders in the Preset Browser.
- Once the installation is complete, you can apply the newly installed presets to your photos by selecting them from the Preset Browser. Simply click on a preset to apply its settings to your photo.
- Remember, you can further tweak the preset’s effect by adjusting the sliders in the Develop module to suit your specific image.
By following these steps, you can easily install Lightroom presets and start using them to enhance your photos and achieve your desired visual style.
Tips for Organizing and Managing Lightroom Presets
As your collection of Lightroom presets grows, it’s important to have an organized system in place to manage and access them efficiently. Here are some tips for organizing and managing your Lightroom presets:
- Create folders: Utilize folders within the Presets panel to categorize and group similar presets together. For example, you can have folders for different styles (e.g., landscape presets, portrait presets), specific photographers, or even by seasons or occasions.
- Use descriptive names: When naming your presets, be specific and descriptive. This will make it easier to locate the desired preset when browsing through your collection. Include keywords related to the style or effect of the preset to further aid in organization.
- Favorite important presets: Mark your most frequently used or favorite presets as “favorites” in Lightroom. This will create a separate folder under the Presets panel, allowing for quick access to your preferred presets.
- Remove unused presets: Regularly review and remove any presets that you no longer use or have become outdated. This will declutter your preset library and make it easier to navigate.
- Backup presets: To safeguard your presets, regularly backup your Lightroom catalog, which includes all your presets and editing settings. This ensures that in the event of any system failure or data loss, you can easily restore your presets.
- Export presets: If you want to share presets with others or use them on a different computer, consider exporting them as separate preset files. This allows you to package presets into a single file that can be easily imported into Lightroom on another system.
- Add keywords to presets: To improve searchability, consider adding keywords to your presets. This can help you find specific presets based on attributes such as mood, color, or subject matter.
- Create presets for specific purposes: If you find yourself frequently applying a specific set of adjustments to your photos, consider creating a custom preset for that purpose. This can help streamline your editing process and provide consistency across your images.
- Regularly update and organize: Set aside time to review and update your preset collection. As your photography style evolves, you may find that certain presets are no longer aligned with your vision. Removing or updating presets ensures that your library remains relevant and tailored to your current needs.
By implementing these tips, you can maintain a well-organized and efficient preset library, allowing you to easily find and apply the presets that best suit your editing goals and style.
Troubleshooting Common Issues with Lightroom Presets
While working with Lightroom presets, you may encounter some common issues that can affect their installation or usage. Here are some troubleshooting tips to help you overcome these challenges:
- Installation errors: If you are experiencing difficulties installing presets, double-check that you are following the correct installation process outlined by the source of the presets. Ensure that the preset files are in the supported format for Lightroom (usually .xmp or .lrtemplate).
- Missing presets: If you can’t locate recently installed presets in Lightroom, try restarting the Lightroom application. This can help refresh the program and ensure that the presets appear in the Presets panel.
- Incompatibility issues: If presets are not producing the expected results or are not compatible with your version of Lightroom, check the compatibility information provided with the preset pack. Some presets may require specific versions of Lightroom or may not be compatible with older versions.
- Conflicting adjustments: Occasionally, presets may conflict with other adjustments applied to an image. If you’re not seeing the expected effect, ensure that there are no conflicting settings in the develop module such as exposure adjustments or local adjustments. Temporarily resetting all adjustments to zero can help isolate the issue.
- Editing sliders not moving: If you’re unable to adjust the sliders in the develop module after applying a preset, check to see if there are any locked adjustments. Locked sliders will have a small padlock icon next to them. Unlock the sliders by clicking on the lock icon to make the adjustments.
- Performance issues: If Lightroom is running slow or becomes unresponsive after applying presets, try restarting the program or your computer. In some cases, large preset libraries can impact performance, so consider removing unused presets or organizing them into folders.
- Presets not saving: If you’ve made adjustments to a preset and want to save the changes, ensure that you are using the “Update with Current Settings” or “Create New Preset” option within Lightroom. This will save your changes as a new or updated preset, allowing you to apply them to other images.
- Reinstalling presets: If all else fails and you’re still experiencing issues, you can try reinstalling the presets. Remove the preset files from Lightroom, restart the application, and then re-import the preset files into your library.
By following these troubleshooting tips, you can address common issues and ensure a smooth experience with Lightroom presets. Remember to refer to the specific instructions provided by the source of the presets for troubleshooting advice specific to their product.
Conclusion
Lightroom presets are a powerful tool for enhancing your photos and streamlining your editing workflow. Whether you download presets directly from Lightroom, the Adobe Creative Cloud, or third-party websites, they provide a quick and efficient way to achieve various styles and effects with just a few clicks.
In this article, we explored different ways to download presets in Lightroom. You learned how to download presets directly from Lightroom, from the Adobe Creative Cloud, and from third-party websites. Additionally, we provided instructions on how to install the downloaded presets to make them accessible within Lightroom. We also discussed tips for organizing and managing your preset library, as well as troubleshooting common issues that may arise when working with presets.
With the knowledge gained from this article, you can now confidently explore a diverse range of Lightroom presets, experiment with different styles, and elevate your photo editing skills. Remember to regularly review and update your preset collection to keep it relevant to your evolving style and preferences.
So, dive in, start downloading presets, and take your photo editing to new heights with Lightroom!