Introduction
Welcome to the world of digital music! With the rise of streaming platforms, it’s easier than ever to listen to your favorite tunes online. However, there may be times when you want to have your music available offline, without relying on an internet connection. This is where Google Drive comes in handy.
Google Drive is a cloud storage service that allows you to store and access your files from anywhere. One of its great features is the ability to upload and download music files, making it a convenient option for those who want to have their music collection securely stored in the cloud.
In this article, we will guide you through the process of downloading music to your Google Drive. Whether you’re looking to create a backup of your favorite songs or simply want to have them accessible on multiple devices, this tutorial will provide you with step-by-step instructions to help you get started.
Before we dive into the steps, make sure you have a Google account and are signed in to Google Drive. If you don’t have an account, you can easily create one by visiting the Google account sign-up page.
Now, let’s get started on the journey of downloading your music to Google Drive!
Step 1: Accessing Google Drive
The first step in downloading music to your Google Drive is to access your Google Drive account. Here’s how:
- Open your web browser and go to https://drive.google.com. This will take you to the Google Drive homepage.
- Sign in to your Google account. If you’re already signed in to another Google service (like Gmail or YouTube) on the same browser, you may be automatically signed in to Google Drive.
- Once signed in, you’ll be redirected to your Google Drive dashboard. This is where you can view and manage all your files and folders.
Now that you’re logged in to Google Drive, you’re ready to move on to the next step.
Please note that you can also access Google Drive through the mobile app. Simply download the Google Drive app from your device’s app store and sign in with your Google account credentials.
Accessing Google Drive is straightforward and ensures that you have a secure and convenient platform to upload and store your music files. Now that you’ve successfully accessed your Google Drive account, let’s proceed to the next step in the process.
Step 2: Choosing the Music Files
Now that you have accessed your Google Drive account, it’s time to select the music files you want to download. Follow these steps:
- Locate the music files on your computer or device. These files could be stored in various formats, such as MP3, WAV, or FLAC.
- Create a new folder on your computer or device to organize your music files. This step is optional but recommended to keep your music collection organized in Google Drive.
- Copy or move the music files you want to download to Google Drive into the newly created folder. You can drag and drop the files directly into the Google Drive web interface or use the upload button to manually select the files from your computer.
This process allows you to choose specific songs, albums, or entire folders of music to upload to Google Drive. By organizing your music files in a dedicated folder, you can easily locate and manage them within Google Drive.
It’s important to note that Google Drive offers a generous amount of free storage space (15 GB) for every Google account. If your music collection exceeds this limit, you may need to consider purchasing additional storage space from Google.
Now that you have selected your music files and organized them (if desired), let’s move on to the next step of uploading your music to Google Drive.
Step 3: Uploading Music to Google Drive
With your music files selected, it’s time to upload them to your Google Drive account. Follow these steps to complete the upload:
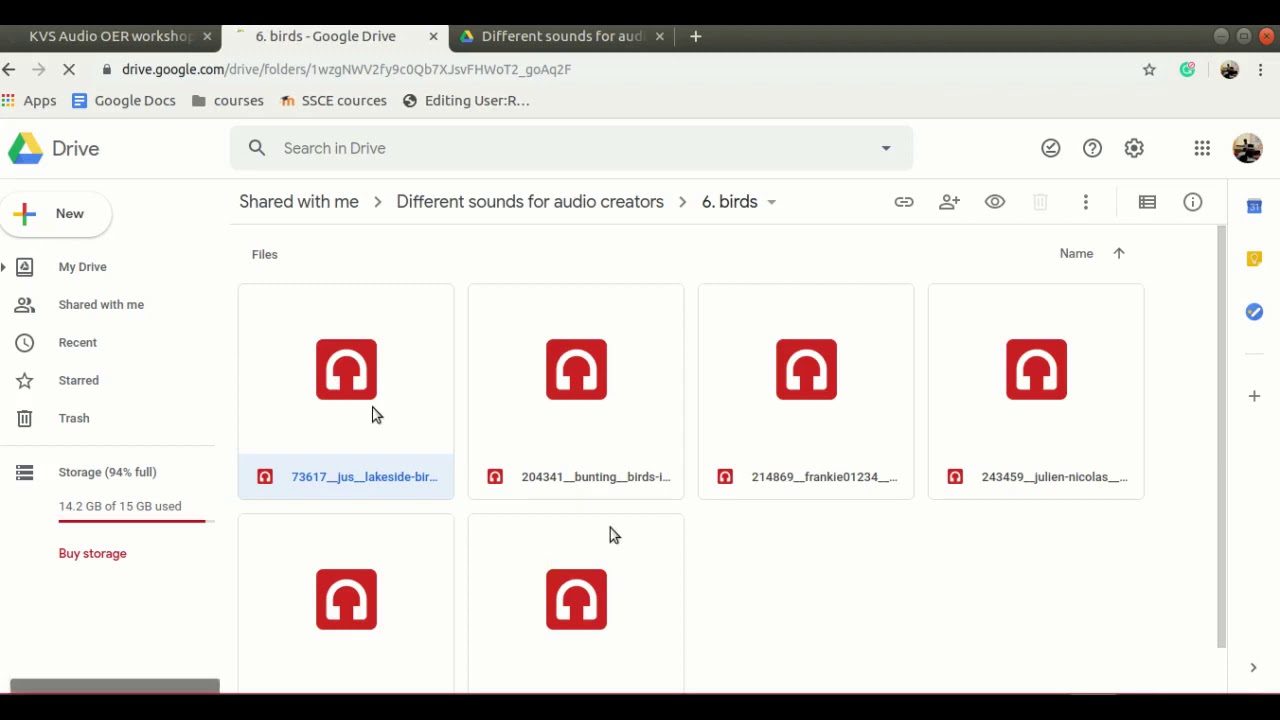
- Go to your Google Drive dashboard, where you should see the files and folders you have already uploaded.
- Navigate to the folder where you want to upload your music files. If you haven’t created a folder yet, now is a good time to do so. Click on the “New” button and select “Folder” to create a new folder.
- Once you’re in the desired folder, click on the “+ New” button and select “File upload” from the drop-down menu.
- A file browser window will appear. Locate and select the music files you want to upload from your computer or device.
- The selected music files will begin uploading to your Google Drive account. The progress of the upload will be displayed, and you can see the files appearing in the folder once the upload is complete.
While the upload process may take some time, it largely depends on the size of the files and your internet connection speed. It’s important to ensure a stable internet connection throughout the upload process to avoid any interruptions.
Once the music files are uploaded to your Google Drive account, they will be securely stored in the cloud. This means you can access your music from any device with an internet connection, making it convenient for listening on the go.
Now that your music files are uploaded to Google Drive, let’s move on to organizing them for easy access.
Step 4: Organizing Music in Google Drive
Now that you have uploaded your music files to Google Drive, it’s time to organize them so that you can easily find and manage your music collection. Follow these steps to organize your music:
- Navigate to the folder in your Google Drive where you uploaded your music files.
- Review the uploaded files and make any necessary edits, such as renaming the files or adding album artwork.
- Create subfolders within the main music folder to further categorize your music. For example, you can create folders for different genres, artists, or playlists.
- Drag and drop the music files into the appropriate subfolders.
- If desired, you can add additional information to the music files, such as song titles, album names, and artist information. This can be done by right-clicking on the music file, selecting “Properties” or “Get info,” and filling in the necessary details.
Organizing your music in this way will make it easier to locate specific songs or albums when you want to download them from Google Drive. It also allows you to create a structured music library, similar to how you would organize your music locally on your computer.
Additionally, you can take advantage of Google Drive’s search function to quickly find specific music files. Simply use the search bar at the top of the Google Drive interface and enter keywords like song titles, artists, or genres to locate the desired music files.
Now that you have organized your music collection in Google Drive, it’s time to move on to the final step of downloading your music files.
Step 5: Downloading Music from Google Drive
Once you have uploaded and organized your music files in Google Drive, you can easily download them to your computer or other devices for offline listening. Follow these steps to download your music files:
- Navigate to the folder where your music files are located in Google Drive.
- Locate the music file you want to download and right-click on it.
- In the context menu that appears, click on “Download” or “Download as” (depending on the browser you’re using).
- Select the destination on your computer where you want to save the downloaded music file.
- Click “Save” to start the download process.
If you want to download multiple music files or an entire folder, you can either select multiple files by holding down the Ctrl key (or the Command key on macOS) while clicking on the files, or compress the folder into a zip file and download it as a single file.
Please note that the download speed will depend on your internet connection and the size of the music files. Larger files may take longer to download, so it’s important to be patient during the process.
Once the download is complete, you can access your music files on your computer or device and play them using your preferred media player.
Congratulations! You have successfully downloaded your music from Google Drive. Your music is now easily accessible for offline listening whenever and wherever you want.
Now that you have completed the process of downloading music from Google Drive, you can enjoy your favorite tunes whenever you desire. It’s a convenient and secure way to ensure you have your music collection available wherever you go.
Conclusion
Downloading music to your Google Drive provides a convenient way to have your music collection accessible across multiple devices. With a few simple steps, you can securely upload, organize, and download your favorite songs, ensuring that they are always at your fingertips.
Throughout this guide, we have covered the step-by-step process of downloading music to Google Drive. We began by accessing Google Drive and signing in to our Google account. Then, we selected the music files we wanted to upload and organized them within folders to keep our collection organized.
We then proceeded to upload our music files to Google Drive, taking advantage of the cloud storage and its ability to securely store our songs. By following the process, you ensured that your music collection is safely backed up and available for streaming or downloading at any time.
To make it easier to find and manage your music files, we discussed the importance of organizing them within Google Drive. Creating subfolders and adding additional information to the files can help you create a well-structured music library.
Finally, we explained how to download music from Google Drive so that you can enjoy your favorite songs offline, without relying on an internet connection. Whether you want to download individual songs or entire folders, the process is quick and straightforward.
Now that you are familiar with the process of downloading music to Google Drive, you can bring your music collection with you wherever you go. From listening to your favorite tunes during a long commute to sharing playlists with friends, Google Drive offers a convenient and accessible solution.
So, start exploring Google Drive and unleash the power of having your music collection stored and accessible in the cloud. Embrace the freedom of downloading your music and enjoying it offline whenever and wherever you want.
Happy downloading and happy listening!


