Introduction
Welcome to our guide on how to download Minecraft if you have already purchased it! Minecraft is a popular sandbox game that has captured the hearts of millions of players worldwide. Whether you’re a new player or someone returning to the game after a break, it’s important to know how to download and install Minecraft on your device.
Downloading Minecraft can sometimes be confusing, especially if you’re not familiar with the process. That’s why we have created this step-by-step guide to help you navigate through the necessary steps. By following our instructions, you’ll be able to re-download Minecraft and start playing in no time.
Throughout the guide, we’ll walk you through the process of finding your purchase email, recovering your Mojang account, accessing the Mojang website, navigating to the Minecraft download section, downloading Minecraft for your specific operating system, and finally, installing and launching the game.
It’s worth noting that these instructions are applicable to players who have already purchased Minecraft. If you haven’t purchased the game yet, you’ll need to go through the official channels to buy Minecraft before you can download and install it.
So, without further ado, let’s dive into the step-by-step process of downloading Minecraft if you already own it.
Step 1: Finding Your Purchase Email
The first step in downloading Minecraft if you have already bought it is to locate the purchase email that was sent to you when you initially bought the game. This email contains important information and details that you will need during the download and installation process.
If you’re having difficulty finding the purchase email, there are a few places you can check:
- Search your email inbox: Start by searching your email inbox for any messages related to Minecraft or Mojang. Use keywords like “Minecraft purchase” or “Mojang account” to narrow down the search results. Look for an email that includes your purchase receipt or a confirmation of your purchase.
- Check your spam or junk folder: Sometimes, legitimate emails can end up in your spam or junk folder. Make sure to check these folders and mark any Mojang or Minecraft-related emails as “Not spam” to ensure you receive future emails from them.
- Contact customer support: If you’re still unable to locate the purchase email, reach out to Mojang’s customer support team for assistance. They will be able to verify your identity and provide you with the necessary information to proceed with the download.
Once you have found the purchase email, keep it easily accessible as you will need to refer to it in the following steps. The email typically contains important details such as your Minecraft username, transaction ID, and a download link to the game.
With your purchase email in hand, you’re now ready to move on to the next step: recovering your Mojang account.
Step 2: Recovering Your Mojang Account
In order to proceed with the download and installation of Minecraft, you’ll need to ensure that you have access to your Mojang account. If you’ve forgotten your account login details or are having trouble accessing it, don’t worry. This step will guide you through the process of recovering your Mojang account.
Here’s what you need to do:
- Go to the Mojang website: Open a web browser and visit the official Mojang website at www.minecraft.net. This is where you can access your Mojang account and make any necessary changes.
- Click on “Login”: On the Mojang website, locate the “Login” button or link. Click on it to proceed to the login page.
- Click on “Forgot password?”: If you can’t remember your password, click on the “Forgot password?” link below the login form. This will initiate the account recovery process.
- Enter your email: On the account recovery page, enter the email address associated with your Mojang account. Make sure to enter the correct email address that you used when purchasing Minecraft.
- Follow the instructions: Mojang will send you an email with instructions on how to reset your password. Check your email inbox and follow the steps outlined in the email to reset your password and regain access to your Mojang account.
- Login to your Mojang account: Once you have successfully reset your password, go back to the Mojang website and login using your newly reset credentials. This will give you access to your Mojang account dashboard.
By following these steps, you should now have recovered your Mojang account, allowing you to proceed with the next steps of downloading Minecraft. If you encounter any issues during the account recovery process, don’t hesitate to reach out to Mojang’s customer support for further assistance.
Now that you have successfully recovered your Mojang account, let’s move on to the next step: accessing the Mojang website.
Step 3: Accessing the Mojang Website
After recovering your Mojang account, the next step in downloading Minecraft is to access the official Mojang website. This is where you can manage your account settings and find the necessary resources to download the game.
Here’s how you can access the Mojang website:
- Open a web browser: Launch your preferred web browser on your device. It could be Google Chrome, Mozilla Firefox, Safari, or any other browser of your choice.
- Visit the Mojang website: Enter the URL “www.minecraft.net” in the address bar of your browser and press Enter. This will take you to the official Mojang website.
- Login to your Mojang account: On the Mojang website, locate the “Login” button or link. Click on it and enter your Mojang account credentials (your email and password) to log in.
- Access your account dashboard: Once you have successfully logged in, you will be directed to your Mojang account’s dashboard. This is where you can manage your account settings, view your purchase history, and access various resources related to Minecraft.
It’s important to note that accessing the Mojang website requires a stable internet connection. Make sure you have a reliable internet connection before proceeding with this step.
Now that you have successfully accessed the Mojang website, you’re ready to move on to the next step: navigating to the Minecraft download section.
Step 4: Navigating to the Minecraft Download Section
Once you have accessed your Mojang account dashboard, the next step in downloading Minecraft is to navigate to the Minecraft download section. This is where you can find the appropriate download link for your specific operating system.
Follow these steps to find the Minecraft download section:
- On the Mojang website’s dashboard, look for the “Games” tab or section. It is usually located at the top of the page.
- Click on the “Games” tab to reveal a dropdown menu or list of available games.
- Locate and select “Minecraft” from the list of games. This will take you to the Minecraft-specific page.
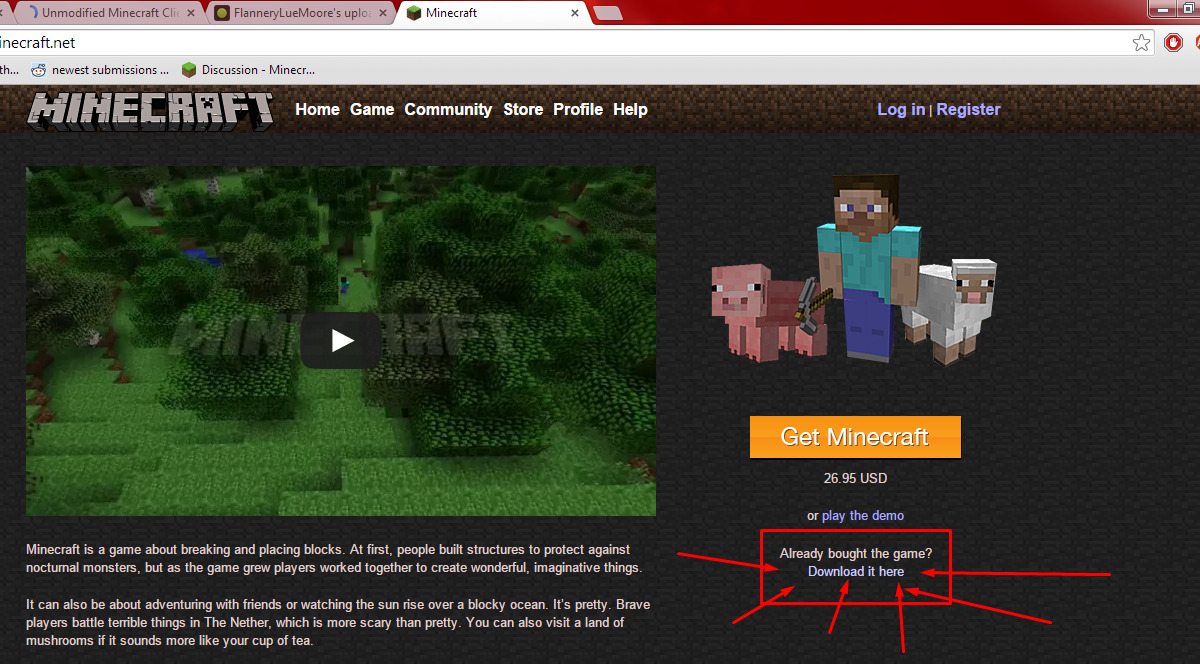
- On the Minecraft page, look for the “Download” or “Get Minecraft” button/link. This will redirect you to the download section.
Make sure to double-check that you are on the official Mojang website when navigating to the Minecraft download section. This is to ensure your safety and to avoid downloading Minecraft from unauthorized sources.
By following these steps, you should now be on the Minecraft download section of the Mojang website. The next step is to proceed with downloading Minecraft for your specific operating system.
Step 5: Downloading Minecraft for Your Operating System
Now that you have reached the Minecraft download section on the official Mojang website, it’s time to download the game for your specific operating system. Minecraft is available for Windows, Mac, and Linux, so make sure to select the appropriate version for your device.
Follow these steps to download Minecraft:
- On the Minecraft download page, you should see three different versions available: Minecraft for Windows, Minecraft for Mac, and Minecraft for Linux.
- Click on the download link that corresponds to your operating system. This will initiate the download process.
- Wait for the download to complete. The length of time it takes will depend on your internet speed.
- Once the download is finished, locate the downloaded file on your computer. It is typically saved in the “Downloads” folder unless you specified a different location.
- Double-click on the downloaded file to begin the installation process.
While the download is in progress, it’s best to avoid interrupting the process or closing the browser window. Doing so may result in an incomplete or corrupted download.
Note that the instructions may vary slightly depending on the specific operating system you are using. If you encounter any issues during the download process, refer to the official Minecraft support resources or contact Mojang’s customer support for assistance.
With the game successfully downloaded to your device, it’s time to move on to the next step: installing Minecraft.
Step 6: Installing Minecraft on Your Device
Now that you have downloaded the Minecraft installer file, it’s time to proceed with the installation process. The steps for installing Minecraft may vary slightly depending on your operating system, but the general process remains the same.
Here’s how you can install Minecraft on your device:
- Locate the downloaded Minecraft installer file on your computer. It is usually saved in the “Downloads” folder or a location of your choice.
- Double-click on the installer file to run it. This will launch the Minecraft installation wizard.
- Follow the on-screen instructions to proceed with the installation process. You may be prompted to agree to the terms and conditions and choose the installation location.
- Once you have selected your preferred installation options, click on the “Install” or “Next” button to begin the installation.
- Wait for the installation process to complete. The length of time it takes will depend on your computer’s processing speed.
- Once the installation is finished, you should see a confirmation message indicating that Minecraft has been successfully installed on your device.
After the installation is complete, you can choose to create a shortcut for Minecraft on your desktop or start menu for easy access. This will allow you to launch the game without having to navigate to the installation folder every time.
Remember to keep the installation file in a safe place in case you need to reinstall Minecraft in the future or install it on another device.
Now that you have successfully installed Minecraft on your device, it’s time to move on to the next step: launching the game and logging in.
Step 7: Launching Minecraft and Logging In
With Minecraft successfully installed on your device, it’s time to launch the game and log in to your Minecraft account. By logging in, you will be able to access your saved worlds, play with friends, and customize your game settings.
Follow these steps to launch Minecraft and log in:
- Locate the Minecraft icon on your desktop or in your start menu. Double-click on it to launch the game.
- On the Minecraft launcher, you will see a login section. Enter your Minecraft account credentials (your email and password) in the provided fields.
- If you have enabled two-factor authentication on your Mojang account, you may be prompted to enter a verification code that will be sent to your registered email address or phone number.
- Click on the “Login” or “Play” button to log in to Minecraft.
- If the login is successful, you will be taken to the Minecraft main menu. From here, you can start playing the game or explore the various options and settings available.
Make sure you have a stable internet connection while logging in to Minecraft. A poor or intermittent connection may cause login issues or prevent certain features from working properly.
If you encounter any errors or difficulties during the login process, double-check your account credentials and ensure you are connected to the internet. If the problem persists, refer to the official Minecraft support resources or contact Mojang’s customer support for assistance.
Now that you have successfully logged in to Minecraft, it’s time to proceed to the final step: verifying your ownership of the game.
Step 8: Verifying Your Ownership of Minecraft
Once you have launched Minecraft and logged in to your account, it’s important to verify your ownership of the game. Verifying ownership ensures that you have legitimate access to Minecraft and can fully enjoy all its features and benefits.
Follow these steps to verify your ownership of Minecraft:
- On the Minecraft main menu, locate the “Settings” or “Options” button. This is usually represented by a gear icon.
- Click on the “Settings” or “Options” button to access the game’s settings menu.
- Navigate to the “Account” section of the settings menu. Here, you will find information about your Minecraft account.
- Look for an option to verify your ownership or check your account status. This may be displayed as “Verify Your Account” or something similar.
- Click on the verification option and follow the instructions provided. This may involve entering a verification code or accessing your email to confirm your ownership.
- Once you have completed the verification process, you will receive a confirmation message indicating that your ownership has been verified.
Verifying your ownership of Minecraft is important for security purposes and to ensure that you are the rightful owner of the game. It also allows Mojang to provide you with better support and access to exclusive features and updates.
If you encounter any issues or difficulties during the verification process, carefully follow the instructions provided on the Minecraft website or contact Mojang’s customer support for assistance.
Now that you have successfully verified your ownership of Minecraft, you are ready to embark on your exciting adventures in the blocky world of Minecraft!
Conclusion
Congratulations! You have successfully learned how to download Minecraft if you already own the game. By following the step-by-step process outlined in this guide, you were able to find your purchase email, recover your Mojang account, access the Mojang website, navigate to the Minecraft download section, download and install Minecraft on your device, launch the game, and verify your ownership.
Minecraft offers endless possibilities and adventures, allowing you to explore, build, and create in a virtual world. Whether you’re playing solo or joining friends in multiplayer mode, Minecraft provides hours of entertainment and creativity.
Remember to keep your Mojang account credentials safe and secure to protect your Minecraft ownership and account. Additionally, it’s always a good idea to keep your Minecraft game updated to access the latest features, bug fixes, and improvements.
If you encounter any issues during the download or installation process, don’t hesitate to reach out to Mojang’s customer support for assistance. They are always available to help resolve any problems you may be facing.
Now that you’re all set, it’s time to dive into the world of Minecraft and start crafting, building, and exploring. Enjoy your Minecraft journey and embrace the endless possibilities that await you!