Introduction
Fonts play a crucial role in graphic design, and having a wide variety of fonts at your disposal can greatly enhance your creative projects. Adobe Illustrator, one of the leading software for professional designers, allows you to explore a vast collection of fonts to bring your ideas to life.
However, finding and downloading fonts can sometimes be a daunting task, especially for beginners. With countless websites offering fonts of different styles and licenses, it’s essential to know the right places to search for fonts that fit your needs.
In this article, we will guide you through the process of finding and downloading fonts to use in Adobe Illustrator. Whether you prefer free fonts or are willing to invest in premium options, we’ve got you covered. We will also show you how to install the downloaded fonts on your computer and add them to Adobe Illustrator for seamless integration into your projects.
So, if you’re ready to expand your font library and take your design skills to the next level, let’s dive in and explore the world of downloading fonts to Adobe Illustrator!
Finding Fonts Online
When it comes to finding fonts online, there are several avenues you can explore. From trusted websites offering a wide range of fonts to popular free font repositories, you have plenty of options to choose from. Here are some of the best ways to find fonts that suit your design requirements:
- Sourcing Fonts from Trusted Websites: Many reputable websites offer high-quality fonts that you can use for both personal and commercial projects. These websites often curate fonts from various designers and foundries, ensuring a diverse selection of styles and licensing options. Some popular websites in this category include Adobe Fonts, Google Fonts, and Fonts.com.
- Downloading Fonts from Free Font Websites: If you’re looking for free fonts, there are numerous websites dedicated to providing a vast collection of open-source and freely available fonts. Websites like Font Squirrel, DaFont, and FontSpace offer a wide range of fonts across different categories. However, be mindful of the licensing requirements for each font to avoid any legal issues.
- Purchasing Fonts from Commercial Websites: If you’re willing to invest in premium fonts, commercial font websites are the way to go. These websites offer professionally designed fonts with extensive licensing options. Some popular commercial font websites include MyFonts, FontShop, and Linotype. Investing in commercial fonts ensures high quality and often comes with additional support from the designers or foundries.
When searching for fonts, it’s essential to consider the specific design requirements and the terms of use for each font. Some fonts are suitable for display purposes, while others are more suitable for body text. Additionally, be mindful of the licensing restrictions, especially if you’re planning to use the fonts for commercial purposes.
Now, armed with the knowledge of where to find fonts online, let’s move on to the next step – downloading the fonts to your computer.
Sourcing Fonts from Trusted Websites
When it comes to finding high-quality fonts with reliable licensing, sourcing fonts from trusted websites is an excellent option. These websites carefully curate fonts from various designers and foundries, ensuring a diverse and extensive selection. Here are some of the best websites for sourcing fonts:
- Adobe Fonts: Formerly known as Typekit, Adobe Fonts is a popular choice among designers. It offers a vast library of fonts that seamlessly integrate with Adobe Creative Cloud applications, including Adobe Illustrator. With a subscription to Adobe Creative Cloud, you gain access to a wide range of fonts to enhance your design projects.
- Google Fonts: Developed by Google, Google Fonts is a free and open-source font library. It offers a substantial collection of fonts that you can use for both personal and commercial projects. Google Fonts provides convenient methods to add fonts to your website or download them for use in Adobe Illustrator.
- Fonts.com: Fonts.com is another reliable source for acquiring quality fonts. It offers a vast selection of fonts from renowned foundries, making it a go-to platform for professional designers. Fonts.com provides options for both free and premium fonts, allowing you to choose based on your budget and project requirements.
When selecting fonts from trusted websites, consider the style and purpose of your design project. Look for fonts that complement the overall aesthetic and effectively communicate your message. Take advantage of the preview feature offered by these websites to test the fonts within the context of your design before committing to a specific font.
Furthermore, pay attention to the licensing terms for each font. Some fonts may have restrictions on usage, such as only allowing personal use or requiring attribution. Make sure to read and understand the licensing agreements to ensure compliance with the font’s terms of use.
Overall, sourcing fonts from trusted websites gives you access to a wide range of high-quality options that can elevate your design work. Now that you know where to find reliable fonts, let’s move on to the next step – downloading fonts from free font websites.
Downloading Fonts from Free Font Websites
If you’re on a budget or looking for a diverse range of font styles, free font websites are a great resource. These websites provide an extensive collection of open-source and freely available fonts that you can use for various design projects. Here’s how you can download fonts from free font websites:
- Font Squirrel: Font Squirrel offers a vast selection of high-quality fonts that are free for personal and commercial use. It provides a straightforward download process, allowing you to quickly obtain the font files in various formats such as TTF (TrueType Font) or OTF (OpenType Font).
- DaFont: DaFont is a popular platform that offers a wide range of free fonts contributed by designers from around the world. With an easy-to-navigate interface, you can browse through different categories and styles to find the perfect font. Simply click on the font you like, and DaFont provides a direct download link for the font file.
- FontSpace: FontSpace is another excellent resource for free fonts. With a user-friendly website, you can explore fonts by categories, popularity, or even search for specific keywords. FontSpace allows you to download fonts directly, and some fonts even come with additional options for customization.
When downloading fonts from free font websites, it’s important to pay attention to the licensing terms of each font. While many fonts on these websites are free for both personal and commercial use, some fonts may have specific usage restrictions or require attribution. Make sure to review the licensing details provided with each font to ensure compliance with the terms of use.
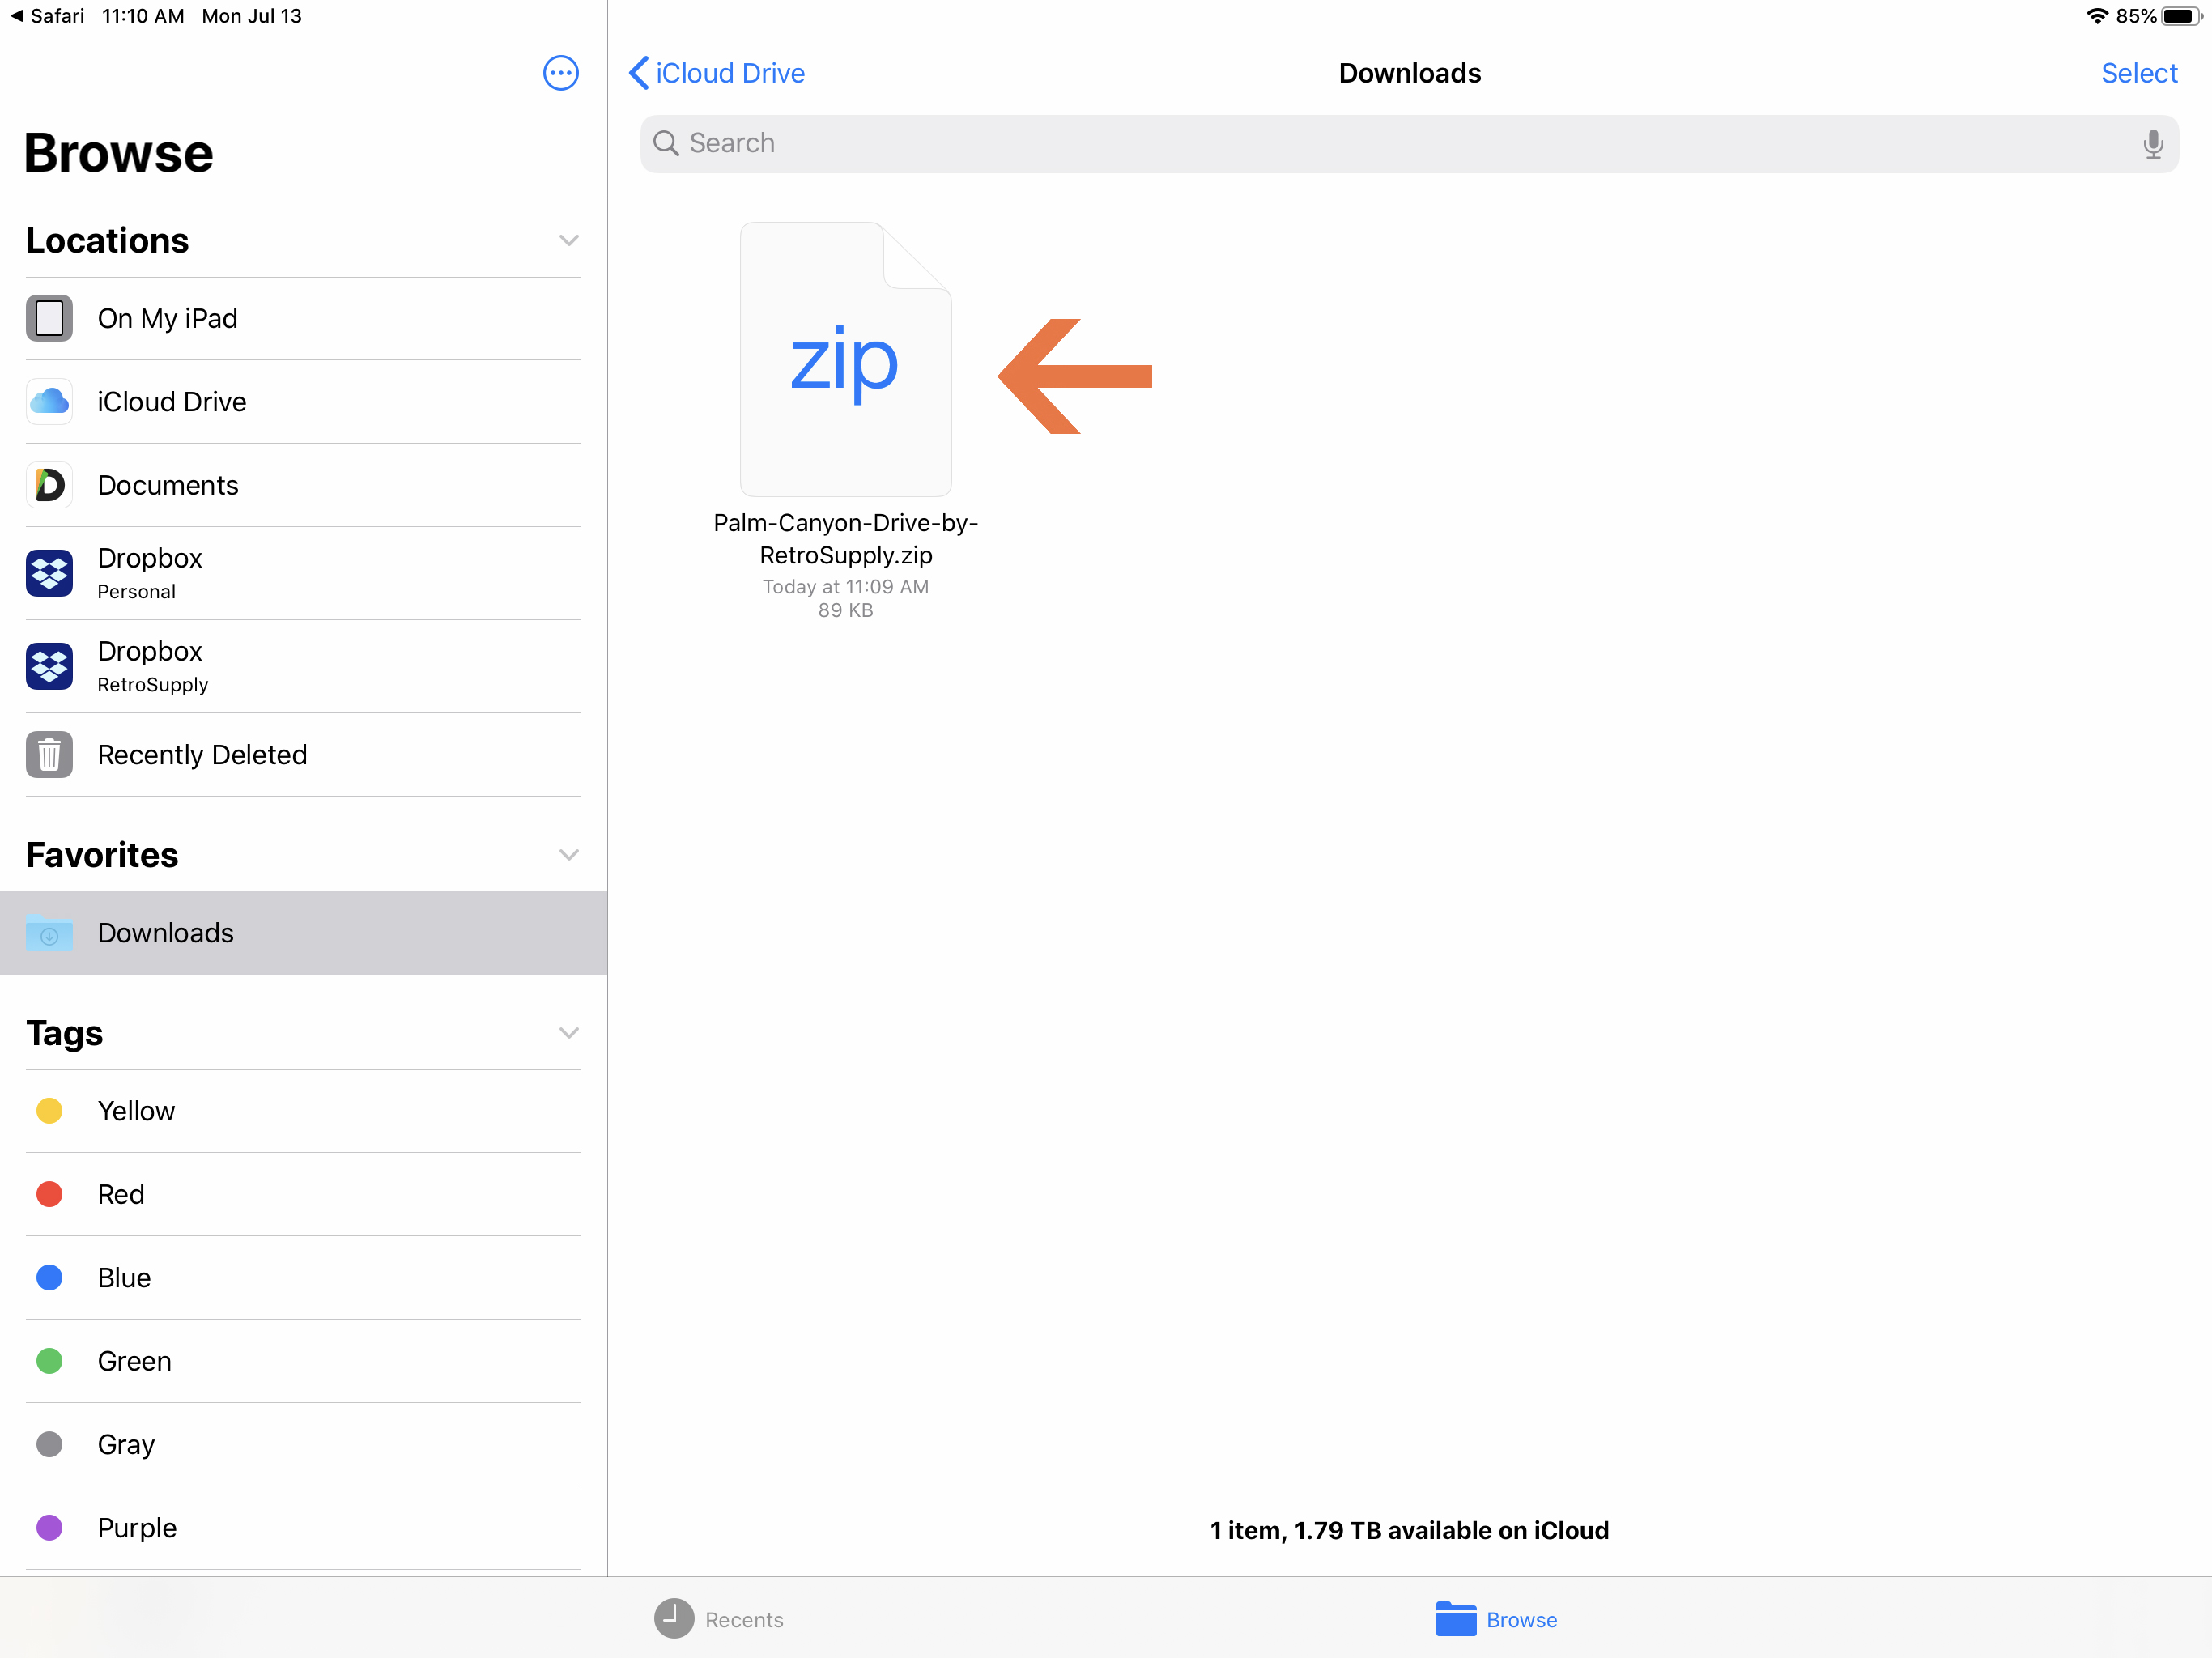
Once you’ve found a font you like, click on the download button or link provided. The font file will be saved to your computer, typically in a zip or compressed format. Extract the font file from the zip folder using a file extraction tool or by right-clicking on the folder and selecting “Extract All.” You will then have access to the font file to install on your computer.
With the knowledge of downloading fonts from free font websites, you now have access to a plethora of fonts to enhance your design projects. In the next section, we will explore the process of purchasing fonts from commercial websites for those seeking premium options.
Purchasing Fonts from Commercial Websites
For professional designers or individuals looking for premium font options with extensive licensing features and support, purchasing fonts from commercial websites is the ideal choice. These websites offer a wide range of high-quality fonts created by renowned designers and foundries. Here’s how you can purchase fonts from commercial websites:
- MyFonts: MyFonts is a popular platform that provides a vast collection of commercial fonts. With an intuitive search feature and detailed font previews, you can easily find the perfect font for your project. MyFonts offers various licensing options, including options for single users, multiple users, and web usage.
- FontShop: FontShop is a well-established marketplace for fonts, offering a diverse range of high-quality typefaces. With an emphasis on quality and design integrity, FontShop collaborates with renowned type designers to bring you exceptional font options. Fonts purchased from FontShop often come with additional support and guidance from the designers themselves.
- Linotype: Linotype is another reputable source for purchasing premium fonts. It offers an extensive library of fonts designed by renowned typographers and foundries. Linotype provides a variety of licensing options, ensuring flexibility for different usage scenarios such as print, web, or app design.
When purchasing fonts from commercial websites, take advantage of the detailed font information provided. Read the descriptions, view the character sets, and examine any additional features or variations that come with the fonts. This allows you to make an informed decision and choose a font that aligns perfectly with your project requirements.
Once you have selected the font you want, click on the purchase or add to cart button. Follow the website’s instructions for the checkout process, providing any necessary information and completing the payment. After the purchase is complete, you will typically receive a download link or access to your font files, allowing you to install them on your computer for use in Adobe Illustrator.
Purchasing fonts from commercial websites ensures that you are supporting the designers and foundries while gaining access to high-quality fonts for your professional projects. Now that you have the knowledge to explore commercial font options, let’s move on to the next steps – installing the downloaded fonts on your computer and adding them to Adobe Illustrator.
Installing Fonts on Your Computer
Before you can start using the fonts you’ve downloaded, you need to install them on your computer. Here are the steps to install fonts on both Windows and macOS:
Downloading Fonts:
1. After downloading font files from trusted or free font websites, locate the downloaded files on your computer. These files are typically in a compressed format like ZIP or RAR.
Extracting Font Files:
2. Extract the font files from the compressed folder. This can usually be done by right-clicking on the folder and selecting “Extract All” or using a dedicated file extraction tool. Make sure to remember the location where you extracted the font files.
Installing Fonts on Windows:
3. On a Windows computer, go to the folder where you extracted the font files. Select all the font files you want to install (usually with the .ttf or .otf extension).
4. Right-click on the selected font files and choose “Install” from the context menu. Windows will install the selected fonts, and you will receive a confirmation message once the installation is complete.
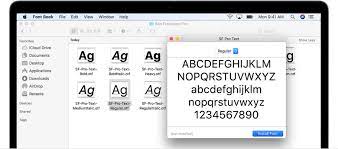
Installing Fonts on macOS:
3. On a macOS computer, go to the folder where you extracted the font files. Select all the font files you want to install (usually with the .ttf or .otf extension).
4. Double-click on one of the selected font files. A Font Book window will open, displaying a preview of the font.
5. Click the “Install Font” button in the Font Book window. macOS will install the selected fonts, and you will receive a confirmation message once the installation is complete.
Once the fonts are installed on your computer, you can start using them in various applications, including Adobe Illustrator. In the next section, we will explore the process of adding fonts to Adobe Illustrator and seamlessly integrating them into your design projects.
Downloading Fonts
Before you can use fonts in Adobe Illustrator, you need to download them onto your computer. Whether you’re sourcing fonts from trusted websites or downloading them from free font repositories, the process is relatively straightforward. Here’s a step-by-step guide to help you download fonts:
1. Find a reputable website that offers the fonts you’re interested in. This could be a trusted font resource like Adobe Fonts, Google Fonts, or a free font website like Font Squirrel or DaFont.
2. Search or browse through the available fonts to find the ones you want to download. Pay attention to the font styles, licenses, and usage terms provided by the website.
3. Once you’ve found a font you like, look for a download button or a link that allows you to download the font file. Font files are usually in formats such as TTF (TrueType Font) or OTF (OpenType Font).
4. Click on the download button or link. A dialog box will appear, asking you to choose a location on your computer to save the font file. Select a folder or create a new one where you can easily locate the downloaded font.
5. Wait for the download to complete. The time it takes will depend on the size of the font file and your internet connection speed.
6. Once the download is finished, navigate to the folder where you saved the font file. You should see the font file with the appropriate file extension (e.g., .ttf or .otf).
Downloading fonts is a crucial initial step in expanding your font library and gaining access to a plethora of creative possibilities in Adobe Illustrator. Now that you have the downloaded font files, the next step is to install them on your computer.
Extracting Font Files
After downloading font files, you may find that they are in a compressed format such as ZIP or RAR. Before you can install the fonts on your computer, you need to extract them from the compressed folder. Here’s how you can extract font files:
1. Locate the downloaded font file on your computer. It is usually found in the default download location or the folder you specified during the download process.
2. Right-click on the compressed folder and select “Extract All” from the context menu. This option may vary depending on your operating system.
3. A dialog box will appear, allowing you to choose the destination folder for the extracted font files. You can either keep the default destination folder or select a different location by clicking the “Browse” button.
4. Once you’ve chosen the destination folder, click the “Extract” or “Extract All” button to start the extraction process. The extraction time will depend on the size of the compressed folder and the performance of your computer.
5. After the extraction is complete, the compressed folder will be replaced with a new folder containing the extracted font files. You can now access the font files in their uncompressed state.
Some font files may come individually without being compressed. In that case, you can skip the extraction step and directly proceed to install the font files on your computer.
Once the font files are extracted, it’s time to install them on your computer. Properly installed fonts will be accessible in Adobe Illustrator, allowing you to use them in your design projects. In the following section, we will discuss how to install fonts on both Windows and macOS systems.
Installing Fonts on Windows
Installing fonts on a Windows computer is a straightforward process that allows you to use the downloaded fonts in various applications, including Adobe Illustrator. Here’s how you can install fonts on Windows:
1. Locate the folder where you extracted the font files. Make sure you can easily navigate to this folder.
2. Select all the font files you want to install. You can do this by clicking on one file, holding down the Ctrl key, and selecting the other font files.
3. Right-click on the selected font files and choose “Install” from the context menu. Windows will initiate the installation process, and a progress bar may appear to indicate the installation status.
4. Once the installation is complete, you will receive a confirmation message. The fonts are now installed on your Windows system and are ready to be used in applications like Adobe Illustrator.
Note: If you encounter any issues during the installation process or if Windows does not recognize the font files, try restarting your computer and repeating the installation steps.
After installing the fonts, they will be available for use in all applications that support custom fonts, including Adobe Illustrator. You can access them through the font selection tool, allowing you to apply the newly installed fonts to your design projects.
Now that you have successfully installed the fonts on your Windows computer, let’s move on to the next step – installing fonts on macOS.
Installing Fonts on macOS
Installing fonts on a macOS computer is a simple process that allows you to use the downloaded fonts in applications like Adobe Illustrator. Here’s how you can install fonts on macOS:
1. Locate the folder where you extracted the font files. Make sure you can easily access this folder.
2. Select all the font files you want to install. You can do this by clicking on one file, holding down the Command key, and selecting the other font files.
3. Double-click on one of the selected font files. This will open the Font Book application, which is the default font management tool on macOS.
4. In the Font Book window that opens, you will see a preview of the selected font(s). Click the “Install Font” button in the upper-left corner of the window.
5. macOS will initiate the font installation process and display a progress bar. Once the installation is complete, you will receive a confirmation message.
6. After installation, you can access the newly installed fonts in applications like Adobe Illustrator. They will appear in the font selection tool, ready to be used in your design projects.
If you encounter any issues during the installation process or if macOS does not recognize the font files, try restarting your computer and repeating the installation steps. Additionally, you can verify that the fonts are installed correctly by opening the Font Book application and checking the list of installed fonts.
With the fonts successfully installed on your macOS system, you can unleash your creativity in Adobe Illustrator and utilize the newly added fonts to create visually stunning designs.
Now that you have learned how to install fonts on both Windows and macOS, you are ready to move on to the next section – adding the installed fonts to Adobe Illustrator.
Adding Fonts to Adobe Illustrator
Once you have downloaded and installed fonts on your computer, the next step is to add them to Adobe Illustrator so you can use them in your design projects. Here’s how you can add fonts to Adobe Illustrator:
1. Close Adobe Illustrator if it is currently open. This ensures that any new fonts you add will be detected when you restart the application.
2. Open the folder where you installed the fonts on your computer. This is typically the default font installation location for your operating system.
3. Select all the font files you want to add to Adobe Illustrator. You can do this by clicking on one file, holding down the Ctrl key (Windows) or Command key (macOS), and selecting the other font files.
4. Right-click on the selected font files and choose “Copy” from the context menu.
5. Navigate to the Fonts folder within Adobe Illustrator’s installation directory. The location of this folder may vary depending on your operating system, but it is typically found in the main Adobe Illustrator folder.
6. Paste the copied font files into the Fonts folder. Right-click inside the Fonts folder and choose “Paste” from the context menu. The font files will be copied into the Adobe Illustrator Fonts folder.
7. Restart Adobe Illustrator to allow the program to detect and load the newly added fonts. Once Illustrator has restarted, the fonts will be available for use in the font selection tool.
Now, when you create a new document or open an existing one in Adobe Illustrator, you will be able to access and apply the newly added fonts to your text elements. The added fonts will be listed alongside the pre-existing fonts in the font selection dropdown menu.
Note: If you encounter any issues with the added fonts not appearing in Adobe Illustrator, make sure that the fonts were installed correctly on your computer and that the Fonts folder within the Adobe Illustrator installation directory is the correct location to add the fonts.
With your newly added fonts ready to be used in Adobe Illustrator, you can now explore endless creative possibilities to bring your design visions to life.
Restarting Adobe Illustrator
After adding new fonts to Adobe Illustrator, it is important to restart the application to ensure that the program recognizes and loads the newly installed fonts. Restarting Adobe Illustrator is a quick and simple process. Here’s how you can do it:
1. Save any open documents or projects you have in Adobe Illustrator, if applicable, to avoid any potential loss of work.
2. Close Adobe Illustrator by clicking on the “File” menu at the top-left corner of the program window and selecting “Exit” or by clicking on the “X” button in the top-right corner.
3. Wait for a few seconds to ensure that Adobe Illustrator completely closes and all related processes have ended.
4. Open Adobe Illustrator again by clicking on its icon in the Applications folder (macOS) or selecting it from the Start menu (Windows).
5. Adobe Illustrator will start up fresh with the newly installed fonts now available for use. You can verify this by checking the font selection dropdown menu, where the added fonts should be listed alongside the pre-existing fonts.
Restarting Adobe Illustrator is important to ensure that the program recognizes and loads the newly added fonts properly. Without restarting, the fonts may not be immediately visible or accessible within the application.
By following these simple steps, you can quickly restart Adobe Illustrator and start utilizing the newly installed fonts in your design projects. Now, you can enjoy the full creative potential of Adobe Illustrator with your expanded font library.
Loading New Fonts in Adobe Illustrator
Once you have installed and restarted Adobe Illustrator, you can load the newly added fonts into the program to start using them in your designs. Here’s how you can load new fonts in Adobe Illustrator:
1. Open Adobe Illustrator and create a new document or open an existing one. This will provide you with a canvas to work on.
2. Select the Text Tool from the Adobe Illustrator toolbar on the left-hand side of the screen. It is represented by a capital “T” icon.
3. Click on the canvas to create a text box. Alternatively, click and drag to draw a text box of a specific size.
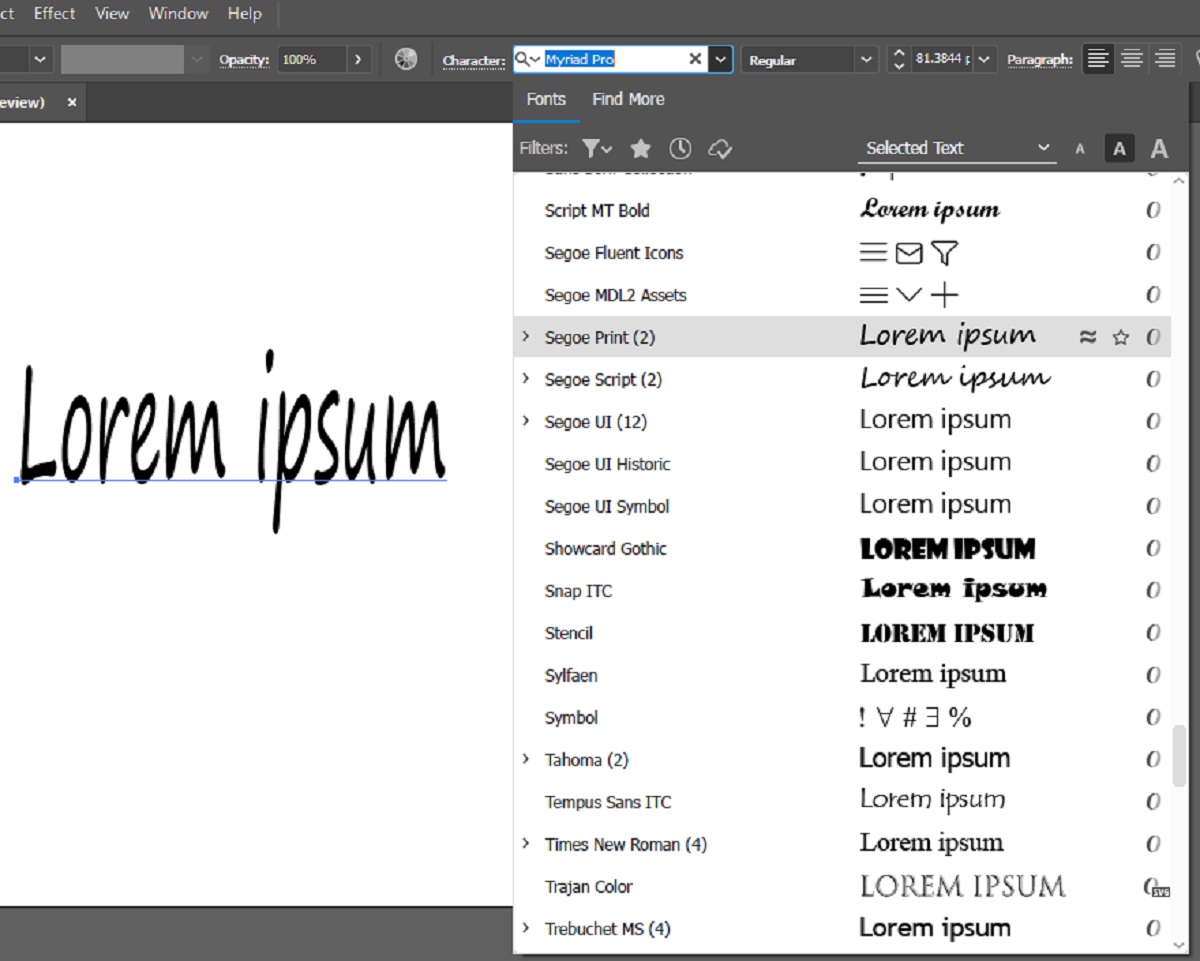
4. With the text box selected, navigate to the Character panel. If it is not already visible, go to the “Window” menu at the top of the screen and select “Character” to open the panel.
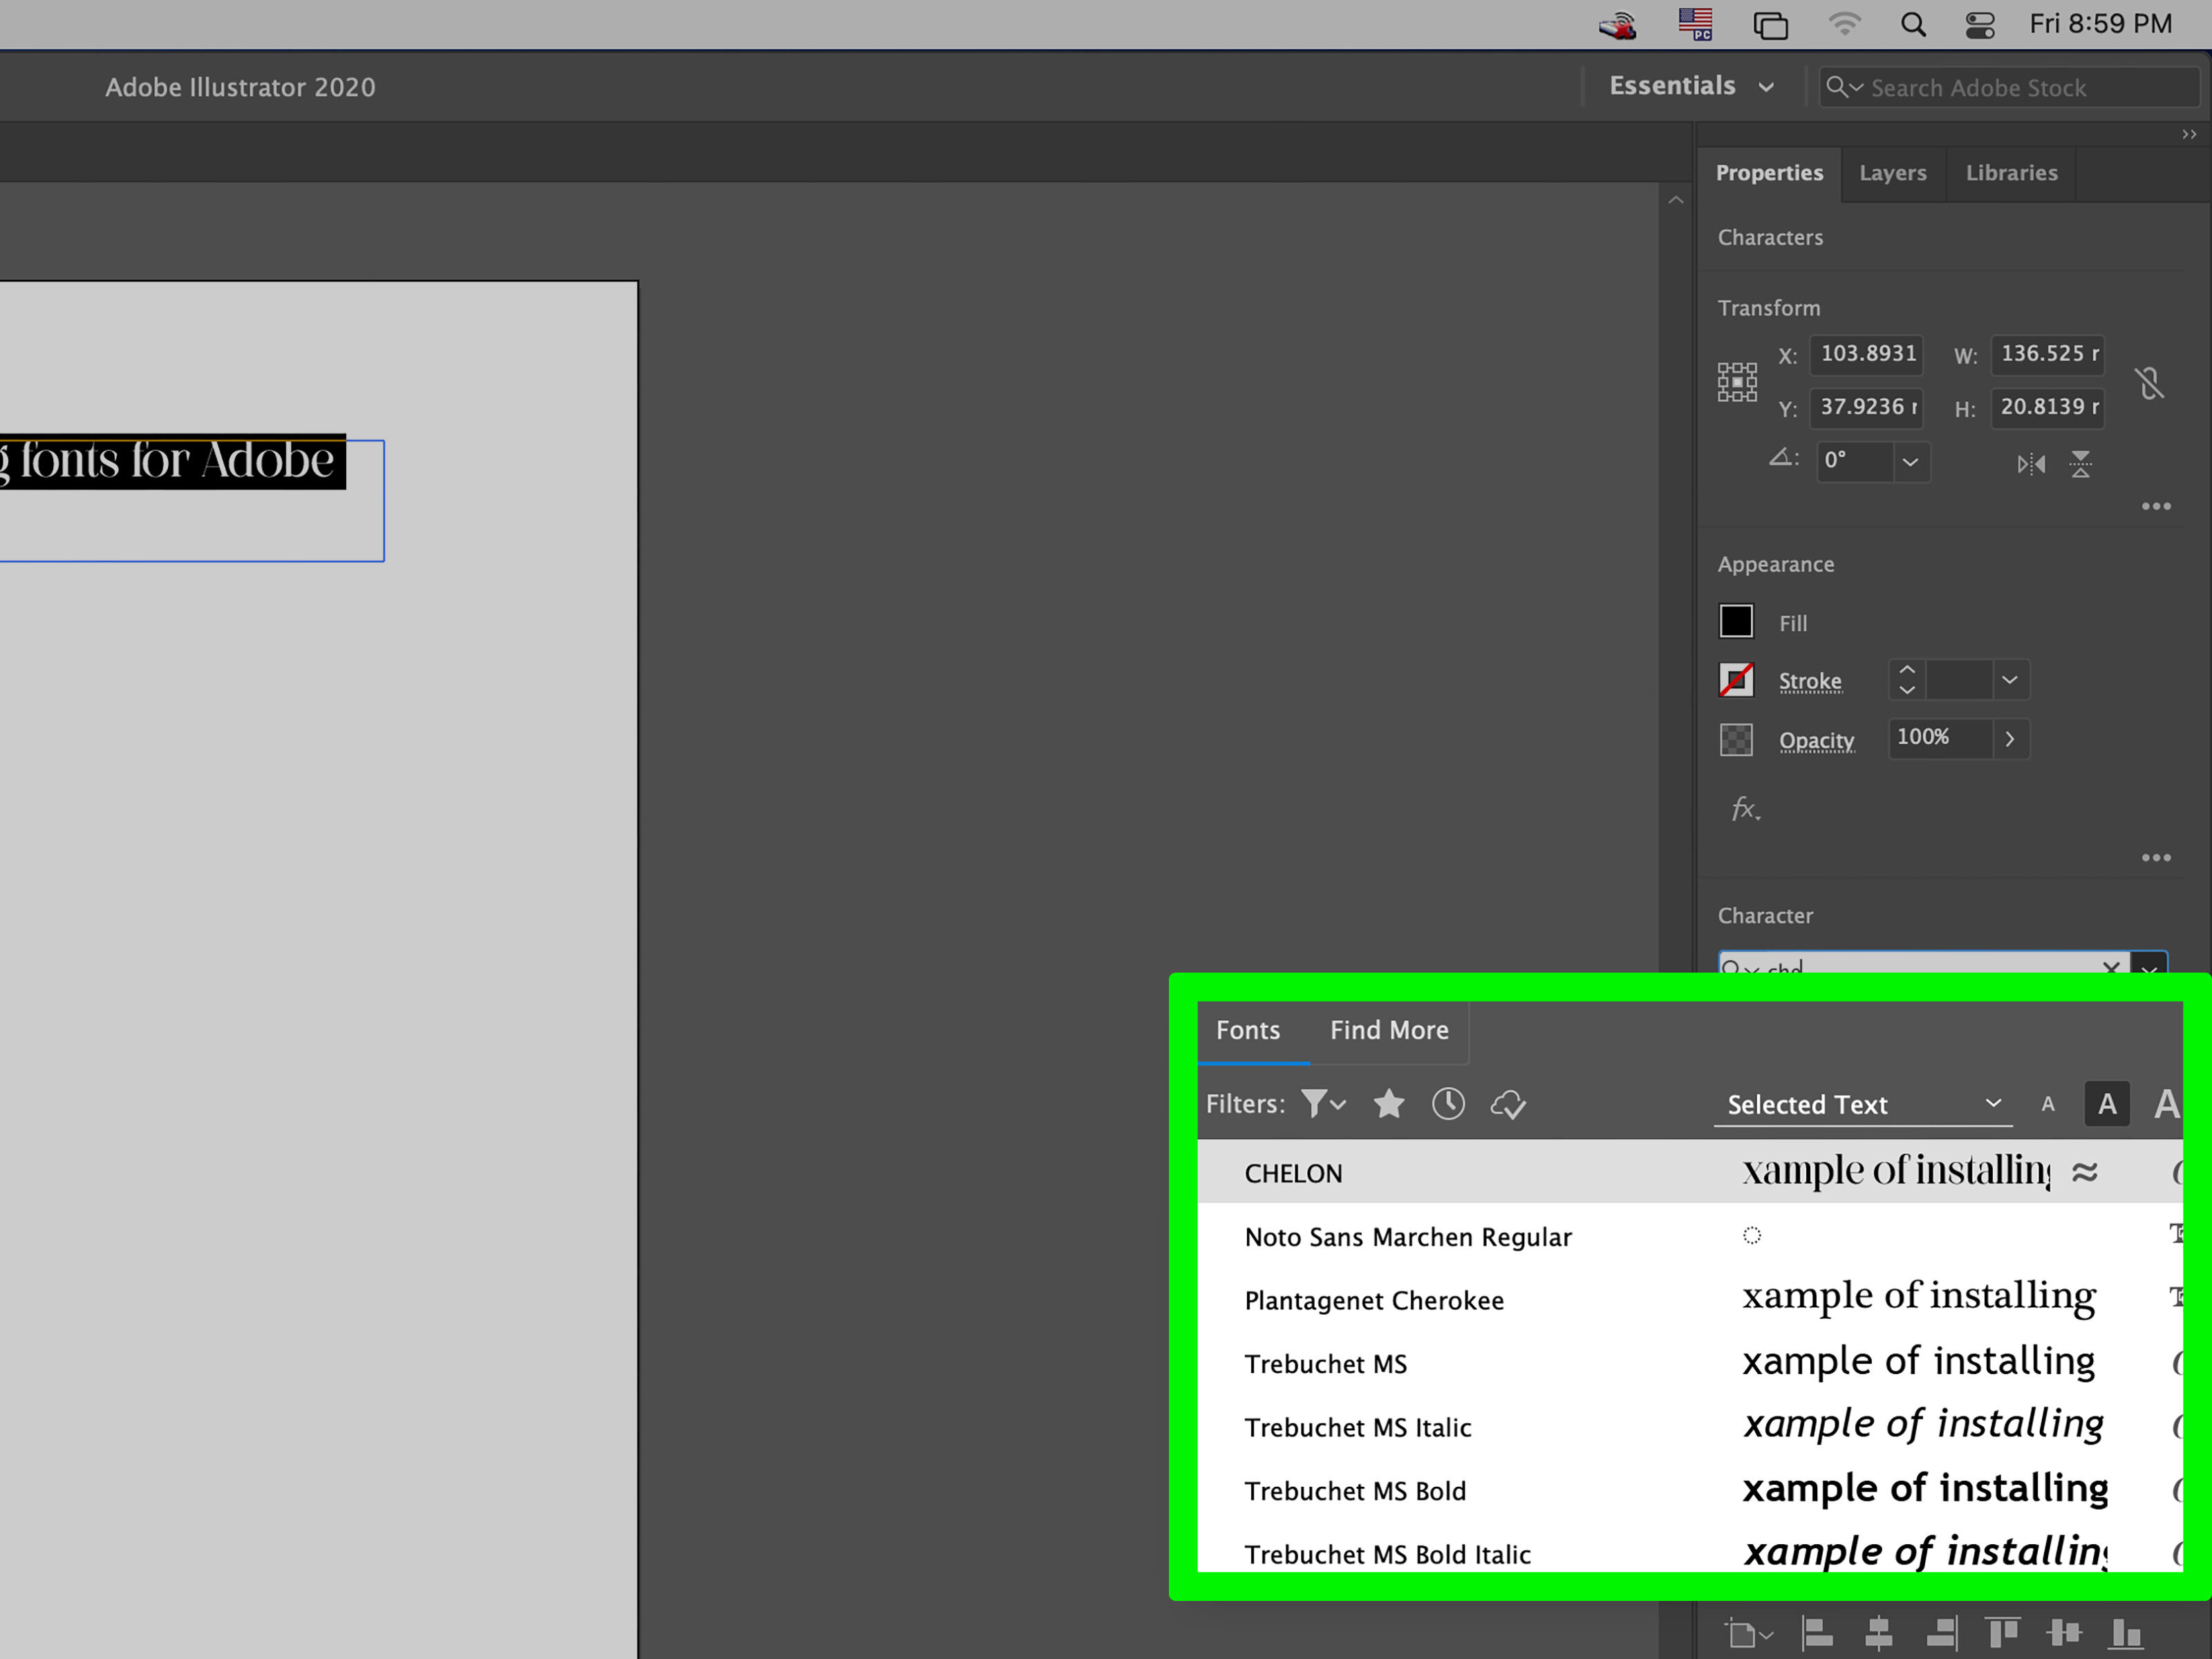
5. In the Character panel, you will find the font selection dropdown menu. Click on the dropdown menu to view the available fonts.
6. Scroll through the font list to locate the new fonts you have added. The fonts will appear alongside the pre-existing fonts in the dropdown menu.
7. Click on the desired font to select it. The text inside the text box will automatically update to reflect the selected font.
8. Customize the text parameters such as size, color, and style as desired using the various options in the Character panel or other relevant panels within Adobe Illustrator.
9. Continue adding and modifying text elements in your design, utilizing the newly loaded fonts to achieve the desired aesthetic.
By following these steps, you can easily load the new fonts into Adobe Illustrator and use them to enhance your designs. Remember to save your work regularly to ensure that any changes or additions are preserved.
With the ability to load new fonts, Adobe Illustrator provides you with the creative freedom to experiment with different typography styles and elevate your design projects to new heights.
Conclusion
Incorporating new fonts into your designs can greatly enhance the visual appeal and creativity of your work. With Adobe Illustrator, the process of finding, downloading, installing, and using fonts has been made relatively simple. By following the steps outlined in this guide, you can expand your font library and unlock endless possibilities for your design projects.
From sourcing fonts from trusted websites to downloading fonts from free font repositories, you have a wide range of options to find the perfect fonts for your needs. Remember to consider the licensing terms and usage restrictions of each font to ensure compliance and avoid any legal issues.
After downloading fonts, it is important to extract the font files from any compressed folders to prepare them for installation. Installing fonts on both Windows and macOS systems is a straightforward process that allows you to access the fonts in various applications, including Adobe Illustrator.
Adding the installed fonts to Adobe Illustrator involves a simple step of restarting the application to ensure that the program recognizes and loads the new fonts. Once Illustrator is restarted, you can easily load the new fonts into the font selection tool and start using them in your designs.
With the knowledge and skills gained from this guide, you are now equipped to confidently navigate the process of downloading and using fonts in Adobe Illustrator. Illuminate your designs with the perfect typography, create captivating visuals, and unleash your creativity to its fullest potential.