Introduction
When it comes to digital artwork and design, Procreate has become one of the most popular applications among artists. With its vast array of tools and features, Procreate allows you to create stunning and intricate designs on your iPad. One of the key elements in any design is the choice of fonts. Fortunately, Procreate allows you to download and install custom fonts to give your artwork a unique and personalized touch.
In this article, we will guide you through the process of downloading fonts for Procreate, so you can add a touch of creativity and originality to your digital artwork. Whether you’re a professional artist or a hobbyist, this step-by-step guide will help you find, download, and install fonts that perfectly match your style and vision.
Before diving into the steps, it’s important to note that Procreate currently supports TrueType Font (TTF) and OpenType (OTF) file formats. Make sure the fonts you download are in one of these formats for compatibility with Procreate. TTF and OTF files are widely available on various font websites, and we’ll discuss the best places to find them later in this guide.
Now, let’s get started and explore how you can easily download and integrate stunning fonts into your Procreate projects!
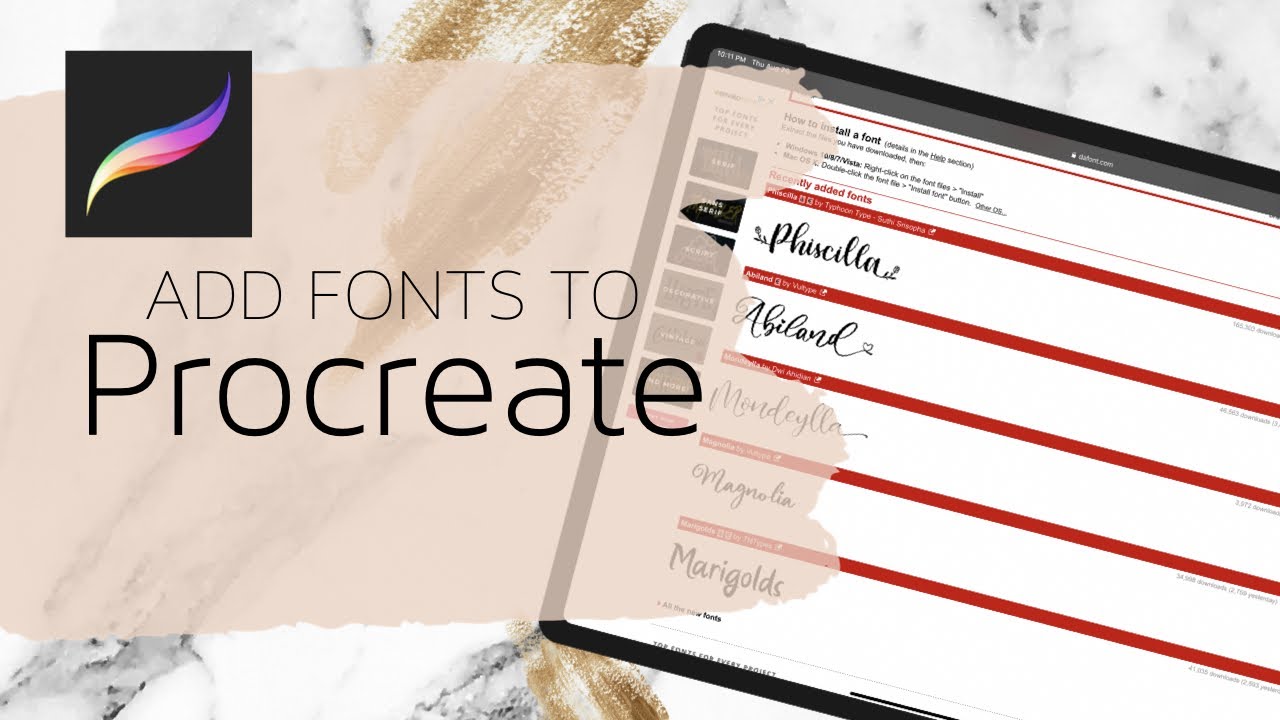
Step 1: Choose a Font Website
The first step in downloading fonts for Procreate is to find a reliable and reputable font website. There are numerous websites that offer free and paid fonts, each with its own unique collection and design styles. Here are a few popular font websites that you can explore:
- Google Fonts: Google Fonts is a free platform that offers a wide range of fonts for various design projects. They have a diverse collection of fonts that are easily accessible and can be used for both personal and commercial purposes.
- DaFont: DaFont is a popular font website known for its vast collection of free fonts. They have a user-friendly interface that allows you to search for fonts based on different categories such as handwriting, serif, sans-serif, script, and more.
- Font Squirrel: Font Squirrel is another great resource for finding high-quality fonts. They offer a curated collection of free fonts that have been carefully vetted for commercial use. The website also provides tools for font identification and font pairing.
- Behance: Behance is a platform where designers showcase their work, including custom fonts. You can find unique and creative fonts created by talented designers and artists. Although not all fonts on Behance are free, it’s a great place to discover new and inspiring designs.
Take some time to explore these websites and browse through their font collections. Consider the style and vibe you want to convey in your artwork, and choose a font website that aligns with your vision.
Remember, while free fonts can be a great starting point, investing in premium fonts can give your designs a more professional and polished look. Many font websites offer affordable paid fonts with commercial licenses, giving you more options to elevate your Procreate creations.
Once you have selected a font website, it’s time to move on to the next step: browsing and selecting fonts that catch your eye.
Step 2: Browse and Select Fonts
Now that you have chosen a font website, it’s time to browse through their font collection and select the fonts that resonate with your artistic style and project requirements. Here are a few tips to help you make the best font selection:
- Consider the Purpose: Think about the purpose of your artwork and the message you want to convey. Are you working on a logo design, a digital painting, or a typographic poster? Different fonts evoke different emotions and suit different design contexts. For example, a playful and whimsical font might work well for a children’s book illustration, while a clean and minimal font could be more appropriate for a professional presentation.
- Readability is Key: While artistic fonts can add flair to your designs, it’s essential to prioritize readability. Ensure that the fonts you choose are easy to read, especially when used in body text or smaller sizes. Fonts with legible letterforms and appropriate spacing can make a significant difference in the overall user experience.
- Contrast and Pairing: Consider selecting fonts that have contrasting styles or pair well together. Combining a script font with a bold sans-serif font, for example, can create visual interest and hierarchy in your design. Font pairing is an art in itself, so take your time to experiment and find combinations that harmonize well.
- Test Before Downloading: Many font websites allow you to preview the fonts before downloading. Take advantage of this feature to see how the fonts look in different sizes and styles. This will give you a better idea of how the font will appear in your Procreate projects.
- Consider Licensing: Pay attention to the licensing terms of the fonts you choose. Some fonts are free for personal use only, while others may require a commercial license for commercial projects. Make sure you comply with the font’s license to avoid any legal issues down the line.
By keeping these tips in mind, you can explore the font collection of your chosen website and make informed decisions about the fonts that best suit your Procreate projects. Once you have finalized your font selections, it’s time to move on to the next step: downloading the font files.
Step 3: Download the Font Files
After selecting the fonts you want to use in your Procreate projects, the next step is to download the font files onto your device. Here’s how you can download the font files from your chosen font website:
- Locate the Download Button: On the font website, find the download button or link associated with the font you want to download. It is usually located near the font preview or description.
- Select the Right Format: Make sure to select the font files in the appropriate format supported by Procreate. As mentioned earlier, Procreate supports TrueType Font (TTF) and OpenType (OTF) file formats. Some websites may provide font files in other formats, so be sure to choose the TTF or OTF files for compatibility.
- Click Download: Once you have selected the desired font format, click the download button to initiate the download process. The font file will then be saved onto your device’s storage.
- Organize Your Font Files: To keep your downloaded font files organized, consider creating a dedicated folder or directory on your device. This will make it easier to locate and manage your fonts when installing them in Procreate.
Repeat these steps for each font you want to download. Take your time to explore the font website’s collection and expand your font library with a variety of styles and designs.
Once you have successfully downloaded the font files, it’s time to transfer them to Procreate on your iPad. Proceed to the next step to learn how to transfer fonts to Procreate.
Step 4: Transfer Fonts to Procreate
Now that you have downloaded the font files onto your device, the next step is to transfer them to Procreate. Procreate provides a seamless way to import and use custom fonts within the application. Follow these steps to transfer your downloaded fonts to Procreate:
- Connect Your iPad to Your Computer: Use a USB cable to connect your iPad to your computer. Make sure both devices are turned on and unlocked.
- Open iTunes or Finder: On your computer, open iTunes (or Finder if you’re using macOS Catalina or later).
- Select Your iPad: In iTunes or Finder, locate your iPad and select it to display its settings.
- Go to File Sharing: In the sidebar, click on “File Sharing”.
- Select Procreate from the Apps List: In the “Apps” section, scroll down and select Procreate from the list of installed apps on your iPad.
- Drag and Drop the Font Files: In the “Procreate Documents” section, you will see a folder named “Fonts”. Open this folder and simply drag and drop the font files you downloaded earlier into this folder.
- Synchronize and Disconnect: Once you have transferred the font files to Procreate, click on the “Sync” button or eject your iPad from iTunes/Finder to safely disconnect it from your computer.
That’s it! You have successfully transferred the font files to Procreate on your iPad. The fonts are now ready to be installed within the Procreate application. Proceed to the next step to learn how to install fonts in Procreate.
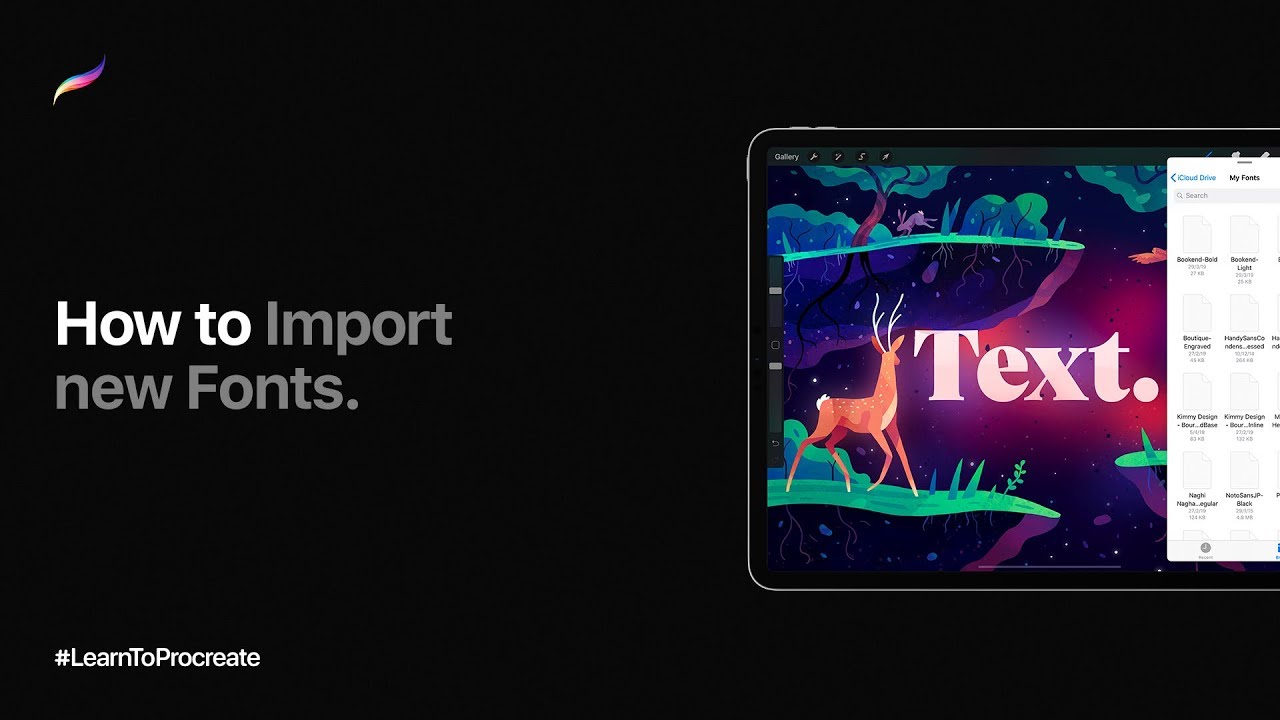
Step 5: Install Fonts in Procreate
Once you have transferred the font files to Procreate, the final step is to install the fonts within the application. Procreate makes it easy to add custom fonts to your projects. Here’s how you can install the fonts in Procreate:
- Open Procreate: Start by opening the Procreate application on your iPad. Make sure you have the latest version of Procreate installed for optimal compatibility.
- Create a New Canvas or Open an Existing Project: You can either create a new canvas or open an existing project where you want to use the custom fonts.
- Access the Text Tool: On the toolbar, tap on the wrench icon to access the Actions menu. From there, tap on the “Add” button and select the “Text” tool.
- Tap on the Font Dropdown: In the Text Options panel that appears, tap on the font dropdown menu to bring up the list of available fonts.
- Find Your Installed Fonts: Scroll through the font list and look for your installed fonts. They will usually be listed under the “My Fonts” or “User” section.
- Select and Apply the Font: Tap on the font you want to use, and it will be applied to the text. You can adjust the size, style, and other text settings as desired.
That’s it! You have successfully installed the custom fonts in Procreate. You can now use them in your artworks, lettering, illustrations, or any other design projects within the app.
Remember, the fonts you have installed in Procreate will be available for use across all your projects in the application. You can switch between different fonts and experiment with various styles to create visually captivating artwork.
Now that you know how to download, transfer, and install fonts in Procreate, you have the freedom to explore a vast world of typography and unleash your creativity on your iPad.
Conclusion
Congratulations! You have successfully learned how to download, transfer, and install fonts in Procreate. By incorporating custom fonts into your artwork, you can add a unique and personal touch to your digital creations.
Remember to choose a reputable font website and browse through their collection to find fonts that align with your artistic vision and project requirements. Consider factors such as purpose, readability, contrast, and font pairing when selecting the perfect fonts for your designs.
After downloading the font files, transfer them to Procreate by connecting your iPad to your computer and using iTunes or Finder. Drag and drop the font files into the Procreate folder to import them into the application.
Once the fonts are imported, you can easily install them within Procreate. Access the Text Tool, tap on the font dropdown, and select your installed fonts. They will be available for use in all your projects, allowing you to create eye-catching artwork with a personalized touch.
With the ability to easily download and use custom fonts in Procreate, you have the freedom to explore different typography styles, experiment with various combinations, and elevate your digital artwork to new heights.
So go ahead, unleash your creativity, and make your Procreate projects stand out with the power of custom fonts!