Introduction
When it comes to downloading files on your Mac, sometimes you may change your mind or realize that you don’t need a particular file anymore. In such cases, it’s important to know how to cancel a download to save time, bandwidth, and storage space. Canceling a download can be done easily and quickly, regardless of the type of file or the download source.
Whether you’re downloading a large software update, a multimedia file, or any other type of content, this article will guide you through the different methods available to cancel a download on your Mac. By canceling unnecessary downloads, you can optimize your device’s performance and reduce clutter in your Downloads folder.
In the following sections, we will explore three different methods to cancel a download on Mac. These methods differ based on the stage of the download and the tools you can utilize to halt the process. From using the progress bar to accessing the Downloads folder or utilizing the Activity Monitor, you’ll have various options to choose from depending on your preferences and the situation at hand.
Methods to Cancel a Download on Mac
When it comes to canceling a download on your Mac, there are three primary methods you can utilize. Each method applies to different scenarios and provides you with the flexibility to cancel downloads at various stages.
Method 1: Using the Progress Bar
The progress bar is an easily accessible tool that allows you to monitor and manage your downloads. To cancel a download using the progress bar, follow these steps:
- Locate the downloading file in the Dock or click on the “Launchpad” in the Dock and open the “Downloads” folder.
- Find the file you want to cancel and click on the “X” icon next to it in the progress bar.
- A confirmation dialog will appear; click “Cancel” to stop the download.
This method is particularly useful if you are actively monitoring your downloads and want to cancel a specific file quickly.
Method 2: Using the Downloads Folder
If you prefer a more organized approach, you can cancel a download through the Downloads folder on your Mac. Here’s how:
- Open a Finder window and click on “Downloads” in the sidebar.
- Locate the file you want to cancel, right-click on it, and select “Move to Trash” from the dropdown menu.
This method is ideal if you want to manage your downloads in a centralized location and clean up your Downloads folder.
Method 3: Using the Activity Monitor
For advanced users who prefer a more technical approach, you can cancel a download through the Activity Monitor utility. Follow these steps:
- Open the Activity Monitor by searching for it in Spotlight or navigating to “Applications” > “Utilities” > “Activity Monitor.”
- In the Activity Monitor window, locate the downloading process by searching for the name or relevant keyword.
- Select the process and click on the “X” icon in the toolbar.
- A confirmation dialog will appear; click “Force Quit” to cancel the download.
This method is useful if you need to stop a download that is unresponsive or causing issues with your system.
Method 1: Using the Progress Bar
One of the easiest and most straightforward methods to cancel a download on your Mac is by utilizing the progress bar. The progress bar allows you to monitor and manage your downloads in real-time, giving you the ability to cancel a file with just a few clicks. Here’s how to cancel a download using the progress bar:
- Locate the downloading file in the Dock or click on the “Launchpad” icon in the Dock and open the “Downloads” folder.
- In the Downloads folder, you’ll find a list of all downloading files, along with their respective progress bars.
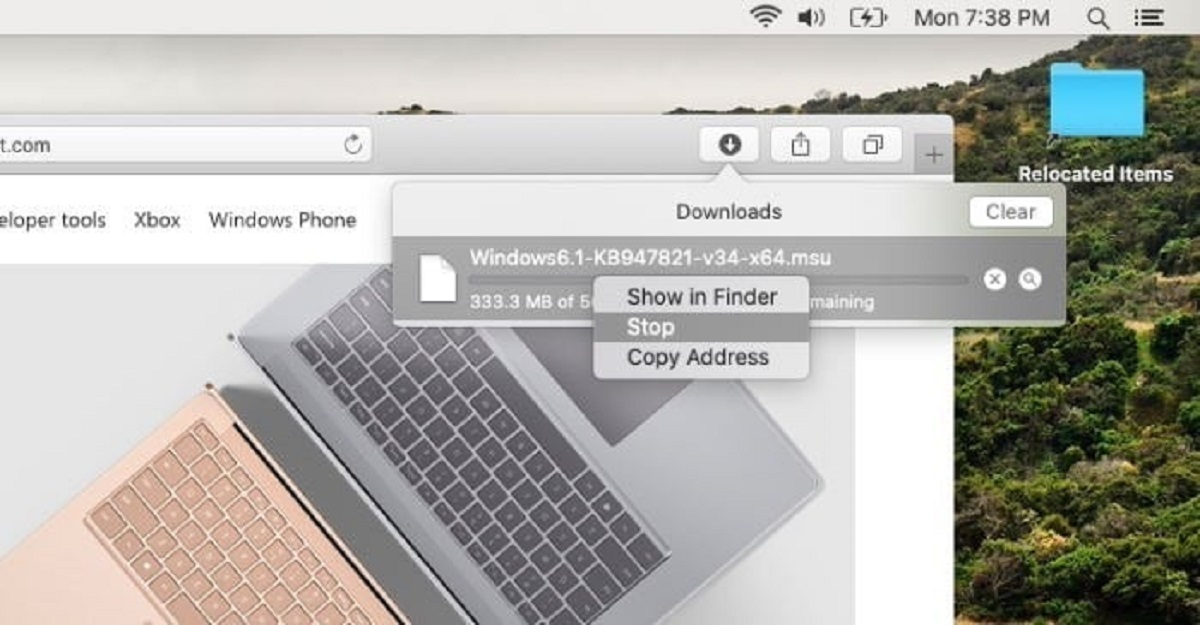
- Identify the file you wish to cancel and hover your cursor over its progress bar.
- When the “X” icon appears on the right side of the progress bar, click on it.
- A confirmation dialog will pop up, asking if you want to cancel the download. Click on the “Cancel” button to stop the download process.
This method works efficiently when you are actively monitoring your downloads and want to cancel a specific file quickly. It allows you to have control over individual downloads and saves you precious time and internet bandwidth. Whether you’re downloading a large software update, an application, or any other file, using the progress bar is a convenient way to cancel downloads on Mac.
Furthermore, canceling a download through the progress bar is a user-friendly approach, as it provides a visual representation of the download’s progress. You can easily identify which downloads are still in progress and cancel them without navigating through multiple menus or applications.
It’s important to note that canceling a download using the progress bar may not immediately free up the space taken up by the partially downloaded file. However, it will stop the download process, preventing any further consumption of internet resources. If you need to reclaim the space occupied by partially downloaded files, you can manually move them to the trash and empty it, freeing up storage space on your Mac.
Method 2: Using the Downloads Folder
If you prefer a more organized approach to canceling a download on your Mac, you can utilize the Downloads folder. This method allows you to manage your downloads in a centralized location and easily cancel any unwanted files. Here’s how to cancel a download using the Downloads folder:
- Open a Finder window on your Mac by clicking on the Finder icon in the Dock or selecting “New Finder Window” from the File menu.
- In the sidebar of the Finder window, look for and click on the “Downloads” folder.
- The Downloads folder will open, displaying a list of all the files you have downloaded.
- Scroll through the list and locate the file you wish to cancel.
- Right-click on the file and select “Move to Trash” from the dropdown menu.
By moving the file to the Trash, you effectively cancel the download and remove it from your system. It’s important to note that canceling a download through the Downloads folder will free up the space occupied by the partially downloaded file, allowing you to reclaim storage space on your Mac.
Using the Downloads folder method is particularly useful if you want to have a comprehensive view of all your downloaded files, whether they are still in progress or completed. It offers a more systematic and organized approach to managing your downloads, allowing you to easily identify and cancel unwanted files.
Additionally, this method provides the flexibility to choose which downloads you want to cancel from a detailed list. It eliminates the need to navigate through numerous progress bars or search for specific files in different locations. By accessing the Downloads folder, you have all your downloads in one place, making it convenient to cancel downloads and keep your system clutter-free.
Keep in mind that canceling a download through the Downloads folder will permanently remove the file from your system. If you realize that you still need the file later, you would have to download it again. Therefore, it’s essential to ensure that you truly want to cancel the download before moving it to the Trash.
Method 3: Using the Activity Monitor
For more advanced users who prefer a technical approach, canceling a download through the Activity Monitor can be an effective method. The Activity Monitor is a built-in utility on your Mac that provides a detailed overview of the processes running on your system. Here’s how to cancel a download using the Activity Monitor:
- Open the Activity Monitor by either searching for it in Spotlight or navigating to “Applications” > “Utilities” > “Activity Monitor.”
- Once the Activity Monitor window is open, you will see a list of processes and system activities.
- At the top-right corner of the Activity Monitor window, there is a search field. Type in the name or relevant keyword associated with the downloading process you want to cancel.
- From the search results, select the process that corresponds to the download you wish to cancel.
- Click on the “X” icon in the toolbar, which represents the “Quit Process” button. A confirmation dialog will appear.
- Click on the “Force Quit” button to terminate the process and cancel the download.
This method can be particularly useful when you encounter a download that is unresponsive or causing issues with your system. By using the Activity Monitor to force quit the downloading process, you can effectively stop the download and resolve any associated problems.
However, it’s important to exercise caution when using the Activity Monitor, as it deals with system processes and termination. Ensure that you select the correct process associated with the download you want to cancel, as terminating the wrong process can have unintended consequences on your system’s stability.
Using the Activity Monitor to cancel a download gives you a deeper level of control and allows you to intervene in scenarios where the default cancellation methods may not work effectively. It can help you troubleshoot any issues related to downloads and ensure the smooth operation of your Mac.
Note that canceling a download through the Activity Monitor will immediately stop the downloading process, but it may not automatically free up the storage space occupied by the partially downloaded file. You may need to manually delete the file if you want to reclaim the occupied space.
Conclusion
Being able to cancel a download on your Mac is a valuable skill that helps you manage your files, optimize system resources, and maintain a clutter-free environment. In this article, we explored three different methods to cancel a download on your Mac: using the progress bar, utilizing the Downloads folder, and employing the Activity Monitor.
The progress bar method allows you to quickly cancel a specific download in progress, providing you with control over individual files. It’s an ideal option for actively monitoring your downloads and saving time and bandwidth by canceling unnecessary files.
The Downloads folder method offers a more organized approach, allowing you to manage all your downloads in one centralized location. By moving a file to the Trash, you can cancel the download and reclaim storage space on your Mac.
For advanced users, the Activity Monitor method provides a technical approach to cancel a download. By force quitting the downloading process, you can resolve issues and regain control over your system.
Each method offers its own benefits and can be chosen based on your preferences and the situation at hand. Whether you prefer a simple and user-friendly approach or a more advanced technical solution, you now have the knowledge to cancel downloads on your Mac effectively.
Remember to exercise caution when using these methods and ensure that you genuinely want to cancel a download before proceeding. Additionally, keep in mind that canceling a download does not automatically delete the partially downloaded file. You may need to manually remove the file to free up storage space on your Mac.
By mastering the art of canceling downloads on your Mac, you can streamline your workflow, optimize system performance, and ensure that you’re only downloading and keeping the files that are truly necessary.