Introduction
Welcome to our guide on how to delete a group in the Splitwise mobile app! Splitwise is a popular expense tracking and bill splitting app that makes it easy to manage shared expenses with friends, family, and roommates. While creating groups in Splitwise helps to organize and track expenses conveniently, there may come a time when you no longer need a particular group and want to delete it.
Deleting a group in the Splitwise mobile app is a straightforward process that can be done in just a few simple steps. In this guide, we will walk you through the process, ensuring that you can easily delete any unnecessary or inactive groups that you no longer wish to keep.
Whether you have a group that you no longer contribute to, a group that has completed its purpose, or simply want to declutter your Splitwise account, our step-by-step instructions will help you navigate through the app effortlessly.
Before we dive into the specific steps, it’s important to note that deleting a group is irreversible. Once a group is deleted, all the expenses and data associated with that group will be permanently removed from your account. Therefore, it’s crucial to double-check if you truly want to delete the group before proceeding.
Now that we’ve covered the essentials, let’s get started with the process of deleting a group in the Splitwise mobile app.
Step 1: Open the Splitwise Mobile App
The first step to deleting a group in the Splitwise mobile app is to open the app on your device. Locate the Splitwise app icon on your home screen or app drawer and tap on it to launch the app.
If you haven’t already, make sure you have downloaded and installed the latest version of the Splitwise mobile app from the App Store (for iOS) or Google Play Store (for Android). This will ensure that you have access to all the latest features and updates.
Upon opening the app, you will be prompted to log in to your Splitwise account. Enter your login credentials, such as your email address and password, and tap the “Log In” button to proceed.
If you don’t have a Splitwise account yet, you can easily sign up for one by tapping on the “Sign Up” or “Create an Account” option on the login screen. Follow the on-screen prompts to create your account and then log in with your newly created credentials.
Once you are logged in, you will be taken to the home screen of the Splitwise app, where you can see an overview of your recent activities and groups. Now that you have successfully opened the Splitwise app, you’re ready to move on to the next step.
Step 2: Navigate to the “Groups” Section
After logging in to the Splitwise mobile app, the next step is to navigate to the “Groups” section. This is where you can access and manage all your groups, including deleting them.
To access the “Groups” section, look for the navigation menu, typically represented by three horizontal lines or a hamburger icon, located either at the top left or top right corner of the app screen. Tap on this icon to open the menu.
Once the menu is open, you will see a list of different sections or options within the app. Look for and select the “Groups” option from the menu. This will take you to the dedicated Groups page.
On the Groups page, you will find a list of all the groups that you are a part of. Each group will typically be displayed with its name, a brief description, and the total amount owed within the group. Scroll through the list to locate the group that you wish to delete.
If you have a long list of groups and find it difficult to locate the specific group, you can use the search bar or any available filters to narrow down the list and find the group easily. Some common filters include sorting by recent activity, alphabetical order, or total balance.
Once you have successfully navigated to the “Groups” section and found the group you want to delete, you’re ready to proceed with the next step.
Step 3: Select the Group You Want to Delete
Now that you are on the “Groups” page in the Splitwise mobile app, it’s time to select the specific group that you want to delete. Find the group from the list and tap on it to open its details.
Groups in Splitwise are typically represented by their names, accompanied by additional information such as the number of members and the total balance of the group. Take a moment to verify that you have selected the correct group before proceeding to delete it.
Once you have tapped on the group, you will be taken to the group details page. Here, you can see a summary of the group’s activity, including the list of members and their individual balances within the group.
On the group details page, you may also find additional options such as editing the group settings, adding expenses, or viewing the transaction history. However, for now, we will focus on deleting the group, so let’s move on to the next step.
By selecting the group, you have indicated your intention to delete it. In the following steps, we will guide you through the process of deleting the group effectively.
Step 4: Tap on the Group’s Name
After selecting the group that you wish to delete in the Splitwise mobile app, the next step is to tap on the group’s name to access additional options and settings.
On the group details page, you will typically see the name of the group prominently displayed at the top. Tap on the group’s name to proceed.
By tapping on the group’s name, you will be taken to a new page where you can view and manage various aspects of the group, including adding or removing members, editing group details, and more.
On this page, you may also find other relevant information and options, such as a summary of the group’s expenses and balances, any pending settle-up amounts, and the option to leave the group if you are an active member.
Take a moment to review the information displayed on this page to ensure that you have selected the correct group that you want to delete. If everything looks right, you’re ready to proceed with the next step in the process of deleting the group.
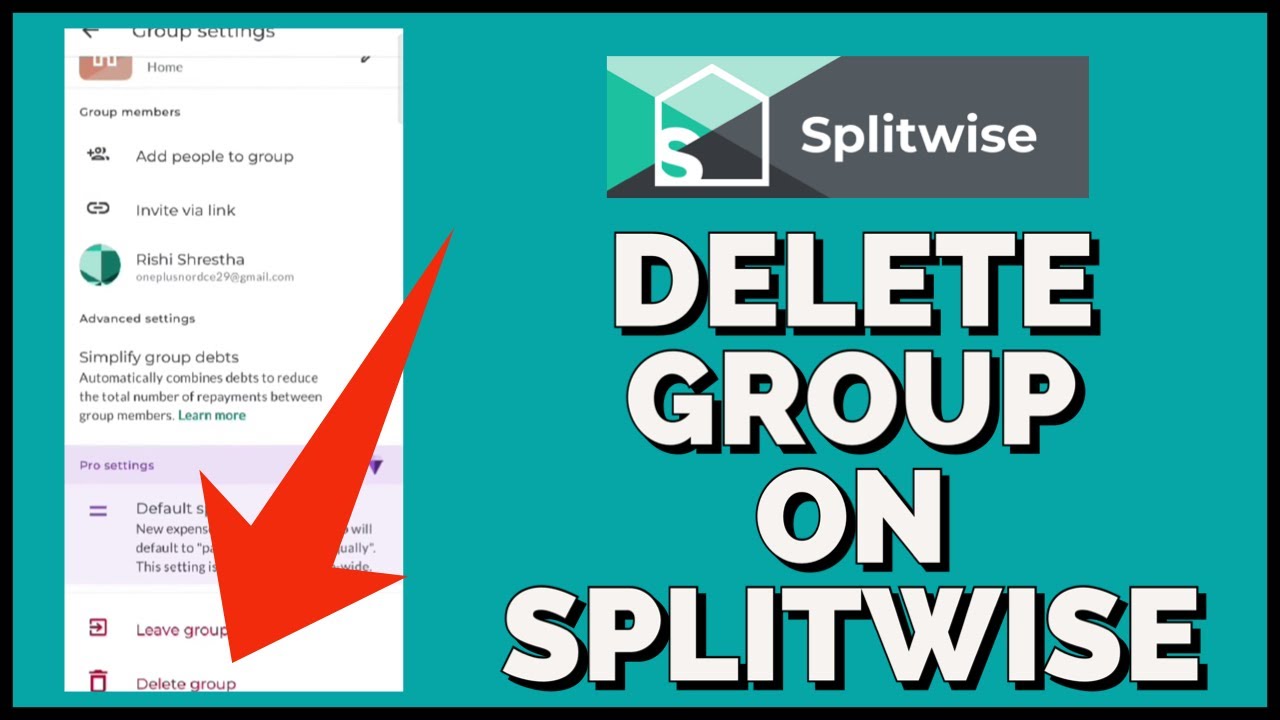
Step 5: Scroll Down and Click on “Delete Group”
Once you have tapped on the group’s name in the Splitwise mobile app, you will be taken to a page where you can view and manage the group’s details. To delete the group, you need to scroll down on this page until you find the option to “Delete Group.”
Scrolling down on the group details page will reveal additional options and settings related to the group. Keep scrolling until you reach the bottom of the page.
Once you have reached the bottom of the page, look for the “Delete Group” option. This option is usually placed towards the end of the page, below any other options and settings.
When you find the “Delete Group” option, click on it to initiate the group deletion process. Depending on the Splitwise app version or platform you are using, the option may be labeled slightly differently, but it will generally be evident that it is the option for deleting the group.
It’s important to note that once you delete a group, all the associated expenses, balances, and transaction history within that group will be permanently removed. Therefore, double-check that you have selected the correct group before proceeding.
If you cannot find the “Delete Group” option, make sure that you have access to the necessary permissions or that you are the group creator or an administrator with the authority to delete the group.
By scrolling down and clicking on the “Delete Group” option, you’re one step closer to successfully deleting the unwanted group from your Splitwise account.
Step 6: Confirm the Deletion
After clicking on the “Delete Group” option in the Splitwise mobile app, you will be prompted to confirm the deletion of the group. This is an important step to ensure that you intended to delete the group and that it is not a mistake.
On the confirmation screen, you will typically see a message or dialog box asking if you are sure you want to delete the group. This is your final opportunity to consider your decision before proceeding.
Read the confirmation message carefully to understand the consequences of deleting the group. Keep in mind that all the group’s expenses, balances, and transaction history will be permanently removed upon confirmation.
If you are certain that you want to delete the group, click on the “Confirm” or “Delete” button to proceed. The exact wording and appearance of the confirmation button may vary depending on the app version or platform you are using, but it will usually be a clear indication of finalizing the deletion.
However, if you have changed your mind or selected the option by mistake, you can click on the “Cancel” or “Go Back” button to abort the deletion process.
It’s crucial to emphasize that group deletion is irreversible. Once you confirm the deletion, there is no way to retrieve the group’s data. Therefore, it’s essential to review your decision and confirm with caution.
With the group deletion confirmed, you’re almost there! Let’s move on to the final step to complete the process.
Step 7: Success! Group Deleted
Congratulations! You have successfully deleted the group from the Splitwise mobile app. Once you confirm the deletion, the group and all associated expenses, balances, and transaction history will be permanently removed from your account.
After the group deletion, you will typically be redirected back to the “Groups” page, where you can see an updated list of your remaining groups. The deleted group should no longer appear on this list as it has been completely removed from your Splitwise account.
Deleting a group can help in decluttering your Splitwise account and keeping your expense tracking organized. It is especially useful for groups that are no longer active or relevant to your current financial situation.
Remember that removing a group does not affect any personal or non-group-related expenses in Splitwise. You will still have access to your individual expenses, balances, and transactions as well as any other active groups you are a part of.
If you ever need to track shared expenses with the same group of people again, you can always create a new group in Splitwise. However, keep in mind that creating a new group means starting fresh with no access to the previous group’s data.
It’s important to periodically review and manage your groups in Splitwise to ensure that your account reflects your current financial commitments and responsibilities.
That’s it! You have completed the process of deleting a group in the Splitwise mobile app. By following these simple steps, you can effortlessly remove unnecessary or inactive groups from your account.
Thank you for using our guide, and we hope this tutorial has been helpful in guiding you through the group deletion process in the Splitwise mobile app.


