Introduction
Welcome to the world of Splitwise, the popular expense sharing app that simplifies group finances and makes it easier to split bills among friends, roommates, and colleagues. But what happens when it’s time to settle up and make payments? That’s where adding a payment method to Splitwise comes in handy.
By adding a payment method to your Splitwise account, you can easily and securely make payments to your contacts directly within the app. It eliminates the hassle of having to handle cash or deal with multiple payment platforms. Whether you want to reimburse a friend for dinner, contribute your share of the rent, or settle travel expenses, having a payment method linked to your Splitwise account makes the process seamless and convenient.
In this guide, we will walk you through the steps of adding a payment method to Splitwise, so you can start making hassle-free payments in no time. Whether you prefer to use a credit card, a debit card, or a mobile payment app, Splitwise has got you covered! So, let’s dive in and get your payment method set up.
Step 1: Sign in to your Splitwise account
The first step to adding a payment method to Splitwise is to sign in to your account. If you don’t already have a Splitwise account, you can easily create one by visiting the Splitwise website or downloading the app from the App Store or Google Play Store.
Once you have your account, open the Splitwise app or visit the Splitwise website and enter your login credentials to access your account. If you’re using the app, you can sign in with your email address and password, or you have the option to sign in using your Google or Facebook account for added convenience.
If you’re using the website, simply enter your email address and password in the designated fields and click on the “Sign In” button. Make sure to use the same credentials you used when you initially created your Splitwise account.
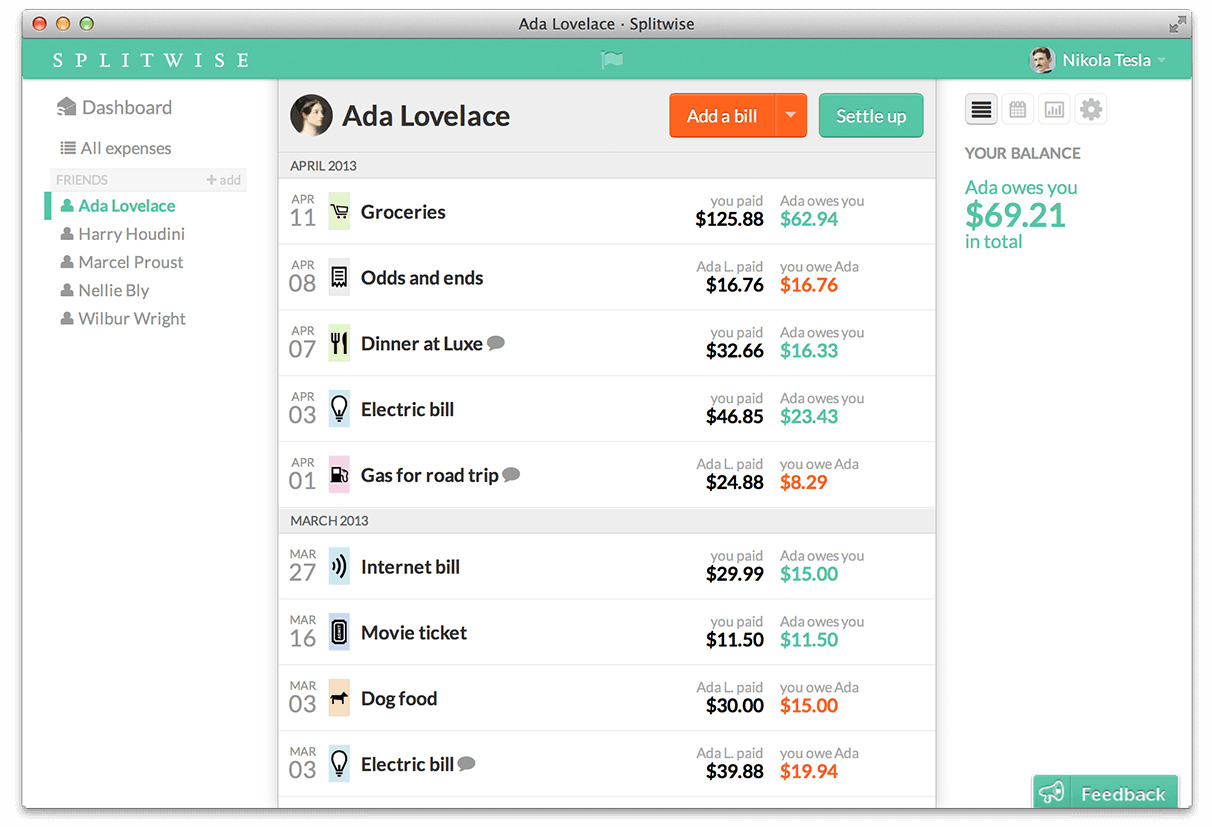
Once you’re signed in, you’ll be directed to your Splitwise dashboard, where you can manage your expenses, view balances, and make payments. With your account ready, it’s time to move on to the next step.
Step 2: Go to “Settings”
Now that you’re signed in to your Splitwise account, it’s time to navigate to the “Settings” section to add your payment method. The “Settings” section is where you can customize various aspects of your Splitwise experience, including managing your payment methods.
To access the “Settings” section, look for the menu icon, usually represented by three horizontal lines, located at the top left or right corner of the screen. Tap or click on the menu icon to open the side menu, and you will see a list of options.
Scroll through the menu options until you find “Settings.” On the Splitwise website, “Settings” might be directly visible as one of the main tabs on the navigation bar. Once you’ve located “Settings,” click or tap on it to proceed.
By navigating to the “Settings” section, you’ll have access to a range of options to manage and customize your Splitwise account, such as notifications, currency preferences, and privacy settings. It’s a central hub to fine-tune your Splitwise experience. But for now, let’s focus on adding a payment method, so let’s move on to the next step.
Step 3: Click on “Payment Methods”
Once you’re in the “Settings” section of your Splitwise account, it’s time to navigate to the “Payment Methods” tab. This is where you’ll find all the options related to managing your payment methods and adding new ones.
Look for the “Payment Methods” option in the menu or navigation bar and click or tap on it to proceed. Depending on the app or website version you’re using, the placement of the “Payment Methods” option may vary. However, it is usually located under the “Settings” section.
After clicking on “Payment Methods,” you’ll be directed to a new page that displays your currently linked payment methods, if any. If you have not added any payment methods before, this page will be empty. But don’t worry, we’ll guide you through the process of adding a new payment method in the next steps.
At this point, you’re just one step away from linking your preferred payment method to Splitwise. Stay with us as we move on to the next step and guide you through the process!
Step 4: Select “Add a Payment Method”
Now that you’re on the “Payment Methods” page in your Splitwise settings, it’s time to add a new payment method. Look for the option that says “Add a Payment Method” and click or tap on it to proceed. This option is typically located at the top or bottom of the page, and it’s usually clearly labeled for easy identification.
By selecting “Add a Payment Method,” you’re taking the next step towards linking your preferred payment option to your Splitwise account. This will enable you to make seamless payments to your contacts and settle bills with ease.
After clicking or tapping on “Add a Payment Method,” a new window or pop-up box will appear, allowing you to choose the type of payment method you wish to add. Splitwise offers a range of options to cater to your preferences, including credit cards, debit cards, and popular mobile payment apps.
Take a moment to review the available options and select the payment method that best suits your needs. Once you’ve made your selection, you’re ready to proceed to the next step, where you’ll provide the required details to link your chosen payment method to your Splitwise account.
Step 5: Choose your preferred payment method
Now that you have selected “Add a Payment Method,” it’s time to choose your preferred payment option from the available choices provided by Splitwise. The payment options typically include credit cards, debit cards, and popular mobile payment apps.
Take a moment to consider which payment method works best for you. If you prefer using your credit card for transactions, select the credit card option and proceed. If you prefer using your debit card, select that option instead. Alternatively, if you prefer using a mobile payment app such as PayPal or Venmo, choose the appropriate app from the list.
It’s important to choose a payment method that you’re comfortable using and that aligns with your financial preferences. Splitwise aims to offer flexibility and convenience when it comes to making payments, so choose the option that suits your needs the best.
Remember, you can always add multiple payment methods to your Splitwise account if you have different preferences for different situations. For example, you may use a credit card for personal expenses but prefer to use a mobile payment app for splitting bills with friends. Feel free to explore the available options and choose the one that fits your requirements.
Once you have chosen your preferred payment method, we’re ready to move on to the next step, where you’ll provide the necessary details to link your payment method to your Splitwise account.
Step 6: Enter the required details
After selecting your preferred payment method, it’s time to enter the required details to link it to your Splitwise account. The information you need to provide may vary depending on the payment option you chose.
If you selected a credit card or debit card, you’ll typically need to enter the cardholder’s name, card number, expiration date, and the security code (CVV) on the back of the card. Make sure to double-check the accuracy of these details to ensure a smooth and error-free experience.
If you chose a mobile payment app, such as PayPal or Venmo, you’ll need to log in to your account for verification. By logging in, you grant permission for Splitwise to securely access your payment app account to complete the payment method link.
During this step, it’s important to follow the instructions provided by Splitwise and enter the required details accurately. This will ensure a seamless setup of your payment method and enable you to make payments without any issues.
Rest assured that Splitwise takes the security and confidentiality of your payment method details seriously. The platform uses industry-standard encryption and security protocols to protect your sensitive information.
Once you have entered the necessary details, review them carefully, and make any corrections if needed. When you’re confident that the information is accurate, proceed to the next step to save and link your payment method to your Splitwise account.
Step 7: Save your payment method
Now that you have entered the required details for your payment method, it’s time to save it and link it to your Splitwise account. This final step ensures that you can easily make payments and settle bills with just a few clicks or taps.
After verifying that the information you entered is correct, look for the “Save” or “Link” button, usually located at the bottom of the page. Click or tap on the button to proceed.
By saving your payment method, Splitwise securely stores the necessary details to facilitate seamless transactions and payments. This way, you don’t have to re-enter your payment information each time a payment is due.
Once you have saved your payment method, you will receive a confirmation message indicating that the linking process was successful. You may also receive an email or in-app notification confirming the addition of your payment method.
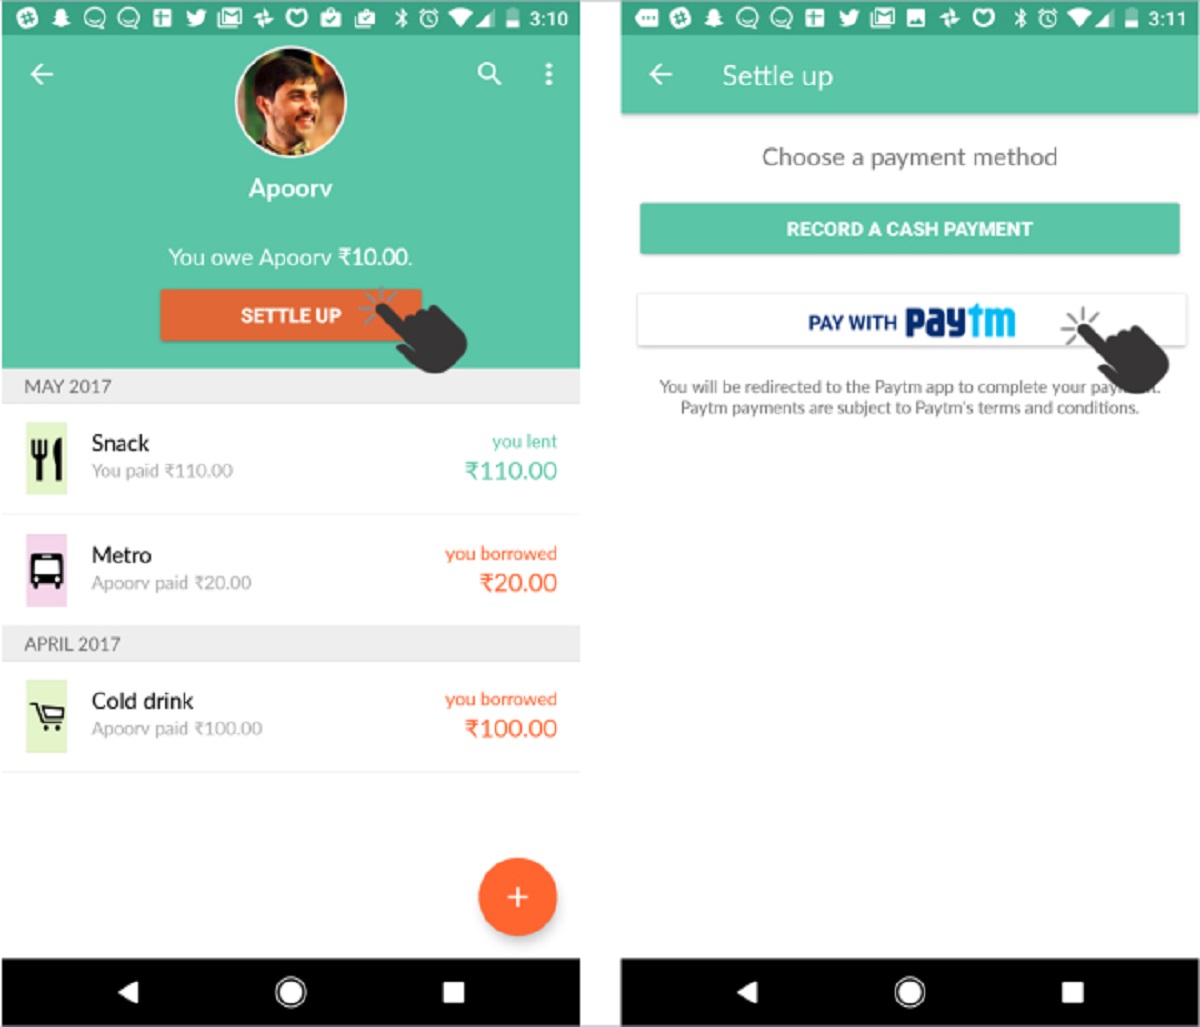
From now on, when you want to make a payment or settle a bill, you can simply select the linked payment method and specify the amount you wish to pay. Splitwise will handle the transaction for you, ensuring a seamless user experience.
If at any point you wish to update or remove a payment method from your Splitwise account, you can revisit the “Payment Methods” section in your account settings and make the necessary adjustments.
Congratulations! You have successfully added a payment method to your Splitwise account. With your preferred option linked, you’re ready to make easy, convenient, and secure payments to your contacts and simplify your expense management.
Conclusion
Adding a payment method to your Splitwise account is a straightforward process that allows you to make seamless payments and settle bills with ease. By following the steps outlined in this guide, you can link your preferred payment option and enjoy the convenience of managing your expenses within Splitwise.
With a payment method linked to your account, you can easily reimburse friends, split bills, and contribute your share of expenses directly through the app. Say goodbye to the hassle of dealing with cash or juggling between multiple payment platforms.
Whether you choose to link a credit card, debit card, or use a popular mobile payment app, Splitwise caters to your preferences and provides a secure platform to handle your transactions. The platform’s commitment to security ensures that your payment information is protected.
Remember, in the “Settings” section of your Splitwise account, you have the flexibility to add multiple payment methods, catering to different scenarios and payment preferences.
So, what are you waiting for? Sign in to your Splitwise account, navigate to the “Settings” section, add a payment method, and experience the ease and convenience of making payments within the app. Start simplifying your expense management today!