Introduction
Welcome to the world of acoustic guitars, where the instrument's playability is crucial to delivering beautiful music. Among the various factors that contribute to a guitar's playability, the action is paramount. The action of an acoustic guitar refers to the height of the strings above the fretboard. It significantly influences the ease of play, the sound quality, and the overall performance of the instrument. In this guide, we will delve into the art of adjusting the action on an acoustic guitar, empowering you to optimize your guitar's playability and sound.
Understanding and adjusting the action on your acoustic guitar is an essential skill for any guitarist, whether you are a beginner or a seasoned player. By learning how to adjust the action, you can tailor the guitar to your playing style and preferences, ensuring a comfortable and enjoyable playing experience. This guide will take you through the process of measuring the action, identifying the need for adjustment, and making the necessary changes to optimize the playability of your acoustic guitar.
Whether you are a performer, a recording artist, or simply a guitar enthusiast, having the ability to adjust the action on your acoustic guitar can make a significant difference in the instrument's feel and sound. With the right tools and knowledge, you can fine-tune the action to achieve the perfect balance between comfortable playability and optimal sound quality. So, let's embark on this journey to discover the art of adjusting the action on an acoustic guitar and unlock the full potential of your instrument.
What is Action on an Acoustic Guitar?
The action on an acoustic guitar refers to the distance between the strings and the fretboard. It plays a pivotal role in determining the playability and sound of the instrument. A high action means that the strings are positioned farther away from the fretboard, requiring more effort to press down and produce clear notes. Conversely, a low action indicates that the strings are closer to the fretboard, allowing for easier fretting and a smoother playing experience.
Optimal action is essential for achieving a comfortable playing experience and ensuring that the guitar produces clear and resonant tones. When the action is too high, it can lead to intonation issues, increased finger fatigue, and a lack of sustain. On the other hand, excessively low action may result in fret buzz, where the strings make an undesirable buzzing sound when played, compromising the overall sound quality.
Adjusting the action on an acoustic guitar involves finding the right balance between string height and playability. By fine-tuning the action, players can customize their instrument to suit their playing style and preferences. Whether you prefer a light touch for intricate fingerstyle playing or a more aggressive approach for strumming, the action can be adjusted to accommodate your unique playing technique.
Furthermore, the action directly impacts the guitar’s sound projection and resonance. A well-adjusted action allows the strings to vibrate freely, producing rich and vibrant tones. Conversely, an improperly set action can stifle the instrument’s natural resonance and diminish its sonic potential.
Overall, the action on an acoustic guitar is a critical factor that influences playability, tone, and overall performance. Understanding its significance and learning how to adjust it empowers guitarists to optimize their instruments for an enhanced playing experience and superior sound quality.
Why Adjust the Action?
Adjusting the action on an acoustic guitar is essential for several reasons, all of which contribute to the instrument’s playability and sound quality. Here are some compelling reasons why adjusting the action is crucial:
- Playability: The action directly affects how the guitar feels and plays. By adjusting the action to suit your playing style, you can make the instrument more comfortable to play, reducing finger fatigue and allowing for smoother transitions between chords and notes.
- Tone and Projection: Optimal action contributes to the guitar’s tone and projection. By setting the action at the right height, you can ensure that the strings vibrate freely, producing clear, resonant tones and maximizing the instrument’s sonic potential.
- Fret Buzz and Intonation: Proper action adjustment helps eliminate fret buzz, where the strings make an undesirable buzzing sound when played. It also contributes to accurate intonation, ensuring that the guitar plays in tune across the entire fretboard.
- Customization: Adjusting the action allows you to customize the guitar to your preferences. Whether you prefer a low, fast action for quick and nimble playing or a slightly higher action for added sustain and resonance, you can tailor the instrument to meet your specific needs.
- Adapting to Climate and String Changes: Changes in temperature and humidity can affect the guitar’s neck and, consequently, the action. By knowing how to adjust the action, you can adapt to environmental changes and maintain consistent playability. Additionally, when changing string gauges, adjusting the action ensures that the guitar remains optimized for the new strings.
Overall, adjusting the action on an acoustic guitar is not only about enhancing playability but also about optimizing the instrument’s sound and performance. It empowers guitarists to tailor their instruments to their unique playing styles and preferences, ultimately leading to a more enjoyable and fulfilling playing experience.
Tools Needed for Adjusting Action
Adjusting the action on an acoustic guitar requires a few essential tools to ensure precision and safety. Here are the primary tools you will need for this task:
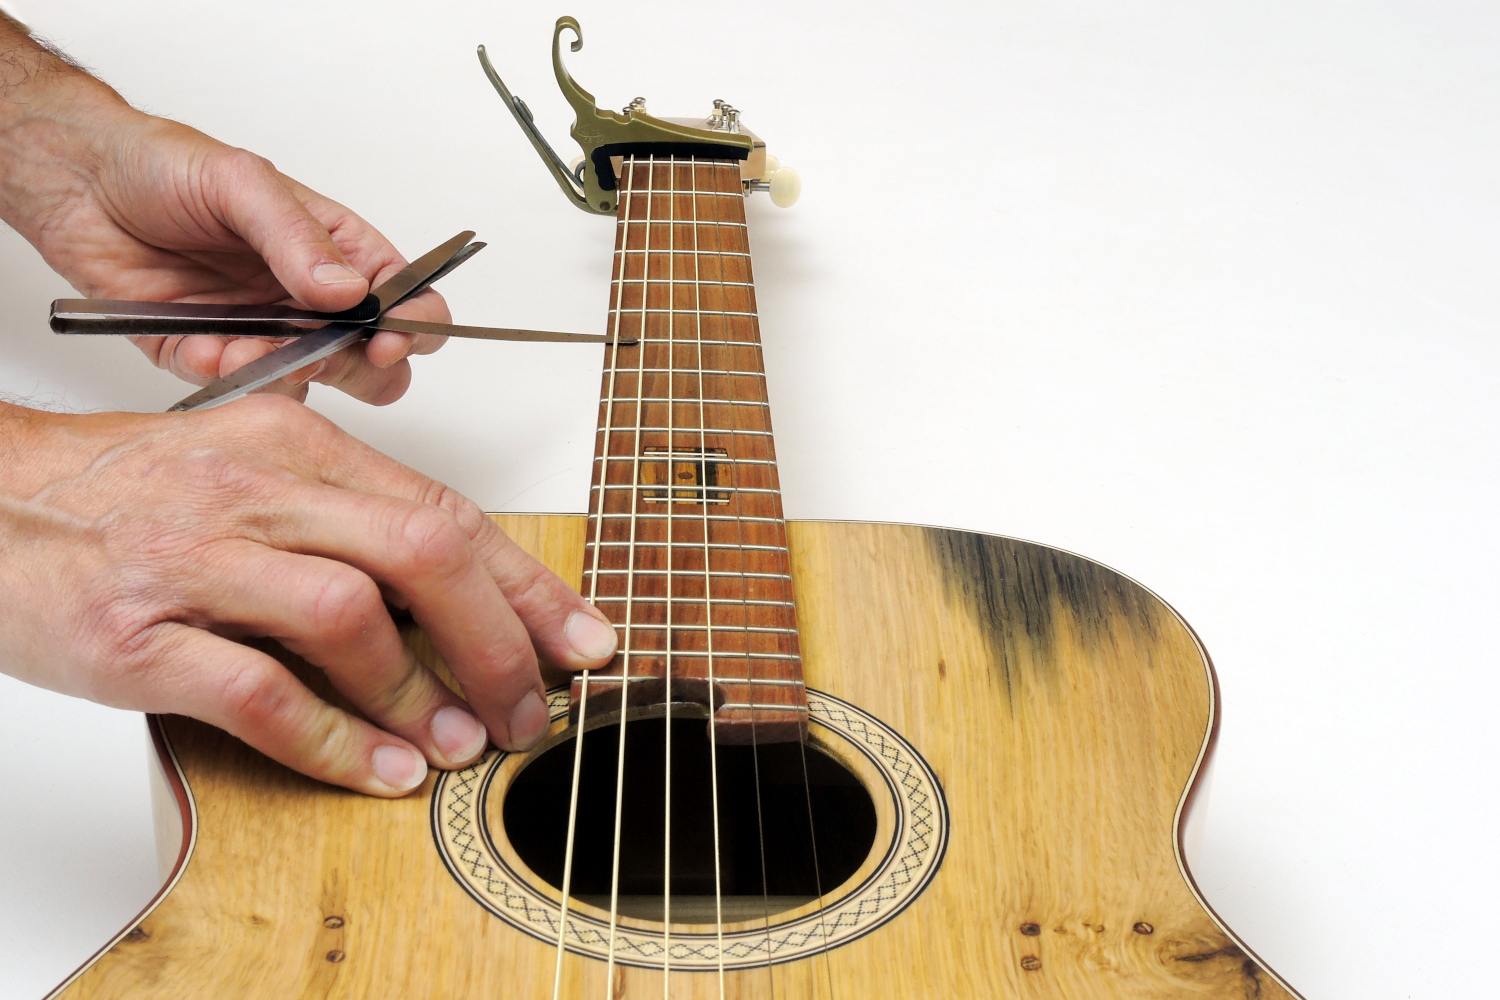
- Capo: A capo is useful for holding down the strings at a specific fret, allowing you to measure the action accurately without the interference of open string vibrations.
- Feeler Gauge: This thin, precise measuring tool is used to determine the gap between the strings and the frets. It helps in achieving consistent and accurate action measurements.
- Truss Rod Wrench: The truss rod wrench is essential for adjusting the guitar’s truss rod, which controls the neck’s relief. This tool allows you to fine-tune the neck’s curvature, affecting the action and playability of the instrument.
- Saddle Adjustment Tools: Depending on the type of bridge on your acoustic guitar, you may need specialized tools to adjust the saddle height. For guitars with adjustable saddles, a screwdriver or hex key may be required. For traditional glued-in saddles, sandpaper and a straightedge are necessary for sanding and leveling.
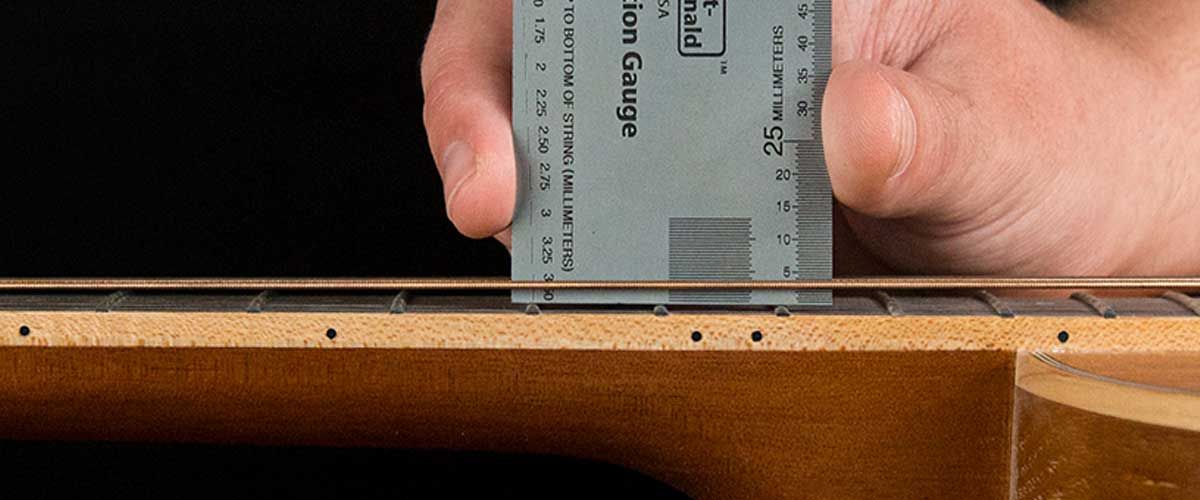
- Action Ruler or Gauge: An action ruler or gauge provides precise measurements for the string height at various points along the fretboard. This tool is indispensable for accurately assessing and adjusting the action.
- String Winder and Cutter: While not directly related to action adjustment, a string winder and cutter are essential for efficiently changing strings. Fresh strings can have an impact on the action, so it’s beneficial to have these tools on hand.
Having these tools readily available ensures that you can measure and adjust the action on your acoustic guitar with accuracy and confidence. It’s important to use the right tools for the job to avoid potential damage to the instrument and to achieve precise adjustments that enhance playability and tone.
How to Measure the Action
Measuring the action on an acoustic guitar is a crucial first step before making any adjustments. Here’s a step-by-step guide on how to measure the action accurately:
- Prepare the Guitar: Start by ensuring that the guitar is in playing condition, with the strings tuned to their standard pitch. This ensures that the measurements are accurate and relevant to actual playing conditions.
- Position the Guitar: Place the guitar on a flat surface or in a playing position, ensuring that it is stable and does not move during the measurement process.
- Use a Capo: Place a capo on the first fret of the guitar to hold down the strings, effectively eliminating the nut from the measurement process. This allows for more consistent and accurate measurements.
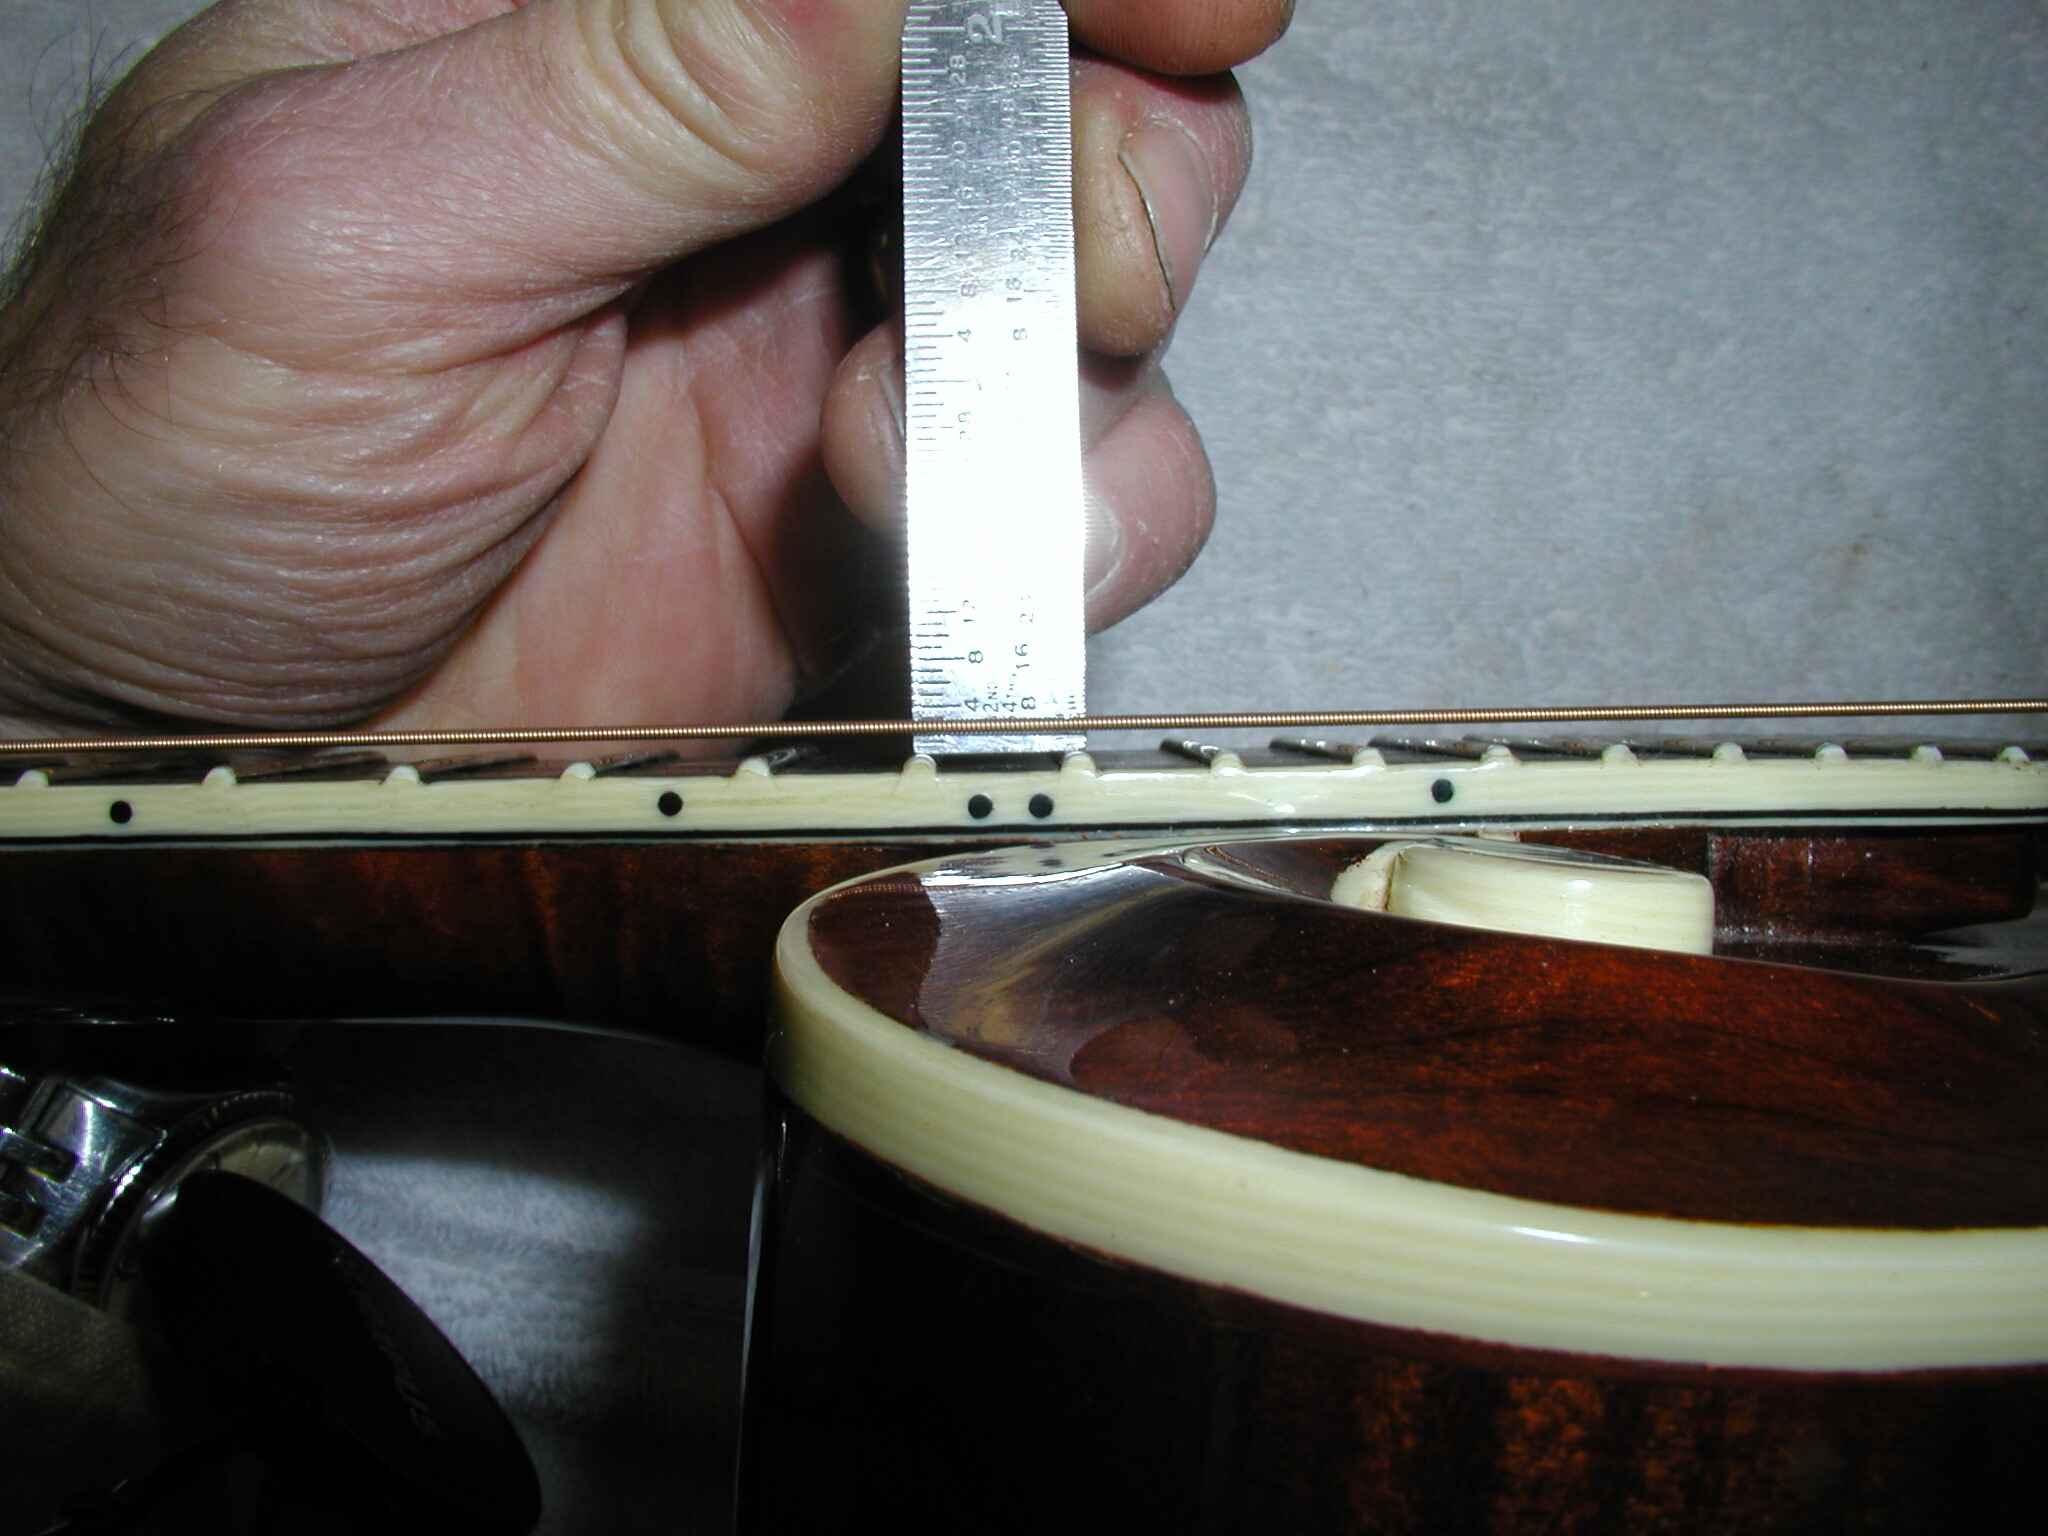
- Measure at the 12th Fret: Using a feeler gauge or action ruler, measure the distance between the bottom of the strings and the top of the 12th fret. This measurement represents the action at the 12th fret, a critical point that significantly influences playability and intonation.
- Check Other Frets: While the 12th fret is a primary point of measurement, it’s essential to check the action at other frets as well. Some players prefer a slight increase in action towards the higher frets to prevent fret buzz during aggressive playing.
- Record the Measurements: Take note of the action measurements at various frets, ensuring that you have a clear understanding of the current setup before proceeding with any adjustments.
By following these steps, you can accurately measure the action on your acoustic guitar, providing a baseline for any necessary adjustments. It’s important to be meticulous in the measurement process, as small discrepancies can have a significant impact on playability and tone.
Adjusting the Truss Rod
The truss rod is a vital component of an acoustic guitar’s neck structure, responsible for maintaining the neck’s relief or curvature. Adjusting the truss rod can directly impact the action of the guitar, making it a crucial step in achieving optimal playability. Here’s a guide to adjusting the truss rod on an acoustic guitar:
- Assess the Neck Relief: Before making any adjustments, evaluate the neck relief by sighting down the edge of the fretboard. Ideally, there should be a slight but visible curvature, allowing for the necessary string clearance without causing fret buzz.
- Use the Right Tool: Locate the truss rod adjustment nut, typically located inside the soundhole or at the headstock. Use the appropriate truss rod wrench to make adjustments, ensuring that the tool fits the nut securely to avoid slippage and potential damage.
- Follow the Manufacturer’s Guidelines: Refer to the guitar’s manual or the manufacturer’s specifications for guidance on truss rod adjustments. Different guitars may have specific recommendations regarding the direction and amount of adjustment needed.
- Make Incremental Adjustments: When adjusting the truss rod, make small, incremental turns, typically in quarter or half-turn increments. Allow time for the neck to settle after each adjustment before reassessing the relief and action.
- Check the Action: After making truss rod adjustments, measure the action again to determine if the changes have yielded the desired results. Be mindful of the impact on the neck relief and overall playability.
- Seek Professional Assistance if Unsure: If you are uncertain about adjusting the truss rod or encounter resistance during the process, it’s advisable to seek assistance from a qualified guitar technician to avoid potential damage to the instrument.
Adjusting the truss rod requires careful consideration and attention to detail, as it directly influences the guitar’s playability and structural integrity. By following the recommended procedures and exercising caution, you can effectively optimize the neck relief and action to suit your playing preferences.
Adjusting the Saddle Height
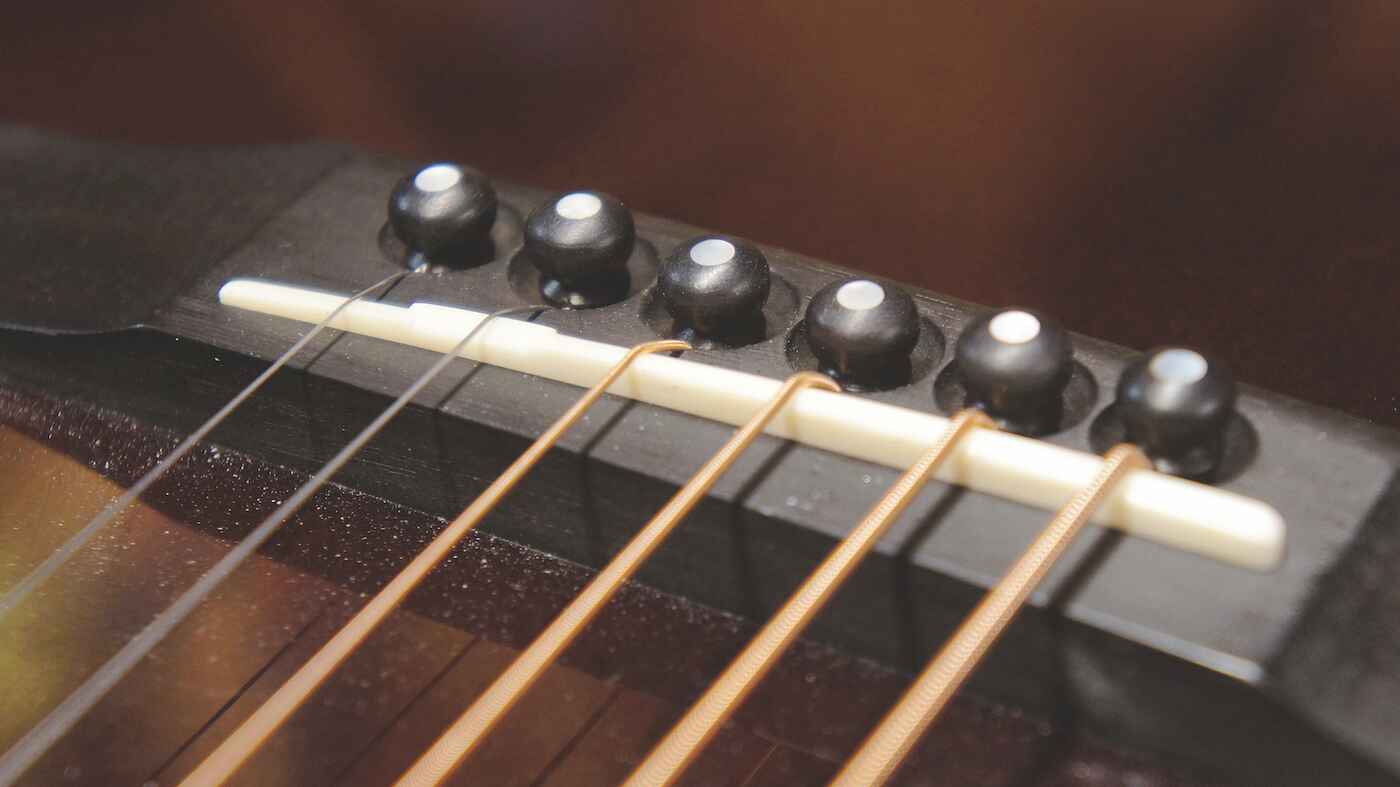
The saddle of an acoustic guitar serves as a crucial point of contact for the strings, directly impacting the action and intonation of the instrument. Adjusting the saddle height allows for precise control over the string action, enabling players to tailor the guitar’s playability to their preferences. Here’s a comprehensive guide to adjusting the saddle height on an acoustic guitar:
- Determine the Desired Action: Before making any adjustments, consider the desired action height based on your playing style and comfort. A lower action facilitates easier fretting and faster playing, while a slightly higher action may enhance sustain and resonance.
- Choose the Right Tools: Depending on the type of saddle your guitar has, you may need specific tools such as a screwdriver, hex key, sandpaper, or a specialized saddle adjustment tool.
- Remove the Saddle: If your guitar’s saddle is removable, carefully lift it out of the bridge slot. Take note of its original position and orientation to ensure proper reinstallation.
- Adjust the Saddle Height: For guitars with adjustable saddles, use the appropriate tool to raise or lower the saddle, making incremental adjustments to achieve the desired action height. For guitars with fixed saddles, sanding the bottom of the saddle can lower its height, while shimming it with a thin piece of material can raise it.
- Reinstall and Test: Once the saddle height is adjusted, carefully reinstall the saddle, ensuring that it sits securely in the bridge slot. Tune the guitar to pitch and test the playability and intonation across the fretboard.
- Seek Professional Assistance if Needed: If you encounter challenges or are uncomfortable making significant saddle height adjustments, it’s advisable to consult a skilled guitar technician to ensure that the modifications are carried out effectively and without compromising the guitar’s structural integrity.
Adjusting the saddle height demands precision and careful consideration, as it directly influences the action and playability of the guitar. By understanding the impact of saddle adjustments and following recommended procedures, players can effectively customize their acoustic guitars to achieve optimal playability and tone.
Checking the Nut Height
The nut of an acoustic guitar plays a crucial role in determining the action at the lower end of the fretboard. Checking the nut height is essential for ensuring consistent and comfortable playability across the entire fretboard. Here’s a detailed guide on how to check the nut height on an acoustic guitar:
- Evaluate the Current Action: Before assessing the nut height, measure the action at the first fret using a feeler gauge or action ruler. This initial measurement provides a baseline for determining any necessary adjustments to the nut height.
- Inspect the Nut Slot: Examine the nut slot to ensure that it is clean and free from debris that may affect the accuracy of the measurement. A clear and properly seated nut is essential for obtaining precise measurements.
- Use a Feeler Gauge: Place an appropriate feeler gauge, typically under the E string, to measure the gap between the bottom of the string and the top of the first fret. This measurement indicates the nut height and allows for comparisons with the desired action specifications.
- Assess String Height Discrepancies: Check the nut height for each string, as inconsistencies may exist due to wear or improper seating. Identifying any discrepancies enables targeted adjustments to achieve uniform string height and playability.
- Consider Professional Assistance if Needed: If the nut height measurements reveal significant discrepancies or if adjustments are required, it’s advisable to seek assistance from a skilled guitar technician to ensure that the nut is properly adjusted without compromising its structural integrity.
Checking the nut height is a critical aspect of maintaining optimal playability and ensuring that the guitar’s action is consistent and comfortable across the fretboard. By carefully assessing the nut height and addressing any discrepancies, players can enhance the overall playability and performance of their acoustic guitars.
Final Thoughts
Adjusting the action on an acoustic guitar is a skill that empowers players to tailor their instruments to their unique preferences and playing styles. By understanding the significance of action adjustments and following the proper procedures, guitarists can achieve optimal playability, tone, and overall performance. Whether it’s fine-tuning the truss rod to optimize neck relief, adjusting the saddle height for precise string action control, or assessing the nut height for consistent playability, each step contributes to the instrument’s overall playability and sonic potential.
It’s important to approach action adjustments with patience and attention to detail, as small changes can have a significant impact on the guitar’s playability and sound. Regularly checking and maintaining the action ensures that the instrument remains responsive and comfortable to play, adapting to the player’s evolving needs and environmental conditions.
Furthermore, seeking professional assistance when uncertain about making adjustments can prevent potential damage to the instrument and ensure that the modifications are carried out effectively. A skilled guitar technician can provide valuable insights and expertise, guiding players through the process of optimizing their guitar’s action for an enhanced playing experience.
Ultimately, the art of adjusting the action on an acoustic guitar is a journey of exploration and customization, allowing players to unlock the full potential of their instruments and create music that resonates with their unique style and expression. By mastering the techniques and principles of action adjustments, guitarists can elevate their playing experience and unleash the true capabilities of their acoustic guitars.