Introduction
Welcome to our guide on how to lower the action on an acoustic guitar. If you’re a guitar player, you know that the action – the distance between the strings and the fretboard – plays a crucial role in the playability and comfort of your instrument. However, if your guitar’s action is too high, it may cause discomfort and hinder your ability to play smoothly.
In this article, we will walk you through the process of lowering the action on your acoustic guitar. You’ll learn why you might want to lower the action, the tools and equipment you’ll need, and a step-by-step guide to effectively adjust the action to your desired level.
Lowering the action on an acoustic guitar can improve your playing experience by making it easier to fret notes and chords, reducing finger fatigue, and enhancing the overall tone and intonation of the instrument. Whether you’re a beginner or an experienced guitarist, knowing how to adjust the action on your guitar can help you achieve a more enjoyable and satisfying playing experience.
While it may seem daunting at first, with proper guidance and a bit of practice, you can successfully lower the action on your acoustic guitar. So, let’s dive in and learn how to enhance the playability of your instrument!
What is Action on Acoustic Guitar?
Before we delve into the process of lowering the action on an acoustic guitar, it’s important to understand what exactly we mean by “action.” In simple terms, action refers to the distance between the strings and the fretboard of the guitar.
A higher action means the strings are farther away from the fretboard, requiring more effort to press them down and produce clean notes. Conversely, a lower action means the strings are closer to the fretboard, making it easier to fret notes and chords with less pressure.
The action of an acoustic guitar is typically determined by the guitar’s saddle and the nut. The saddle, located at the bridge, holds the strings in place and can be adjusted vertically to alter the action. The nut, located at the top of the fretboard, also affects the action and can be adjusted horizontally.
It’s important to note that the action of a guitar is a matter of personal preference. Some players prefer a higher action for a louder and more resonant tone, while others prefer a lower action for faster and more comfortable playing. Finding the right balance is crucial to suit your playing style and achieve optimal playability.
The ideal action for an acoustic guitar can vary depending on factors such as string gauge, playing style, and personal preference. Generally, a moderate action that allows for easy fretting without excessive string buzz is considered a good starting point.
Now that we’re familiar with the concept of action on an acoustic guitar, let’s explore why you might want to lower the action and improve your guitar’s playability.
Why Would You Want to Lower the Action?
The action on an acoustic guitar is a significant factor in determining the overall playability and comfort of the instrument. While some players may prefer a higher action for specific reasons, there are several compelling reasons why you might want to lower the action on your acoustic guitar:
1. Easier Fretting: Lowering the action reduces the distance between the strings and the fretboard, making it easier to press down the strings and fret notes and chords. This can greatly enhance the speed and accuracy of your playing, especially during complex or fast passages.
2. Reduced Finger Fatigue: High action can require more pressure to fret notes, leading to increased finger fatigue during prolonged playing sessions. By lowering the action, you can alleviate unnecessary strain on your fingers and play comfortably for longer periods.
3. Improved Intonation: Lowering the action can contribute to better intonation, ensuring that your guitar plays in tune across the entire fretboard. When the action is too high, it can result in notes sounding sharp or flat, making it challenging to achieve clean and accurate playing.
4. Enhanced Tone: Lowering the action can improve the tone of your acoustic guitar by promoting better string-to-fretboard contact. This can result in a more vibrant and resonant sound, allowing your guitar to reach its full potential.
5. Optimized Playing Style: Different playing styles, such as fingerpicking or aggressive strumming, may benefit from a lower action that accommodates the specific demands of those techniques. Lowering the action can make it easier to execute intricate fingerpicking patterns or achieve a more dynamic and responsive strumming sound.
6. Increased Playability for Beginners: Lowering the action is particularly beneficial for beginner guitarists who are still developing finger strength and dexterity. By making the guitar easier to play, beginners can focus on learning proper technique and building their skills without unnecessary physical obstacles.
Remember that adjusting the action on an acoustic guitar requires careful consideration and, in some cases, professional assistance. It’s important to find the right balance between playability, desired tone, and your specific playing style. With a little effort and experimentation, you can achieve a more enjoyable and effortless playing experience by lowering the action on your acoustic guitar.
Tools and Equipment You May Need
Lowering the action on an acoustic guitar requires a few specific tools and equipment to ensure a safe and effective adjustment. Here are some essential items you may need:
1. Truss Rod Wrench: This is a specialized wrench used to adjust the truss rod, which controls the neck relief of the guitar. The truss rod helps to counteract the tension of the strings and maintain the proper curvature of the neck.
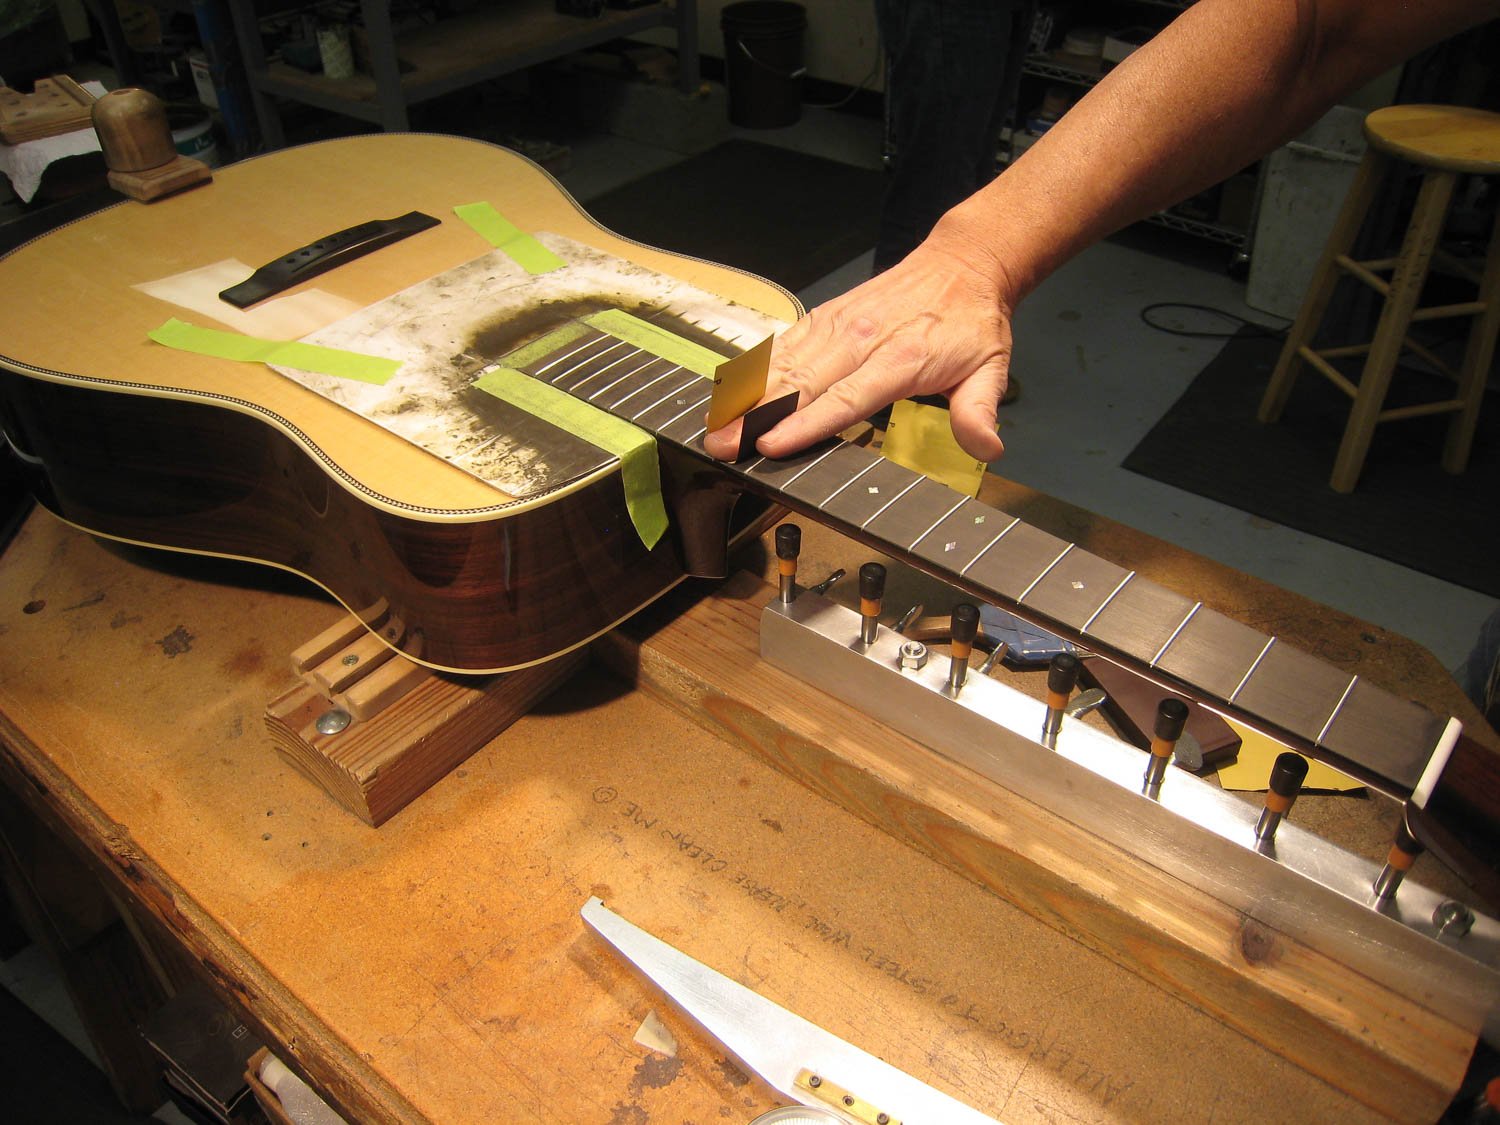
2. Saddle Sanding Block: A saddle sanding block or sandpaper can be used to gently sand down the bottom of the saddle, which is located on the bridge of the guitar. This allows you to lower the action by reducing the height of the saddle.
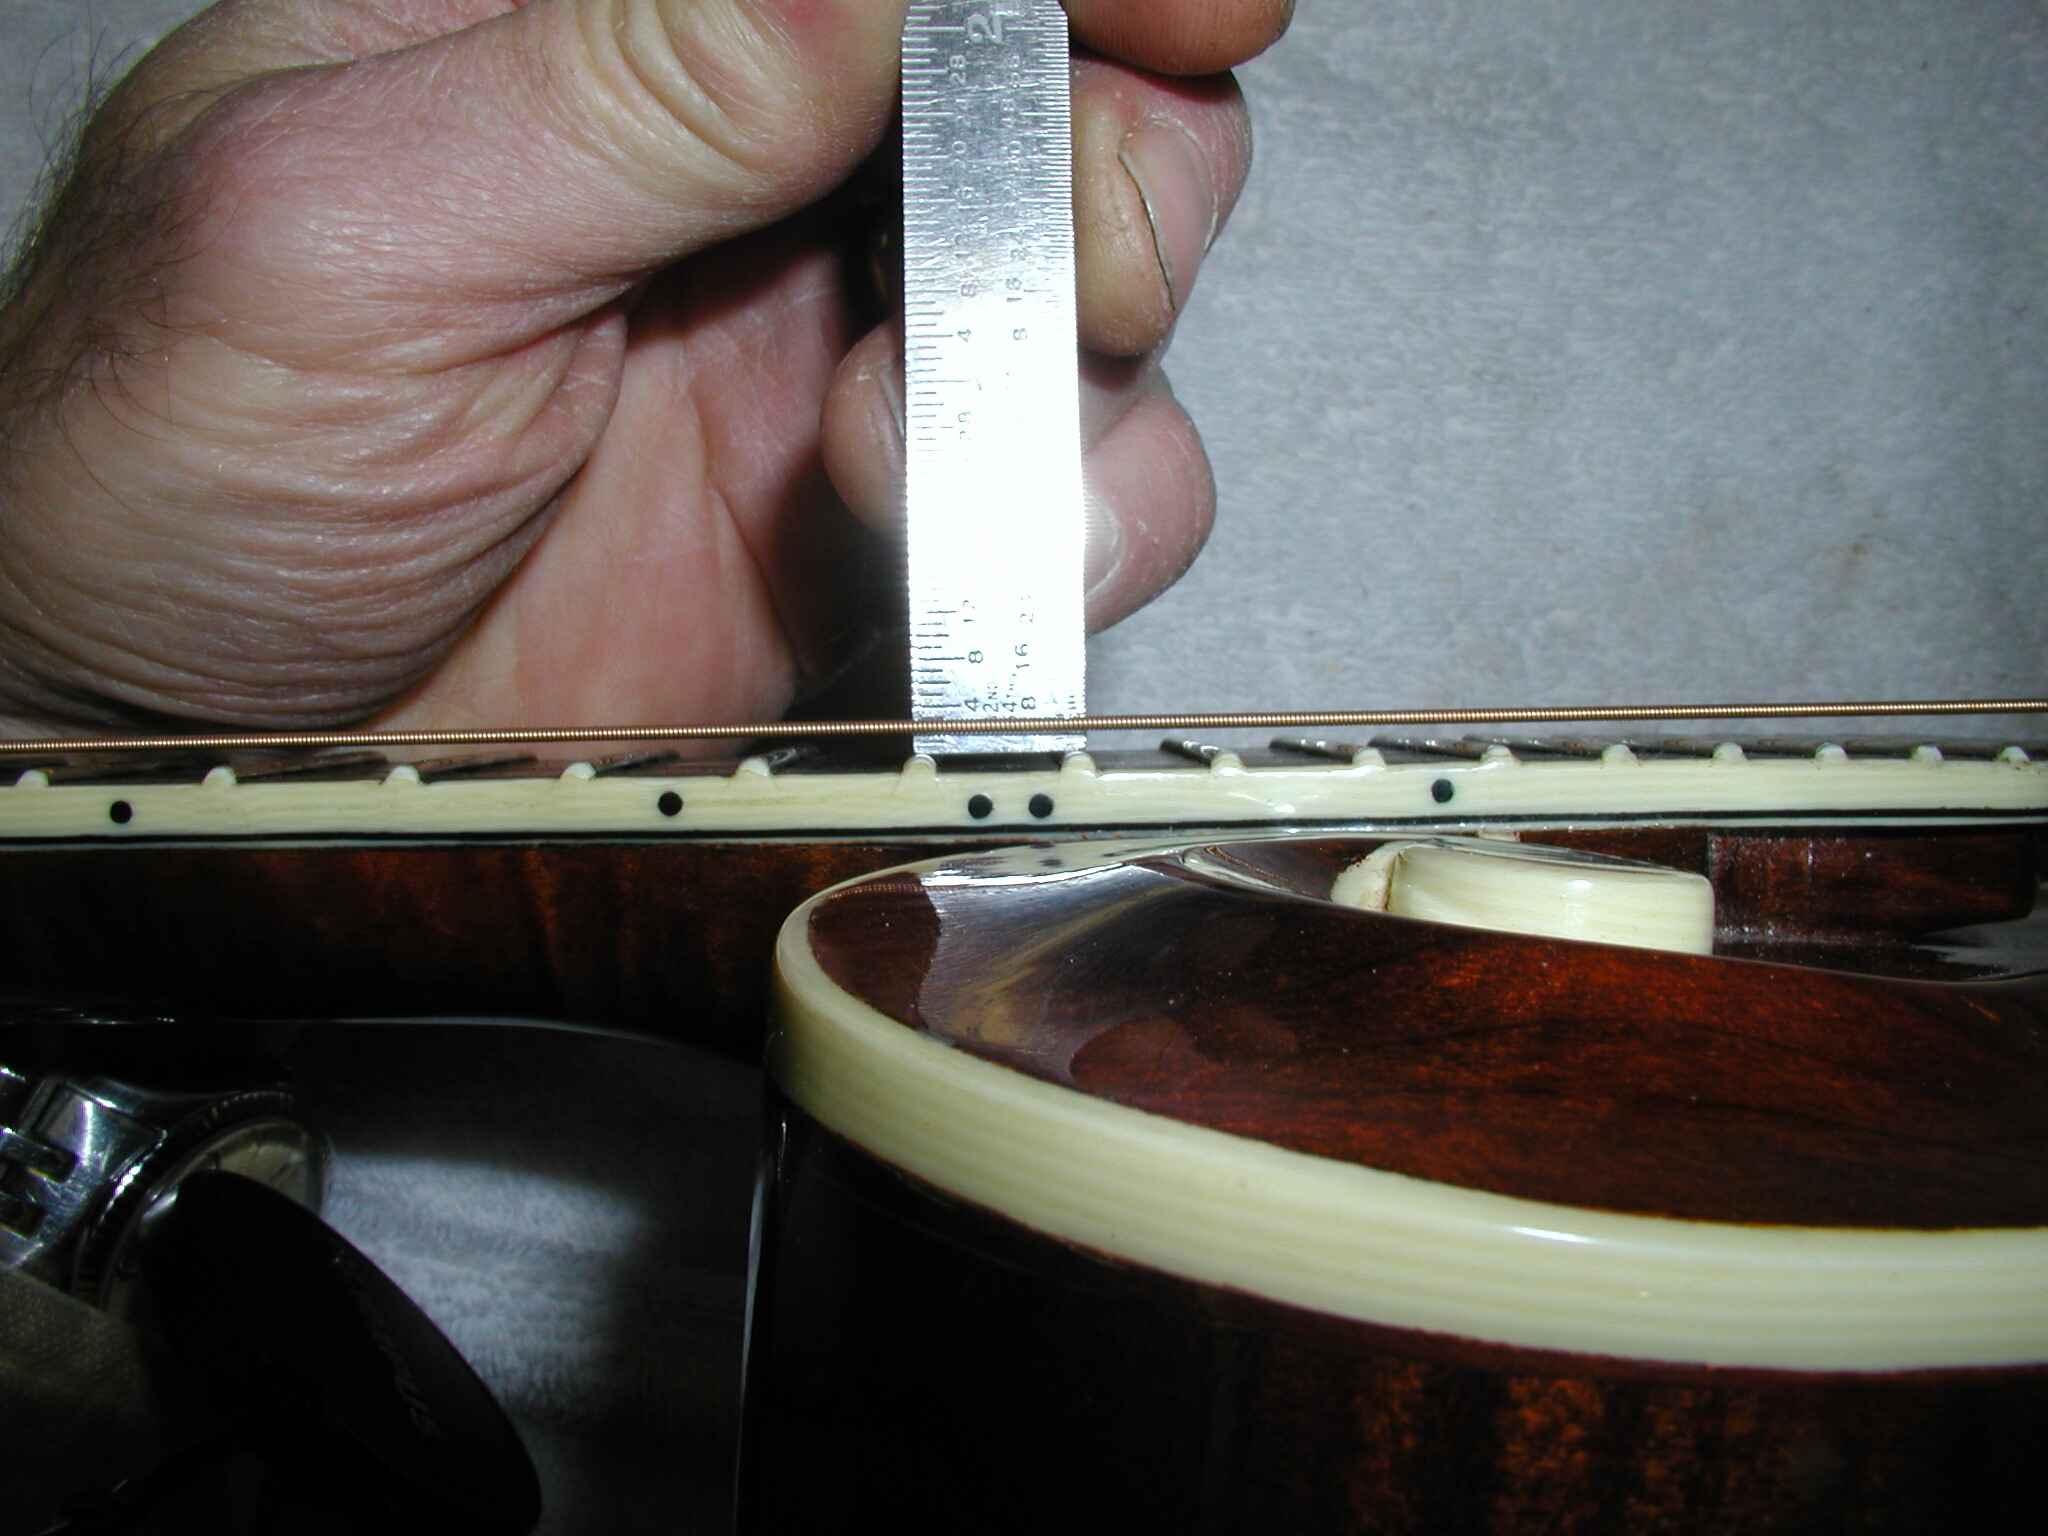
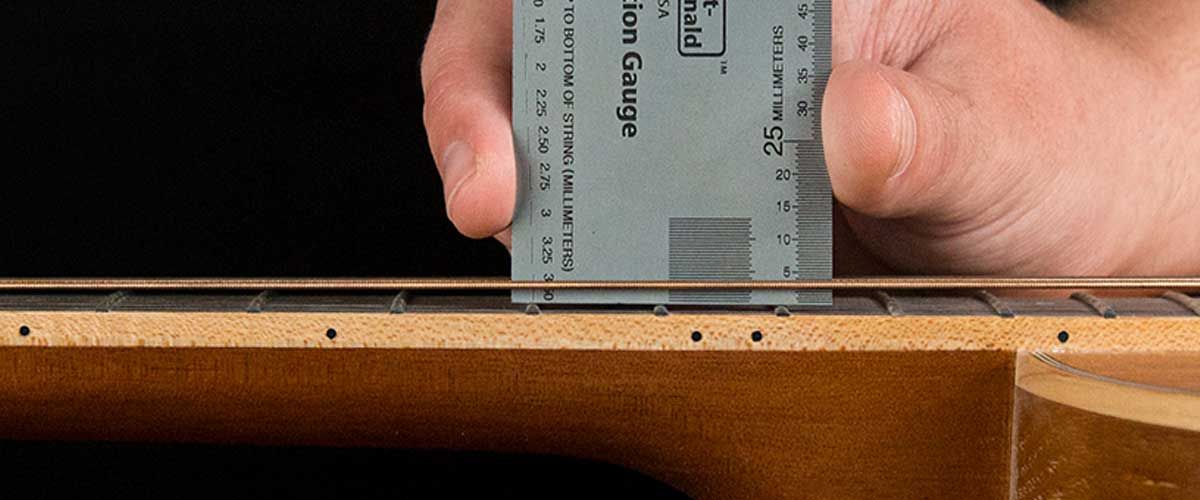
3. Feeler Gauge: A feeler gauge is a thin strip of metal used to measure the gap between the strings and the frets. It helps you determine the current action and make precise adjustments.
4. Nut Files: If you need to lower the action at the nut, nut files are essential tools. These specialized files allow you to file the slots in the nut to the desired height.
5. Ruler or Straight Edge: A ruler or straight edge is useful for checking the straightness of the neck and measuring the action at different points along the fretboard.
6. Microfiber Cloth: A soft and lint-free microfiber cloth is handy for wiping down the guitar and cleaning any dust or debris during the adjustment process.
7. Capo: While not necessarily essential, a capo can help you simulate playing conditions and assess the action at different fret positions.
It’s worth noting that the specific tools needed may vary depending on the type and brand of your acoustic guitar. If you’re unsure about which tools to use or how to proceed, it’s always a good idea to consult with a professional guitar technician who can guide you through the process and ensure the proper adjustments are made.
Remember to handle your guitar and the tools with care to avoid any damage. Additionally, it’s important to follow proper safety precautions and take your time when making adjustments to ensure the best possible outcome. With the right tools and equipment at your disposal, you’ll be well-prepared to lower the action on your acoustic guitar and improve its playability according to your preferences.
Step-by-step Guide to Lower the Action on an Acoustic Guitar
Lowering the action on an acoustic guitar requires careful adjustments to the saddle and nut, as well as potential tweaks to the truss rod. Here is a step-by-step guide to help you through the process:
1. Assess the Current Action: Before making any adjustments, it’s essential to evaluate the current action of your guitar. Use a ruler or straight edge to measure the distance between the strings and the fretboard at different points along the neck.
2. Loosen the Strings: Begin by loosening the strings to relieve tension on the guitar. This will make it easier to adjust the saddle and nut without causing damage.
3. Adjust the Saddle: If you need to lower the action at the bridge, remove the saddle from the bridge by gently lifting it out. Use a saddle sanding block or sandpaper to shave off small amounts from the bottom of the saddle. Proceed gradually, checking the action after each adjustment, to avoid removing too much material.
4. Adjust the Nut: If you need to lower the action at the nut, carefully file the slots using nut files. Take care to file each slot evenly to ensure proper string height. Again, make small adjustments and test the action as you go.
5. Check Neck Relief: Use the truss rod wrench to assess the neck relief. Turning the truss rod clockwise typically increases the neck’s backward bow, while turning it counterclockwise increases the forward bow. Make adjustments as necessary, ensuring to follow the manufacturer’s guidelines and aim for a slight relief in the neck.
6. Re-tune and Test: Once you’ve made the necessary adjustments, re-tune the guitar and test the action by playing a few chords and notes throughout the fretboard. Pay attention to any unwanted buzzing or string dampening and make additional adjustments if needed.
7. Fine-tune as Necessary: If you’re still not satisfied with the action, you may need to repeat the process, making smaller adjustments to achieve the desired playability. Remember, making small increments is preferable to avoid going too far.
It’s important to note that adjusting the action on an acoustic guitar requires patience and proper technique. If you’re unsure or uncomfortable with the process, it’s always best to seek assistance from a professional guitar technician. They can offer expertise and ensure the adjustments are made correctly, minimizing the risk of damage to your instrument.
By following this step-by-step guide, you’ll be able to lower the action on your acoustic guitar, ultimately improving its playability and making it more comfortable to play. Take your time and enjoy the journey of customizing your guitar to suit your unique playing style and preferences.
Fine-tuning and Testing
After adjusting the action on your acoustic guitar, it’s essential to fine-tune and test the instrument to ensure optimal playability. Fine-tuning can help eliminate any remaining issues and make small adjustments to achieve your desired playing experience. Here are some steps to follow:
1. Re-Tune the Guitar: After making adjustments to the action, re-tune the guitar to ensure that all strings are at the correct pitch. This step is crucial as lowering the action can affect the tension on the strings.
2. Test Playability: Play a variety of chords, scales, and techniques across different frets to test the playability of the guitar. Pay attention to any buzzing or unwanted string dampening. If you encounter buzzing, it may indicate that the action is too low and needs slight adjustment.
3. Check Intonation: Use a tuner to check the intonation of the guitar. Play harmonics at the 12th fret and compare them to the fretted notes at the same position. If there is a significant difference in pitch, you may need to make adjustments to the saddle or seek professional assistance to ensure proper intonation.
4. Assess String Height: Use a ruler or feeler gauge to measure the distance between the strings and the frets along the fretboard. Make sure the string height is consistent across the neck to ensure uniform playability.
5. Make Further Adjustments (if needed): If you encounter issues such as buzzing or discomfort at specific frets or strings, you may need to make additional adjustments. Take small, incremental steps to fine-tune the action until you achieve the desired playability.
6. Seek Professional Help (if necessary): If you’re unsure about your adjustments or if you encounter persistent issues, it’s advisable to consult with a professional guitar technician. They can offer their expertise and make any necessary adjustments to ensure optimal playability.
Remember, finding the perfect action for your acoustic guitar may require some experimentation and personal preference. It’s important to strike a balance between low action for ease of playing and avoiding excessive buzzing or fret noise. Take the time to fine-tune and test your guitar until you achieve a comfortable and enjoyable playing experience.
By following these steps and periodically monitoring the playability of your acoustic guitar, you can ensure that it remains properly adjusted for optimal performance. Regularly checking and adjusting the action as needed will help maintain a consistent and enjoyable playing experience over time.
Precautions and Tips for Lowering Action
Lowering the action on an acoustic guitar requires careful attention and a methodical approach. While it can significantly improve playability, it’s crucial to take precautions to avoid damaging your instrument. Here are some precautions and tips to keep in mind:
1. Go Slow: Make small adjustments at a time. It’s better to take gradual steps and reassess the playability after each adjustment rather than making drastic changes that may be difficult to undo.
2. Measure Twice: Use a ruler or feeler gauge to measure the action at different points along the fretboard. This ensures that the action remains consistent across all frets and avoids any unwanted buzzing or string dampening.
3. Give Strings Time to Adjust: After making any adjustments to the action, allow the guitar strings to settle and stretch before reassessing playability. This usually takes a few hours or even a day, depending on the type and brand of strings.
4. Consult Manufacturer Guidelines: Refer to the manufacturer’s guidelines or consult the guitar’s manual for specific recommendations on adjusting the action. Different guitar models may have unique considerations or requirements.
5. Consider Professional Assistance: If you lack experience or feel unsure about making adjustments on your own, it’s highly recommended to seek help from a professional guitar technician. They have the expertise and specialized tools to make precise adjustments without risking damage to the instrument.
6. Avoid Excessive Neck Relief: When adjusting the truss rod, be cautious not to over-adjust. Excessive backward or forward bow in the neck can lead to fret buzzing or even permanent damage. Follow the manufacturer’s guidelines and make gentle adjustments as needed.
7. Monitor Intonation: Lowering the action can sometimes affect your guitar’s intonation. Regularly check and fine-tune the intonation using a tuner to ensure accurate pitch across the fretboard.
8. Protect Your Guitar: Use a clean, soft cloth to protect the guitar’s finish while making adjustments. Avoid using excessive force or applying pressure that could lead to scratches or damage to the body, neck, or fretboard.
9. Keep Track of Adjustments: Make note of the adjustments you make and any corresponding changes in playability. This will help you maintain a record of the adjustments and ensure consistency over time.
10. Regular Maintenance: After lowering the action, continue to monitor the playability of your guitar. Wood can expand or contract with changes in humidity and temperature, potentially affecting the action. Regular maintenance and adjustments may be necessary to maintain optimal playability.
By following these precautions and tips, you can safely and effectively lower the action on your acoustic guitar. Remember, if you’re uncertain about any aspect of the adjustment process, it’s always wise to seek guidance from a professional guitar technician who can provide expert assistance.
Frequently Asked Questions about Lowering Action on Acoustic Guitar
Lowering the action on an acoustic guitar can be a complex process, and it’s natural to have questions. Here are some common questions that guitar players often ask about lowering the action:
1. Is it possible to lower the action on my acoustic guitar without professional help?
Yes, it’s possible to lower the action on your acoustic guitar without professional help. However, it requires careful attention and proper tools. If you’re unsure about the process or lack experience, it’s best to consult a professional guitar technician.
2. Can I lower the action without affecting the guitar’s intonation?
Lowering the action can sometimes affect the guitar’s intonation. When making adjustments, it’s important to regularly check and fine-tune the intonation using a tuner. Proper adjustments to the saddle and nut can mitigate any intonation issues that may arise.
3. Will lowering the action improve the playability of my guitar?
Lowering the action can significantly improve the playability of your guitar. It can make it easier to fret notes and chords, reduce finger fatigue, and enhance overall responsiveness and comfort while playing.
4. How much should I lower the action on my acoustic guitar?
The amount you should lower the action depends on personal preference and playing style. It’s recommended to start with small adjustments and assess the playability after each adjustment. Aim for a moderate action that allows for easy fretting without excessive buzzing.
5. Can lowering the action cause string buzz?
Lowering the action too much or unevenly can lead to string buzz. It’s important to make gradual adjustments and regularly check the playability of your guitar. If you encounter string buzz, you may need to fine-tune the action and consider factors such as neck relief and the condition of the frets.
6. Will lowering the action affect the tone of my guitar?
Lowering the action can have a subtle impact on the tone of your guitar. It can promote better string-to-fretboard contact, resulting in improved resonance and sustain. However, the effect on tone is subjective and may vary depending on various factors, including your playing style and the design of your guitar.
7. Can I undo the adjustments if I’m not satisfied with the lower action?
Yes, adjustments to the action can be reversed. However, it’s recommended to make gradual changes and carefully assess the playability after each adjustment to avoid going too far. If you’re unsure, it’s best to seek guidance from a professional guitar technician.
Remember, every guitar is unique, and the process of lowering the action may vary depending on the guitar’s construction and individual needs. If you have further questions or concerns, don’t hesitate to consult with a knowledgeable guitar technician who can provide personalized advice and assistance for your specific instrument.
Conclusion
Lowering the action on an acoustic guitar can greatly enhance your playing experience by improving playability, reducing finger fatigue, and enhancing tone and intonation. While it may seem like a challenging task, with proper guidance and patience, you can successfully adjust the action to suit your preferences and playing style.
In this guide, we’ve explored the concept of action on an acoustic guitar and why you might want to lower it. We’ve discussed the tools and equipment you may need, provided a step-by-step guide to help you through the adjustment process, offered tips for fine-tuning and testing, and shared precautions to keep in mind.
Remember, as you lower the action, it’s important to make gradual adjustments, regularly evaluate playability, and be mindful of factors like neck relief, nut height, and intonation. If you’re unsure or uncomfortable with the process, seeking professional assistance from a guitar technician is always a wise decision.
By following this guide and taking the necessary precautions, you can achieve a more comfortable, enjoyable, and responsive playing experience with your acoustic guitar. Experiment, listen to your instrument, and make adjustments as needed to find the perfect balance between playability and tone.
Now it’s time to put your newfound knowledge into action and elevate your guitar playing to new heights. Happy playing!