Common Issues with 3D Printing
3D printing has revolutionized various industries with its ability to create intricate and complex objects. However, like any technology, it is not without its challenges. There are several common issues that arise during the printing process, which can lead to failed prints or low-quality output. Understanding and troubleshooting these issues can help you achieve optimal results with your 3D printer.
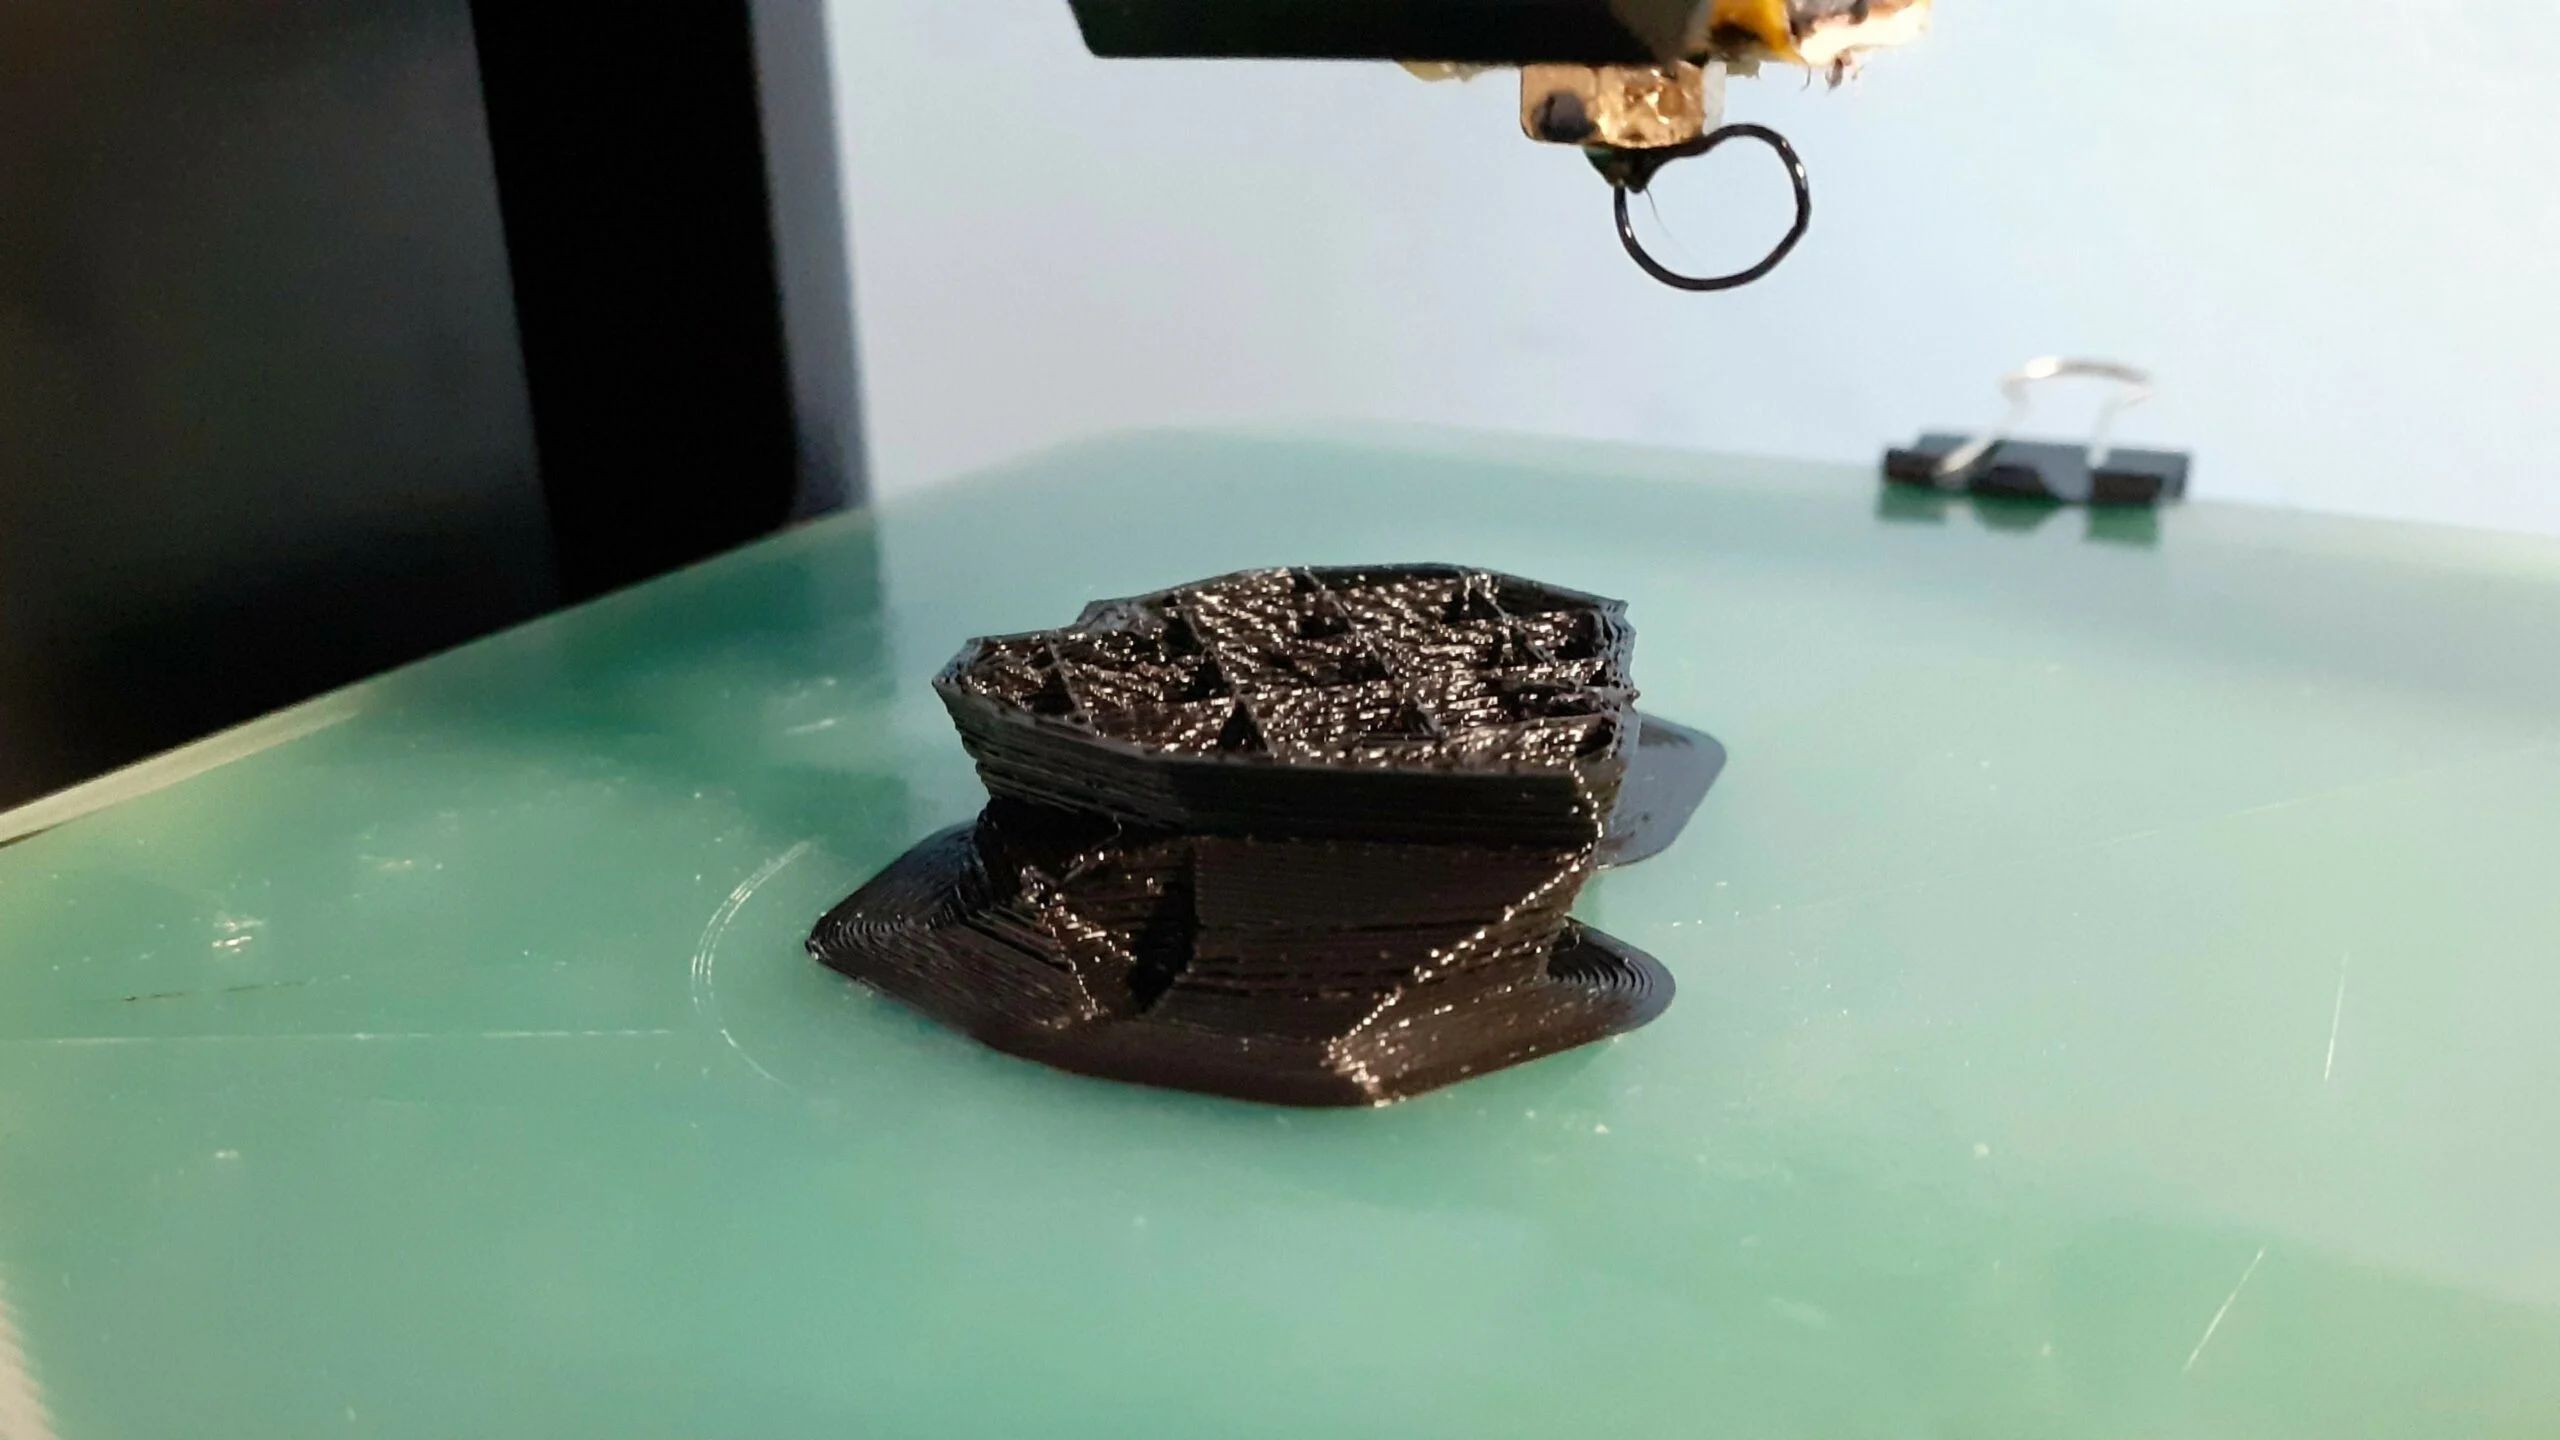
One common issue is prints not sticking to the bed. This can result in prints detaching, warping, or becoming misaligned. Another issue is the warping or curling of prints, which occurs when the edges of printed objects lift or bend upwards. Filament jamming or extruder clogging is another frustrating problem that can occur, preventing the smooth flow of filament and disrupting the printing process.
Over-extrusion or under-extrusion can also be problematic. Over-extrusion leads to excess filament being deposited, resulting in messy prints and decreased print quality. Under-extrusion, on the other hand, leads to insufficient filament being deposited, causing weak and incomplete prints.
Stringing or oozing of filament is another issue that often occurs during 3D printing. This happens when the nozzle continues to extrude filament even when it is moving between different points, causing unwanted strands or blobs. Layer shifting or misaligned layers can also occur, resulting in distorted or unsightly prints.
Poor print quality or surface finish is a concern for many 3D printer users. This issue can manifest as rough, bumpy, or uneven surfaces on printed objects, compromising the overall appearance. Additionally, calibration issues with the 3D printer can cause a range of problems, such as inaccurate dimensions, improper layer heights, or skewed prints.
Lastly, filament not feeding properly into the extruder can hinder the printing process. This can occur due to various reasons, including issues with the filament spool, improperly adjusted tension on the filament feeding mechanism, or a clogged nozzle.
Understanding these common issues is the first step towards resolving them and achieving successful 3D prints. In the following sections, we will discuss how to identify the cause of these problems and provide troubleshooting steps to overcome them.
How to Identify the Cause of the Problem
When faced with 3D printing issues, it’s crucial to identify the root cause before attempting any troubleshooting. Here are some steps to help you identify the cause of the problem:
1. Visual Inspection: Start by examining the failed print and look for any visible abnormalities or defects. Check for warping, curling, extrusion inconsistencies, or layer misalignment. This visual inspection can provide important clues about the underlying issue.
2. Review Print Settings: Check your 3D printer settings and ensure they are properly configured for the specific model and filament you are using. Look for settings related to bed temperature, nozzle temperature, print speed, layer height, and infill density. Incorrect settings can often be the cause of print problems.
3. Filament Examination: Inspect the filament itself for any irregularities. Check for tangles, knots, or moisture absorption, as these can lead to filament feed issues or poor print quality. Additionally, make sure the filament diameter matches the settings in the printer software.
4. Check Bed Leveling: Ensure that your print bed is properly leveled. An uneven print bed can lead to prints not sticking or warping issues. Use a leveling tool or perform a bed leveling calibration to ensure all areas of the bed are at the correct distance from the nozzle.
5. Clean the Printer: Dust, debris, and filament residue can accumulate on the printer components over time, leading to various issues. Regularly clean the print bed, nozzle, and extruder to maintain optimal printing conditions. Pay special attention to the extruder gears, as clogs can occur here.
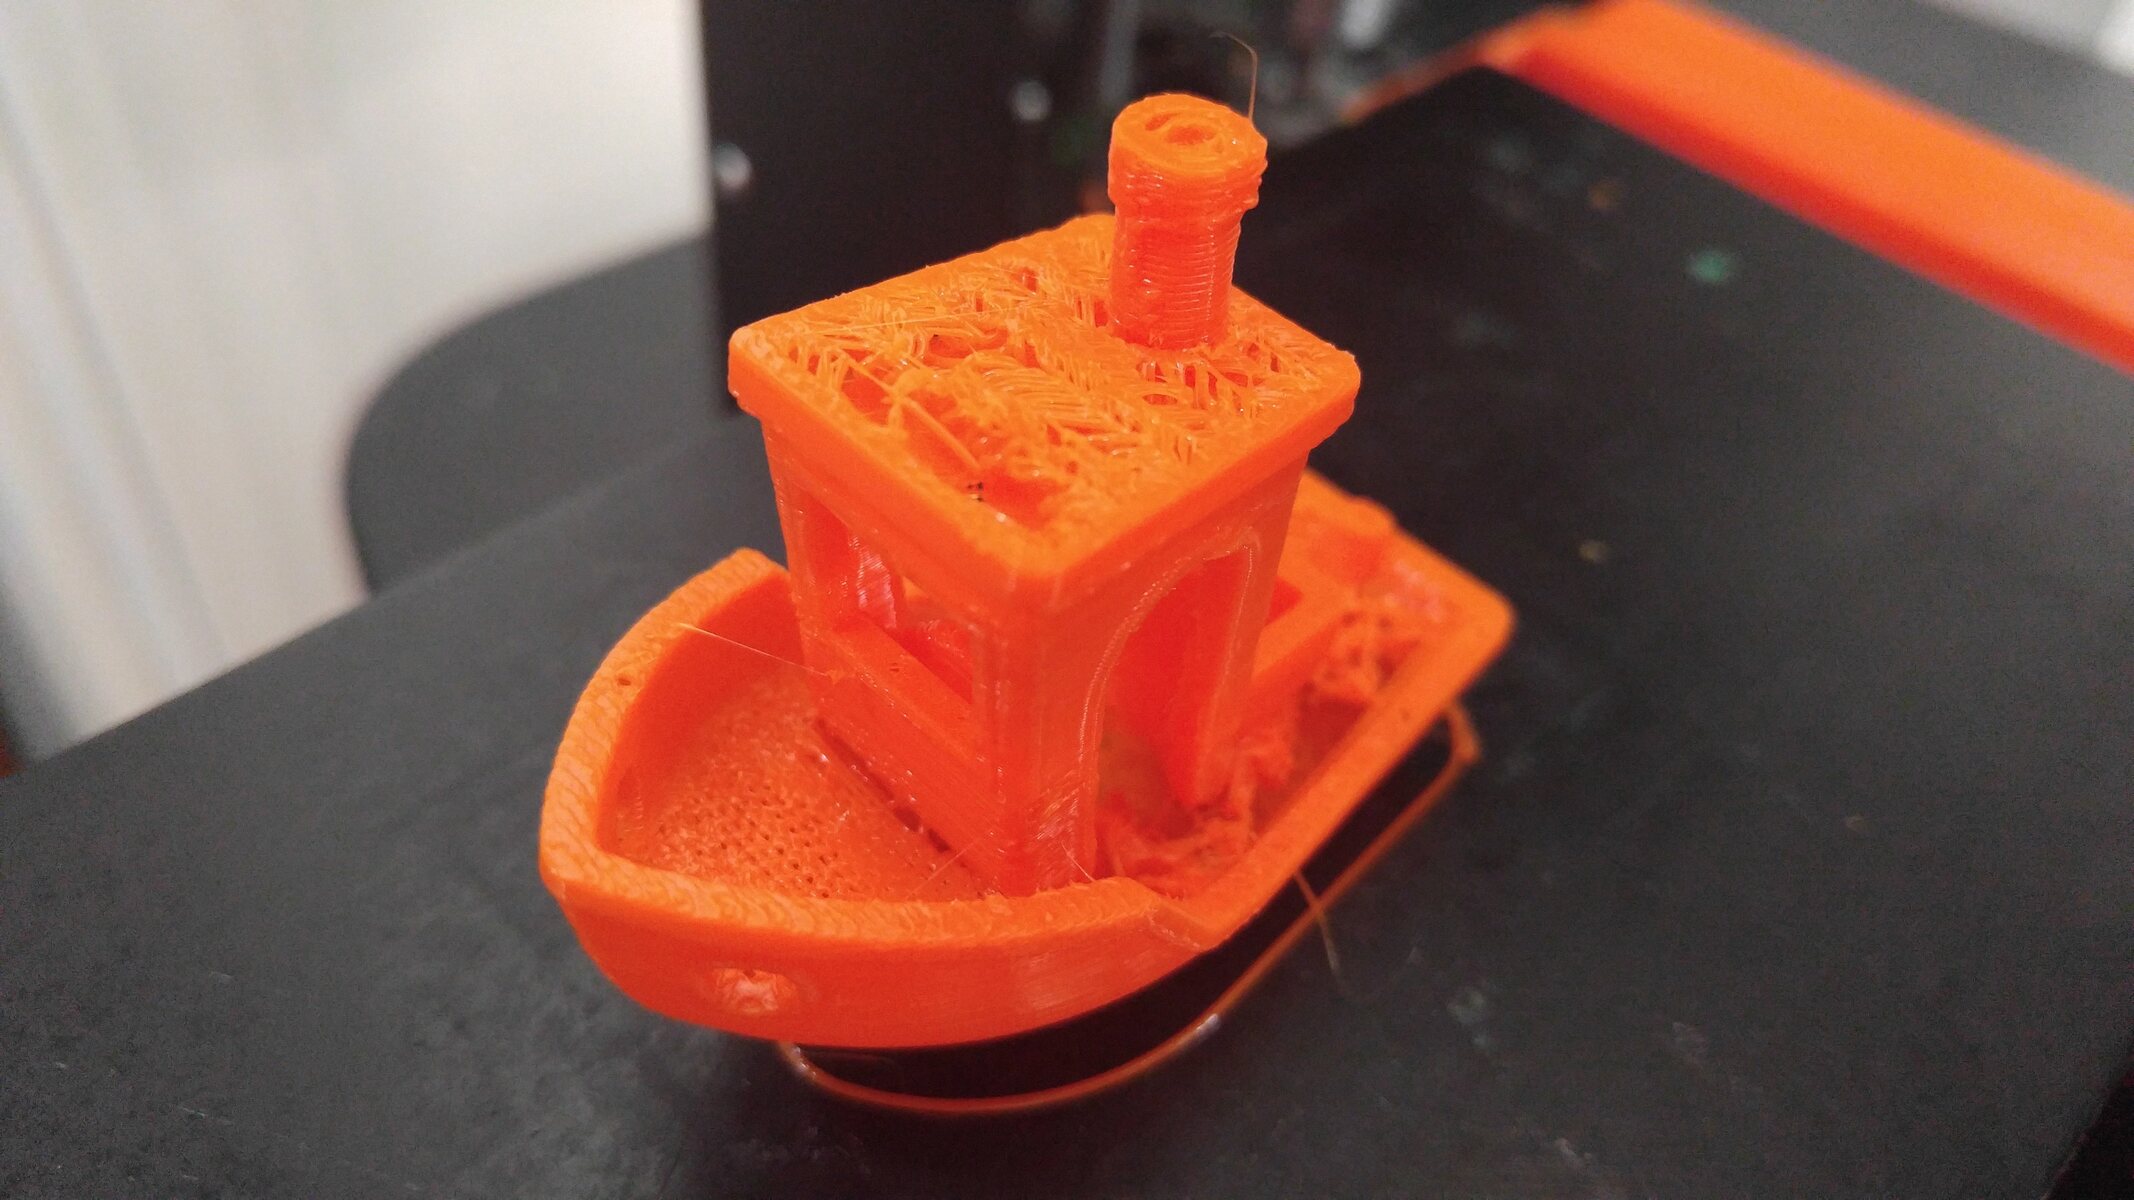
6. Print a Calibration Object: Print a calibration object, such as a calibration cube or benchy, to assess the overall print quality. This can help you identify specific issues with dimensional accuracy, over/under-extrusion, or stringing. Use the print results as a reference point for further troubleshooting.
7. Research Online Resources: If you’re still unable to identify the cause of the problem, consult online forums, user groups, or manufacturer’s documentation. These resources often contain valuable insights and solutions to common 3D printing issues.
Remember, the key to identifying the cause of the problem is careful observation and systematic diagnosis. By following these steps, you can pinpoint the issue and move on to the appropriate troubleshooting steps.
Troubleshooting Steps for Different Problems
Once you have identified the cause of the problem, it’s time to troubleshoot and resolve the issue. Here are some specific troubleshooting steps for different common problems in 3D printing:
1. Prints Not Sticking to the Bed:
- Ensure that the print bed is clean and free from any dust, oil, or residue.
- Apply an adhesive, such as glue stick or hairspray, to improve bed adhesion.
- Adjust the bed leveling to ensure proper distance between the nozzle and bed.
- Increase the bed temperature to improve filament adhesion.
2. Warping or Curling of Prints:
- Enclose the printer to create a stable temperature environment and minimize drafts.
- Use a heated bed and ensure that it’s set to the correct temperature for the filament being used.
- Apply a brim or raft to increase the surface area of the print and improve adhesion.
- Consider using a strong adhesive, such as a PET tape or specialized bed adhesives.
3. Filament Jamming or Extruder Clogging:
- Ensure that the filament is properly loaded and feeding correctly into the extruder.
- Clean the nozzle and extruder gears to remove any filament residue or debris.
- Check the filament diameter and adjust the extruder settings accordingly.
- Try increasing the nozzle temperature slightly to facilitate smoother filament flow.
4. Over-Extrusion or Under-Extrusion:
- Adjust the extruder steps per millimeter (E-steps) to ensure accurate filament extrusion.
- Check the filament diameter and update the slicer settings if necessary.
- Calibrate the extruder by measuring and adjusting the flow rate to achieve proper extrusion.
- Ensure that the nozzle size specified in the slicer software matches the actual nozzle size.
5. Stringing or Oozing of Filament:
- Optimize retraction settings in the slicer software to minimize filament stringing.
- Increase travel speed between print areas to reduce the time for filament oozing.
- Consider enabling the “coasting” feature in the slicer, which stops extrusion slightly before the end of a segment to minimize stringing.
- Adjust the nozzle temperature to find the optimal balance between filament viscosity and stringing prevention.
6. Layer Shifting or Misaligned Layers:
- Check the belts and pulleys for any looseness or signs of wear and re-tighten or replace if necessary.
- Ensure that the build plate is securely attached and not moving during the printing process.
- Inspect the stepper motors for overheating or skipping steps and make any required adjustments.
- Verify that the slicer settings are correctly configured for the printer’s build volume.
7. Poor Print Quality or Surface Finish:
- Optimize the print settings in the slicer software, adjusting parameters such as print speed, layer height, and cooling fan speed.
- Check the filament quality and consider using a higher-quality or different brand filament.
- Ensure that the nozzle is clean and free from any filament residue or clogs.
- Perform regular maintenance on the printer, including calibration and cleaning of the print bed and nozzle.
Remember to approach troubleshooting systematically, focusing on one problem at a time and making incremental adjustments to find the optimal settings for your specific printer and filament combination. Patience and experimentation are key in achieving high-quality 3D prints.
Problem: Prints Not Sticking to the Bed
One of the most common issues faced by 3D printer users is prints not sticking to the bed. When prints fail to adhere properly, it can lead to a range of problems such as prints detaching, warping, or becoming misaligned. Fortunately, there are several troubleshooting steps you can take to resolve this issue.
1. Ensure a Clean Print Bed: Start by ensuring that the print bed is clean and free from any dust, oil, or residue. Use isopropyl alcohol or a mild detergent to clean the bed thoroughly. Avoid using harsh chemicals as they can damage the print surface.
2. Apply an Adhesive: Improve bed adhesion by applying an adhesive to the print bed. Common options include using a glue stick, hairspray, or specialized 3D printing adhesives like Kapton tape or a PEI sheet. These adhesives create a temporary bond between the print and the bed, enhancing adhesion.
3. Adjust Bed Leveling: Proper bed leveling is crucial for prints to successfully stick to the bed. Use a bed leveling tool or perform a bed leveling calibration to ensure that the nozzle is at the correct distance from the bed. Adjust the leveling screws or knobs as necessary to achieve a uniform distance across the entire bed.
4. Increase Bed Temperature: Increasing the bed temperature can help improve filament adhesion. Check the recommended bed temperature for the filament you are using and ensure that the bed temperature is set correctly in your printer’s settings. If necessary, gradually increase the bed temperature to find the optimal adhesion point.
5. Use a Brim or Raft: Adding a brim or raft to your prints can increase the surface area in contact with the bed, providing better adhesion. These are extra layers or structures that surround the base of the print, offering additional support and preventing warping or detachment.
6. Adjust Print Settings: Fine-tuning your print settings can also help with bed adhesion. Consider adjusting parameters such as the initial layer height, print speed, and flow rate. Increasing the initial layer height slightly can improve bed adhesion by ensuring better filament contact with the bed surface.
7. Check Print Surface Material: Different print surfaces can influence bed adhesion. If you’re using a removable print surface, ensure that it’s clean and in good condition. Some commonly used surfaces include glass, PEI sheets, or adhesive-backed surfaces. Experimenting with different surfaces can help determine the best one for your specific printer and filament combination.
By following these troubleshooting steps, you can increase the chances of your prints sticking to the bed successfully. It may take some trial and error to find the optimal settings and techniques for your specific printer, but with patience and persistence, you can achieve consistent and reliable bed adhesion.
Problem: Warping or Curling of Prints
Warping or curling of prints is a common issue that can occur during the 3D printing process. This problem arises when the edges or corners of printed objects lift or bend upwards, resulting in distorted or failed prints. Several factors can contribute to warping or curling, but there are troubleshooting steps you can take to address this issue.
1. Enclose the Printing Area: Creating a stable temperature environment can help minimize temperature fluctuations that contribute to warping. Consider using an enclosure or constructing a makeshift enclosure around your 3D printer. This enclosure helps maintain a more consistent temperature, reducing the likelihood of warping.
2. Utilize a Heated Build Plate: Using a heated build plate can significantly reduce the occurrence of warping or curling. Ensure that the build plate temperature is set correctly for the filament being used. Consulting the filament manufacturer’s guidelines or adjusting the bed temperature based on your past printing experiences can help achieve the optimal temperature for the filament.
3. Apply an Adhesive: Enhance the adhesion between the print and the build plate surface by applying adhesive materials. This can include using a glue stick, hairspray, or specialized 3D printing adhesives like Kapton tape or a PEI sheet. These adhesive materials provide a better gripping surface, minimizing the chance of warping or curling.
4. Use a Brim or Raft: Adding a brim or raft to your prints can help mitigate warping or curling. A brim is a thin layer that surrounds the base of the print, increasing the surface area in contact with the build plate. It provides additional stability and can help prevent warping. Similarly, a raft creates a thicker base for the print, distributing the stress more evenly and reducing the risk of curling.
5. Optimize Cooling Settings: Cooling settings can also affect warping. If your printer has a cooling fan, ensure it is set at an appropriate speed. Adjusting the cooling settings in the slicer software can help control the cooling effect during the print. Gradually increasing or decreasing the fan speed can help find the right balance to minimize warping.
6. Adjust Print Settings: Fine-tuning your print settings can play a vital role in combating warping. Consider adjusting the initial layer height, print speed, and infill density. Increasing the initial layer height slightly can aid in better adhesion to the build plate. Adjusting the print speed and infill density can also help reduce the internal stresses within the print, limiting the likelihood of warping.
7. Evaluate Filament Types: Different filament types have varying degrees of susceptibility to warping. Some materials, such as ABS, are more prone to warping, while others, such as PLA, are generally less problematic. Consider experimenting with different filament materials to determine which works best for your specific printing requirements and minimizes warping issues.
By applying these troubleshooting steps, you can address and reduce the occurrence of warping or curling in your 3D prints. It may take some adjustments and experimentation to find the optimal settings for your specific printer and filament combination, but with persistence, you can achieve successful and warp-free prints.
Problem: Filament Jamming or Extruder Clogging
Filament jamming or extruder clogging is a frustrating problem that can occur during 3D printing. It happens when the filament fails to flow smoothly through the extruder, leading to disrupted prints or complete print failures. There are several common causes for filament jamming or clogging, but there are troubleshooting steps you can take to resolve the issue.
1. Check Filament Quality: Ensure that you are using good-quality filament. Low-quality or poorly stored filament can be more prone to jamming or clogging due to impurities or inconsistent diameter. Verify that the filament is dry and not brittle, as moisture absorption can also cause printing issues.
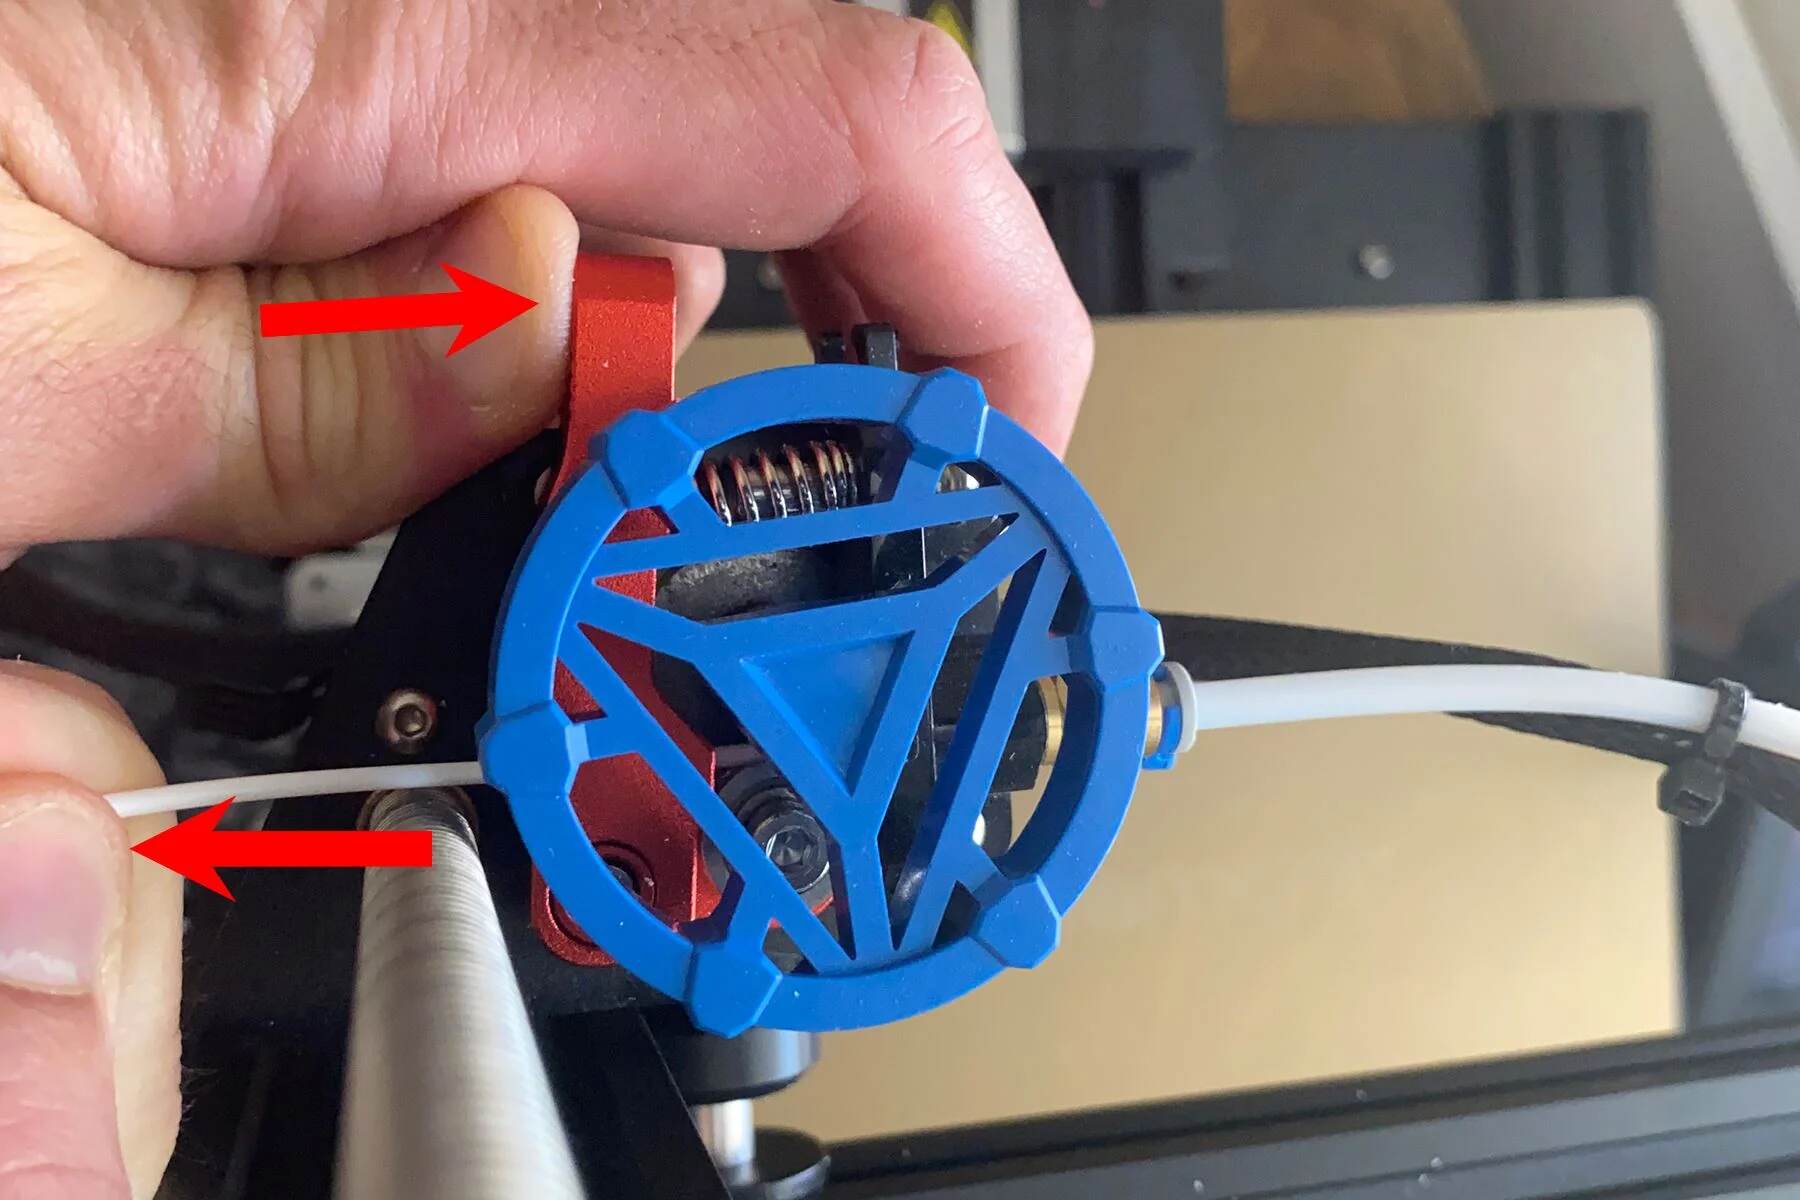
2. Verify Proper Filament Loading: Confirm that the filament is loaded correctly into the extruder. Ensure that the filament is inserted all the way into the filament pathway and that it is properly seated and guided by the filament drive mechanism.
3. Clean the Nozzle: Filament residue or debris can accumulate in the nozzle, leading to clogs. Heat the nozzle to the recommended temperature for the filament type and use a micro-drill bit or a nozzle cleaning needle to carefully remove any blockages. Be cautious not to damage the nozzle while cleaning.
4. Check the Filament Pathway: Inspect the filament pathway for any obstructions or tangles that may impede the smooth flow of filament. Remove any debris or tangled filament and ensure that the pathway is clear for the filament to travel without hindrance.
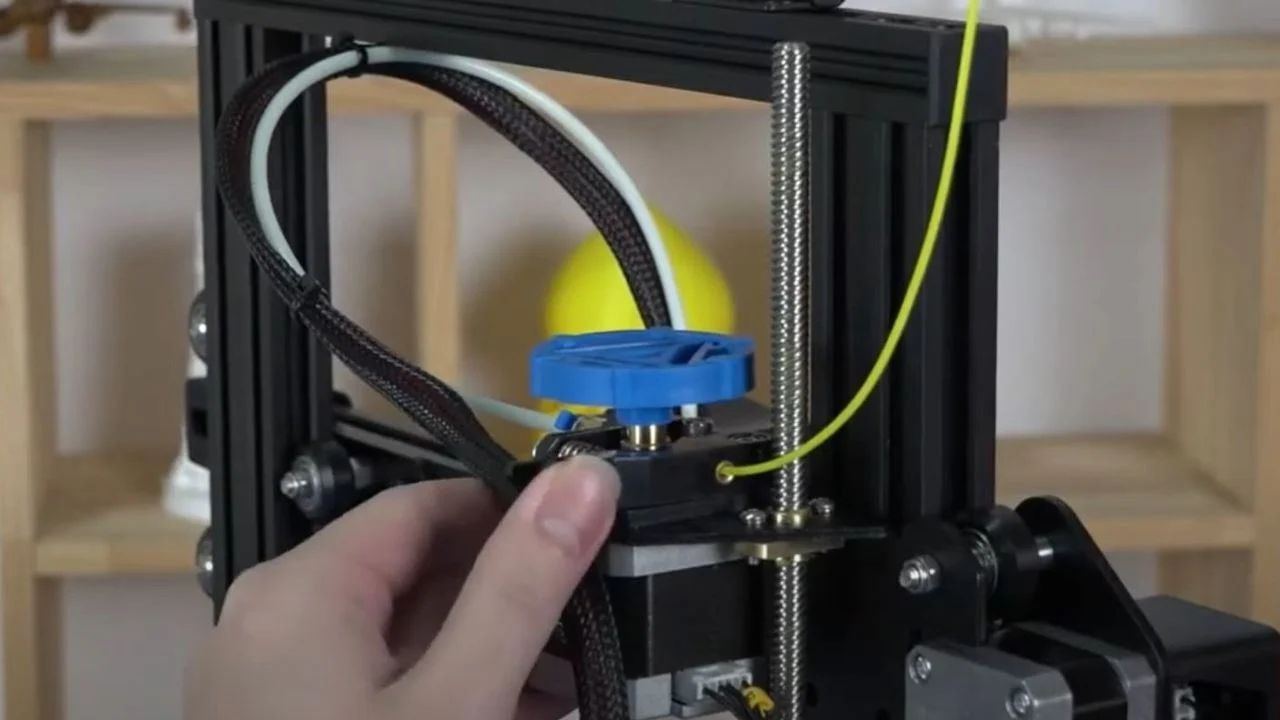
5. Adjust Filament Tension: Incorrect filament tension can also cause jamming or clogging. If your printer has adjustable tension settings, make sure that the tension is properly calibrated for the filament being used. Too much tension can deform or grind the filament, while too little tension can result in feeding issues.
6. Verify Optimal Nozzle Temperature: Incorrect nozzle temperature can contribute to filament jamming or clogging. Consult the filament manufacturer’s recommendations for the optimum nozzle temperature. If the temperature is set too low, the filament may not melt properly and can cause blockages. If set too high, the filament can become too runny and lead to clogs.
7. Check Extruder Gears: Extruder gears can become clogged or worn over time, leading to filament feeding problems. Inspect the gears for any signs of filament debris or damage. Clean the gears if necessary and replace them if they appear worn or unable to grip the filament properly.
By following these troubleshooting steps, you can address filament jamming or extruder clogging issues and ensure a smooth and uninterrupted 3D printing experience. It is important to approach the troubleshooting process systematically and make incremental adjustments, as each printer and filament combination may require different solutions.
Problem: Over-Extrusion or Under-Extrusion
Over-extrusion and under-extrusion are common problems encountered in 3D printing that can significantly impact print quality and structural integrity. Over-extrusion occurs when the printer deposits an excess amount of filament, leading to messy prints and compromised details. Under-extrusion, on the other hand, results from insufficient filament being extruded, resulting in weak and incomplete prints. Thankfully, there are several troubleshooting steps you can take to address these issues.
1. Adjust Extruder Steps per Millimeter (E-Steps): Incorrectly calibrated E-steps can cause over-extrusion or under-extrusion. This parameter determines how much filament is fed through the extruder with each step. Use a calibration process to accurately set the E-steps, ensuring that the extruder is pushing the correct amount of filament.
2. Check Filament Diameter: Verify that the filament diameter matches the settings in your printer and slicer software. If the filament is thicker or thinner than what is specified, adjust the filament diameter setting accordingly to ensure proper extrusion.
3. Calibrate Flow Rate: Fine-tune the flow rate to correctly adjust the amount of filament extruded during printing. This adjustment compensates for variations in filament properties and extruder performance. Print a calibration object and use the measured dimensions to adjust the flow rate setting in your slicer software.
4. Verify Nozzle Size: Ensure that the nozzle size specified in your slicer software matches the actual nozzle size on your 3D printer. An incorrectly set nozzle size can lead to inaccurate extrusion and affect print quality.
5. Check Filament Pathway and Tension: Inspect the filament pathway and check for any obstructions or tangles that can hinder smooth filament flow. Incorrectly set filament tension can also result in extrusion issues. Adjust the tension mechanism to ensure proper filament feeding without excessive resistance or slipping.
6. Optimize Print Temperature: Adjusting the print temperature can help alleviate over-extrusion or under-extrusion. Experiment with small increments of temperature changes to find the optimum temperature for your filament. Higher temperatures can promote better flow, while lower temperatures can reduce the risk of oozing and stringing.
7. Clean or Replace the Nozzle: A clogged or partially blocked nozzle can cause inconsistent extrusion. Heat the nozzle to the recommended temperature for the filament and use a nozzle cleaning needle or small drill bit to carefully remove any blockages. If the nozzle is severely clogged or damaged, clean it thoroughly or replace it altogether.
Addressing over-extrusion or under-extrusion issues requires both calibration and adjustments in the printer settings. By following these troubleshooting steps, you can achieve the correct filament flow and produce high-quality, accurate prints.
Problem: Stringing or Oozing of Filament
Stringing or oozing of filament is a common problem in 3D printing that occurs when the printer continues to extrude filament even when it is moving between different points, resulting in unwanted strands or blobs. This issue can lead to messy prints, loss of detail, and increased post-processing work. However, there are several troubleshooting steps you can take to minimize stringing and oozing.
1. Retraction Settings: Adjusting the retraction settings in your slicer software can help reduce stringing. Retraction is the process of pulling the filament back slightly when the nozzle is moving between different print areas. Increase the retraction distance and speed to prevent the filament from oozing during these moves.
2. Travel Speed: Increase the travel speed between print areas to minimize the time the nozzle spends moving without extruding. Faster travel speeds can help prevent filament from dripping or stringing during non-printing movements. Experiment with different travel speeds to find the optimal setting that reduces stringing without compromising print quality.
3. Coasting: Some slicer software has a feature known as “coasting” that helps reduce stringing. Coasting stops filament extrusion slightly before the end of a segment, allowing pressure in the nozzle to push out the remaining filament. This can prevent excessive oozing at the end of a print movement, resulting in cleaner prints.
4. Z-Hop: Enabling the z-hop feature can minimize stringing by lifting the nozzle slightly during non-printing movements. By avoiding contact with the printed object, the risk of dragging or depositing excess filament is reduced. However, z-hopping can occasionally cause other issues, such as layer artifacts or inconsistencies, so it is essential to fine-tune the z-hop settings accordingly.
5. Temperature Adjustments: Temperature plays a significant role in filament flow and can contribute to stringing or oozing. Experiment with slight temperature adjustments to find the optimal balance for your filament. Cooling the nozzle slightly can help reduce the likelihood of excessive oozing, while raising the temperature can enhance filament flow during printing.
6. Filament Retraction Test: Perform a filament retraction test to determine the ideal retraction settings for your specific printer and filament combination. This involves printing a test model specifically designed to expose potential stringing issues. Adjust the retraction distance and speed until you achieve minimal stringing in the test print.
7. Filament Quality: Poor-quality or moisture-absorbed filament can contribute to stringing and oozing. Ensure that you are using high-quality filament and store it properly in a dry environment. Consider using a filament dryer to remove any moisture from the filament before printing. Dry filament is less likely to string or ooze during the printing process.
By implementing these troubleshooting steps, you can minimize stringing or oozing of filament in your 3D prints. Keep in mind that finding the perfect settings for your specific printer and filament may require some trial and error, so be patient and make incremental adjustments to achieve cleaner and more precise prints.
Problem: Layer Shifting or Misaligned Layers
Layer shifting or misaligned layers are frustrating issues that can occur during 3D printing. This problem manifests as layers that are not properly aligned, resulting in skewed or distorted prints. Layer shifting can happen horizontally, vertically, or in both directions, ruining the overall structure of the printed object. However, there are several troubleshooting steps you can take to address this problem.
1. Check Belt Tension: Inspect the belts in your 3D printer for any signs of slack or looseness. Loose belts can cause layer shifting during the quick movements of the print head. Adjust the tension of the belts to ensure they are taut and provide the necessary stability for accurate printing.
2. Examine Pulleys and Gears: The pulleys and gears responsible for moving the print head need to be tight and secure. Check for any loose or worn-out pulleys, gears, or couplings that may cause the print head to slip or skip steps. Tighten or replace any components that show signs of wear or instability.
3. Verify Stepper Motors: Ensure that the stepper motors responsible for moving the print head are functioning properly. Overheated motors or motors that are not correctly calibrated can cause layer shifting. Check the motor’s temperature and adjust the current/voltage settings if necessary. Also, ensure that the motor cables are securely connected.
4. Examine the Print Bed Attachment: A loose or unstable print bed can lead to layer shifting. Ensure that the print bed is securely attached to the printer’s frame. Double-check any screws or mounting mechanisms to ensure they are tightened properly, providing stability during the printing process.
5. Reduce Printing Speed: High print speeds can sometimes contribute to layer shifting, particularly if the printer’s mechanics are not well-calibrated to handle fast movements. Try reducing the printing speed to a more moderate level to alleviate the stress on the printer and minimize the chances of layer misalignment.
6. Adjust Acceleration and Jerk Settings: Acceleration and jerk settings determine the speed at which the printer changes direction. Incorrectly configured settings can result in excessive vibrations or sudden movements that lead to layer shifting. Experiment with lower acceleration and jerk values to reduce the likelihood of misaligned layers.
7. Verify Slicer Settings: Confirm that your slicer software is generating the correct G-code instructions for your specific printer. Incorrect settings or mismatched configurations can cause mechanical issues that result in layer shifting. Ensure that the print dimensions, nozzle size, and other printer-specific parameters are accurately configured.
By implementing these troubleshooting steps, you can minimize layer shifting and achieve more accurate and aligned prints. It’s important to note that different printers may require different adjustments, so be patient and persistent in fine-tuning your printer’s settings to achieve the best results.
Problem: Poor Print Quality or Surface Finish
Poor print quality or surface finish is a common issue that can affect the overall appearance and functionality of 3D prints. This problem can manifest as rough, bumpy, or uneven surfaces on printed objects, compromising their visual appeal and structural integrity. However, there are several troubleshooting steps you can take to improve print quality and surface finish.
1. Optimize Print Settings: Fine-tuning your print settings is crucial for achieving better print quality. Experiment with different parameters such as print speed, layer height, and infill density. Slow down the print speed to improve accuracy, decrease the layer height for finer details, and adjust the infill density to achieve the desired strength and weight.
2. Level the Print Bed: Make sure that your print bed is properly leveled. An unlevel bed can cause the nozzle to be too far from or too close to the bed, resulting in inconsistent layer adhesion and poor print quality. Use a leveling tool or perform a bed leveling calibration to ensure that all areas of the bed are at the correct distance from the nozzle.
3. Clean the Print Surface: Dust, debris, and residue on the print surface can negatively impact print quality. Ensure that the print surface is clean and free from any contaminants. Use isopropyl alcohol or a mild detergent to clean the bed thoroughly before each print to ensure optimal print adhesion and surface finish.
4. Increase Cooling Fan Speed: Cooling is essential for achieving good print quality, especially for overhangs and small details. Increase the cooling fan speed to help solidify each layer quickly and improve overall print quality. However, be cautious not to cool the print too much, as it can lead to warping or shrinkage.
5. Check Filament Quality: The quality and characteristics of the filament can significantly impact print quality. Ensure you are using high-quality filament that is stored and handled properly. Inconsistent filament diameter, moisture absorption, or impurities can affect print quality. Consider using a reputable and reliable filament brand for better results.
6. Calibrate Extruder and Flow Rate: Proper calibration of the extruder and flow rate is crucial for accurate filament deposition. Use calibrated objects to measure and adjust the extruder’s steps per millimeter (E-steps) and the flow rate setting in your slicer software. This ensures that the correct amount of filament is being extruded, resulting in more precise prints.
7. Regular Maintenance: Perform regular maintenance on your 3D printer to ensure optimal performance. This includes cleaning the nozzle, unclogging any filament residue, lubricating moving parts, and checking for loose or worn-out components. Regular maintenance helps prevent issues that can impact print quality.
By implementing these troubleshooting steps, you can significantly improve the print quality and surface finish of your 3D prints. Remember, it may take some experimentation and adjustments to find the optimal settings and techniques for your specific printer and filament combination, so be patient and persistent in your quest for better prints.
Problem: 3D Printer Calibration Issues
3D printer calibration issues can cause a range of problems in the printing process, resulting in inaccurate dimensions, improper layer heights, or skewed prints. Calibration is essential to ensure that your printer is operating optimally and producing accurate and precise prints. However, various factors can affect calibration and lead to printing difficulties. Here are some common calibration issues and troubleshooting steps to address them:
1. Bed Leveling: Proper bed leveling is crucial for successful printing. If your prints consistently have uneven first layers or adhesion issues, it may indicate a bed leveling problem. Follow the manufacturer’s instructions to calibrate the bed properly, ensuring that the print bed is parallel to the printer’s X and Y axes and at the correct distance from the nozzle.
2. Z-Axis Calibration: Inaccurate Z-axis calibration can result in uneven layer heights or poor layer adhesion. Use the slicer software to adjust the Z-axis steps per millimeter, which determines the distance the Z-axis moves with each step. Print a calibration object and measure the layer height to determine if further adjustment is needed.
3. Extruder Calibration: Calibrating the extruder is crucial for accurate filament extrusion. Incorrect extruder calibration can result in under-extrusion or over-extrusion, affecting the quality and strength of prints. Use a calibration tool or print a calibration cube to measure the extrusion amount and adjust the extruder steps per millimeter (E-steps) accordingly in your printer’s firmware or slicer software.
4. X, Y, and Z-Axis Steps per Millimeter: The X, Y, and Z-axis steps per millimeter determine the movement accuracy of your printer. If prints consistently show dimensional inaccuracies, you may need to recalibrate these values. Print a calibration cube with known dimensions and compare the printed dimensions to the intended dimensions. Adjust the steps per millimeter values until the printed dimensions match the intended ones.
5. Print Speed and Acceleration Settings: Uneven or wavering prints can be caused by incorrect print speed or acceleration settings. Experiment with different settings to find the optimal balance between speed and accuracy. Lower acceleration values can reduce vibrations and help maintain stable movements during printing.
6. PID Tuning: PID tuning is a calibration process that optimizes the temperature stability of your 3D printer. Inconsistent temperature control can result in poor print quality. Use PID tuning instructions provided by your printer’s manufacturer or accessible online resources to fine-tune the temperature control system for more reliable and accurate temperature performance.
7. Print Calibration Object: Printing a calibration object, such as a calibration cube or benchy, can help identify specific issues in print calibration. These objects allow you to assess dimensional accuracy, layer adhesion, and overall print quality. Use the results as a reference for making further adjustments to your printer’s calibration settings.
By addressing these calibration issues and taking the necessary troubleshooting steps, you can ensure that your 3D printer is properly calibrated, resulting in more accurate and high-quality prints. Calibration is an ongoing process, so periodically check and readjust your printer’s settings to maintain optimal performance.
Problem: Filament Not Feeding Properly
Filament not feeding properly is a common issue faced by 3D printer users. It occurs when the filament fails to feed smoothly into the extruder, causing disruptions in the printing process. This can lead to incomplete prints, under-extrusion, or even complete print failures. Several factors can contribute to this problem, but there are troubleshooting steps you can take to resolve it.
1. Check Filament Pathway: Inspect the filament pathway from the filament spool to the extruder. Ensure that there are no obstructions, knots, or tangles that may impede the smooth feeding of the filament. Straighten out any tangled filament and ensure that it can freely move through the filament pathway without any hindrance.
2. Verify Filament Tension: Improper filament tension can restrict the smooth flow of filament. Ensure that the filament tension mechanism, such as the tension arm or idler bearing, is properly adjusted for the specific filament being used. The filament should have enough tension to prevent slippage but not be overly tight that it deforms or grinds the filament.
3. Clean or Replace the Filament Drive Gear: The filament drive gear or extruder drive wheel grips the filament and pushes it into the extruder. Over time, the gear can accumulate filament residue or wear down, leading to feeding issues. Clean the gear teeth and remove any debris or replace the gear if it appears worn or damaged.
4. Adjust Filament Retraction and Extruder Settings: Fine-tuning the retraction and extruder settings can help with filament feeding. Retraction refers to the process of pulling the filament back slightly when the nozzle is moving between different print areas. Adjust the retraction settings in your slicer software to optimize the filament retraction distance and speed. Additionally, ensure that the extruder settings, such as pressure advance or stepper current, are properly adjusted for your specific printer and filament combination.
5. Verify Filament Diameter: Inaccurate filament diameter settings can cause feeding problems, especially if the actual filament diameter is different from what is configured in the slicer software. Measure the filament diameter at various points using a caliper, and adjust the filament diameter setting in the slicer software accordingly.
6. Check Hot End Temperature: Filament feeding can be affected by inadequate or excessive hot end temperatures. Ensure that the hot end temperature is set correctly for the filament being used. If the temperature is too low, the filament may not melt properly and can cause feeding issues. Conversely, if the temperature is too high, the filament may become too runny and cause clogs.
7. Test Different Filament Spool Placement: The position of the filament spool can sometimes affect its feeding. Test different spool placements to find the most optimal position that prevents filament from tangling or applying excessive strain on the filament pathway. This can include placing the spool on a vertical holder or using a filament guide to ensure smoother filament feeding.
By addressing these troubleshooting steps, you can resolve filament feeding issues and ensure a smooth and uninterrupted 3D printing process. It is important to approach troubleshooting systematically, focusing on one potential cause at a time and making incremental adjustments to find the optimal settings for your specific printer and filament combination.
Conclusion
Effective troubleshooting is key to resolving common issues that may arise when using a 3D printer. Taking the time to identify the root cause of the problem and implementing targeted solutions can help improve the overall printing experience and achieve higher quality prints.
By addressing issues such as prints not sticking to the bed, warping or curling of prints, filament jamming or extruder clogging, over-extrusion or under-extrusion, stringing or oozing of filament, layer shifting or misaligned layers, poor print quality or surface finish, and filament not feeding properly, you can overcome various challenges and achieve successful prints.
Remember to approach troubleshooting systematically, focusing on one problem at a time and making incremental adjustments to find the optimal solutions for your specific printer and filament combination. It is crucial to take note of any modifications made during the troubleshooting process and their effects on the print quality to maintain a record of successful problem-solving strategies.
Additionally, regular maintenance of the 3D printer is essential to avoid potential issues in the first place. Cleaning the printer, checking for loose or worn-out components, and calibrating various aspects of the printer ensure optimal performance and minimize the occurrence of problems. Regularly checking and updating firmware, as well as keeping software and drivers up to date, can also have a positive impact on the printing process.
As you gain experience with your 3D printer, you will become more adept at troubleshooting and addressing common issues. Taking the time to learn the nuances of your specific printer model and understanding the characteristics of different filaments will empower you to overcome challenges and achieve exceptional 3D prints.