Checking for Compatibility
Before you start installing new RAM in your computer, it’s crucial to ensure compatibility between the RAM module and your system. This will help avoid any potential issues or compatibility conflicts down the line. Here are a few steps you can take to ensure the compatibility of your new RAM:
- Check your computer’s specifications: Start by checking your computer’s specifications to determine the type of RAM it supports. Look for details such as the maximum RAM capacity, RAM speed, and memory type (DDR3, DDR4, etc.). You can usually find this information in your computer’s manual or on the manufacturer’s website.
- Determine the required form factor: RAM modules come in different form factors such as DIMM (Desktop) or SODIMM (Laptop). Ensure you choose the correct form factor based on your computer’s requirements.
- Consider the memory speed: The speed of the RAM module also plays a role in compatibility. If you’re adding new RAM to existing modules, it’s recommended to match the speeds for optimal performance. However, if you’re replacing all the RAM, ensure the new modules are compatible with your system’s speed capabilities.
- Check the operating voltage: Different RAM modules may have different operating voltages. Ensure that the voltage of the new RAM matches the requirements of your motherboard. Incompatible voltage can lead to system instability or even damage to the components.
- Consider the maximum capacity: Each motherboard has a maximum RAM capacity that it can support. Ensure that the total capacity of the new RAM modules does not exceed your system’s maximum limit. Additionally, check if your operating system supports the desired amount of RAM.
By following these steps, you can ensure that the new RAM you choose is compatible with your system. This will greatly reduce the chances of encountering any compatibility issues while installing or while using your computer. It’s important to be diligent with these checks to make sure your RAM upgrade goes smoothly.
Removing the Old RAM
Once you’ve verified the compatibility of your new RAM module, it’s time to remove the old RAM from your computer. Follow these steps to safely remove the old RAM:
- Power off your computer: Shut down your computer and unplug it from the power source. This will prevent any electrical accidents and ensure your safety during the process.
- Open the computer case: Depending on your computer model, you might need to remove a side panel or access a specific compartment to gain access to the RAM slots. Consult your computer’s manual or manufacturer’s website for instructions on how to open the case.
- Ground yourself: Before handling any computer components, it’s essential to ground yourself to prevent any static discharge. You can do this by touching a grounded object, such as a metal doorknob or the back of your computer case.
- Locate the RAM slots: Identify the RAM slots on your motherboard. These are usually long, rectangular slots, typically located near the CPU. Open the retaining clips at each end of the RAM module by gently pushing them outward.
- Remove the old RAM: Once the retaining clips are open, you can gently remove the old RAM module by pulling it straight out of the slot. Avoid applying excessive force and handle the RAM module with care.
- Store or dispose of the old RAM: If the old RAM is still in good working condition, you may consider keeping it as a backup or selling it. However, if the RAM modules are faulty or outdated, it’s best to dispose of them responsibly according to your local e-waste regulations.
By following these steps, you’ll be able to safely remove the old RAM module from your computer.
Remember to handle the RAM modules with care and avoid touching the gold contacts as it can cause damage to the RAM.
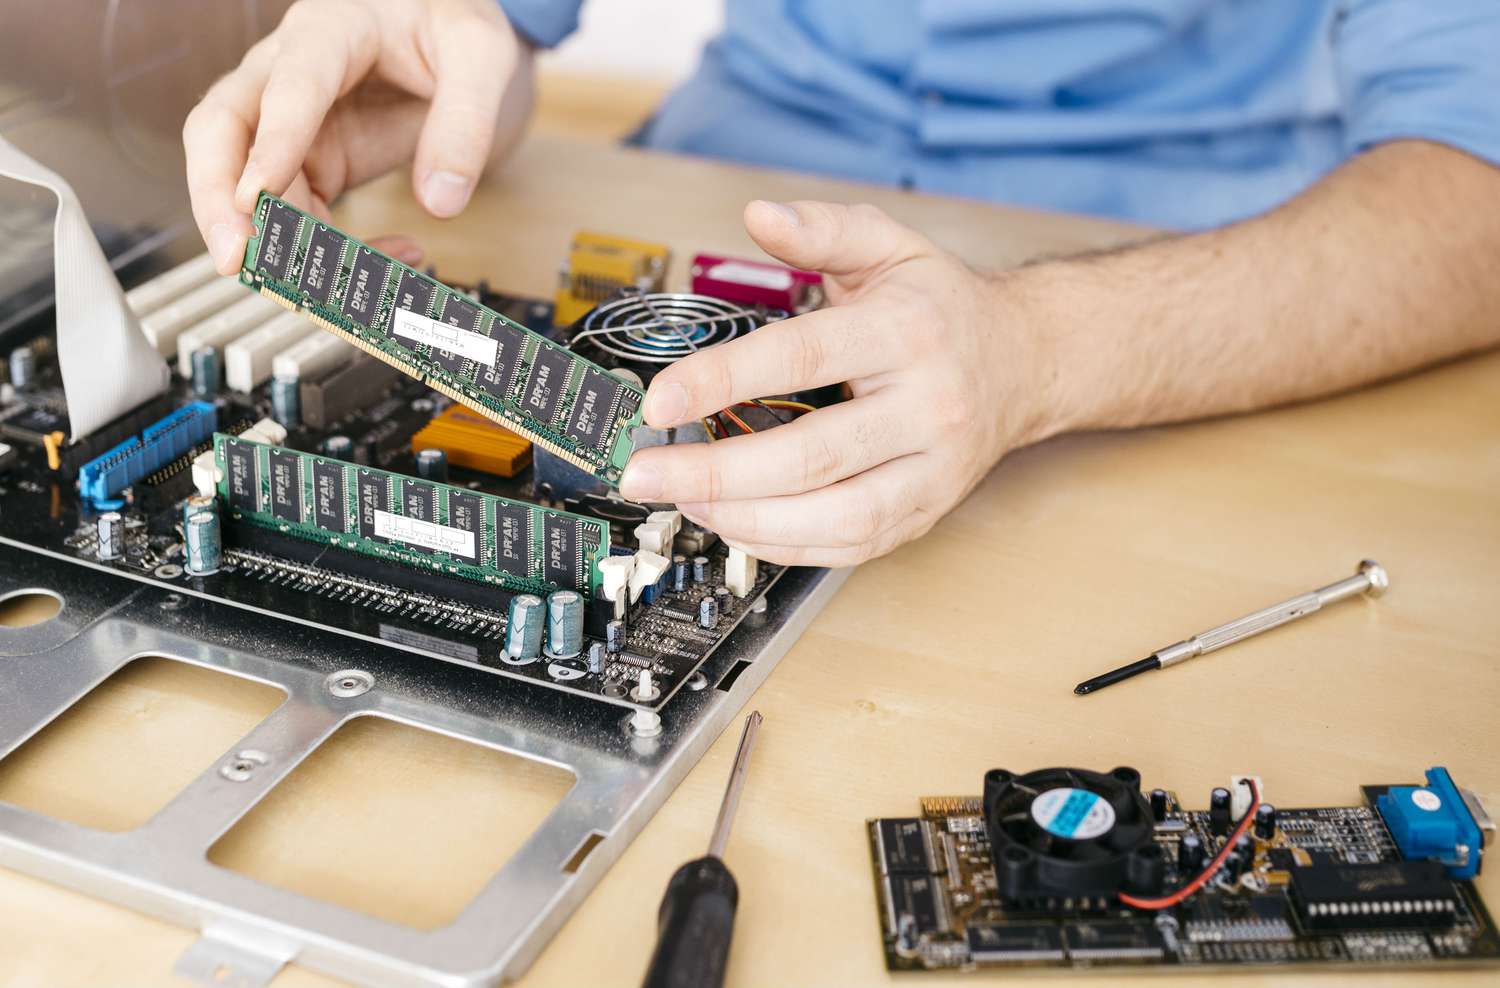
Installing the New RAM
With the old RAM removed, it’s time to install the new RAM modules into your computer. Follow these steps to properly install the new RAM:
- Identify the RAM slots: Take a look at your motherboard and identify the RAM slots where the new modules will be inserted. These slots are typically located near the CPU and will be similar in appearance to the slots where the old RAM was removed.
- Match the notch: Look for the small notch on the bottom of the RAM module. This notch ensures that the RAM can only be inserted in one direction. Align the notch on the RAM module with the corresponding notch in the RAM slot.
- Insert the RAM module: Hold the RAM module by its edges and gently insert it into the RAM slot at a slight angle. Be sure to apply even pressure and push firmly until the module is fully seated in the slot. The retaining clips on each end should automatically lock into place.
- Repeat for additional modules: If you are installing multiple RAM modules, repeat the previous step for each one, ensuring that they are properly aligned and firmly seated in their respective slots.
- Close the computer case: Once all the new RAM modules are installed, carefully close the computer case, ensuring that all screws and latches are securely tightened. This will protect the internal components and maintain proper airflow within the computer.
That’s it! You have successfully installed the new RAM modules into your computer. Now, it’s time to power on your system and test the new memory configuration.
Powering On and Testing
After installing the new RAM modules, it’s important to power on your computer and perform some tests to ensure that the new memory is working correctly. Follow these steps to power on and test your system:
- Connect the power cable: Plug in the power cable and ensure that it is securely connected to your computer and the power source.
- Press the power button: Press the power button on your computer to turn it on. You should hear the fans spinning and see the lights come on.
- Check the BIOS screen: During the startup process, your computer will typically display a BIOS screen. This is the basic input/output system that controls your hardware. Check if the BIOS recognizes the new RAM modules and displays the correct amount of memory. If the memory is not recognized correctly, you may need to adjust the BIOS settings.
- Run a memory test: To ensure the stability and performance of your new RAM, it’s recommended to run a memory test. There are various software tools available, such as MemTest86, that can thoroughly test your RAM for any errors or issues. Allow the memory test to run for at least one full pass to ensure optimal results.
- Check system stability: After completing the memory test, use your computer as usual and monitor its performance and stability. Run resource-intensive tasks or programs to check if the system remains stable and responsive. If you experience any crashes, errors, or unusual behavior, it may indicate a problem with the RAM configuration.
- Repeat if necessary: If you encounter any issues during the testing process, double-check the RAM installation to ensure that the modules are properly seated in their slots. If necessary, repeat the installation process or seek assistance from a professional technician.
By following these steps, you can power on your computer with the new RAM modules and perform essential tests to verify their functionality. It’s crucial to ensure both the BIOS recognition and the system stability to ensure a successful RAM upgrade.
Adjusting the BIOS Settings (if necessary)
After installing new RAM modules, it’s important to check if your computer’s BIOS settings are properly configured to recognize and utilize the new memory. In some cases, you may need to adjust the BIOS settings manually. Follow these steps to adjust the BIOS settings if necessary:
- Restart your computer: If your computer is already on, restart it to access the BIOS settings. During the startup process, look for a message or key combination to enter the BIOS setup. Common key combinations include F2, DEL, ESC, or F10, but it may differ depending on your computer’s manufacturer.
- Enter the BIOS setup: Once you’re in the BIOS setup, navigate using the arrow keys and look for options related to memory or RAM settings. The location of these options can vary depending on the BIOS version and manufacturer, so refer to your motherboard’s manual or manufacturer’s website for specific guidance.
- Adjust memory settings: In the memory or RAM settings, you may find options such as “Memory Configuration,” “Memory Timing,” or “DRAM Timing Control.” Here, you can adjust settings like clock speed, timings, voltage, or XMP profiles. Be cautious when adjusting these settings and ensure that you are familiar with the implications of any changes you make.
- Save and exit: Once you have made any necessary changes to the BIOS settings, save the changes and exit the BIOS setup. Depending on your BIOS, you can usually do this by pressing the F10 key or selecting the option to save and exit.
- Restart and retest: After adjusting the BIOS settings, restart your computer and retest the system stability and performance. Keep an eye out for any improvements or changes in the way your computer operates with the new RAM configuration.
It’s important to note that adjusting the BIOS settings can have a significant impact on your system’s stability and performance. If you’re not familiar with BIOS settings or unsure about making changes, it’s recommended to consult your motherboard’s manual or seek assistance from a knowledgeable technician.
Verifying the Recognized RAM Capacity
After installing new RAM modules and adjusting the BIOS settings if necessary, it’s crucial to verify that your system recognizes the correct amount of RAM. Follow these steps to verify the recognized RAM capacity:
- Restart your computer: Restart your computer to ensure that any changes made to the BIOS settings take effect.
- Check the BIOS screen: During the startup process, pay close attention to the BIOS screen. It should display the recognized RAM capacity alongside other system information. Verify that the displayed capacity matches the total amount of RAM you have installed.
- Check the operating system: Once your computer has finished booting, check the recognized RAM capacity within the operating system. In Windows, you can do this by right-clicking on the “Computer” or “This PC” icon, selecting “Properties,” and looking for the RAM information. On macOS, go to the Apple menu, choose “About This Mac,” and navigate to the “Memory” section.
- Compare with the installed RAM: Compare the recognized RAM capacity with the total amount of RAM you have installed. If there is a discrepancy between the two, it may indicate a problem with the RAM installation or configuration.
- Perform memory-intensive tasks: To further ensure that the installed RAM is functioning properly, perform memory-intensive tasks such as running multiple applications simultaneously or working with large files. Monitor the system’s performance and check for any signs of instability, slowdowns, or errors.
Verifying the recognized RAM capacity is essential to ensure that your system is utilizing the full potential of the installed RAM. If there are any issues or inconsistencies, double-check the RAM installation, BIOS settings, and consult the motherboard’s manual or seek professional assistance if needed.
Troubleshooting Common Issues
Even with careful installation and configuration, you may encounter some common issues when installing new RAM modules. Here are a few troubleshooting steps to address these issues:
- Check for loose connections: If you are facing problems with your system after installing new RAM, ensure that all connections are secure. Make sure the RAM modules are properly inserted and locked into their respective slots. Also, check other connections such as power cables, data cables, and peripherals.
- Reseat the RAM modules: Sometimes, the RAM modules may not be seated properly in their slots, leading to unrecognized or unstable memory. Try removing and reinserting the RAM modules, ensuring that they are firmly seated. Again, be cautious and handle the modules with care.
- Verify compatibility: Double-check the compatibility of the new RAM modules with your computer. Ensure that the modules are compatible with your motherboard, operating system, and other hardware. Refer to the specifications and requirements provided by the manufacturer and consult professional help if needed.
- Test each RAM module individually: If you have installed multiple RAM modules and are experiencing issues, test each module individually. Remove all but one module and see if the problem persists. Repeat this process for each module. By doing so, you can identify if any specific module is causing the issue.
- Update BIOS and drivers: Outdated BIOS or drivers can lead to compatibility issues with new RAM modules. Check the manufacturer’s website for any available BIOS updates for your motherboard and install them. Additionally, update the necessary drivers for your computer to ensure smooth operation.
- Run memory diagnostics: To check for any errors or issues with the RAM modules, run memory diagnostics. Most operating systems have built-in memory diagnostic tools that can help identify any problems. Alternatively, you can use third-party software like MemTest86 to perform comprehensive memory tests.
- Seek professional assistance: If you have tried the above troubleshooting steps and are still facing issues, it’s best to seek professional assistance. Contact the manufacturer’s support, reach out to a computer technician, or consult online forums for further guidance.
Troubleshooting common issues when installing new RAM requires patience and thoroughness. By following these steps, you can address many common problems and ensure that your computer benefits from the increased memory capacity and performance provided by the new RAM modules.