Introduction
Welcome to the world of Fortnite, the immensely popular online multiplayer game that has taken the gaming community by storm. Whether you’re a seasoned player or just starting out, you may have encountered performance issues while playing Fortnite. One possible solution to improve your gaming experience is to add more RAM to your computer.
RAM, or Random Access Memory, plays a crucial role in gaming performance. It functions as temporary storage for data that the computer needs to access quickly. The more RAM your computer has, the more data it can store for immediate use, reducing the need for the system to retrieve information from slower permanent storage devices such as the hard drive or solid-state drive.
Adding more RAM can provide a significant boost to your computer’s performance, including smoother gameplay, faster loading times, fewer lags, and improved overall responsiveness. In this guide, we will walk you through the process of adding more RAM to your computer specifically for Fortnite, ensuring that you have all the necessary information to make an informed decision and successfully upgrade your system.
Before we delve into the steps to add more RAM, it’s important to determine whether you truly need it for your Fortnite gaming experience. If you’re experiencing frequent crashes, freezes, or significant lag during gameplay, these issues could be indicators of insufficient RAM. Additionally, if you often multitask while playing Fortnite, such as running other resource-intensive programs simultaneously, you may benefit from adding more RAM to your system.
Now that we understand why adding more RAM can be beneficial for Fortnite, let’s move on to the next section and learn how to check your current RAM capacity and usage.
Why You May Need More RAM for Fortnite
Fortnite is a demanding game that requires significant system resources to run smoothly. The game’s graphics, animations, and complex calculations put a strain on your computer’s hardware, including the RAM. Here are a few reasons why you may need more RAM specifically for playing Fortnite:
- Improved Performance: One of the primary benefits of adding more RAM is improved performance. With additional RAM, your computer can store more data related to Fortnite, enabling faster access and reducing the need for the system to retrieve information from slower storage devices. This can result in smoother gameplay, faster loading times, and a more responsive gaming experience.
- Reduced Lag and Stutter: If you’ve noticed lag or stutter during gameplay, particularly during intense battles or when multiple players are in close proximity, inadequate RAM could be the culprit. Insufficient RAM can cause the game to stutter or freeze as the system struggles to keep up with the demands of running Fortnite. Adding more RAM can help alleviate these issues and provide a more seamless gaming experience.
- Multi-tasking While Playing: Many Fortnite players like to multitask while gaming, whether it’s streaming, video editing, or running other resource-intensive applications in the background. These activities consume additional RAM, and if you find that your system slows down or becomes unstable when running Fortnite alongside other programs, increasing your RAM capacity can help accommodate those extra tasks.
- Future-proofing: As technology advances, games like Fortnite become more demanding on hardware resources. If you plan to continue playing Fortnite and other upcoming games, it’s essential to future-proof your system. Adding more RAM now ensures that your computer can handle the evolving requirements of newer games, extending the lifespan of your gaming setup before the need for a more significant upgrade.
Remember that adding more RAM is not a guaranteed solution for all performance issues. Other factors, such as the processor, graphics card, and storage speed, also play a role. However, increasing your RAM capacity is often a cost-effective step that can provide noticeable improvements in Fortnite performance.
Now that we understand why adding more RAM is beneficial for playing Fortnite, let’s continue to the next section, where we will guide you through the process of checking your current RAM capacity and usage on your computer.
Checking Your Current RAM
Before you proceed with adding more RAM to your computer, it’s important to determine your current RAM capacity and usage. This information will help you identify whether your computer requires additional RAM for an optimal Fortnite gaming experience. Here’s how you can check your current RAM:
- Task Manager (Windows): On a Windows computer, you can use the built-in Task Manager to monitor your RAM usage. Press Ctrl + Shift + Esc to open Task Manager, and click on the Performance tab. Under the Memory section, you’ll see how much RAM is being utilized and the total amount of RAM installed.
- Activity Monitor (Mac): If you’re using a Mac, you can use the Activity Monitor to check your RAM usage. Open the Applications folder, then go to Utilities and launch Activity Monitor. In the Activity Monitor window, click on the Memory tab to view your RAM usage and total RAM capacity.
- System Information: Both Windows and Mac provide system information that includes details about your hardware, including RAM. On Windows, press the Windows key + R to open the Run dialog box, type msinfo32, and press Enter. In the System Information window, go to Components and select Memory to view details about your RAM. On Mac, click on the Apple menu, select About This Mac, and then click on the Memory tab.
- Third-Party Software: If you prefer a more comprehensive view of your system’s hardware, you can use third-party software utilities such as CPU-Z or Speccy on Windows, or Macs Fan Control on Mac. These tools provide detailed information about your computer’s specifications, including RAM capacity and usage.
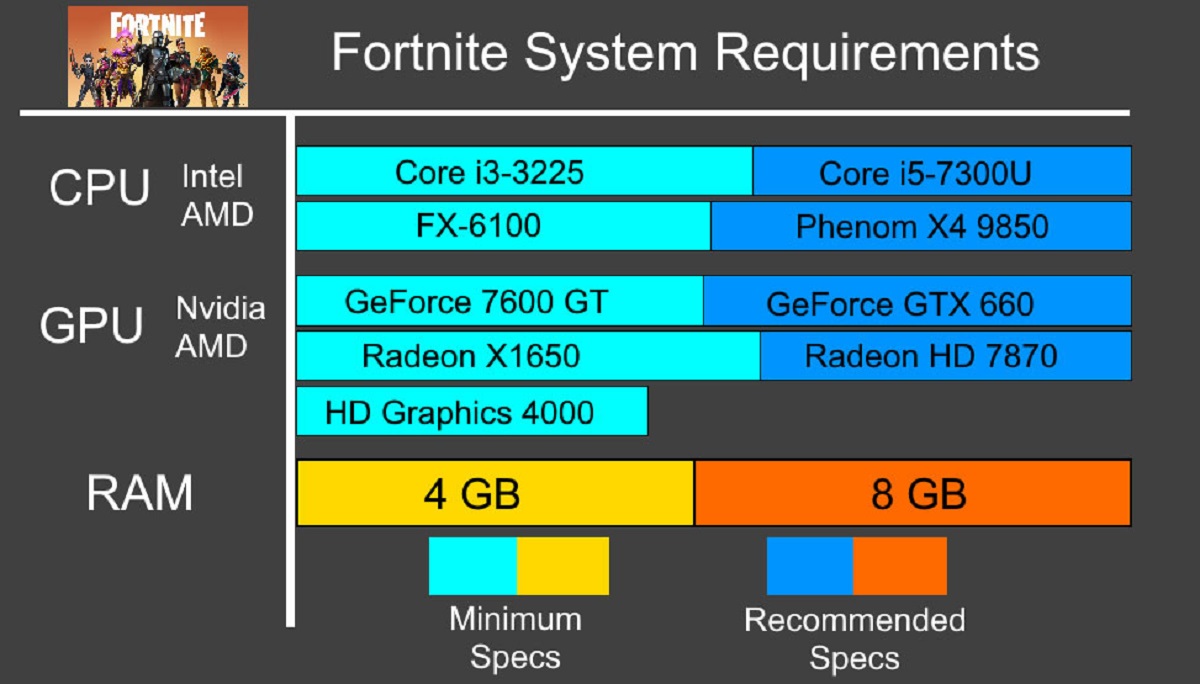
Once you have determined your current RAM capacity and usage, you can compare it to the recommended specifications for Fortnite. The official system requirements for Fortnite can be found on the Epic Games website. If your current RAM is below the recommended threshold or if you’re experiencing performance issues, adding more RAM will likely make a noticeable difference.
Now that you have a clear understanding of your current RAM status, the next section will guide you through determining the amount of RAM you need to add for playing Fortnite effectively.
Determine the Amount of RAM You Need
Now that you have checked your current RAM capacity and usage, the next step is to determine how much additional RAM you need to add for an optimal Fortnite gaming experience. Several factors should be considered when determining the amount of RAM you should install:
- Official System Requirements: Start by referring to the official system requirements provided by Epic Games for Fortnite. These requirements will give you a basic idea of the minimum and recommended RAM specifications for running the game. Keep in mind that the recommended specifications are typically a good starting point for achieving optimal performance.
- Game Settings and Resolution: The RAM requirements can vary depending on the game settings and resolution you prefer. Higher graphic settings and resolutions demand more RAM to render the game smoothly. If you’re aiming for higher quality visuals and playing at higher resolutions, consider adding more RAM to ensure your system can handle the additional workload.
- Other Applications and Multitasking: Consider your multitasking habits while playing Fortnite. If you tend to run resource-intensive applications or perform multiple tasks simultaneously, you may want to increase your RAM capacity beyond the game’s minimum requirements. This will allow your system to accommodate the additional memory needs of Fortnite and other applications, ensuring a smoother and more stable gaming experience.
- Future-Proofing: It’s always a good idea to plan for the future when upgrading your computer’s hardware. As technology advances, games become more demanding, and system requirements increase accordingly. To ensure that your system remains capable of running upcoming games and updates, consider adding some additional RAM beyond the current recommended specifications for Fortnite.
Keep in mind that adding more RAM than necessary might not always translate into significant performance gains. It’s important to strike a balance between your needs, budget, and the optimal requirements for Fortnite. Adding too much RAM could result in diminishing returns as other factors such as your processor and graphics card may become bottlenecks.
With these considerations in mind, you should now have a better understanding of the amount of additional RAM you need to add to your computer. In the next section, we will cover the different types of RAM and compatibility considerations to ensure you make the right purchase.
Understanding RAM Types and Compatibility
When it comes to upgrading your computer’s RAM, it’s essential to understand the different types of RAM and their compatibility with your system. RAM modules come in various types, such as DDR2, DDR3, DDR4, and the latest DDR5. Here’s what you need to know:
- DDR Generation: The DDR generation signifies the speed and performance of the RAM module. Each generation offers faster data transfer rates and increased bandwidth compared to its predecessors. It’s crucial to determine which DDR generation is compatible with your motherboard. Check your motherboard’s specifications or manufacturer’s website for this information.
- Capacity and Form Factor: RAM modules come in various capacities, such as 4GB, 8GB, 16GB, and so on. Determine the maximum RAM capacity supported by your motherboard. It’s also important to consider the form factor of the module, whether it’s the standard DIMM (Dual In-Line Memory Module) or smaller modules like SO-DIMMs (Small Outline DIMMs) for laptops or compact systems.
- Speed and Latency: RAM modules have different clock speeds measured in megahertz (MHz). Higher clock speeds generally result in better performance. However, ensure that your motherboard supports the chosen RAM speed. Additionally, RAM latency, often represented as CL (CAS Latency) numbers, should also be considered. Lower CL numbers indicate faster access times.
- ECC and Non-ECC: Error-Correcting Code (ECC) RAM is primarily used in servers and workstations to detect and correct memory errors. Non-ECC RAM is the standard choice for most consumer systems. Be sure to select the appropriate type based on your motherboard’s compatibility and requirements.
- Motherboard Compatibility: To ensure compatibility, it’s crucial to verify the RAM specifications supported by your motherboard. Consult your motherboard’s manual or visit the manufacturer’s website for a list of compatible RAM modules. Pay attention to the maximum capacity, DDR generation, and supported speeds to make an informed decision.
It’s important to note that mixing different types and speeds of RAM modules can lead to compatibility issues, potentially causing system instability. When upgrading your RAM, it’s generally recommended to use identical RAM modules to maximize compatibility and performance.
Now that you have a solid understanding of RAM types and compatibility, the next step is to purchase the RAM modules that meet your system’s requirements. In the next section, we will guide you through the process of purchasing compatible RAM for your Fortnite gaming setup.
Purchase the Compatible RAM Module
Now that you are familiar with the different types and compatibility aspects of RAM, it’s time to purchase the compatible RAM module for your computer. Follow these steps to ensure you choose the right RAM for your Fortnite gaming setup:
- Check your Motherboard Compatibility: Refer to your motherboard’s specifications or manufacturer’s website to determine the compatible RAM types, capacities, and speeds supported by your system. This information will help narrow down your choices when shopping for RAM modules.
- Determine Your Requirements: Based on the amount of additional RAM you need, decide on the capacity that suits your needs. Consider your budget and the recommended specifications for Fortnite. Aim for a balance between performance and cost.
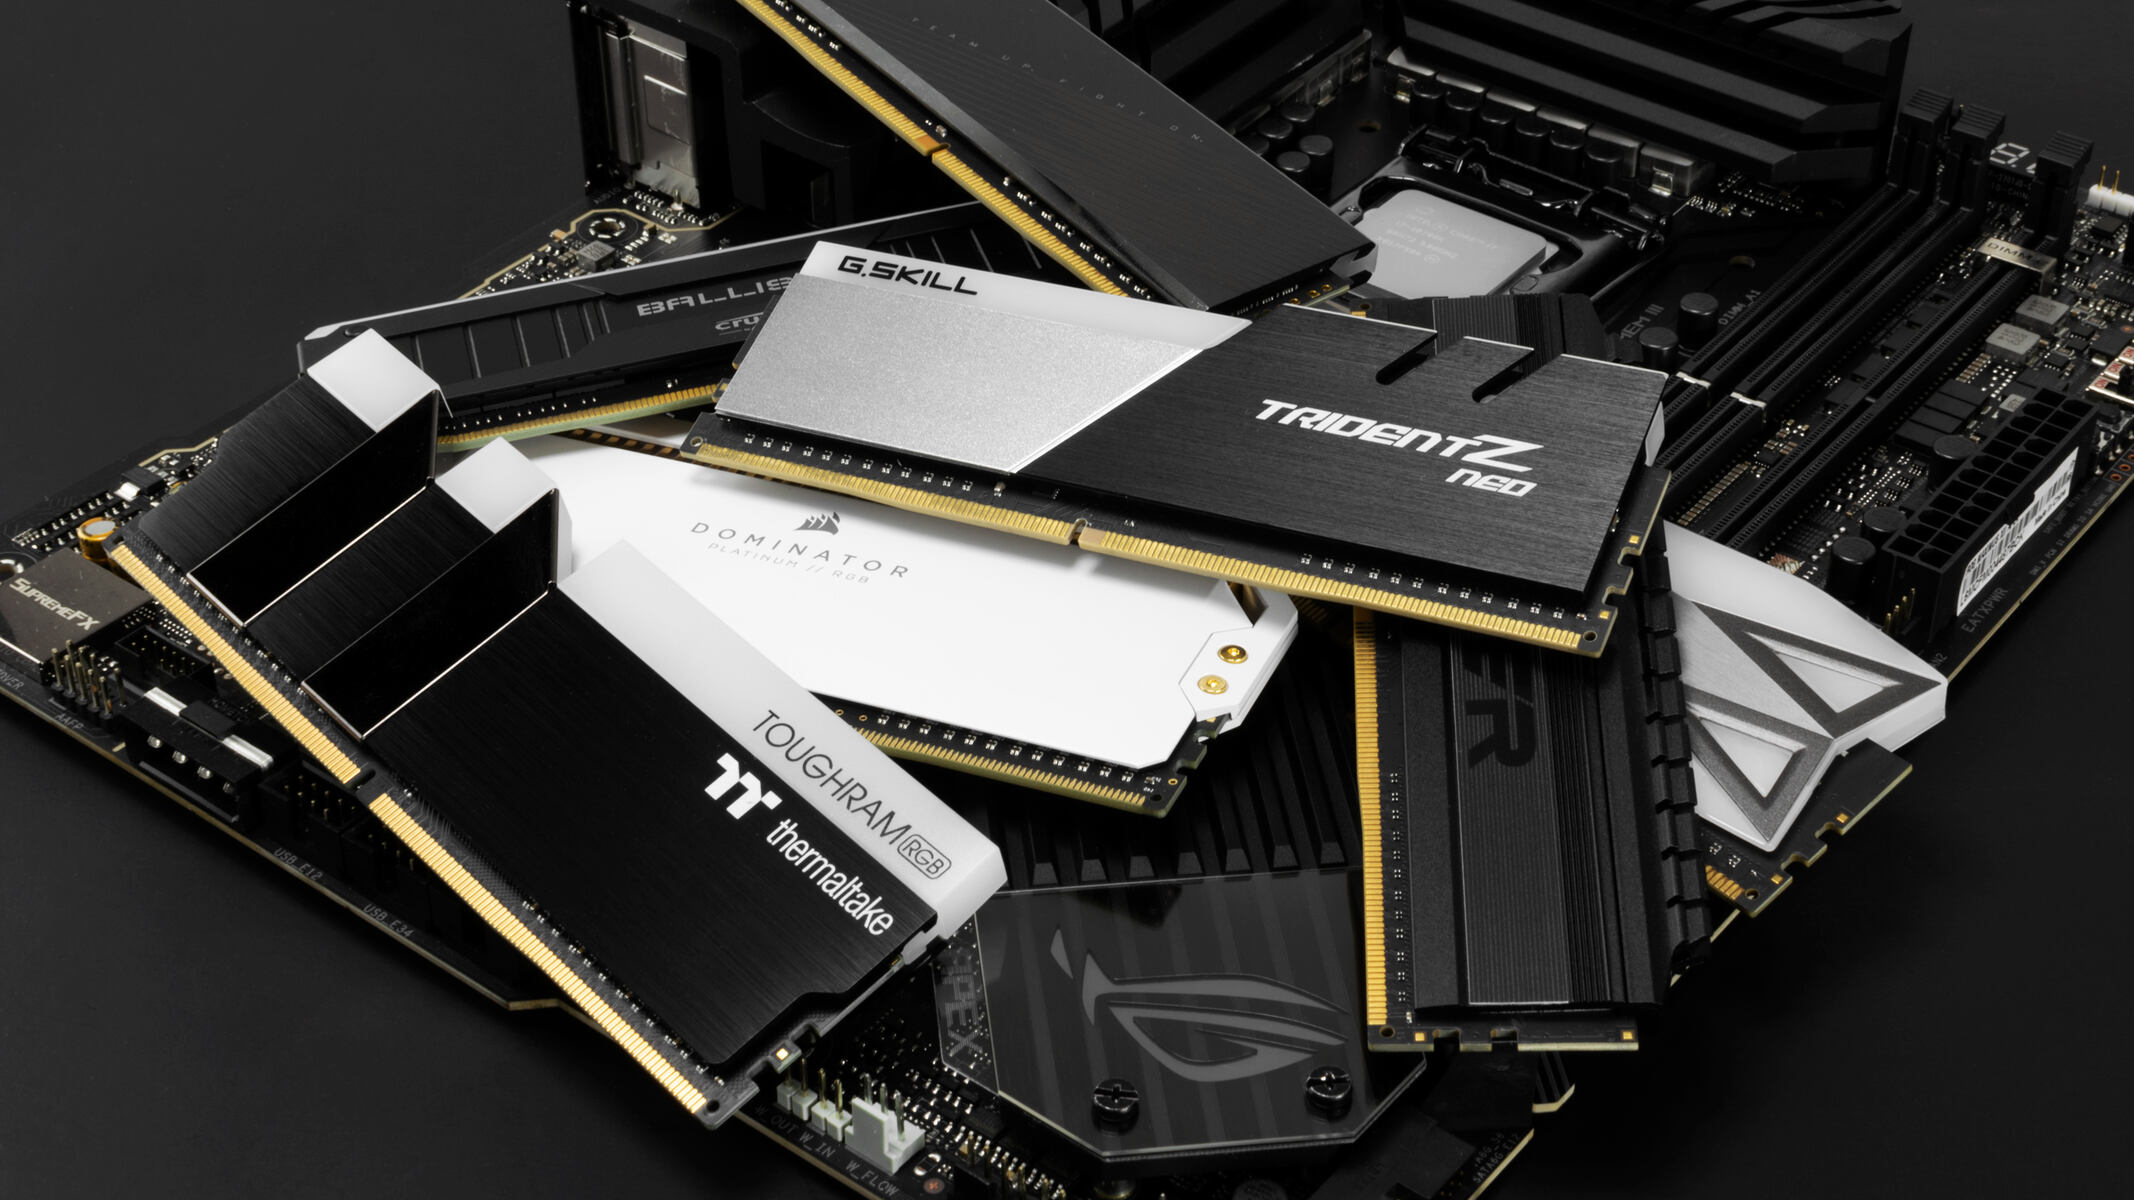
- Choose a Reputable Brand: Stick to trusted and reliable brands when purchasing RAM. Companies like Corsair, Kingston, Crucial, and G.Skill are well-known for producing high-quality RAM modules. Check customer reviews and ratings to ensure the brand you choose has a good track record.
- Consider Speed and Latency: If your motherboard supports higher RAM speeds, you may opt for faster modules to maximize performance. Keep in mind that the benefits of faster RAM may vary depending on other system components. Consider the latency (CL) numbers as well, aiming for lower values for improved access times.
- Budget Considerations: Compare prices from different retailers to find the best deal within your budget. While it’s tempting to opt for the cheapest option, prioritize quality and compatibility over cost. Investing in reliable RAM from reputable brands will ensure better performance and longevity.
- Warranty and Customer Support: Check the warranty period provided by the manufacturer. Reliable RAM modules typically come with a warranty of at least a few years. Additionally, consider the availability of customer support in case you encounter any issues or require assistance during the installation process.
Make sure to double-check all the specifications and compatibility details before making your purchase. Retailers often provide filters and search options to help narrow down the available options based on your system requirements.
Now that you’re well-equipped with knowledge on purchasing compatible RAM modules, the next section will guide you through the process of safely installing the new RAM into your computer.
Power Off and Unplug your Computer
Before proceeding with the installation of your new RAM module, it’s crucial to power off your computer and unplug it from the power source. This step ensures your safety and prevents any potential damage to your computer during the installation process. Here’s how to power off and unplug your computer:
- Closing Applications: Save and close any open applications or files to prevent data loss. It’s important to shut down the computer properly before proceeding.
- Shut Down: Click on the Start menu (Windows) or the Apple logo (Mac) and select Shut Down. Allow your computer to fully shut down before proceeding to the next step.
- Unplug Power Cord: Once your computer is fully shut down, unplug the power cord from the wall socket or surge protector. This ensures that your computer is completely disconnected from the power source, minimizing any potential electric shock hazards.
- Drain Remaining Power: To be extra cautious, press and hold the power button on your computer for a few seconds. This helps discharge any residual electrical charge present in the system.
Make sure to follow these steps precisely to ensure your safety and to protect your computer from any potential damage during the installation process. Remember, proper power management is essential when working with computer components.
In the next section, we will guide you through the process of opening your computer’s case, allowing you to gain access to the RAM slots and start the installation process.
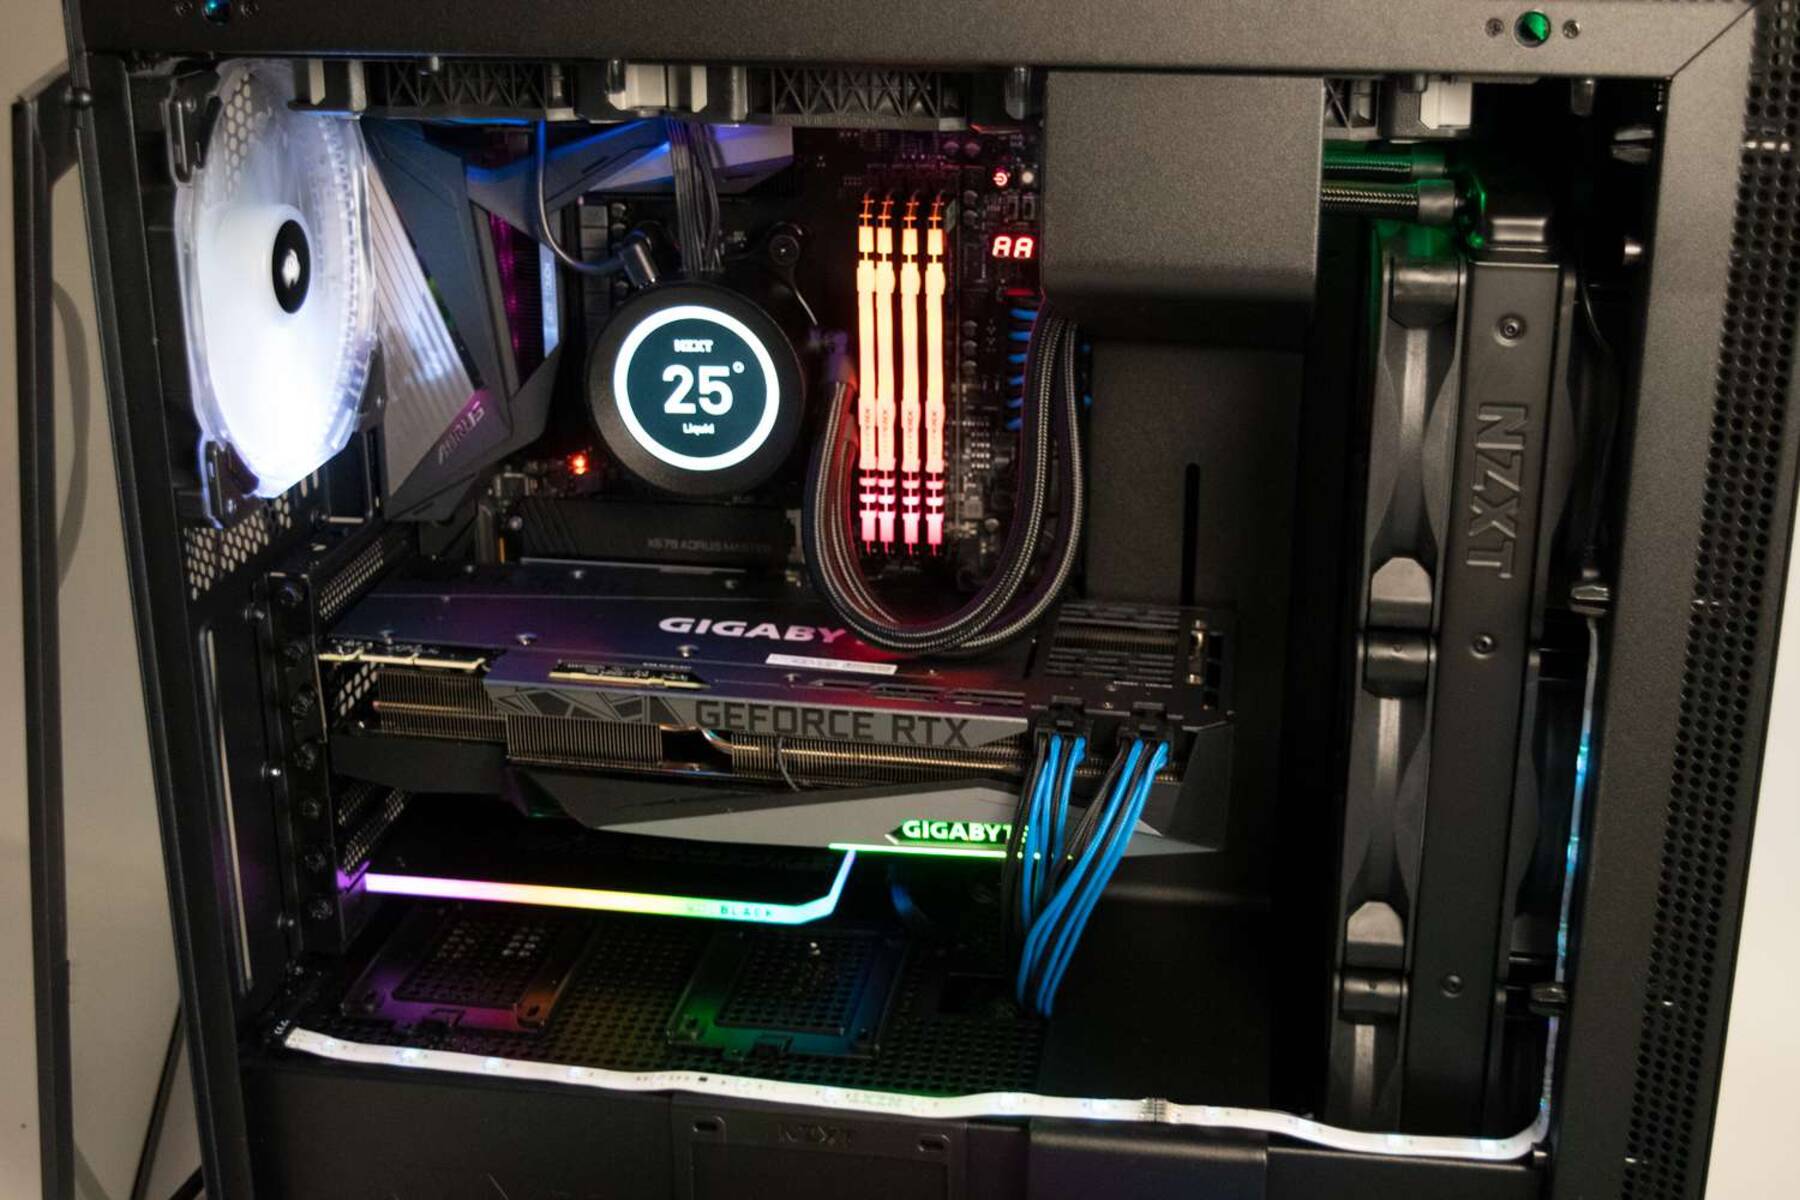
Open the Computer Case
Now that your computer is safely powered off and unplugged, it’s time to open the computer case to access the internals. Opening the case will allow you to locate the RAM slots and proceed with installing the new RAM module. Follow these steps to open your computer case:
- Identify the Case Type: The method of opening your computer case will depend on its type. Most desktop computer cases have side panels that can be removed, either by sliding or unscrewing.
- Locate the Screws: Look for screws on the back or side of your computer case. These screws hold the side panels in place. Use a screwdriver to unscrew the screws and set them aside in a safe place.
- Slide the Side Panel: If your computer case has a sliding side panel, gently slide it towards the rear of the case. The panel should disengage from the chassis, allowing you to remove it completely.
- Remove the Side Panel: For cases with screw-mounted side panels, carefully grip the panel and gently pull it away from the chassis. Be cautious not to force it or use excessive pressure, as this could damage the case or its components.
- Set Aside the Side Panel: Place the removed side panel in a secure location, away from the immediate work area, to prevent any accidental damage or interference during the installation process.
Once you have successfully opened the computer case, you will have access to your computer’s internal components, including the RAM slots. Take a moment to familiarize yourself with the interior layout for a better understanding of where the RAM slots are located.
Now that you have opened the computer case, the next section will guide you through the process of locating the RAM slots within your computer.
Locate the RAM Slots
With the computer case open, it’s time to locate the RAM slots where you will install the new RAM module. Finding the RAM slots may vary slightly depending on the motherboard design, but the general steps below will guide you through the process:
- Refer to the User Manual: If you have the user manual for your motherboard, it will provide detailed information on the location of the RAM slots. Consult the manual and look for a diagram or labeled components that indicate the RAM slot positions.
- Identify the DIMM Slots: Inspect the motherboard and locate the DIMM (Dual In-Line Memory Module) slots. These are typically long, rectangular slots located near the CPU socket. Most modern motherboards have multiple RAM slots, usually numbered and color-coded for easy identification.
- Check for Existing RAM Modules: If your computer already has RAM installed, you will find one or more modules inserted into the RAM slots. Take note of the empty slots and their positioning relative to the occupied ones, as this will help you determine where to install the new RAM module.
- Observe Slot Notches: Each RAM slot has small notches along the bottom edge. These notches align with corresponding tabs on the bottom edge of the RAM module. Ensure that you identify the correct orientation of the RAM slots and align the RAM module accordingly for a proper fit.
- Pay Attention to Retention Clips: RAM slots often have retention clips on each side of the slot. These clips secure the RAM module in place. Take note of how the clips are positioned and how they function, as you will need to gently release and engage them when inserting and removing RAM modules.
By following these steps, you should be able to locate the RAM slots within your computer. If you encounter any difficulties or are unsure about the positioning of the RAM slots, consult your motherboard’s user manual or visit the manufacturer’s website for further assistance.
Now that you have located the RAM slots, it’s time to remove the existing RAM modules (if applicable) in preparation for the installation of the new RAM module. The next section will guide you through the process of removing the existing RAM modules safely.
Remove Your Existing RAM Modules
Before installing the new RAM module, you need to remove any existing RAM modules that are already installed in your computer. Follow these steps to safely remove the existing RAM modules:
- Release Retention Clips: Gently push outward on the retention clips on both ends of the RAM module slot. This action will cause the clips to release and slightly move away from the RAM module.
- Remove Existing RAM Module: Once the retention clips have been released, carefully grasp the edges of the RAM module and gently pull it out of the socket. Pay attention to the notches on the RAM module and ensure that you pull it out at a straight angle without applying excessive force.
- Set Aside the Removed RAM Module: Place the removed RAM module in a safe and static-free location. Avoid placing it on surfaces that generate static electricity, as this can damage the component. If you plan to reuse the RAM module or keep it as a spare, store it in an anti-static bag for protection.
- Repeat for Additional RAM Modules (if applicable): If you have multiple RAM modules installed, repeat the steps to remove each module individually. Take note of the orientation and order of removal for reference when installing the new RAM module(s).
- Inspect the RAM Slots: After removing the existing RAM module(s), take a moment to inspect the RAM slots for any dirt, dust, or debris. Use compressed air or an anti-static brush to gently remove any particles if necessary. Ensure the slots are clean and free from any obstructions before proceeding with the installation of the new RAM module.
By following these steps, you should be able to safely remove your existing RAM module(s) in preparation for installing the new RAM module. Take your time and handle the components with care to avoid any damage.
With the existing RAM modules removed, you’re now ready to proceed with the installation of the new RAM module. In the next section, we will guide you through the process of installing the new RAM module into the RAM slot.
Install the New RAM Module
With the existing RAM module(s) removed, you are now ready to install the new RAM module. Follow these steps to ensure a proper installation:
- Orient the New RAM Module: Take the new RAM module and align it with the RAM slot. The notches on the bottom edge of the module should match the tabs in the slot. Ensure that you’re inserting the RAM module in the correct orientation.
- Insert the RAM Module: Hold the RAM module by its edges and position it at a slight angle. Gently insert the module into the RAM slot, ensuring that the bottom edge is fully inserted and the module is perpendicular to the motherboard.
- Apply Even Pressure: Once the RAM module is correctly aligned, apply even pressure to both ends of the module using your fingers. Press down until the retention clips on both sides of the slot automatically engage and secure the RAM module in place.
- Confirm Proper Installation: After inserting the RAM module, visually inspect the slot and ensure that the retention clips are fully engaged and holding the module securely. The RAM module should be level and not wobble. Confirm that the module is seated properly and aligned with the surrounding RAM modules (if any).
- Repeat for Additional RAM Modules (if applicable): If you have multiple RAM modules to install, repeat the steps above for each module. Ensure that you install them in the correct slots, following any specific instructions provided in your motherboard’s documentation regarding dual-channel or quad-channel configurations.
It’s essential to handle the new RAM module with care and avoid touching the gold contacts or any sensitive components. Additionally, do not exert excessive force during the installation process, as this can cause damage to the RAM module, motherboard, and other components.
Now that the new RAM module is securely installed in the RAM slot, you can proceed to the next section to close the computer case and prepare for powering on your computer.
Close the Computer Case
With the new RAM module properly installed, it’s time to close the computer case to protect the internal components. Follow these steps to ensure a secure closure:
- Align the Side Panel: Take the side panel that was removed earlier and align it with the case’s opening. Ensure that any tabs or hooks on the panel align with the corresponding slots or notches on the case.
- Slide or Position the Side Panel: Depending on your computer case type, either slide the side panel back into position or carefully position it against the case. Apply gentle pressure to slide or push the panel until it is snugly in place.
- Screw the Side Panel: If your computer case has screw-mounted side panels, use the screws that were removed earlier to secure the panel. Align the screw holes on the panel with those on the case and tighten the screws using a screwdriver. Be cautious not to overtighten, as this may damage the case or its components.
- Double-Check Closure: Once the side panel is securely in place, visually inspect the case to ensure that it is closed properly. The panel should align flush with the rest of the case, with no gaps or misalignment.
- Reconnect Power and Peripherals: Finally, reconnect the power cord to the wall socket or surge protector. If you disconnected any peripherals, such as a keyboard or mouse, during the installation process, reconnect them as well.
By following these steps, you ensure that the computer case is securely closed, providing protection for the internal components and maintaining proper airflow to prevent overheating.
With the computer case closed, you can now proceed to power on your computer and check if the new RAM module is recognized. In the next section, we will guide you through the process of checking if the new RAM was successfully recognized by your computer.
Power On your Computer
With the computer case closed and all the necessary connections restored, you are ready to power on your computer and check if the new RAM module has been successfully recognized. Follow these steps to power on your computer:
- Reconnect Power Cable: Plug the power cable back into the wall socket or surge protector.
- Press the Power Button: Locate the power button on your computer case or front panel and press it to turn on your computer.
- Observe the Startup Process: Watch the screen closely as your computer boots up. The BIOS or UEFI firmware will detect the new RAM module and display the total amount of installed RAM during the startup process. If the total amount matches the expected increase based on the new RAM module, it indicates that the installation is successful.
- Check System Information: Once the operating system has loaded, you can further verify the new RAM module’s recognition. On Windows, you can go to the System Information utility by pressing Windows key + R, then typing “msinfo32” and pressing Enter. On Mac, click on the Apple menu, select “About This Mac“, and then click on the “Memory” tab. These utilities will display the total installed RAM, including the newly added module.
If the new RAM module is recognized and the total RAM reflects the expected increase, you have successfully added more RAM to your computer. This additional RAM should enhance your computer’s performance, providing smoother gameplay and improved multitasking capabilities.
If, for any reason, the new RAM is not recognized, ensure that the RAM module is properly seated in the slot. If needed, power off your computer, open the case, and reinsert the RAM module. If the issue persists, double-check the compatibility and alignment of the module with your motherboard’s specifications.
Congratulations! You have completed the installation process and powered on your computer. In the next section, we will guide you through the process of configuring your Fortnite settings to take advantage of the increased RAM.
Check if the New RAM was Recognized
After powering on your computer with the newly installed RAM module, it’s important to check if the system has successfully recognized the additional memory. Here’s how you can verify if the new RAM was recognized:
- System Information Utility (Windows): On a Windows computer, you can use the System Information utility to check if the new RAM module is recognized. Press Windows key + R to open the Run dialog box, type “msinfo32“, and hit Enter. In the System Information window, navigate to the “System Summary” section and look for the “Installed Physical Memory (RAM)” field. It should display the total amount of RAM, including the newly added module.
- About This Mac (Mac): If you’re using a Mac, click on the Apple menu in the top-left corner of the screen and select “About This Mac“. In the window that appears, click on “Memory“. The total installed memory, including the newly added module, will be displayed. Ensure that the displayed amount matches the expected increase.
- Task Manager (Windows) or Activity Monitor (Mac): Additionally, you can monitor the RAM usage while running applications, including Fortnite. Open the Task Manager (Windows) or Activity Monitor (Mac) and observe the memory utilization. If the total RAM shown is higher than before the installation, it indicates that the new RAM module is being utilized.
- Fortnite Performance: Finally, launch Fortnite and test its performance. Pay attention to any improvements in gameplay smoothness, reduced loading times, and decreased lag or stuttering. If you notice a significant enhancement in performance and overall system responsiveness, it signals that the new RAM module is functioning correctly.
If the new RAM module is not recognized, ensure that it is properly installed in the slot. In some cases, reseating the RAM module might help establish a proper connection. If the issue persists, verify the compatibility of the RAM module with your motherboard and double-check its specifications.
By checking if the new RAM module is recognized, you can ensure that your system is utilizing the additional memory and reaping the benefits in terms of improved gaming performance and multitasking capabilities.
In the next section, we will guide you through the process of configuring your Fortnite settings to optimize them for your enhanced system performance.
Configure your Fortnite Settings
Now that you have successfully added more RAM to your computer and verified its recognition, it’s time to optimize your Fortnite settings to take full advantage of the increased memory. Configuring the game settings can help you achieve smoother gameplay and ensure an immersive experience. Follow these steps to configure your Fortnite settings:
- Launch Fortnite: Start by launching the Fortnite game on your computer.
- Open Settings: Once the game is running, click on the three horizontal lines in the top-right corner of the window to access the main menu. From there, choose the “Settings” option.
- Graphics Settings: In the settings menu, navigate to the “Graphics” tab. Here, you can adjust various graphical settings based on your preference and system capabilities. Consider the following suggestions for optimal performance:
- Display Resolution: Set the resolution to match your monitor’s native resolution for the best visual quality. Lowering the resolution can improve performance but may impact the image clarity.
- Graphics Quality: Depending on your system’s capabilities, adjust the graphics quality level to a level that provides smooth gameplay without sacrificing visual quality. Experiment with different settings to find the balance that works best for you.
- Shadow Quality: Shadows can be resource-intensive in games. Lowering the shadow quality or disabling them altogether can significantly improve performance.
- Effects and Post Processing: Consider disabling or reducing the intensity of effects and post-processing settings such as motion blur, depth of field, and ambient occlusion to improve performance and minimize visual distractions.
- View Distance: Reducing the view distance can have a positive impact on performance since it limits the amount of rendering required in distant areas of the game world.
- Texture Quality: High-resolution textures can consume a significant amount of VRAM. Set the texture quality to a level that matches your system’s VRAM capacity to ensure smooth gameplay.
- Other Settings: Apart from graphics settings, you can explore other options such as audio, controls, and keybindings to customize your Fortnite experience further.
- Apply Settings and Test: Once you have adjusted the settings to your liking, click on the Apply or Save button to apply the changes. Exit the settings menu and launch a game to test the performance and visual quality with the newly configured settings.
By configuring your Fortnite settings appropriately, you can optimize the performance to match your new RAM capabilities. Experiment with different settings while aiming for a balance between performance and visual quality to ensure an enjoyable gaming experience.
Now that your Fortnite settings are configured, it’s time to put your enhanced system to the test. In the next section, we will guide you through testing the performance of your new RAM module in Fortnite.
Test your New RAM’s Performance in Fortnite
Now that you have added more RAM to your computer and configured your Fortnite settings, it’s time to put your enhanced system to the test. By testing the performance of your new RAM module in Fortnite, you can verify the improvements and ensure a smoother and more enjoyable gaming experience. Follow these steps to test the performance:
- Launch Fortnite: Start by launching Fortnite on your computer.
- Enter a Match: Join a match or create a game to test the performance of your new RAM module. Choose a game mode that you usually play to get a realistic assessment of the improvements.
- Monitor Gameplay: While playing, monitor the performance of Fortnite. Pay attention to the following indicators:
- Frame Rate: Check if the frame rate remains consistent and smooth throughout the gameplay. Higher frame rates provide a more fluid and responsive gaming experience.
- Loading Times: Observe if the loading times have decreased compared to before adding the new RAM module. Faster loading times enable you to jump into the action more quickly.
- Lag and Stutter: Note if you experience fewer instances of lag or stutter during gameplay. Additional RAM can help reduce these issues, resulting in a smoother gaming experience.
- Overall Responsiveness: Assess the overall responsiveness of the game. Note if actions and inputs feel more instantaneous, without any noticeable delays or sluggishness.
- Compare with Previous Experience: Reflect on your previous experiences with Fortnite before adding the new RAM module. Compare the current gameplay with regards to performance, visual quality, and overall enjoyment. Consider if the new RAM has made a noticeable difference in your gaming experience.
- Adjust Settings (if needed): If you encounter any performance issues such as low FPS or lag, consider adjusting the Fortnite settings further. Experiment with lower graphics settings or specific options that may impact performance to find the optimal configuration for your system and preferences.
- Repeat and Fine-tune: Repeat the testing process in different gameplay scenarios and environments to gather more data on the performance of your new RAM module. Fine-tune the Fortnite settings based on your preferences and desired balance between performance and visual quality.
By testing the performance of your new RAM module in Fortnite, you can assess the impact of the upgrade on gaming performance, responsiveness, and overall enjoyment. Keep in mind that the benefits of additional RAM may vary depending on your system’s other components and the overall optimization of Fortnite. Fine-tuning settings and experimenting with different configurations can further enhance your gaming experience.
Congratulations on completing the testing phase! In the next section, we will wrap up the guide and provide a summary of the key steps and considerations in adding more RAM for Fortnite.
Conclusion
Adding more RAM to your computer can significantly enhance your Fortnite gaming experience by improving performance, reducing lag, and increasing overall system responsiveness. Throughout this guide, we have covered the key steps and considerations involved in adding more RAM specifically for Fortnite. Here’s a summary of the important points:
We began by discussing the need for more RAM, exploring the reasons why it may be necessary to upgrade your system’s memory capacity. We then guided you through checking your current RAM capacity, determining the amount of RAM you need, and understanding RAM types and compatibility with your motherboard.
We then explored the process of purchasing a compatible RAM module from a reputable brand, ensuring that you choose the right capacity, speed, and form factor for your system. We emphasized the importance of considering factors such as system requirements, budget, and future-proofing.
Next, we provided instructions on safely opening and closing the computer case to access and install the new RAM module. We walked you through removing the existing RAM modules, locating the RAM slots, and securely installing the new RAM module. We emphasized the need to handle the components with care and ensure proper alignment and engagement of the retention clips.
Once the new RAM was installed, we advised checking if it was recognized by the system through utilities such as the System Information tool or the About This Mac window. We also encouraged testing the new RAM’s performance in Fortnite by monitoring frame rate, loading times, responsiveness, and overall gaming experience.
Finally, we guided you through configuring your Fortnite settings to optimize them for your upgraded system, fine-tuning graphics, effects, and other options to achieve a balance between performance and visual quality.
By following these steps and considerations, you have successfully added more RAM to your computer for an improved Fortnite gaming experience. Be sure to regularly maintain your system, keep the RAM modules clean, and stay updated with the latest drivers and game updates for the best performance.
Now, armed with your upgraded system and optimized settings, it’s time to enjoy a smoother and more immersive Fortnite gaming experience. Good luck and have fun!